

Trident概述
 建議變更
建議變更
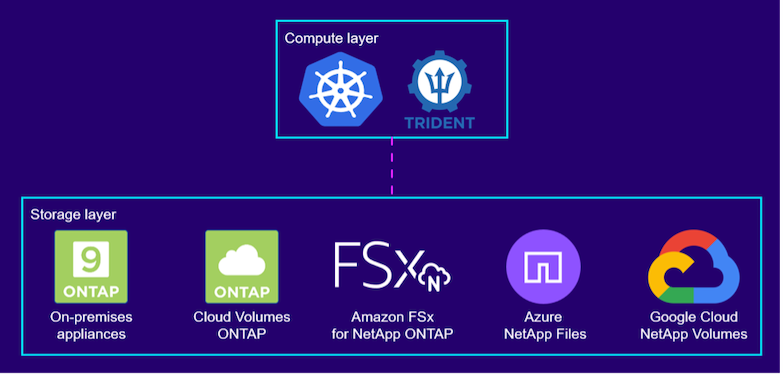
Trident是一個開源且完全支援的容器和 Kubernetes 發行版(包括 Red Hat OpenShift)儲存編排器。 Trident可與整個NetApp儲存產品組合搭配使用,包括NetApp ONTAP和 Element 儲存系統,並且還支援 NFS 和 iSCSI 連線。 Trident允許最終用戶從其NetApp儲存系統配置和管理存儲,而無需儲存管理員的干預,從而加速 DevOps 工作流程。
管理員可以根據專案需求和儲存系統模型配置多個儲存後端,以實現進階儲存功能,包括壓縮、特定磁碟類型或保證一定效能等級的 QoS 等級。定義完成後,開發人員可以在他們的專案中使用這些後端來建立持久性卷聲明 (PVC) 並根據需要將持久性儲存附加到他們的容器。
Trident的開發週期很快,和 Kubernetes 一樣,每年發布四次。
已測試過哪個版本的Trident以及可以找到哪個 Kubernetes 發行版的支援矩陣 "這裡"。
請參閱"Trident產品文檔"有關安裝和配置的詳細資訊。
下載Trident
若要在已部署的使用者叢集上安裝Trident並配置持久性卷,請完成下列步驟:
-
將安裝檔案下載到管理工作站並提取內容。目前版本的Trident可以下載 "這裡"。
-
從下載的軟體包中提取Trident安裝。
[netapp-user@rhel7 ~]$ tar -xzf trident-installer-22.01.0.tar.gz
[netapp-user@rhel7 ~]$ cd trident-installer/
[netapp-user@rhel7 trident-installer]$
使用 Helm 安裝Trident Operator
-
首先設定用戶集群的 `kubeconfig`文件作為環境變量,這樣您就不必引用它,因為Trident沒有選項來傳遞此文件。
[netapp-user@rhel7 trident-installer]$ export KUBECONFIG=~/ocp-install/auth/kubeconfig
-
執行 Helm 指令從 helm 目錄中的 tarball 安裝Trident運算符,同時在使用者叢集中建立 trident 命名空間。
[netapp-user@rhel7 trident-installer]$ helm install trident helm/trident-operator-22.01.0.tgz --create-namespace --namespace trident
NAME: trident
LAST DEPLOYED: Fri May  7 12:54:25 2021
NAMESPACE: trident
STATUS: deployed
REVISION: 1
TEST SUITE: None
NOTES:
Thank you for installing trident-operator, which will deploy and manage NetApp's Trident CSI
storage provisioner for Kubernetes.

Your release is named 'trident' and is installed into the 'trident' namespace.
Please note that there must be only one instance of Trident (and trident-operator) in a Kubernetes cluster.

To configure Trident to manage storage resources, you will need a copy of tridentctl, which is
available in pre-packaged Trident releases.  You may find all Trident releases and source code
online at https://github.com/NetApp/trident.

To learn more about the release, try:

  $ helm status trident
  $ helm get all trident
-
您可以透過檢查命名空間中執行的 pod 或使用 tridentctl 二進位檔案檢查已安裝的版本來驗證Trident是否已成功安裝。
[netapp-user@rhel7 trident-installer]$ oc get pods -n trident
NAME                               READY   STATUS    RESTARTS   AGE
trident-csi-5z45l                  1/2     Running   2          30s
trident-csi-696b685cf8-htdb2       6/6     Running   0          30s
trident-csi-b74p2                  2/2     Running   0          30s
trident-csi-lrw4n                  2/2     Running   0          30s
trident-operator-7c748d957-gr2gw   1/1     Running   0          36s

[netapp-user@rhel7 trident-installer]$ ./tridentctl -n trident version
+----------------+----------------+
| SERVER VERSION | CLIENT VERSION |
+----------------+----------------+
| 22.01.0          | 22.01.0          |
+----------------+----------------+

|
在某些情況下,客戶環境可能需要客製化Trident部署。在這些情況下,也可以手動安裝Trident操作符並更新包含的清單以自訂部署。 |
手動安裝Trident Operator
-
首先,設定用戶集群的 `kubeconfig`文件作為環境變量,這樣您就不必引用它,因為Trident沒有選項來傳遞此文件。
[netapp-user@rhel7 trident-installer]$ export KUBECONFIG=~/ocp-install/auth/kubeconfig
-
這 `trident-installer`目錄包含定義所有必要資源的清單。使用適當的清單,創建 `TridentOrchestrator`自訂資源定義。
[netapp-user@rhel7 trident-installer]$ oc create -f deploy/crds/trident.netapp.io_tridentorchestrators_crd_post1.16.yaml
customresourcedefinition.apiextensions.k8s.io/tridentorchestrators.trident.netapp.io created
-
如果不存在,請使用提供的清單在叢集中建立Trident命名空間。
[netapp-user@rhel7 trident-installer]$ oc apply -f deploy/namespace.yaml
namespace/trident created
-
建立Trident操作員部署所需的資源,例如
ServiceAccount`對於操作員來說, `ClusterRole`和 `ClusterRoleBinding`到 `ServiceAccount,一個專門的 `PodSecurityPolicy`或操作員本身。[netapp-user@rhel7 trident-installer]$ oc create -f deploy/bundle.yaml serviceaccount/trident-operator created clusterrole.rbac.authorization.k8s.io/trident-operator created clusterrolebinding.rbac.authorization.k8s.io/trident-operator created deployment.apps/trident-operator created podsecuritypolicy.policy/tridentoperatorpods created
-
您可以使用以下命令在部署操作員後檢查其狀態:
[netapp-user@rhel7 trident-installer]$ oc get deployment -n trident
NAME               READY   UP-TO-DATE   AVAILABLE   AGE
trident-operator   1/1     1            1           23s
[netapp-user@rhel7 trident-installer]$ oc get pods -n trident
NAME                                READY   STATUS    RESTARTS   AGE
trident-operator-66f48895cc-lzczk   1/1     Running   0          41s
-
部署操作員後,我們現在可以使用它來安裝Trident。這需要創建一個
TridentOrchestrator。[netapp-user@rhel7 trident-installer]$ oc create -f deploy/crds/tridentorchestrator_cr.yaml tridentorchestrator.trident.netapp.io/trident created [netapp-user@rhel7 trident-installer]$ oc describe torc trident Name: trident Namespace: Labels: <none> Annotations: <none> API Version: trident.netapp.io/v1 Kind: TridentOrchestrator Metadata: Creation Timestamp: 2021-05-07T17:00:28Z Generation: 1 Managed Fields: API Version: trident.netapp.io/v1 Fields Type: FieldsV1 fieldsV1: f:spec: .: f:debug: f:namespace: Manager: kubectl-create Operation: Update Time: 2021-05-07T17:00:28Z API Version: trident.netapp.io/v1 Fields Type: FieldsV1 fieldsV1: f:status: .: f:currentInstallationParams: .: f:IPv6: f:autosupportHostname: f:autosupportimage: f:autosupportProxy: f:autosupportSerialNumber: f:debug: f:enableNodePrep: f:imagePullSecrets: f:imageRegistry: f:k8sTimeout: f:kubeletDir: f:logFormat: f:silenceAutosupport: f:tridentimage: f:message: f:namespace: f:status: f:version: Manager: trident-operator Operation: Update Time: 2021-05-07T17:00:28Z Resource Version: 931421 Self Link: /apis/trident.netapp.io/v1/tridentorchestrators/trident UID: 8a26a7a6-dde8-4d55-9b66-a7126754d81f Spec: Debug: true Namespace: trident Status: Current Installation Params: IPv6: false Autosupport Hostname: Autosupport image: netapp/trident-autosupport:21.01 Autosupport Proxy: Autosupport Serial Number: Debug: true Enable Node Prep: false Image Pull Secrets: Image Registry: k8sTimeout: 30 Kubelet Dir: /var/lib/kubelet Log Format: text Silence Autosupport: false Trident image: netapp/trident:22.01.0 Message: Trident installed Namespace: trident Status: Installed Version: v22.01.0 Events: Type Reason Age From Message ---- ------ ---- ---- ------- Normal Installing 80s trident-operator.netapp.io Installing Trident Normal Installed 68s trident-operator.netapp.io Trident installed -
您可以透過檢查命名空間中執行的 pod 或使用 tridentctl 二進位檔案檢查已安裝的版本來驗證Trident是否已成功安裝。
[netapp-user@rhel7 trident-installer]$ oc get pods -n trident
NAME                                READY   STATUS    RESTARTS   AGE
trident-csi-bb64c6cb4-lmd6h         6/6     Running   0          82s
trident-csi-gn59q                   2/2     Running   0          82s
trident-csi-m4szj                   2/2     Running   0          82s
trident-csi-sb9k9                   2/2     Running   0          82s
trident-operator-66f48895cc-lzczk   1/1     Running   0          2m39s

[netapp-user@rhel7 trident-installer]$ ./tridentctl -n trident version
+----------------+----------------+
| SERVER VERSION | CLIENT VERSION |
+----------------+----------------+
| 22.01.0          | 22.01.0          |
+----------------+----------------+
準備工作節點以進行存儲
NFS
大多數 Kubernetes 發行版都附帶預設安裝的用於掛載 NFS 後端的軟體包和實用程序,包括 Red Hat OpenShift。
但是,對於 NFSv3,沒有在客戶端和伺服器之間協商並發的機制。因此,必須手動將客戶端 sunrpc 插槽表條目的最大數量與伺服器上支援的值同步,以確保 NFS 連線的最佳效能,而無需伺服器減小連線的視窗大小。
對於ONTAP,支援的 sunrpc 插槽表條目的最大數量為 128,即ONTAP一次可以處理 128 個並發 NFS 請求。但是,預設情況下,Red Hat CoreOS/Red Hat Enterprise Linux 每個連線最多有 65,536 個 sunrpc 插槽表條目。我們需要將此值設為 128,這可以使用 OpenShift 中的 Machine Config Operator (MCO) 來完成。
若要修改 OpenShift 工作節點中的最大 sunrpc 插槽表條目數,請完成下列步驟:
-
登入 OCP 網路控制台並導覽至 Compute > Machine Configs。點選建立機器配置。複製並貼上 YAML 文件,然後按一下「建立」。
apiVersion: machineconfiguration.openshift.io/v1 kind: MachineConfig metadata: name: 98-worker-nfs-rpc-slot-tables labels: machineconfiguration.openshift.io/role: worker spec: config: ignition: version: 3.2.0 storage: files: - contents: source: data:text/plain;charset=utf-8;base64,b3B0aW9ucyBzdW5ycGMgdGNwX21heF9zbG90X3RhYmxlX2VudHJpZXM9MTI4Cg== filesystem: root mode: 420 path: /etc/modprobe.d/sunrpc.conf -
建立 MCO 後,需要在所有工作節點上套用組態並逐一重新啟動。整個過程大約需要20到30分鐘。使用以下命令驗證機器配置是否已套用 `oc get mcp`並確保工人的機器配置池已更新。
[netapp-user@rhel7 openshift-deploy]$ oc get mcp
NAME     CONFIG                                    UPDATED   UPDATING   DEGRADED
master   rendered-master-a520ae930e1d135e0dee7168   True      False      False
worker   rendered-worker-de321b36eeba62df41feb7bc   True      False      False
iSCSI
要準備工作節點以允許透過 iSCSI 協定映射區塊儲存卷,您必須安裝必要的軟體包來支援該功能。
在 Red Hat OpenShift 中,這是透過在部署叢集後將 MCO(機器配置操作員)應用於叢集來處理的。
若要設定工作節點以執行 iSCSI 服務,請完成下列步驟:
-
登入 OCP 網路控制台並導覽至 Compute > Machine Configs。點選建立機器配置。複製並貼上 YAML 文件,然後按一下「建立」。
不使用多路徑時:
apiVersion: machineconfiguration.openshift.io/v1
kind: MachineConfig
metadata:
  labels:
    machineconfiguration.openshift.io/role: worker
  name: 99-worker-element-iscsi
spec:
  config:
    ignition:
      version: 3.2.0
    systemd:
      units:
        - name: iscsid.service
          enabled: true
          state: started
  osImageURL: ""
使用多路徑時:
apiVersion: machineconfiguration.openshift.io/v1 kind: MachineConfig metadata: name: 99-worker-ontap-iscsi labels: machineconfiguration.openshift.io/role: worker spec: config: ignition: version: 3.2.0 storage: files: - contents: source: data:text/plain;charset=utf-8;base64,ZGVmYXVsdHMgewogICAgICAgIHVzZXJfZnJpZW5kbHlfbmFtZXMgbm8KICAgICAgICBmaW5kX211bHRpcGF0aHMgbm8KfQoKYmxhY2tsaXN0X2V4Y2VwdGlvbnMgewogICAgICAgIHByb3BlcnR5ICIoU0NTSV9JREVOVF98SURfV1dOKSIKfQoKYmxhY2tsaXN0IHsKfQoK verification: {} filesystem: root mode: 400 path: /etc/multipath.conf systemd: units: - name: iscsid.service enabled: true state: started - name: multipathd.service enabled: true state: started osImageURL: "" -
配置建立後,大約需要 20 到 30 分鐘將配置套用到工作節點並重新載入它們。使用以下命令驗證機器配置是否已套用 `oc get mcp`並確保工人的機器配置池已更新。您也可以登入工作節點來確認 iscsid 服務正在執行(如果使用多路徑,則 multipathd 服務正在執行)。
[netapp-user@rhel7 openshift-deploy]$ oc get mcp
NAME     CONFIG                                    UPDATED   UPDATING   DEGRADED
master   rendered-master-a520ae930e1d135e0dee7168   True      False      False
worker   rendered-worker-de321b36eeba62df41feb7bc   True      False      False

[netapp-user@rhel7 openshift-deploy]$ ssh core@10.61.181.22 sudo systemctl status iscsid
● iscsid.service - Open-iSCSI
   Loaded: loaded (/usr/lib/systemd/system/iscsid.service; enabled; vendor preset: disabled)
   Active: active (running) since Tue 2021-05-26 13:36:22 UTC; 3 min ago
     Docs: man:iscsid(8)
           man:iscsiadm(8)
 Main PID: 1242 (iscsid)
   Status: "Ready to process requests"
    Tasks: 1
   Memory: 4.9M
      CPU: 9ms
   CGroup: /system.slice/iscsid.service
           └─1242 /usr/sbin/iscsid -f

[netapp-user@rhel7 openshift-deploy]$ ssh core@10.61.181.22 sudo systemctl status multipathd
 ● multipathd.service - Device-Mapper Multipath Device Controller
   Loaded: loaded (/usr/lib/systemd/system/multipathd.service; enabled; vendor preset: enabled)
   Active: active (running) since Tue 2021-05-26 13:36:22 UTC; 3 min ago
  Main PID: 918 (multipathd)
    Status: "up"
    Tasks: 7
    Memory: 13.7M
    CPU: 57ms
    CGroup: /system.slice/multipathd.service
            └─918 /sbin/multipathd -d -s
也可以透過執行以下命令來確認 MachineConfig 已成功應用且服務已如預期啟動 `oc debug`帶有適當標誌的命令。
建立儲存系統後端
完成Trident Operator 安裝後,您必須為正在使用的特定NetApp儲存平台設定後端。按照下面的連結繼續設定並設定Trident。