

TR-4998: Pacemaker 클러스터링 및 FSx ONTAP 사용한 AWS EC2의 Oracle HA
 변경 제안
변경 제안
Allen Cao, Niyaz Mohamed, NetApp
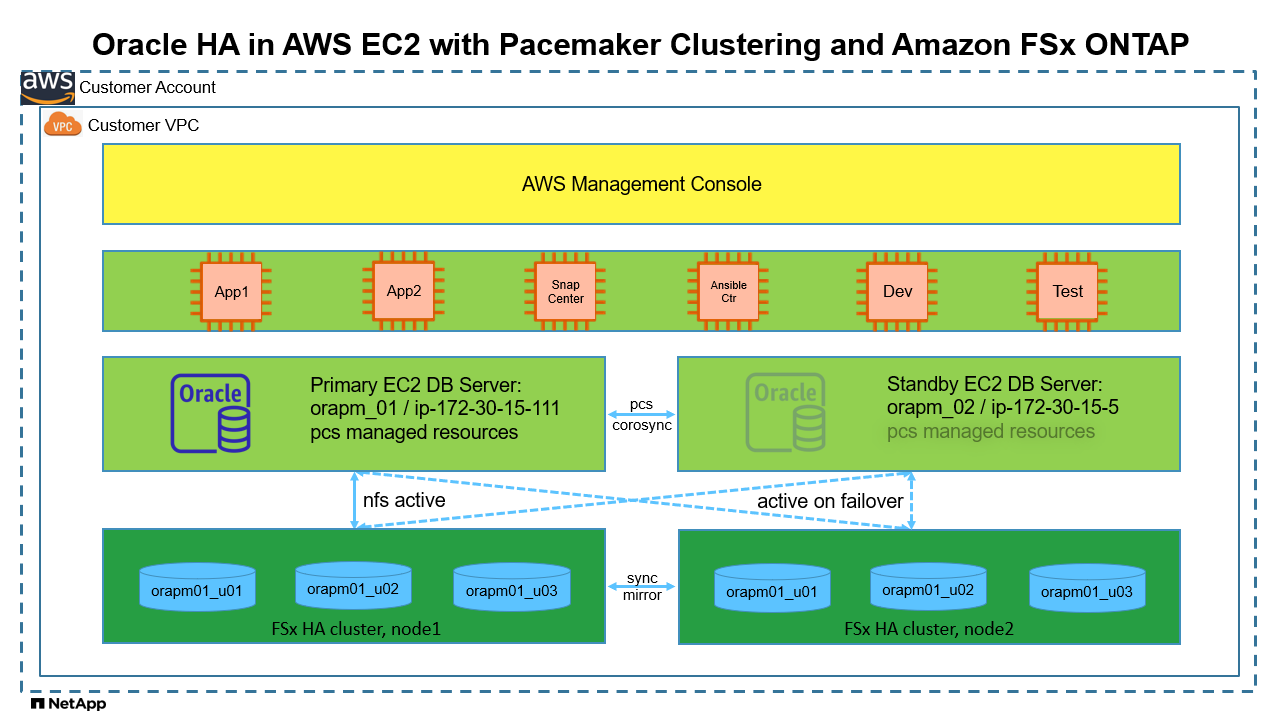
이 솔루션은 NFS 프로토콜을 통해 데이터베이스 스토리지 HA를 위한 Redhat Enterprise Linux(RHEL) 및 Amazon FSx ONTAP 의 Pacemaker 클러스터링을 사용하여 AWS EC2에서 Oracle 고가용성(HA)을 구현하기 위한 개요와 세부 정보를 제공합니다.
목적
퍼블릭 클라우드에서 Oracle을 자체 관리하고 실행하려는 많은 고객은 몇 가지 과제를 극복해야 합니다. 그러한 과제 중 하나는 Oracle 데이터베이스의 고가용성을 구현하는 것입니다. 전통적으로 Oracle 고객은 여러 클러스터 노드에서 액티브-액티브 트랜잭션을 지원하기 위해 "Real Application Cluster" 또는 RAC라는 Oracle 데이터베이스 기능에 의존합니다. 노드 하나에 오류가 발생해도 애플리케이션 처리가 중단되지 않습니다. 안타깝게도 Oracle RAC 구현은 AWS EC2와 같은 많은 인기 있는 퍼블릭 클라우드에서 쉽게 사용할 수 없거나 지원되지 않습니다. RHEL 및 Amazon FSx ONTAP 에 내장된 Pacemaker 클러스터링(PCS)을 활용하면 고객은 Oracle RAC 라이선스 비용 없이 컴퓨팅과 스토리지 모두에서 액티브-패시브 클러스터링을 위한 실행 가능한 대안을 확보하여 AWS 클라우드에서 미션 크리티컬 Oracle 데이터베이스 워크로드를 지원할 수 있습니다.
이 문서에서는 RHEL에서 Pacemaker 클러스터링을 설정하는 방법, NFS 프로토콜을 사용하여 EC2와 Amazon FSx ONTAP 에 Oracle 데이터베이스를 배포하는 방법, HA를 위해 Pacemaker에서 Oracle 리소스를 구성하는 방법, 가장 자주 발생하는 HA 시나리오에서 검증을 통해 데모를 마무리하는 방법에 대한 자세한 내용을 보여줍니다. 이 솔루션은 NetApp SnapCenter UI 도구를 사용하여 빠른 Oracle 데이터베이스 백업, 복원 및 복제에 대한 정보도 제공합니다.
이 솔루션은 다음과 같은 사용 사례를 해결합니다.
-
RHEL에서 Pacemaker HA 클러스터링을 설정하고 구성합니다.
-
AWS EC2 및 Amazon FSx ONTAP 에 Oracle 데이터베이스 HA 배포.
대상
이 솔루션은 다음과 같은 사람들을 위해 만들어졌습니다.
-
AWS EC2와 Amazon FSx ONTAP 에 Oracle을 배포하려는 DBA입니다.
-
AWS EC2와 Amazon FSx ONTAP 에서 Oracle 워크로드를 테스트하고 싶어하는 데이터베이스 솔루션 아키텍트입니다.
-
AWS EC2 및 Amazon FSx ONTAP 에서 Oracle 데이터베이스를 배포하고 관리하려는 스토리지 관리자입니다.
-
AWS EC2와 Amazon FSx ONTAP 에 Oracle 데이터베이스를 구축하려는 애플리케이션 소유자입니다.
솔루션 테스트 및 검증 환경
이 솔루션의 테스트와 검증은 최종 배포 환경과 일치하지 않을 수 있는 실험실 환경에서 수행되었습니다. 섹션을 참조하세요배포 고려사항의 핵심 요소 자세한 내용은.
아키텍처
하드웨어 및 소프트웨어 구성 요소
하드웨어 |
||
Amazon FSx ONTAP 스토리지 |
AWS에서 제공하는 현재 버전 |
us-east-1의 단일 AZ, 1024GiB 용량, 128MB/s 처리량 |
DB 서버용 EC2 인스턴스 |
t2.xlarge/4vCPU/16G |
두 개의 EC2 T2 xlarge EC2 인스턴스(하나는 기본 DB 서버로, 다른 하나는 대기 DB 서버로 사용) |
Ansible 컨트롤러용 VM |
4개의 vCPU, 16GiB RAM |
NFS에서 자동화된 AWS EC2/FSx 프로비저닝 및 Oracle 배포를 실행하기 위한 하나의 Linux VM |
소프트웨어 |
||
레드햇 리눅스 |
RHEL Linux 8.6(LVM) - x64 Gen2 |
테스트를 위해 RedHat 구독을 배포했습니다. |
오라클 데이터베이스 |
버전 19.18 |
RU 패치 p34765931_190000_Linux-x86-64.zip을 적용했습니다. |
오라클 OPatch |
버전 12.2.0.1.36 |
최신 패치 p6880880_190000_Linux-x86-64.zip |
맥박 조정 장치 |
버전 0.10.18 |
RedHat의 RHEL 8.0용 고가용성 애드온 |
NFS |
버전 3.0 |
Oracle dNFS 활성화됨 |
앤서블 |
코어 2.16.2 |
파이썬 3.6.8 |
AWS EC2/FSx 랩 환경에서 Oracle 데이터베이스 활성/수동 구성
섬기는 사람 |
데이터 베이스 |
DB 스토리지 |
기본 노드: orapm01/ip-172.30.15.111 |
NTAP(NTAP_PDB1,NTAP_PDB2,NTAP_PDB3) |
/u01, /u02, /u03 Amazon FSx ONTAP 볼륨에 NFS 마운트 |
대기 노드: orapm02/ip-172.30.15.5 |
장애 조치 시 NTAP(NTAP_PDB1, NTAP_PDB2, NTAP_PDB3) |
/u01, /u02, /u03 장애 조치 시 NFS 마운트 |
배포 고려사항의 핵심 요소
-
* Amazon FSx ONTAP HA.* Amazon FSx ONTAP 은 기본적으로 단일 또는 여러 가용성 영역에 있는 HA 스토리지 컨트롤러 쌍으로 프로비저닝됩니다. 미션 크리티컬 데이터베이스 워크로드에 대해 액티브/패시브 방식으로 스토리지 중복성을 제공합니다. 저장소 장애 조치는 최종 사용자에게 투명하게 이루어집니다. 스토리지 장애 조치 시 사용자 개입이 필요하지 않습니다.
-
PCS 자원 그룹 및 자원 주문. 리소스 그룹을 사용하면 종속성이 있는 여러 리소스가 동일한 클러스터 노드에서 실행될 수 있습니다. 리소스 순서는 리소스 시작 순서와 종료 순서를 반대로 적용합니다.
-
선호하는 노드. Pacemaker 클러스터는 의도적으로 액티브/패시브 클러스터링(Pacemaker의 요구 사항 아님)에 배포되며 FSx ONTAP 클러스터링과 동기화됩니다. 활성 EC2 인스턴스는 위치 제약 조건이 있는 경우 Oracle 리소스에 대한 기본 노드로 구성됩니다.
-
대기 노드에서 펜스 지연이 발생합니다. 2노드 PCS 클러스터에서는 쿼럼이 인위적으로 1로 설정됩니다. 클러스터 노드 간에 통신 문제가 발생하는 경우, 두 노드 중 하나가 다른 노드를 펜싱하려고 시도할 수 있으며, 이로 인해 잠재적으로 데이터가 손상될 수 있습니다. 대기 노드에 지연을 설정하면 문제가 완화되고 대기 노드가 펜싱되는 동안 기본 노드가 서비스를 계속 제공할 수 있습니다.
-
다중 az 배포 고려 사항. 솔루션은 단일 가용성 영역에 배포되고 검증됩니다. 다중 AZ 배포의 경우, 가용성 영역 간에 PCS 플로팅 IP를 이동하려면 추가 AWS 네트워킹 리소스가 필요합니다.
-
오라클 데이터베이스 저장 레이아웃. 이 솔루션 데모에서는 테스트 데이터베이스 NTAP에 Oracle 바이너리, 데이터 및 로그를 호스팅하기 위해 3개의 데이터베이스 볼륨을 프로비저닝합니다. 볼륨은 NFS를 통해 Oracle DB 서버에 /u01 - 바이너리, /u02 - 데이터, /u03 - 로그로 마운트됩니다. 이중 제어 파일은 중복성을 위해 /u02 및 /u03 마운트 지점에 구성됩니다.
-
dNFS 구성. dNFS(Oracle 11g부터 사용 가능)를 사용하면 DB VM에서 실행되는 Oracle 데이터베이스가 기본 NFS 클라이언트보다 훨씬 더 많은 I/O를 처리할 수 있습니다. 자동화된 Oracle 배포는 기본적으로 NFSv3에서 dNFS를 구성합니다.
-
데이터베이스 백업. NetApp 사용자 친화적인 UI 인터페이스를 통해 데이터베이스 백업, 복원 및 복제를 위한 SnapCenter software 제품군을 제공합니다. NetApp 빠른(1분 이내) 스냅샷 백업, 빠른(분) 데이터베이스 복원 및 데이터베이스 복제를 달성하기 위해 이러한 관리 도구를 구현할 것을 권장합니다.
솔루션 구축
다음 섹션에서는 Pacemaker 클러스터링과 데이터베이스 스토리지 보호를 위한 Amazon FSx ONTAP 사용하여 AWS EC2에서 Oracle 데이터베이스 HA를 배포하고 구성하는 단계별 절차를 제공합니다.
배포를 위한 전제 조건
Details
배포에는 다음과 같은 전제 조건이 필요합니다.
-
AWS 계정이 설정되었고, AWS 계정 내에 필요한 VPC 및 네트워크 세그먼트가 생성되었습니다.
-
최신 버전의 Ansible과 Git이 설치된 Ansible 컨트롤러 노드로 Linux VM을 프로비저닝합니다. 자세한 내용은 다음 링크를 참조하세요."NetApp 솔루션 자동화 시작하기" 섹션에서 -
Setup the Ansible Control Node for CLI deployments on RHEL / CentOS또는
Setup the Ansible Control Node for CLI deployments on Ubuntu / Debian.Ansible 컨트롤러와 EC2 인스턴스 DB VM 간에 ssh 공개/비공개 키 인증을 활성화합니다.
EC2 인스턴스 및 Amazon FSx ONTAP 스토리지 클러스터 프로비저닝
Details
EC2 인스턴스와 Amazon FSx ONTAP AWS 콘솔에서 수동으로 프로비저닝할 수 있지만 NetApp Terraform 기반 자동화 툴킷을 사용하여 EC2 인스턴스와 FSx ONTAP 스토리지 클러스터의 프로비저닝을 자동화하는 것이 좋습니다. 자세한 절차는 다음과 같습니다.
-
AWS CloudShell 또는 Ansible 컨트롤러 VM에서 EC2 및 FSx ONTAP 용 자동화 툴킷 사본을 복제합니다.
git clone https://bitbucket.ngage.netapp.com/scm/ns-bb/na_aws_fsx_ec2_deploy.git
툴킷이 AWS CloudShell에서 실행되지 않으면 AWS 사용자 계정 액세스/비밀 키 쌍을 사용하여 AWS 계정에 대한 AWS CLI 인증이 필요합니다. -
툴킷에 포함된 READme.md 파일을 검토하세요. 필요한 AWS 리소스에 맞게 main.tf 및 관련 매개변수 파일을 수정합니다.
An example of main.tf: resource "aws_instance" "orapm01" { ami = var.ami instance_type = var.instance_type subnet_id = var.subnet_id key_name = var.ssh_key_name root_block_device { volume_type = "gp3" volume_size = var.root_volume_size } tags = { Name = var.ec2_tag1 } } resource "aws_instance" "orapm02" { ami = var.ami instance_type = var.instance_type subnet_id = var.subnet_id key_name = var.ssh_key_name root_block_device { volume_type = "gp3" volume_size = var.root_volume_size } tags = { Name = var.ec2_tag2 } } resource "aws_fsx_ontap_file_system" "fsx_01" { storage_capacity = var.fs_capacity subnet_ids = var.subnet_ids preferred_subnet_id = var.preferred_subnet_id throughput_capacity = var.fs_throughput fsx_admin_password = var.fsxadmin_password deployment_type = var.deployment_type disk_iops_configuration { iops = var.iops mode = var.iops_mode } tags = { Name = var.fsx_tag } } resource "aws_fsx_ontap_storage_virtual_machine" "svm_01" { file_system_id = aws_fsx_ontap_file_system.fsx_01.id name = var.svm_name svm_admin_password = var.vsadmin_password } -
Terraform 계획을 검증하고 실행합니다. 성공적으로 실행하면 대상 AWS 계정에 두 개의 EC2 인스턴스와 FSx ONTAP 스토리지 클러스터가 생성됩니다. 자동화 출력에는 EC2 인스턴스 IP 주소와 FSx ONTAP 클러스터 엔드포인트가 표시됩니다.
terraform plan -out=main.planterraform apply main.plan
이로써 Oracle에 대한 EC2 인스턴스와 FSx ONTAP 프로비저닝이 완료되었습니다.
페이스메이커 클러스터 설정
Details
RHEL용 고가용성 애드온은 Oracle 데이터베이스 서비스와 같은 중요한 프로덕션 서비스에 안정성, 확장성 및 가용성을 제공하는 클러스터형 시스템입니다. 이 사용 사례 데모에서는 2노드 Pacemaker 클러스터를 설정 및 구성하여 액티브/패시브 클러스터링 시나리오에서 Oracle 데이터베이스의 고가용성을 지원합니다.
ec2-user로 EC2 인스턴스에 로그인하고 다음 작업을 완료합니다. both EC2 인스턴스:
-
AWS Red Hat Update Infrastructure(RHUI) 클라이언트를 제거합니다.
sudo -i yum -y remove rh-amazon-rhui-client* -
Red Hat에 EC2 인스턴스 VM을 등록합니다.
sudo subscription-manager register --username xxxxxxxx --password 'xxxxxxxx' --auto-attach -
RHEL 고가용성 rpm을 활성화합니다.
sudo subscription-manager config --rhsm.manage_repos=1sudo subscription-manager repos --enable=rhel-8-for-x86_64-highavailability-rpms -
심장 박동 조절기와 펜스를 설치하세요.
sudo yum update -ysudo yum install pcs pacemaker fence-agents-aws -
모든 클러스터 노드에서 hacluster 사용자의 비밀번호를 생성합니다. 모든 노드에 동일한 비밀번호를 사용하세요.
sudo passwd hacluster -
PCS 서비스를 시작하고 부팅 시 시작되도록 설정합니다.
sudo systemctl start pcsd.servicesudo systemctl enable pcsd.service -
PCSD 서비스를 확인하세요.
sudo systemctl status pcsd[ec2-user@ip-172-30-15-5 ~]$ sudo systemctl status pcsd ● pcsd.service - PCS GUI and remote configuration interface Loaded: loaded (/usr/lib/systemd/system/pcsd.service; enabled; vendor preset: disabled) Active: active (running) since Tue 2024-09-10 18:50:22 UTC; 33s ago Docs: man:pcsd(8) man:pcs(8) Main PID: 65302 (pcsd) Tasks: 1 (limit: 100849) Memory: 24.0M CGroup: /system.slice/pcsd.service └─65302 /usr/libexec/platform-python -Es /usr/sbin/pcsd Sep 10 18:50:21 ip-172-30-15-5.ec2.internal systemd[1]: Starting PCS GUI and remote configuration interface... Sep 10 18:50:22 ip-172-30-15-5.ec2.internal systemd[1]: Started PCS GUI and remote configuration interface. -
호스트 파일에 클러스터 노드를 추가합니다.
sudo vi /etc/hosts[ec2-user@ip-172-30-15-5 ~]$ cat /etc/hosts 127.0.0.1 localhost localhost.localdomain localhost4 localhost4.localdomain4 ::1 localhost localhost.localdomain localhost6 localhost6.localdomain6 # cluster nodes 172.30.15.111 ip-172-30-15-111.ec2.internal 172.30.15.5 ip-172-30-15-5.ec2.internal
-
AWS 계정에 연결하려면 awscli를 설치하고 구성합니다.
sudo yum install awsclisudo aws configure[ec2-user@ip-172-30-15-111 ]# sudo aws configure AWS Access Key ID [None]: XXXXXXXXXXXXXXXXX AWS Secret Access Key [None]: XXXXXXXXXXXXXXXX Default region name [None]: us-east-1 Default output format [None]: json
-
아직 설치하지 않았다면 resource-agents 패키지를 설치하세요.
sudo yum install resource-agents
~에 only one 클러스터 노드의 경우 다음 작업을 완료하여 PCS 클러스터를 생성합니다.
-
pcs 사용자 hacluster를 인증합니다.
sudo pcs host auth ip-172-30-15-5.ec2.internal ip-172-30-15-111.ec2.internal[ec2-user@ip-172-30-15-111 ~]$ sudo pcs host auth ip-172-30-15-5.ec2.internal ip-172-30-15-111.ec2.internal Username: hacluster Password: ip-172-30-15-111.ec2.internal: Authorized ip-172-30-15-5.ec2.internal: Authorized
-
PCS 클러스터를 생성합니다.
sudo pcs cluster setup ora_ec2nfsx ip-172-30-15-5.ec2.internal ip-172-30-15-111.ec2.internal[ec2-user@ip-172-30-15-111 ~]$ sudo pcs cluster setup ora_ec2nfsx ip-172-30-15-5.ec2.internal ip-172-30-15-111.ec2.internal No addresses specified for host 'ip-172-30-15-5.ec2.internal', using 'ip-172-30-15-5.ec2.internal' No addresses specified for host 'ip-172-30-15-111.ec2.internal', using 'ip-172-30-15-111.ec2.internal' Destroying cluster on hosts: 'ip-172-30-15-111.ec2.internal', 'ip-172-30-15-5.ec2.internal'... ip-172-30-15-5.ec2.internal: Successfully destroyed cluster ip-172-30-15-111.ec2.internal: Successfully destroyed cluster Requesting remove 'pcsd settings' from 'ip-172-30-15-111.ec2.internal', 'ip-172-30-15-5.ec2.internal' ip-172-30-15-111.ec2.internal: successful removal of the file 'pcsd settings' ip-172-30-15-5.ec2.internal: successful removal of the file 'pcsd settings' Sending 'corosync authkey', 'pacemaker authkey' to 'ip-172-30-15-111.ec2.internal', 'ip-172-30-15-5.ec2.internal' ip-172-30-15-111.ec2.internal: successful distribution of the file 'corosync authkey' ip-172-30-15-111.ec2.internal: successful distribution of the file 'pacemaker authkey' ip-172-30-15-5.ec2.internal: successful distribution of the file 'corosync authkey' ip-172-30-15-5.ec2.internal: successful distribution of the file 'pacemaker authkey' Sending 'corosync.conf' to 'ip-172-30-15-111.ec2.internal', 'ip-172-30-15-5.ec2.internal' ip-172-30-15-111.ec2.internal: successful distribution of the file 'corosync.conf' ip-172-30-15-5.ec2.internal: successful distribution of the file 'corosync.conf' Cluster has been successfully set up.
-
클러스터를 활성화합니다.
sudo pcs cluster enable --all[ec2-user@ip-172-30-15-111 ~]$ sudo pcs cluster enable --all ip-172-30-15-5.ec2.internal: Cluster Enabled ip-172-30-15-111.ec2.internal: Cluster Enabled
-
클러스터를 시작하고 검증합니다.
sudo pcs cluster start --allsudo pcs status[ec2-user@ip-172-30-15-111 ~]$ sudo pcs status Cluster name: ora_ec2nfsx WARNINGS: No stonith devices and stonith-enabled is not false Cluster Summary: * Stack: corosync (Pacemaker is running) * Current DC: ip-172-30-15-111.ec2.internal (version 2.1.7-5.1.el8_10-0f7f88312) - partition with quorum * Last updated: Wed Sep 11 15:43:23 2024 on ip-172-30-15-111.ec2.internal * Last change: Wed Sep 11 15:43:06 2024 by hacluster via hacluster on ip-172-30-15-111.ec2.internal * 2 nodes configured * 0 resource instances configured Node List: * Online: [ ip-172-30-15-5.ec2.internal ip-172-30-15-111.ec2.internal ] Full List of Resources: * No resources Daemon Status: corosync: active/enabled pacemaker: active/enabled pcsd: active/enabled
이것으로 Pacemaker 클러스터 설정 및 초기 구성이 완료되었습니다.
페이스메이커 클러스터 펜싱 구성
Details
프로덕션 클러스터에는 페이스메이커 펜싱 구성이 필수입니다. AWS EC2 클러스터에서 제대로 작동하지 않는 노드가 자동으로 격리되어 해당 노드가 클러스터 리소스를 소모하거나, 클러스터 기능을 손상시키거나, 공유 데이터를 손상시키는 것을 방지합니다. 이 섹션에서는 fence_aws 펜싱 에이전트를 사용하여 클러스터 펜싱을 구성하는 방법을 보여줍니다.
-
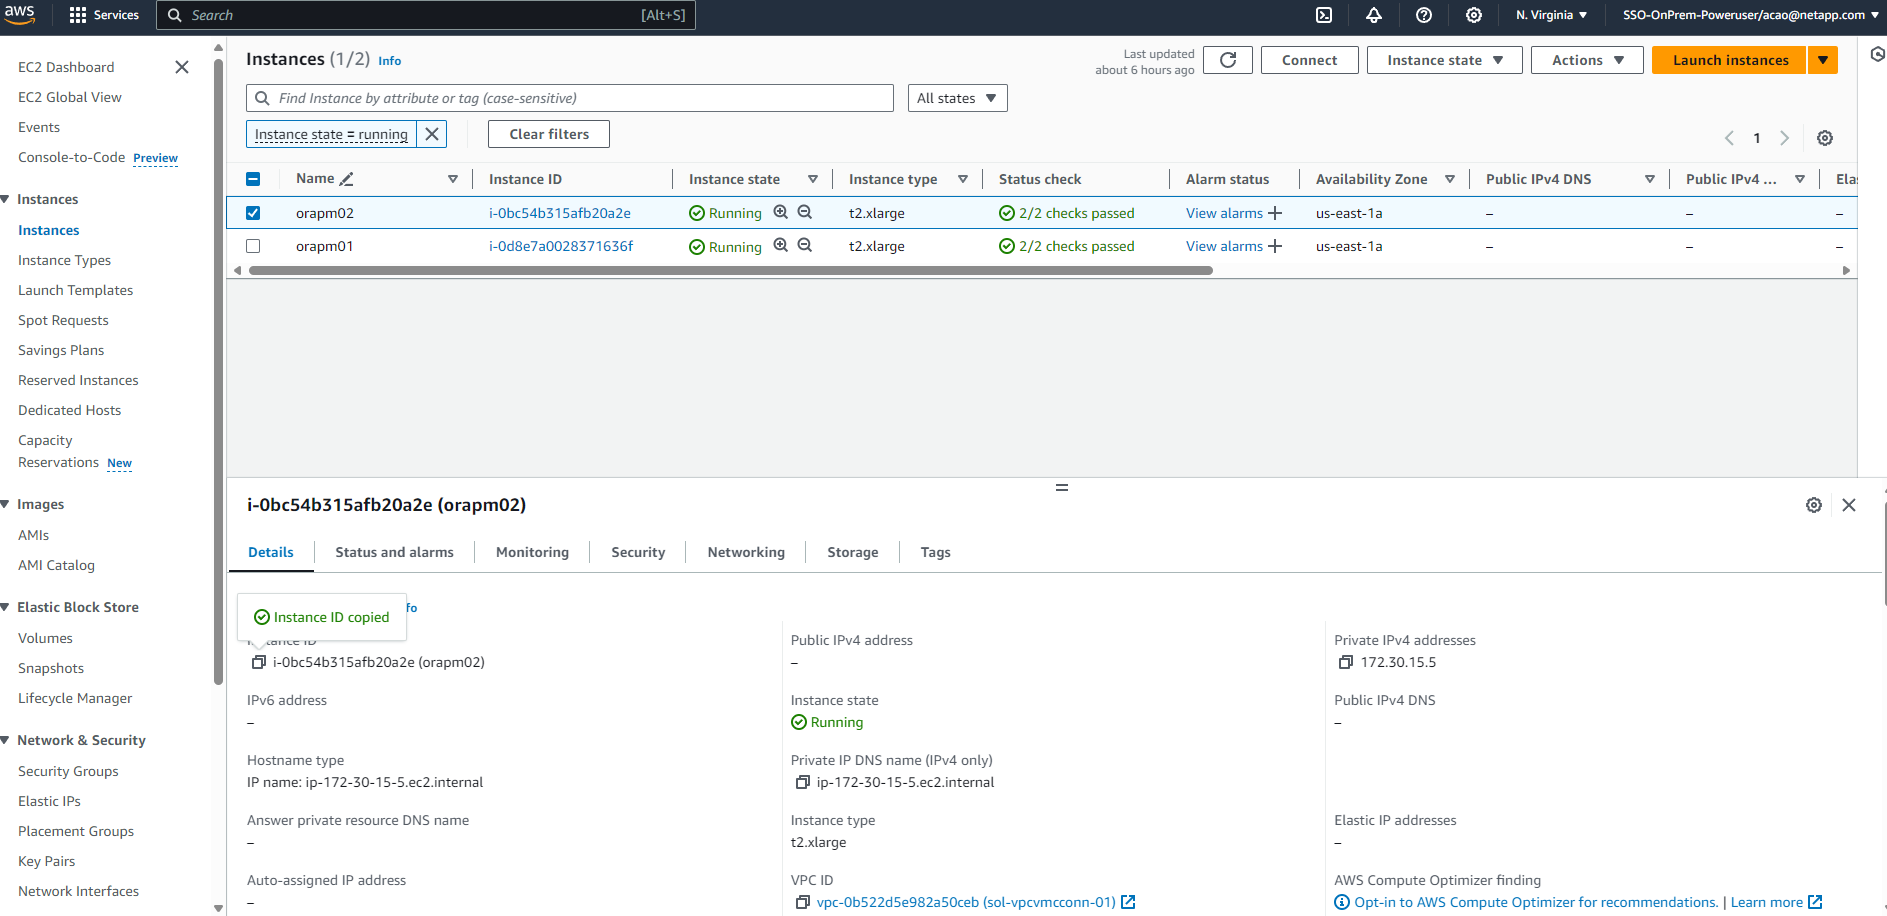
루트 사용자로서 다음 AWS 메타데이터 쿼리를 입력하여 각 EC2 인스턴스 노드의 인스턴스 ID를 가져옵니다.
echo $(curl -s http://169.254.169.254/latest/meta-data/instance-id)[root@ip-172-30-15-111 ec2-user]# echo $(curl -s http://169.254.169.254/latest/meta-data/instance-id) i-0d8e7a0028371636f or just get instance-id from AWS EC2 console
-
다음 명령을 입력하여 펜스 장치를 구성합니다. pcmk_host_map 명령을 사용하여 RHEL 호스트 이름을 인스턴스 ID에 매핑합니다. 이전에 AWS 인증에 사용했던 AWS 사용자 계정의 AWS 액세스 키와 AWS 비밀 액세스 키를 사용하세요.
sudo pcs stonith \ create clusterfence fence_aws access_key=XXXXXXXXXXXXXXXXX secret_key=XXXXXXXXXXXXXXXXXX \ region=us-east-1 pcmk_host_map="ip-172-30-15-111.ec2.internal:i-0d8e7a0028371636f;ip-172-30-15-5.ec2.internal:i-0bc54b315afb20a2e" \ power_timeout=240 pcmk_reboot_timeout=480 pcmk_reboot_retries=4 -
펜싱 구성을 검증합니다.
pcs status[root@ip-172-30-15-111 ec2-user]# pcs status Cluster name: ora_ec2nfsx Cluster Summary: * Stack: corosync (Pacemaker is running) * Current DC: ip-172-30-15-111.ec2.internal (version 2.1.7-5.1.el8_10-0f7f88312) - partition with quorum * Last updated: Wed Sep 11 21:17:18 2024 on ip-172-30-15-111.ec2.internal * Last change: Wed Sep 11 21:16:40 2024 by root via root on ip-172-30-15-111.ec2.internal * 2 nodes configured * 1 resource instance configured Node List: * Online: [ ip-172-30-15-5.ec2.internal ip-172-30-15-111.ec2.internal ] Full List of Resources: * clusterfence (stonith:fence_aws): Started ip-172-30-15-111.ec2.internal Daemon Status: corosync: active/enabled pacemaker: active/enabled pcsd: active/enabled
-
클러스터 수준에서 재부팅하는 대신 stonith-action을 off로 설정합니다.
pcs property set stonith-action=off[root@ip-172-30-15-111 ec2-user]# pcs property config Cluster Properties: cluster-infrastructure: corosync cluster-name: ora_ec2nfsx dc-version: 2.1.7-5.1.el8_10-0f7f88312 have-watchdog: false last-lrm-refresh: 1726257586 stonith-action: off
stonith-action을 off로 설정하면 펜싱된 클러스터 노드가 처음에 종료됩니다. stonith power_timeout(240초)에 정의된 기간이 지나면 펜스 노드가 재부팅되고 클러스터에 다시 가입합니다. -
대기 노드의 펜스 지연 시간을 10초로 설정합니다.
pcs stonith update clusterfence pcmk_delay_base="ip-172-30-15-111.ec2.internal:0;ip-172-30-15-5.ec2.internal:10s"[root@ip-172-30-15-111 ec2-user]# pcs stonith config Resource: clusterfence (class=stonith type=fence_aws) Attributes: clusterfence-instance_attributes access_key=XXXXXXXXXXXXXXXX pcmk_delay_base=ip-172-30-15-111.ec2.internal:0;ip-172-30-15-5.ec2.internal:10s pcmk_host_map=ip-172-30-15-111.ec2.internal:i-0d8e7a0028371636f;ip-172-30-15-5.ec2.internal:i-0bc54b315afb20a2e pcmk_reboot_retries=4 pcmk_reboot_timeout=480 power_timeout=240 region=us-east-1 secret_key=XXXXXXXXXXXXXXXX Operations: monitor: clusterfence-monitor-interval-60s interval=60s
|
|
실행하다 pcs stonith refresh 중지된 스토니스 펜스 에이전트를 새로 고치거나 실패한 스토니스 리소스 작업을 지우는 명령입니다.
|
PCS 클러스터에 Oracle 데이터베이스 배포
Details
PCS 클러스터에서 사전 정의된 매개변수를 사용하여 데이터베이스 설치 및 구성 작업을 실행하려면 NetApp 에서 제공하는 Ansible 플레이북을 활용하는 것이 좋습니다. 이 자동화된 Oracle 배포의 경우 플레이북을 실행하기 전에 세 개의 사용자 정의 매개변수 파일에 대한 사용자 입력이 필요합니다.
-
호스트 - 자동화 플레이북이 실행되는 대상을 정의합니다.
-
vars/vars.yml - 모든 대상에 적용되는 변수를 정의하는 전역 변수 파일입니다.
-
host_vars/host_name.yml - 지정된 대상에만 적용되는 변수를 정의하는 로컬 변수 파일입니다. 우리의 사용 사례에서는 이는 Oracle DB 서버입니다.
이러한 사용자 정의 변수 파일 외에도 필요하지 않은 한 변경할 필요가 없는 기본 매개변수가 포함된 여러 가지 기본 변수 파일이 있습니다. 다음은 PCS 클러스터링 구성에서 AWS EC2와 FSx ONTAP 에 자동화된 Oracle을 배포하는 세부 정보를 보여줍니다.
-
Ansible 컨트롤러 관리자 사용자 홈 디렉토리에서 NFS용 NetApp Oracle 배포 자동화 툴킷의 사본을 복제합니다.
git clone https://bitbucket.ngage.netapp.com/scm/ns-bb/na_oracle_deploy_nfs.git
Ansible 컨트롤러는 네트워크 연결이 있는 한 데이터베이스 EC2 인스턴스와 동일한 VPC에 위치하거나 온프레미스에 위치할 수 있습니다. -
호스트 매개변수 파일에 사용자 정의 매개변수를 입력합니다. 다음은 일반적인 호스트 파일 구성의 예입니다.
[admin@ansiblectl na_oracle_deploy_nfs]$ cat hosts
#Oracle hosts
[oracle]
orapm01 ansible_host=172.30.15.111 ansible_ssh_private_key_file=ec2-user.pem
orapm02 ansible_host=172.30.15.5 ansible_ssh_private_key_file=ec2-user.pem
-
vars/vars.yml 매개변수 파일에 사용자 정의 매개변수를 입력합니다. 다음은 일반적인 vars.yml 파일 구성의 예입니다.
[admin@ansiblectl na_oracle_deploy_nfs]$ cat vars/vars.yml
######################################################################
###### Oracle 19c deployment user configuration variables       ######
###### Consolidate all variables from ONTAP, linux and oracle   ######
######################################################################

###########################################
### ONTAP env specific config variables ###
###########################################

# Prerequisite to create three volumes in NetApp ONTAP storage from System Manager or cloud dashboard with following naming convention:
# db_hostname_u01 - Oracle binary
# db_hostname_u02 - Oracle data
# db_hostname_u03 - Oracle redo
# It is important to strictly follow the name convention or the automation will fail.


###########################################
### Linux env specific config variables ###
###########################################

redhat_sub_username: xxxxxxxx
redhat_sub_password: "xxxxxxxx"


####################################################
### DB env specific install and config variables ###
####################################################

# Database domain name
db_domain: ec2.internal

# Set initial password for all required Oracle passwords. Change them after installation.
initial_pwd_all: "xxxxxxxx"
-
host_vars/host_name.yml 매개변수 파일에 사용자 정의 매개변수를 입력합니다. 다음은 일반적인 host_vars/host_name.yml 파일 구성의 예입니다.
[admin@ansiblectl na_oracle_deploy_nfs]$ cat host_vars/orapm01.yml
# User configurable Oracle host specific parameters

# Database SID. By default, a container DB is created with 3 PDBs within the CDB
oracle_sid: NTAP

# CDB is created with SGA at 75% of memory_limit, MB. Consider how many databases to be hosted on the node and
# how much ram to be allocated to each DB. The grand total of SGA should not exceed 75% available RAM on node.
memory_limit: 8192

# Local NFS lif ip address to access database volumes
nfs_lif: 172.30.15.95
nfs_lif 주소는 이전 섹션의 자동화된 EC2 및 FSx ONTAP 배포에서 출력된 FSx ONTAP 클러스터 엔드포인트에서 검색할 수 있습니다. -
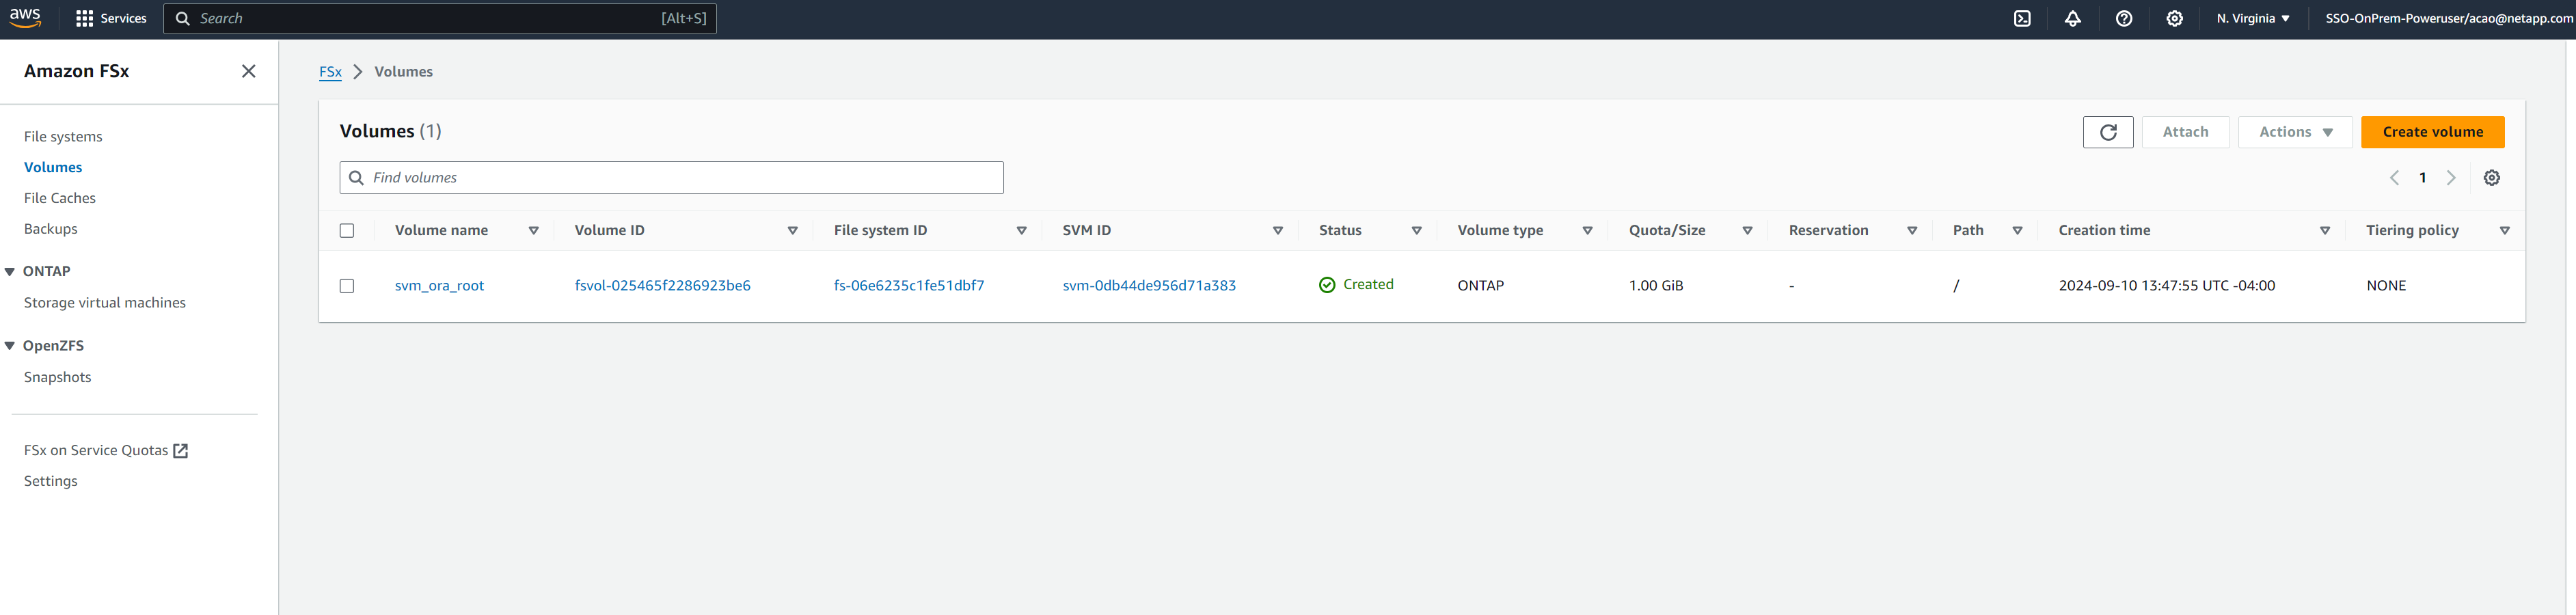
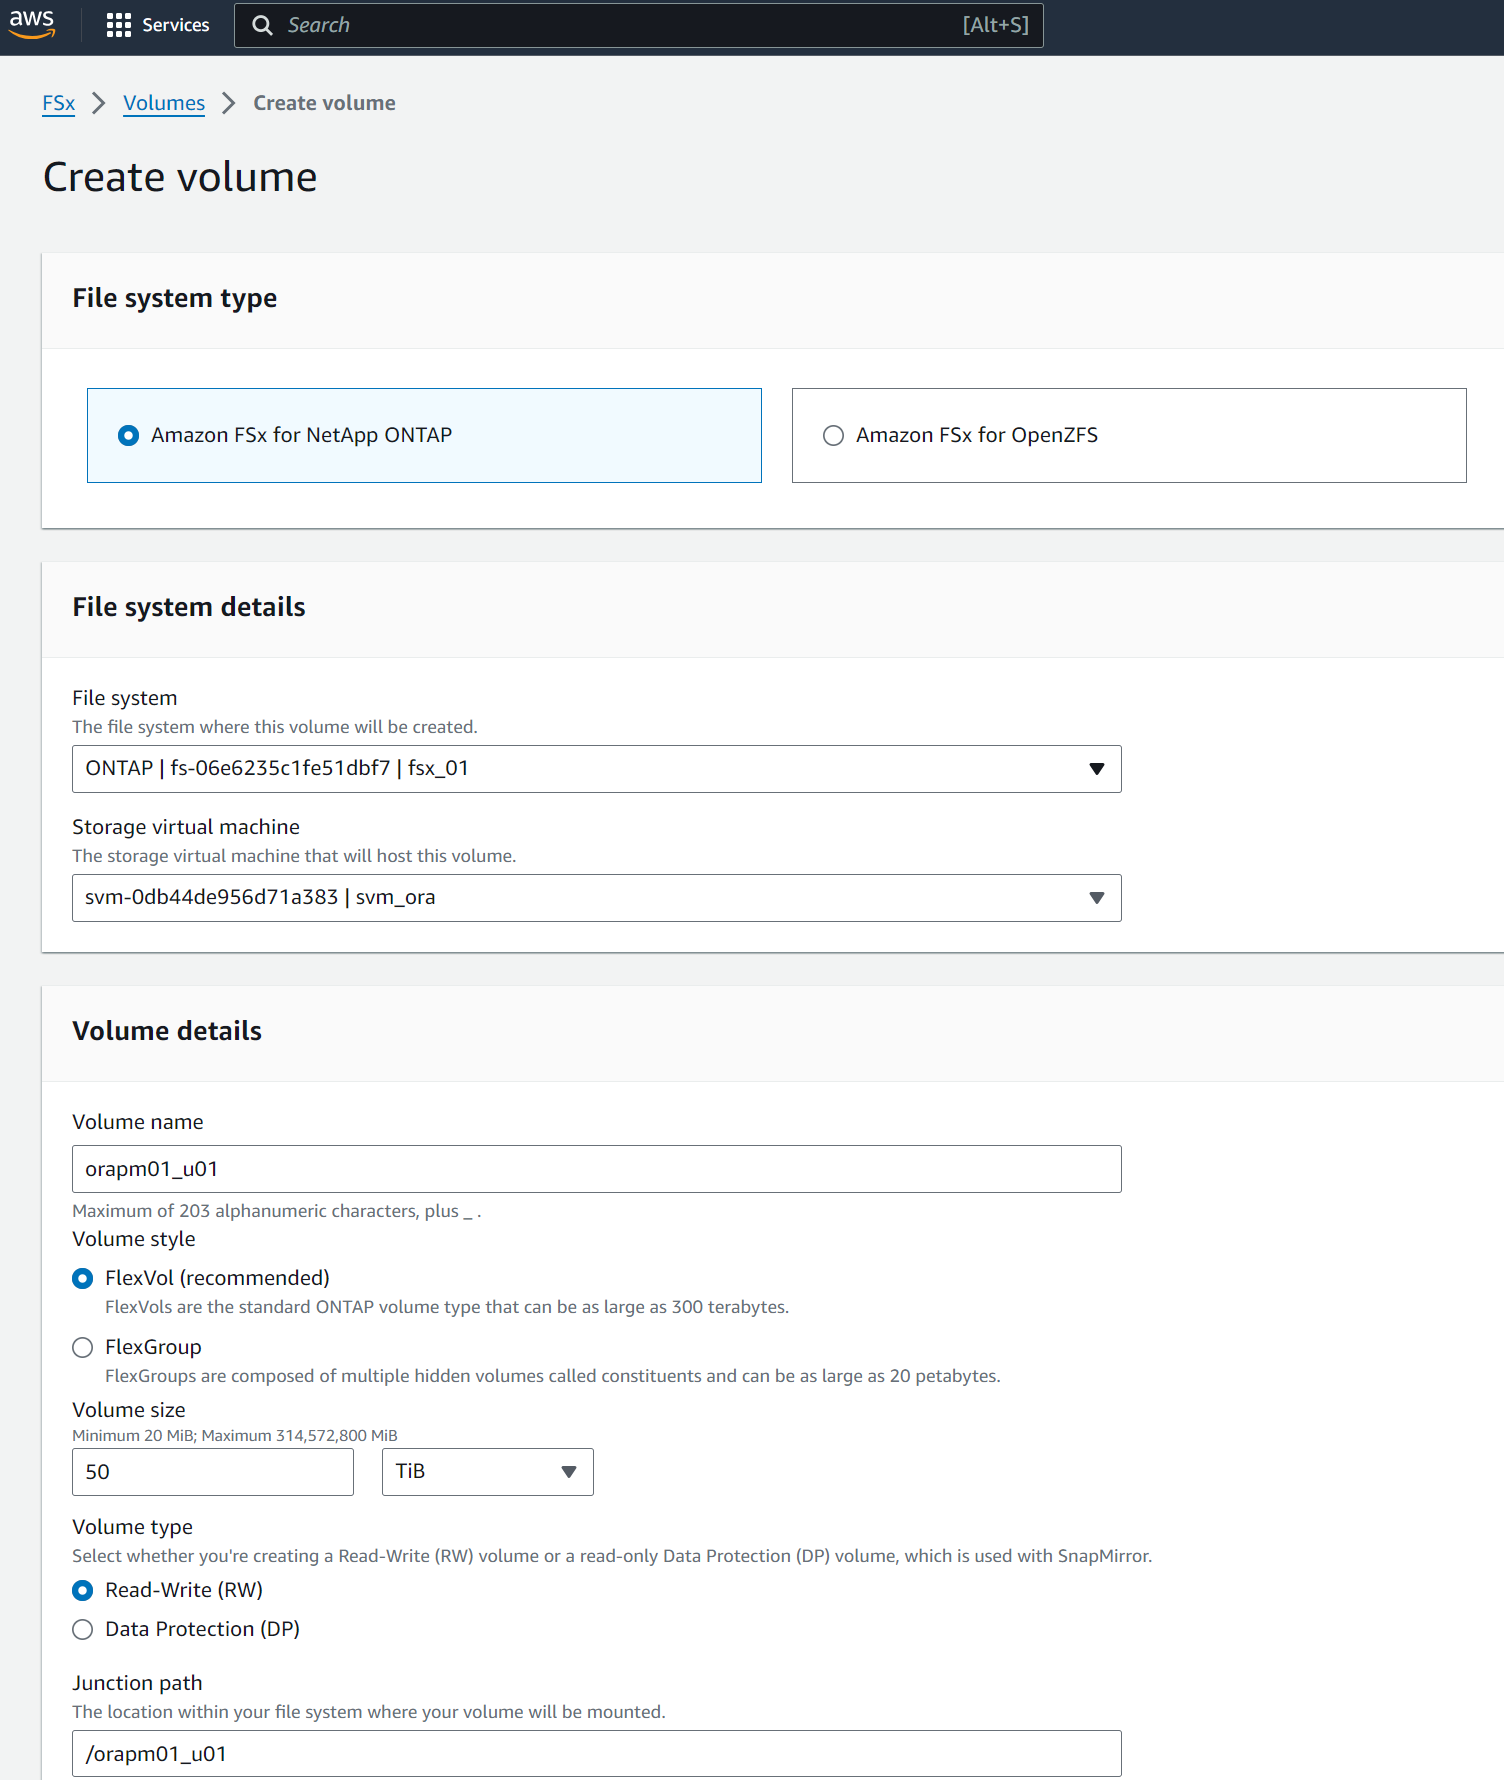
AWS FSx 콘솔에서 데이터베이스 볼륨을 생성합니다. 아래에 표시된 대로 볼륨의 접두사로 PCS 기본 노드 호스트 이름(orapm01)을 사용해야 합니다.
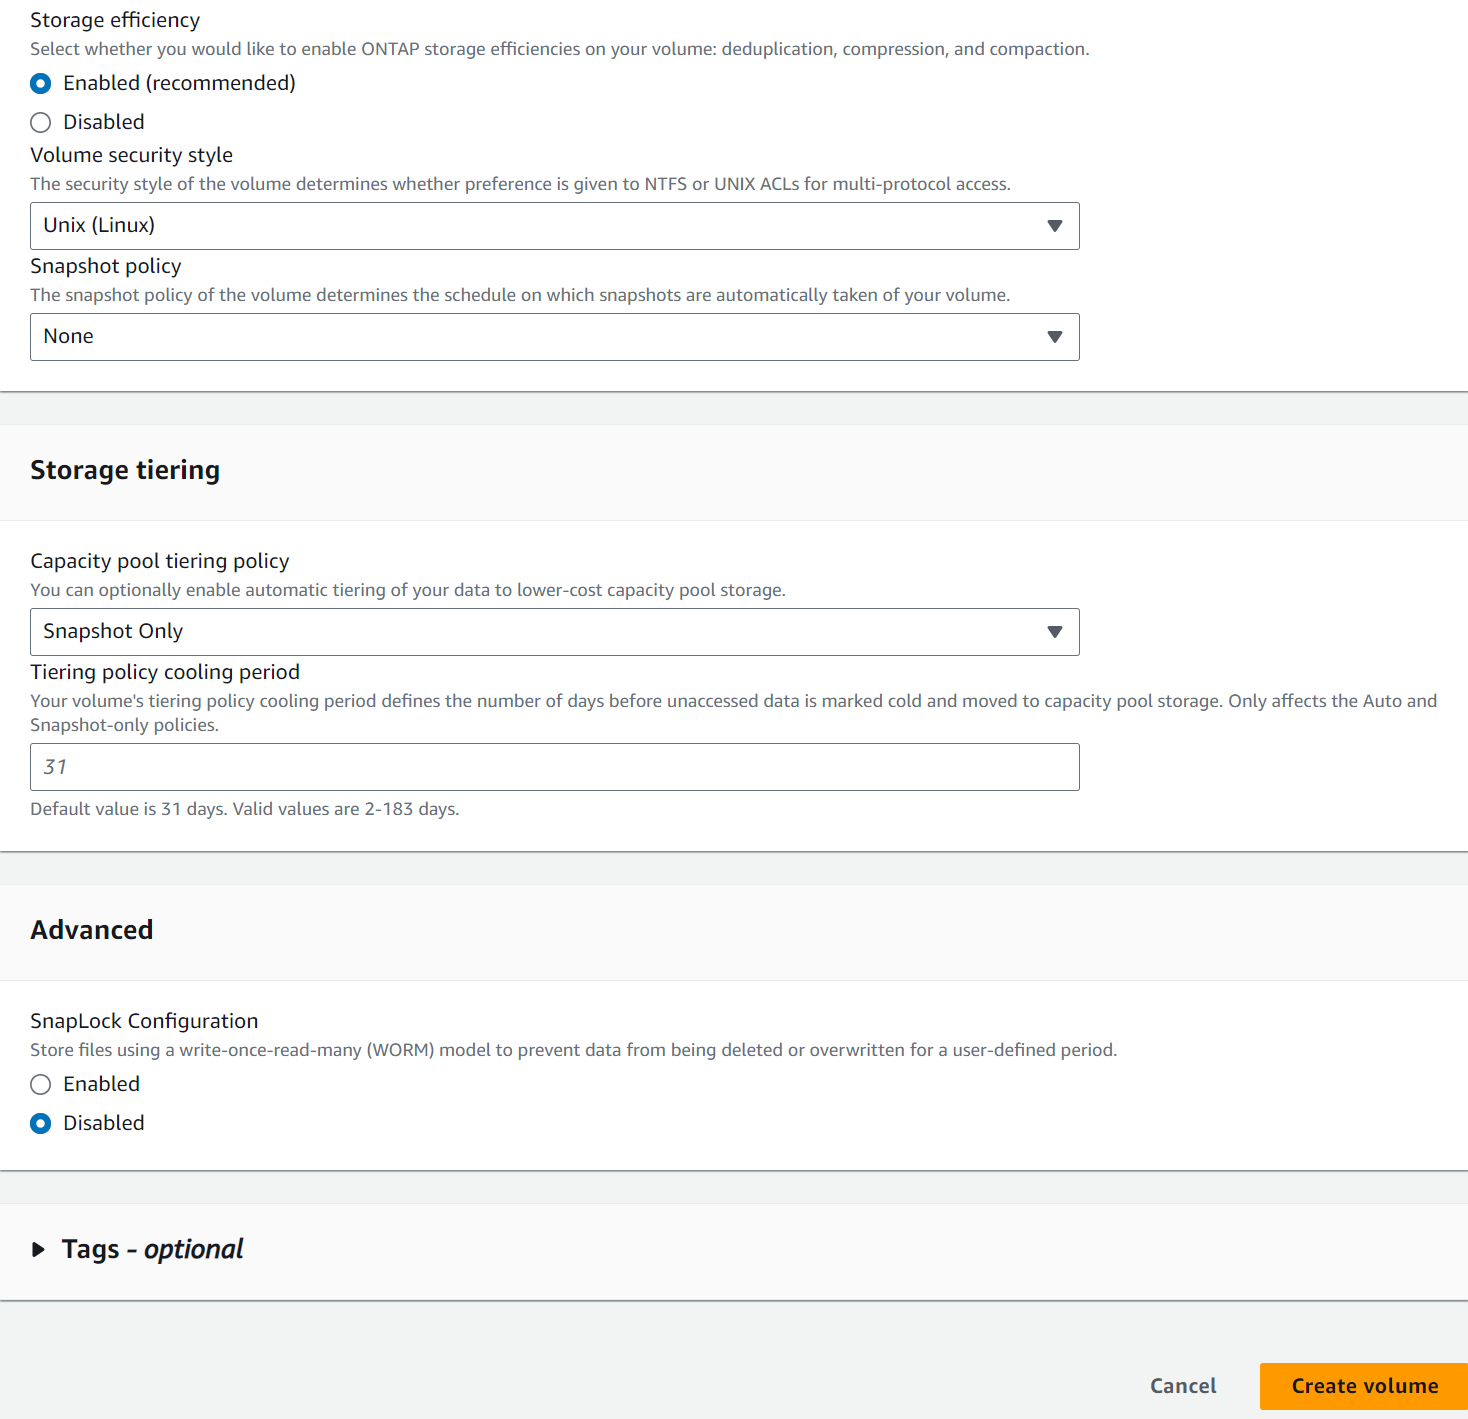
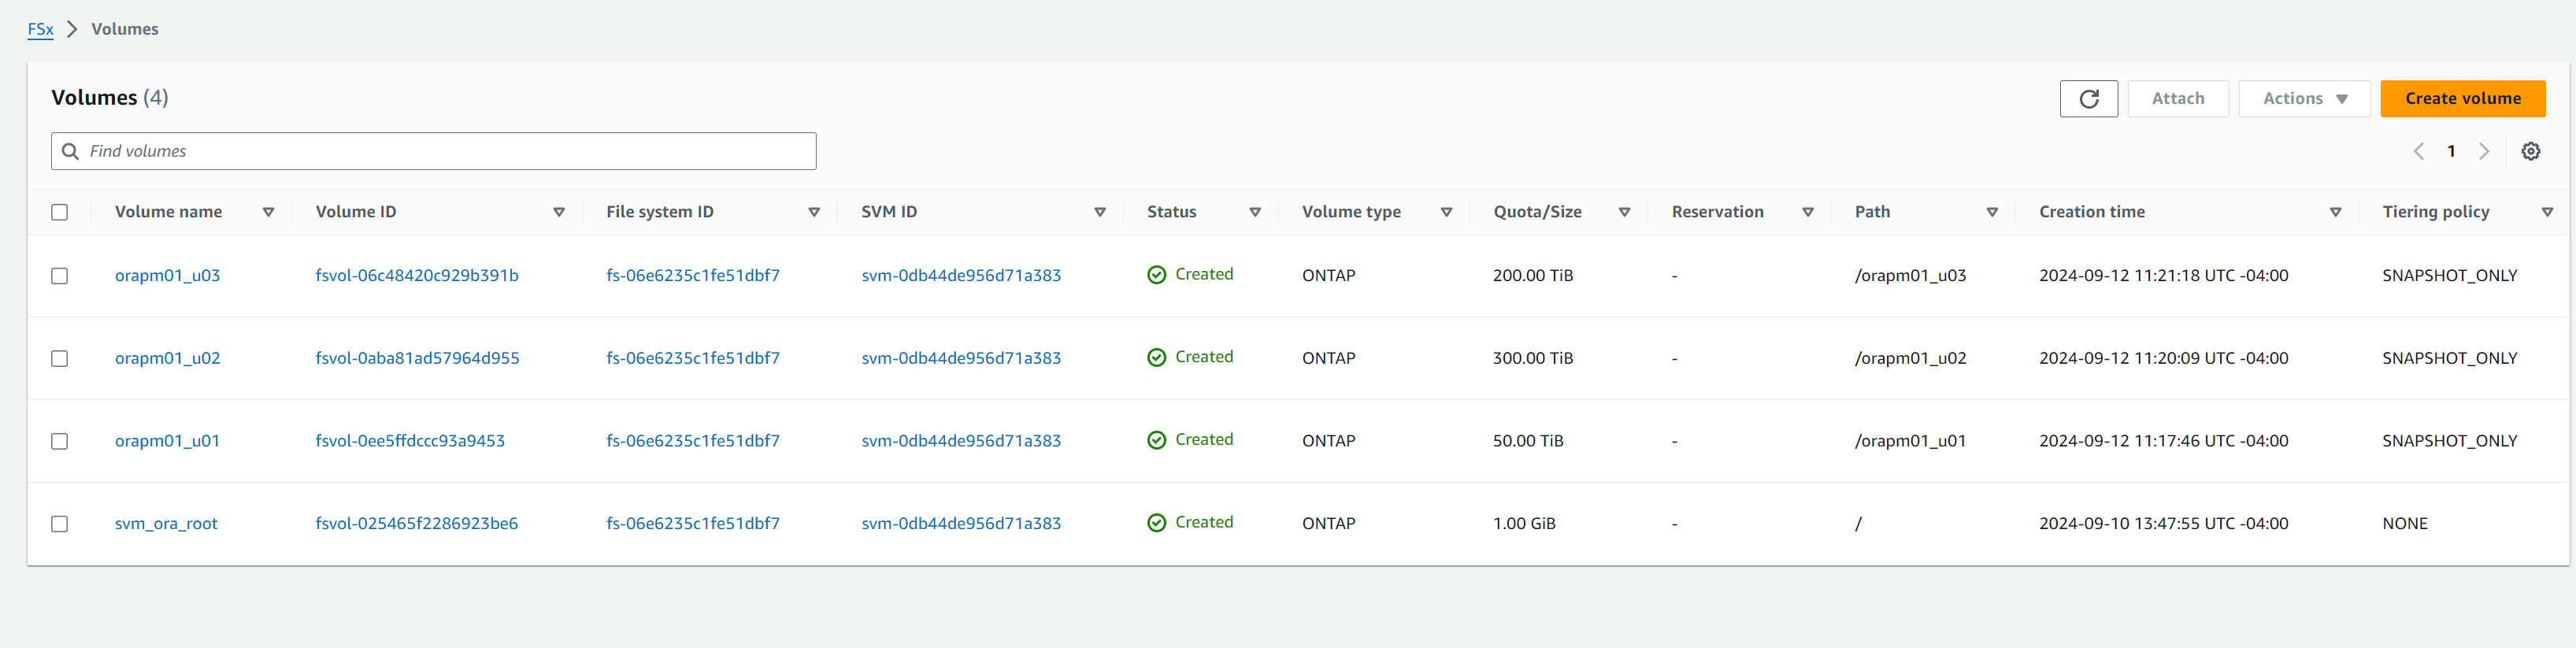
-
PCS 기본 노드 EC2 인스턴스 ip-172-30-15-111.ec2.internal /tmp/archive 디렉토리에 777 권한이 있는 Oracle 19c 설치 파일 다음 단계.
installer_archives:
  - "LINUX.X64_193000_db_home.zip"
  - "p34765931_190000_Linux-x86-64.zip"
  - "p6880880_190000_Linux-x86-64.zip"
-
Linux 구성에 대한 플레이북 실행
all nodes.ansible-playbook -i hosts 2-linux_config.yml -u ec2-user -e @vars/vars.yml[admin@ansiblectl na_oracle_deploy_nfs]$ ansible-playbook -i hosts 2-linux_config.yml -u ec2-user -e @vars/vars.yml PLAY [Linux Setup and Storage Config for Oracle] **************************************************************************************************************************************************************************************************************************************************************************** TASK [Gathering Facts] ****************************************************************************************************************************************************************************************************************************************************************************************************** ok: [orapm01] ok: [orapm02] TASK [linux : Configure RedHat 7 for Oracle DB installation] **************************************************************************************************************************************************************************************************************************************************************** skipping: [orapm01] skipping: [orapm02] TASK [linux : Configure RedHat 8 for Oracle DB installation] **************************************************************************************************************************************************************************************************************************************************************** included: /home/admin/na_oracle_deploy_nfs/roles/linux/tasks/rhel8_config.yml for orapm01, orapm02 TASK [linux : Register subscriptions for RedHat Server] ********************************************************************************************************************************************************************************************************************************************************************* ok: [orapm01] ok: [orapm02] . . .
-
Oracle 구성을 위한 플레이북 실행
only on primary node(hosts 파일에서 대기 노드를 주석 처리합니다).ansible-playbook -i hosts 4-oracle_config.yml -u ec2-user -e @vars/vars.yml --skip-tags "enable_db_start_shut"[admin@ansiblectl na_oracle_deploy_nfs]$ ansible-playbook -i hosts 4-oracle_config.yml -u ec2-user -e @vars/vars.yml --skip-tags "enable_db_start_shut" PLAY [Oracle installation and configuration] ******************************************************************************************************************************************************************************************************************************************************************************** TASK [Gathering Facts] ****************************************************************************************************************************************************************************************************************************************************************************************************** ok: [orapm01] TASK [oracle : Oracle software only install] ******************************************************************************************************************************************************************************************************************************************************************************** included: /home/admin/na_oracle_deploy_nfs/roles/oracle/tasks/oracle_install.yml for orapm01 TASK [oracle : Create mount points for NFS file systems / Mount NFS file systems on Oracle hosts] *************************************************************************************************************************************************************************************************************************** included: /home/admin/na_oracle_deploy_nfs/roles/oracle/tasks/oracle_mount_points.yml for orapm01 TASK [oracle : Create mount points for NFS file systems] ******************************************************************************************************************************************************************************************************************************************************************** changed: [orapm01] => (item=/u01) changed: [orapm01] => (item=/u02) changed: [orapm01] => (item=/u03) . . .
-
데이터베이스가 배포된 후에는 기본 노드의 /etc/fstab에 있는 /u01, /u02, /u03 마운트를 주석 처리합니다. 마운트 지점은 PCS에서만 관리되기 때문입니다.
sudo vi /etc/fstab[root@ip-172-30-15-111 ec2-user]# cat /etc/fstab UUID=eaa1f38e-de0f-4ed5-a5b5-2fa9db43bb38 / xfs defaults 0 0 /mnt/swapfile swap swap defaults 0 0 #172.30.15.95:/orapm01_u01 /u01 nfs rw,bg,hard,vers=3,proto=tcp,timeo=600,rsize=65536,wsize=65536 0 0 #172.30.15.95:/orapm01_u02 /u02 nfs rw,bg,hard,vers=3,proto=tcp,timeo=600,rsize=65536,wsize=65536 0 0 #172.30.15.95:/orapm01_u03 /u03 nfs rw,bg,hard,vers=3,proto=tcp,timeo=600,rsize=65536,wsize=65536 0 0
-
/etc/oratab /etc/oraInst.loc, /home/oracle/.bash_profile을 대기 노드에 복사합니다. 적절한 파일 소유권과 권한을 유지하세요.
-
기본 노드에서 데이터베이스와 리스너를 종료하고 /u01, /u02, /u03을 마운트 해제합니다.
[root@ip-172-30-15-111 ec2-user]# su - oracle
Last login: Wed Sep 18 16:51:02 UTC 2024
[oracle@ip-172-30-15-111 ~]$ sqlplus / as sysdba

SQL*Plus: Release 19.0.0.0.0 - Production on Wed Sep 18 16:51:16 2024
Version 19.18.0.0.0

Copyright (c) 1982, 2022, Oracle.  All rights reserved.


Connected to:
Oracle Database 19c Enterprise Edition Release 19.0.0.0.0 - Production
Version 19.18.0.0.0

SQL> shutdown immediate;

SQL> exit
Disconnected from Oracle Database 19c Enterprise Edition Release 19.0.0.0.0 - Production
Version 19.18.0.0.0
[oracle@ip-172-30-15-111 ~]$ lsnrctl stop listener.ntap

[oracle@ip-172-30-15-111 ~]$ exit
logout
[root@ip-172-30-15-111 ec2-user]# umount /u01
[root@ip-172-30-15-111 ec2-user]# umount /u02
[root@ip-172-30-15-111 ec2-user]# umount /u03
-
대기 노드 ip-172-30-15-5에 마운트 포인트를 생성합니다.
mkdir /u01 mkdir /u02 mkdir /u03 -
대기 노드 ip-172-30-15-5에 FSx ONTAP 데이터베이스 볼륨을 마운트합니다.
mount -t nfs 172.30.15.95:/orapm01_u01 /u01 -o rw,bg,hard,vers=3,proto=tcp,timeo=600,rsize=65536,wsize=65536mount -t nfs 172.30.15.95:/orapm01_u02 /u02 -o rw,bg,hard,vers=3,proto=tcp,timeo=600,rsize=65536,wsize=65536mount -t nfs 172.30.15.95:/orapm01_u03 /u03 -o rw,bg,hard,vers=3,proto=tcp,timeo=600,rsize=65536,wsize=65536[root@ip-172-30-15-5 ec2-user]# df -h Filesystem Size Used Avail Use% Mounted on devtmpfs 7.7G 0 7.7G 0% /dev tmpfs 7.7G 33M 7.7G 1% /dev/shm tmpfs 7.7G 17M 7.7G 1% /run tmpfs 7.7G 0 7.7G 0% /sys/fs/cgroup /dev/xvda2 50G 21G 30G 41% / tmpfs 1.6G 0 1.6G 0% /run/user/1000 172.30.15.95:/orapm01_u01 48T 47T 844G 99% /u01 172.30.15.95:/orapm01_u02 285T 285T 844G 100% /u02 172.30.15.95:/orapm01_u03 190T 190T 844G 100% /u03
-
oracle 사용자로 변경하고 바이너리를 다시 링크합니다.
[root@ip-172-30-15-5 ec2-user]# su - oracle
Last login: Thu Sep 12 18:09:03 UTC 2024 on pts/0
[oracle@ip-172-30-15-5 ~]$ env | grep ORA
ORACLE_SID=NTAP
ORACLE_HOME=/u01/app/oracle/product/19.0.0/NTAP
[oracle@ip-172-30-15-5 ~]$ cd $ORACLE_HOME/bin
[oracle@ip-172-30-15-5 bin]$ ./relink
writing relink log to: /u01/app/oracle/product/19.0.0/NTAP/install/relinkActions2024-09-12_06-21-40PM.log
-
dnfs 라이브러리를 odm 폴더로 다시 복사합니다. 다시 연결하면 dfns 라이브러리 파일이 손실될 수 있습니다.
[oracle@ip-172-30-15-5 odm]$ cd /u01/app/oracle/product/19.0.0/NTAP/rdbms/lib/odm
[oracle@ip-172-30-15-5 odm]$ cp ../../../lib/libnfsodm19.so .
-
대기 노드 ip-172-30-15-5에서 데이터베이스를 검증하기 위해 시작합니다.
[oracle@ip-172-30-15-5 odm]$ sqlplus / as sysdba SQL*Plus: Release 19.0.0.0.0 - Production on Thu Sep 12 18:30:04 2024 Version 19.18.0.0.0 Copyright (c) 1982, 2022, Oracle. All rights reserved. Connected to an idle instance. SQL> startup; ORACLE instance started. Total System Global Area 6442449688 bytes Fixed Size 9177880 bytes Variable Size 1090519040 bytes Database Buffers 5335154688 bytes Redo Buffers 7598080 bytes Database mounted. Database opened. SQL> select name, open_mode from v$database; NAME OPEN_MODE --------- -------------------- NTAP READ WRITE SQL> show pdbs CON_ID CON_NAME OPEN MODE RESTRICTED ---------- ------------------------------ ---------- ---------- 2 PDB$SEED READ ONLY NO 3 NTAP_PDB1 READ WRITE NO 4 NTAP_PDB2 READ WRITE NO 5 NTAP_PDB3 READ WRITE NO -
DB를 종료하고 기본 노드 IP-172-30-15-111로 데이터베이스를 장애 복구합니다.
SQL> shutdown immediate;
Database closed.
Database dismounted.
ORACLE instance shut down.
SQL> exit

[root@ip-172-30-15-5 ec2-user]# df -h
Filesystem                 Size  Used Avail Use% Mounted on
devtmpfs                   7.7G     0  7.7G   0% /dev
tmpfs                      7.7G   33M  7.7G   1% /dev/shm
tmpfs                      7.7G   17M  7.7G   1% /run
tmpfs                      7.7G     0  7.7G   0% /sys/fs/cgroup
/dev/xvda2                  50G   21G   30G  41% /
tmpfs                      1.6G     0  1.6G   0% /run/user/1000
172.30.15.95:/orapm01_u01   48T   47T  844G  99% /u01
172.30.15.95:/orapm01_u02  285T  285T  844G 100% /u02
172.30.15.95:/orapm01_u03  190T  190T  844G 100% /u03

[root@ip-172-30-15-5 ec2-user]# umount /u01
[root@ip-172-30-15-5 ec2-user]# umount /u02
[root@ip-172-30-15-5 ec2-user]# umount /u03

[root@ip-172-30-15-111 ec2-user]# mount -t nfs 172.30.15.95:/orapm01_u01 /u01 -o rw,bg,hard,vers=3,proto=tcp,timeo=600,rsize=65536,wsize=65536
mount: (hint) your fstab has been modified, but systemd still uses
       the old version; use 'systemctl daemon-reload' to reload.
[root@ip-172-30-15-111 ec2-user]# mount -t nfs 172.30.15.95:/orapm01_u02 /u02 -o rw,bg,hard,vers=3,proto=tcp,timeo=600,rsize=65536,wsize=65536
mount: (hint) your fstab has been modified, but systemd still uses
       the old version; use 'systemctl daemon-reload' to reload.
[root@ip-172-30-15-111 ec2-user]# mount -t nfs 172.30.15.95:/orapm01_u03 /u03 -o rw,bg,hard,vers=3,proto=tcp,timeo=600,rsize=65536,wsize=65536
mount: (hint) your fstab has been modified, but systemd still uses
       the old version; use 'systemctl daemon-reload' to reload.
[root@ip-172-30-15-111 ec2-user]# df -h
Filesystem                 Size  Used Avail Use% Mounted on
devtmpfs                   7.7G     0  7.7G   0% /dev
tmpfs                      7.8G   48M  7.7G   1% /dev/shm
tmpfs                      7.8G   33M  7.7G   1% /run
tmpfs                      7.8G     0  7.8G   0% /sys/fs/cgroup
/dev/xvda2                  50G   29G   22G  58% /
tmpfs                      1.6G     0  1.6G   0% /run/user/1000
172.30.15.95:/orapm01_u01   48T   47T  844G  99% /u01
172.30.15.95:/orapm01_u02  285T  285T  844G 100% /u02
172.30.15.95:/orapm01_u03  190T  190T  844G 100% /u03
[root@ip-172-30-15-111 ec2-user]# su - oracle
Last login: Thu Sep 12 18:13:34 UTC 2024 on pts/1
[oracle@ip-172-30-15-111 ~]$ sqlplus / as sysdba

SQL*Plus: Release 19.0.0.0.0 - Production on Thu Sep 12 18:38:46 2024
Version 19.18.0.0.0

Copyright (c) 1982, 2022, Oracle.  All rights reserved.

Connected to an idle instance.

SQL> startup;
ORACLE instance started.

Total System Global Area 6442449688 bytes
Fixed Size                  9177880 bytes
Variable Size            1090519040 bytes
Database Buffers         5335154688 bytes
Redo Buffers                7598080 bytes
Database mounted.
Database opened.
SQL> exit
Disconnected from Oracle Database 19c Enterprise Edition Release 19.0.0.0.0 - Production
Version 19.18.0.0.0
[oracle@ip-172-30-15-111 ~]$ lsnrctl start listener.ntap

LSNRCTL for Linux: Version 19.0.0.0.0 - Production on 12-SEP-2024 18:39:17

Copyright (c) 1991, 2022, Oracle.  All rights reserved.

Starting /u01/app/oracle/product/19.0.0/NTAP/bin/tnslsnr: please wait...

TNSLSNR for Linux: Version 19.0.0.0.0 - Production
System parameter file is /u01/app/oracle/product/19.0.0/NTAP/network/admin/listener.ora
Log messages written to /u01/app/oracle/diag/tnslsnr/ip-172-30-15-111/listener.ntap/alert/log.xml
Listening on: (DESCRIPTION=(ADDRESS=(PROTOCOL=tcp)(HOST=ip-172-30-15-111.ec2.internal)(PORT=1521)))
Listening on: (DESCRIPTION=(ADDRESS=(PROTOCOL=ipc)(KEY=EXTPROC1521)))

Connecting to (DESCRIPTION=(ADDRESS=(PROTOCOL=TCP)(HOST=ip-172-30-15-111.ec2.internal)(PORT=1521)))
STATUS of the LISTENER
------------------------
Alias                     listener.ntap
Version                   TNSLSNR for Linux: Version 19.0.0.0.0 - Production
Start Date                12-SEP-2024 18:39:17
Uptime                    0 days 0 hr. 0 min. 0 sec
Trace Level               off
Security                  ON: Local OS Authentication
SNMP                      OFF
Listener Parameter File   /u01/app/oracle/product/19.0.0/NTAP/network/admin/listener.ora
Listener Log File         /u01/app/oracle/diag/tnslsnr/ip-172-30-15-111/listener.ntap/alert/log.xml
Listening Endpoints Summary...
  (DESCRIPTION=(ADDRESS=(PROTOCOL=tcp)(HOST=ip-172-30-15-111.ec2.internal)(PORT=1521)))
  (DESCRIPTION=(ADDRESS=(PROTOCOL=ipc)(KEY=EXTPROC1521)))
The listener supports no services
The command completed successfully
PCS 관리를 위한 Oracle 리소스 구성
Details
Pacemaker 클러스터링을 구성하는 목적은 장애 발생 시 사용자 개입을 최소화하여 AWS EC2 및 FSx ONTAP 환경에서 Oracle을 실행하기 위한 액티브/패시브 고가용성 솔루션을 설정하는 것입니다. 다음은 PCS 관리를 위한 Oracle 리소스 구성을 보여줍니다.
-
기본 EC2 인스턴스 ip-172-30-15-111에서 루트 사용자로 VPC CIDR 블록에 사용되지 않는 개인 IP 주소를 플로팅 IP로 사용하여 보조 개인 IP 주소를 생성합니다. 이 과정에서 보조 개인 IP 주소가 속할 Oracle 리소스 그룹을 만듭니다.
pcs resource create privip ocf:heartbeat:awsvip secondary_private_ip=172.30.15.33 --group oracle[root@ip-172-30-15-111 ec2-user]# pcs status Cluster name: ora_ec2nfsx Cluster Summary: * Stack: corosync (Pacemaker is running) * Current DC: ip-172-30-15-111.ec2.internal (version 2.1.7-5.1.el8_10-0f7f88312) - partition with quorum * Last updated: Fri Sep 13 16:25:35 2024 on ip-172-30-15-111.ec2.internal * Last change: Fri Sep 13 16:25:23 2024 by root via root on ip-172-30-15-111.ec2.internal * 2 nodes configured * 2 resource instances configured Node List: * Online: [ ip-172-30-15-5.ec2.internal ip-172-30-15-111.ec2.internal ] Full List of Resources: * clusterfence (stonith:fence_aws): Started ip-172-30-15-111.ec2.internal * Resource Group: oracle: * privip (ocf::heartbeat:awsvip): Started ip-172-30-15-5.ec2.internal Daemon Status: corosync: active/enabled pacemaker: active/enabled pcsd: active/enabled
권한이 대기 클러스터 노드에서 생성된 경우 아래와 같이 기본 노드로 이동합니다. -
클러스터 노드 간에 리소스를 이동합니다.
pcs resource move privip ip-172-30-15-111.ec2.internal[root@ip-172-30-15-111 ec2-user]# pcs resource move privip ip-172-30-15-111.ec2.internal Warning: A move constraint has been created and the resource 'privip' may or may not move depending on other configuration [root@ip-172-30-15-111 ec2-user]# pcs status Cluster name: ora_ec2nfsx WARNINGS: Following resources have been moved and their move constraints are still in place: 'privip' Run 'pcs constraint location' or 'pcs resource clear <resource id>' to view or remove the constraints, respectively Cluster Summary: * Stack: corosync (Pacemaker is running) * Current DC: ip-172-30-15-111.ec2.internal (version 2.1.7-5.1.el8_10-0f7f88312) - partition with quorum * Last updated: Fri Sep 13 16:26:38 2024 on ip-172-30-15-111.ec2.internal * Last change: Fri Sep 13 16:26:27 2024 by root via root on ip-172-30-15-111.ec2.internal * 2 nodes configured * 2 resource instances configured Node List: * Online: [ ip-172-30-15-5.ec2.internal ip-172-30-15-111.ec2.internal ] Full List of Resources: * clusterfence (stonith:fence_aws): Started ip-172-30-15-111.ec2.internal * Resource Group: oracle: * privip (ocf::heartbeat:awsvip): Started ip-172-30-15-111.ec2.internal (Monitoring) Daemon Status: corosync: active/enabled pacemaker: active/enabled pcsd: active/enabled -
Oracle에 대한 가상 IP(vip)를 생성합니다. 가상 IP는 필요에 따라 기본 노드와 대기 노드 사이를 이동합니다.
pcs resource create vip ocf:heartbeat:IPaddr2 ip=172.30.15.33 cidr_netmask=25 nic=eth0 op monitor interval=10s --group oracle[root@ip-172-30-15-111 ec2-user]# pcs resource create vip ocf:heartbeat:IPaddr2 ip=172.30.15.33 cidr_netmask=25 nic=eth0 op monitor interval=10s --group oracle [root@ip-172-30-15-111 ec2-user]# pcs status Cluster name: ora_ec2nfsx WARNINGS: Following resources have been moved and their move constraints are still in place: 'privip' Run 'pcs constraint location' or 'pcs resource clear <resource id>' to view or remove the constraints, respectively Cluster Summary: * Stack: corosync (Pacemaker is running) * Current DC: ip-172-30-15-111.ec2.internal (version 2.1.7-5.1.el8_10-0f7f88312) - partition with quorum * Last updated: Fri Sep 13 16:27:34 2024 on ip-172-30-15-111.ec2.internal * Last change: Fri Sep 13 16:27:24 2024 by root via root on ip-172-30-15-111.ec2.internal * 2 nodes configured * 3 resource instances configured Node List: * Online: [ ip-172-30-15-5.ec2.internal ip-172-30-15-111.ec2.internal ] Full List of Resources: * clusterfence (stonith:fence_aws): Started ip-172-30-15-111.ec2.internal * Resource Group: oracle: * privip (ocf::heartbeat:awsvip): Started ip-172-30-15-111.ec2.internal * vip (ocf::heartbeat:IPaddr2): Started ip-172-30-15-111.ec2.internal Daemon Status: corosync: active/enabled pacemaker: active/enabled pcsd: active/enabled -
Oracle 사용자로서 listener.ora와 tnsnames.ora 파일을 업데이트하여 vip 주소를 가리키도록 합니다. 리스너를 다시 시작합니다. DB가 리스너에 등록되도록 필요한 경우 데이터베이스를 반송합니다.
vi $ORACLE_HOME/network/admin/listener.oravi $ORACLE_HOME/network/admin/tnsnames.ora[oracle@ip-172-30-15-111 admin]$ cat listener.ora # listener.ora Network Configuration File: /u01/app/oracle/product/19.0.0/NTAP/network/admin/listener.ora # Generated by Oracle configuration tools. LISTENER.NTAP = (DESCRIPTION_LIST = (DESCRIPTION = (ADDRESS = (PROTOCOL = TCP)(HOST = 172.30.15.33)(PORT = 1521)) (ADDRESS = (PROTOCOL = IPC)(KEY = EXTPROC1521)) ) ) [oracle@ip-172-30-15-111 admin]$ cat tnsnames.ora # tnsnames.ora Network Configuration File: /u01/app/oracle/product/19.0.0/NTAP/network/admin/tnsnames.ora # Generated by Oracle configuration tools. NTAP = (DESCRIPTION = (ADDRESS = (PROTOCOL = TCP)(HOST = 172.30.15.33)(PORT = 1521)) (CONNECT_DATA = (SERVER = DEDICATED) (SERVICE_NAME = NTAP.ec2.internal) ) ) LISTENER_NTAP = (ADDRESS = (PROTOCOL = TCP)(HOST = 172.30.15.33)(PORT = 1521)) [oracle@ip-172-30-15-111 admin]$ lsnrctl status listener.ntap LSNRCTL for Linux: Version 19.0.0.0.0 - Production on 13-SEP-2024 18:28:17 Copyright (c) 1991, 2022, Oracle. All rights reserved. Connecting to (DESCRIPTION=(ADDRESS=(PROTOCOL=TCP)(HOST=172.30.15.33)(PORT=1521))) STATUS of the LISTENER ------------------------ Alias listener.ntap Version TNSLSNR for Linux: Version 19.0.0.0.0 - Production Start Date 13-SEP-2024 18:15:51 Uptime 0 days 0 hr. 12 min. 25 sec Trace Level off Security ON: Local OS Authentication SNMP OFF Listener Parameter File /u01/app/oracle/product/19.0.0/NTAP/network/admin/listener.ora Listener Log File /u01/app/oracle/diag/tnslsnr/ip-172-30-15-111/listener.ntap/alert/log.xml Listening Endpoints Summary... (DESCRIPTION=(ADDRESS=(PROTOCOL=tcp)(HOST=172.30.15.33)(PORT=1521))) (DESCRIPTION=(ADDRESS=(PROTOCOL=ipc)(KEY=EXTPROC1521))) (DESCRIPTION=(ADDRESS=(PROTOCOL=tcps)(HOST=ip-172-30-15-111.ec2.internal)(PORT=5500))(Security=(my_wallet_directory=/u01/app/oracle/product/19.0.0/NTAP/admin/NTAP/xdb_wallet))(Presentation=HTTP)(Session=RAW)) Services Summary... Service "21f0b5cc1fa290e2e0636f0f1eacfd43.ec2.internal" has 1 instance(s). Instance "NTAP", status READY, has 1 handler(s) for this service... Service "21f0b74445329119e0636f0f1eacec03.ec2.internal" has 1 instance(s). Instance "NTAP", status READY, has 1 handler(s) for this service... Service "21f0b83929709164e0636f0f1eacacc3.ec2.internal" has 1 instance(s). Instance "NTAP", status READY, has 1 handler(s) for this service... Service "NTAP.ec2.internal" has 1 instance(s). Instance "NTAP", status READY, has 1 handler(s) for this service... Service "NTAPXDB.ec2.internal" has 1 instance(s). Instance "NTAP", status READY, has 1 handler(s) for this service... Service "ntap_pdb1.ec2.internal" has 1 instance(s). Instance "NTAP", status READY, has 1 handler(s) for this service... Service "ntap_pdb2.ec2.internal" has 1 instance(s). Instance "NTAP", status READY, has 1 handler(s) for this service... Service "ntap_pdb3.ec2.internal" has 1 instance(s). Instance "NTAP", status READY, has 1 handler(s) for this service... The command completed successfully **Oracle listener now listens on vip for database connection** -
Oracle 리소스 그룹에 /u01, /u02, /u03 마운트 포인트를 추가합니다.
pcs resource create u01 ocf:heartbeat:Filesystem device='172.30.15.95:/orapm01_u01' directory='/u01' fstype='nfs' options='rw,bg,hard,vers=3,proto=tcp,timeo=600,rsize=65536,wsize=65536' --group oraclepcs resource create u02 ocf:heartbeat:Filesystem device='172.30.15.95:/orapm01_u02' directory='/u02' fstype='nfs' options='rw,bg,hard,vers=3,proto=tcp,timeo=600,rsize=65536,wsize=65536' --group oraclepcs resource create u03 ocf:heartbeat:Filesystem device='172.30.15.95:/orapm01_u03' directory='/u03' fstype='nfs' options='rw,bg,hard,vers=3,proto=tcp,timeo=600,rsize=65536,wsize=65536' --group oracle -
Oracle DB에 PCS 모니터 사용자 ID를 생성합니다.
[root@ip-172-30-15-111 ec2-user]# su - oracle
Last login: Fri Sep 13 18:12:24 UTC 2024 on pts/0
[oracle@ip-172-30-15-111 ~]$ sqlplus / as sysdba

SQL*Plus: Release 19.0.0.0.0 - Production on Fri Sep 13 19:08:41 2024
Version 19.18.0.0.0

Copyright (c) 1982, 2022, Oracle.  All rights reserved.


Connected to:
Oracle Database 19c Enterprise Edition Release 19.0.0.0.0 - Production
Version 19.18.0.0.0

SQL> CREATE USER c##ocfmon IDENTIFIED BY "XXXXXXXX";

User created.

SQL> grant connect to c##ocfmon;

Grant succeeded.

SQL> exit
Disconnected from Oracle Database 19c Enterprise Edition Release 19.0.0.0.0 - Production
Version 19.18.0.0.0
-
Oracle 리소스 그룹에 데이터베이스를 추가합니다.
pcs resource create ntap ocf:heartbeat:oracle sid='NTAP' home='/u01/app/oracle/product/19.0.0/NTAP' user='oracle' monuser='C##OCFMON' monpassword='XXXXXXXX' monprofile='DEFAULT' --group oracle -
Oracle 리소스 그룹에 데이터베이스 리스너를 추가합니다.
pcs resource create listener ocf:heartbeat:oralsnr sid='NTAP' listener='listener.ntap' --group=oracle -
Oracle 리소스 그룹의 모든 리소스 위치 제약 조건을 기본 노드로 업데이트하여 선호 노드로 설정합니다.
pcs constraint location privip prefers ip-172-30-15-111.ec2.internal
pcs constraint location vip prefers ip-172-30-15-111.ec2.internal
pcs constraint location u01 prefers ip-172-30-15-111.ec2.internal
pcs constraint location u02 prefers ip-172-30-15-111.ec2.internal
pcs constraint location u03 prefers ip-172-30-15-111.ec2.internal
pcs constraint location ntap prefers ip-172-30-15-111.ec2.internal
pcs constraint location listener prefers ip-172-30-15-111.ec2.internal
[root@ip-172-30-15-111 ec2-user]# pcs constraint config Location Constraints: Resource: listener Enabled on: Node: ip-172-30-15-111.ec2.internal (score:INFINITY) Resource: ntap Enabled on: Node: ip-172-30-15-111.ec2.internal (score:INFINITY) Resource: privip Enabled on: Node: ip-172-30-15-111.ec2.internal (score:INFINITY) Resource: u01 Enabled on: Node: ip-172-30-15-111.ec2.internal (score:INFINITY) Resource: u02 Enabled on: Node: ip-172-30-15-111.ec2.internal (score:INFINITY) Resource: u03 Enabled on: Node: ip-172-30-15-111.ec2.internal (score:INFINITY) Resource: vip Enabled on: Node: ip-172-30-15-111.ec2.internal (score:INFINITY) Ordering Constraints: Colocation Constraints: Ticket Constraints: -
Oracle 리소스 구성을 검증합니다.
pcs status[root@ip-172-30-15-111 ec2-user]# pcs status Cluster name: ora_ec2nfsx Cluster Summary: * Stack: corosync (Pacemaker is running) * Current DC: ip-172-30-15-111.ec2.internal (version 2.1.7-5.1.el8_10-0f7f88312) - partition with quorum * Last updated: Fri Sep 13 19:25:32 2024 on ip-172-30-15-111.ec2.internal * Last change: Fri Sep 13 19:23:40 2024 by root via root on ip-172-30-15-111.ec2.internal * 2 nodes configured * 8 resource instances configured Node List: * Online: [ ip-172-30-15-5.ec2.internal ip-172-30-15-111.ec2.internal ] Full List of Resources: * clusterfence (stonith:fence_aws): Started ip-172-30-15-111.ec2.internal * Resource Group: oracle: * privip (ocf::heartbeat:awsvip): Started ip-172-30-15-111.ec2.internal * vip (ocf::heartbeat:IPaddr2): Started ip-172-30-15-111.ec2.internal * u01 (ocf::heartbeat:Filesystem): Started ip-172-30-15-111.ec2.internal * u02 (ocf::heartbeat:Filesystem): Started ip-172-30-15-111.ec2.internal * u03 (ocf::heartbeat:Filesystem): Started ip-172-30-15-111.ec2.internal * ntap (ocf::heartbeat:oracle): Started ip-172-30-15-111.ec2.internal * listener (ocf::heartbeat:oralsnr): Started ip-172-30-15-111.ec2.internal Daemon Status: corosync: active/enabled pacemaker: active/enabled pcsd: active/enabled
배포 후 HA 검증
Details
배포 후에는 테스트와 검증을 실행하여 PCS Oracle 데이터베이스 장애 조치 클러스터가 올바르게 구성되었고 예상대로 작동하는지 확인하는 것이 중요합니다. 테스트 검증에는 클러스터 보호 메커니즘을 통한 관리형 장애 조치와 예상치 못한 리소스 장애 및 복구 시뮬레이션이 포함됩니다.
-
대기 노드의 펜싱을 수동으로 트리거하여 노드 펜싱을 검증하고, 대기 노드가 오프라인 상태가 되고 시간 초과 후 재부팅되었는지 확인합니다.
pcs stonith fence <standbynodename>[root@ip-172-30-15-111 ec2-user]# pcs stonith fence ip-172-30-15-5.ec2.internal Node: ip-172-30-15-5.ec2.internal fenced [root@ip-172-30-15-111 ec2-user]# pcs status Cluster name: ora_ec2nfsx Cluster Summary: * Stack: corosync (Pacemaker is running) * Current DC: ip-172-30-15-111.ec2.internal (version 2.1.7-5.1.el8_10-0f7f88312) - partition with quorum * Last updated: Fri Sep 13 21:58:45 2024 on ip-172-30-15-111.ec2.internal * Last change: Fri Sep 13 21:55:12 2024 by root via root on ip-172-30-15-111.ec2.internal * 2 nodes configured * 8 resource instances configured Node List: * Online: [ ip-172-30-15-111.ec2.internal ] * OFFLINE: [ ip-172-30-15-5.ec2.internal ] Full List of Resources: * clusterfence (stonith:fence_aws): Started ip-172-30-15-111.ec2.internal * Resource Group: oracle: * privip (ocf::heartbeat:awsvip): Started ip-172-30-15-111.ec2.internal * vip (ocf::heartbeat:IPaddr2): Started ip-172-30-15-111.ec2.internal * u01 (ocf::heartbeat:Filesystem): Started ip-172-30-15-111.ec2.internal * u02 (ocf::heartbeat:Filesystem): Started ip-172-30-15-111.ec2.internal * u03 (ocf::heartbeat:Filesystem): Started ip-172-30-15-111.ec2.internal * ntap (ocf::heartbeat:oracle): Started ip-172-30-15-111.ec2.internal * listener (ocf::heartbeat:oralsnr): Started ip-172-30-15-111.ec2.internal Daemon Status: corosync: active/enabled pacemaker: active/enabled pcsd: active/enabled -
리스너 프로세스를 종료하여 데이터베이스 리스너 오류를 시뮬레이션하고 PCS가 리스너 오류를 모니터링하여 몇 초 안에 다시 시작하는지 확인합니다.
[root@ip-172-30-15-111 ec2-user]# ps -ef | grep lsnr
oracle    154895       1  0 18:15 ?        00:00:00 /u01/app/oracle/product/19.0.0/NTAP/bin/tnslsnr listener.ntap -inherit
root      217779  120186  0 19:36 pts/0    00:00:00 grep --color=auto lsnr
[root@ip-172-30-15-111 ec2-user]# kill -9 154895

[root@ip-172-30-15-111 ec2-user]# su - oracle
Last login: Thu Sep 19 14:58:54 UTC 2024
[oracle@ip-172-30-15-111 ~]$ lsnrctl status listener.ntap

LSNRCTL for Linux: Version 19.0.0.0.0 - Production on 13-SEP-2024 19:36:51

Copyright (c) 1991, 2022, Oracle.  All rights reserved.

Connecting to (DESCRIPTION=(ADDRESS=(PROTOCOL=TCP)(HOST=172.30.15.33)(PORT=1521)))
TNS-12541: TNS:no listener
 TNS-12560: TNS:protocol adapter error
  TNS-00511: No listener
   Linux Error: 111: Connection refused
Connecting to (DESCRIPTION=(ADDRESS=(PROTOCOL=IPC)(KEY=EXTPROC1521)))
TNS-12541: TNS:no listener
 TNS-12560: TNS:protocol adapter error
  TNS-00511: No listener
   Linux Error: 111: Connection refused

[oracle@ip-172-30-15-111 ~]$ lsnrctl status listener.ntap

LSNRCTL for Linux: Version 19.0.0.0.0 - Production on 19-SEP-2024 15:00:10

Copyright (c) 1991, 2022, Oracle.  All rights reserved.

Connecting to (DESCRIPTION=(ADDRESS=(PROTOCOL=TCP)(HOST=172.30.15.33)(PORT=1521)))
STATUS of the LISTENER
------------------------
Alias                     listener.ntap
Version                   TNSLSNR for Linux: Version 19.0.0.0.0 - Production
Start Date                16-SEP-2024 14:00:14
Uptime                    3 days 0 hr. 59 min. 56 sec
Trace Level               off
Security                  ON: Local OS Authentication
SNMP                      OFF
Listener Parameter File   /u01/app/oracle/product/19.0.0/NTAP/network/admin/listener.ora
Listener Log File         /u01/app/oracle/diag/tnslsnr/ip-172-30-15-111/listener.ntap/alert/log.xml
Listening Endpoints Summary...
  (DESCRIPTION=(ADDRESS=(PROTOCOL=tcp)(HOST=172.30.15.33)(PORT=1521)))
  (DESCRIPTION=(ADDRESS=(PROTOCOL=ipc)(KEY=EXTPROC1521)))
  (DESCRIPTION=(ADDRESS=(PROTOCOL=tcps)(HOST=ip-172-30-15-111.ec2.internal)(PORT=5500))(Security=(my_wallet_directory=/u01/app/oracle/product/19.0.0/NTAP/admin/NTAP/xdb_wallet))(Presentation=HTTP)(Session=RAW))
Services Summary...
Service "21f0b5cc1fa290e2e0636f0f1eacfd43.ec2.internal" has 1 instance(s).
  Instance "NTAP", status READY, has 1 handler(s) for this service...
Service "21f0b74445329119e0636f0f1eacec03.ec2.internal" has 1 instance(s).
  Instance "NTAP", status READY, has 1 handler(s) for this service...
Service "21f0b83929709164e0636f0f1eacacc3.ec2.internal" has 1 instance(s).
  Instance "NTAP", status READY, has 1 handler(s) for this service...
Service "NTAP.ec2.internal" has 1 instance(s).
  Instance "NTAP", status READY, has 1 handler(s) for this service...
Service "NTAPXDB.ec2.internal" has 1 instance(s).
  Instance "NTAP", status READY, has 1 handler(s) for this service...
Service "ntap_pdb1.ec2.internal" has 1 instance(s).
  Instance "NTAP", status READY, has 1 handler(s) for this service...
Service "ntap_pdb2.ec2.internal" has 1 instance(s).
  Instance "NTAP", status READY, has 1 handler(s) for this service...
Service "ntap_pdb3.ec2.internal" has 1 instance(s).
  Instance "NTAP", status READY, has 1 handler(s) for this service...
The command completed successfully
-
pmon 프로세스를 종료하여 데이터베이스 오류를 시뮬레이션하고 PCS가 데이터 오류를 모니터링하고 몇 초 안에 다시 시작하는지 확인합니다.
**Make a remote connection to ntap database**

[oracle@ora_01 ~]$ sqlplus system@//172.30.15.33:1521/NTAP.ec2.internal

SQL*Plus: Release 19.0.0.0.0 - Production on Fri Sep 13 15:42:42 2024
Version 19.18.0.0.0

Copyright (c) 1982, 2022, Oracle.  All rights reserved.

Enter password:
Last Successful login time: Thu Sep 12 2024 13:37:28 -04:00

Connected to:
Oracle Database 19c Enterprise Edition Release 19.0.0.0.0 - Production
Version 19.18.0.0.0

SQL> select instance_name, host_name from v$instance;

INSTANCE_NAME
----------------
HOST_NAME
----------------------------------------------------------------
NTAP
ip-172-30-15-111.ec2.internal


SQL>

**Kill ntap pmon process to simulate a failure**

[root@ip-172-30-15-111 ec2-user]# ps -ef | grep pmon
oracle    159247       1  0 18:27 ?        00:00:00 ora_pmon_NTAP
root      230595  120186  0 19:44 pts/0    00:00:00 grep --color=auto pmon
[root@ip-172-30-15-111 ec2-user]# kill -9 159247

**Observe the DB failure**

SQL> /
select instance_name, host_name from v$instance
*
ERROR at line 1:
ORA-03113: end-of-file on communication channel
Process ID: 227424
Session ID: 396 Serial number: 4913


SQL> exit
Disconnected from Oracle Database 19c Enterprise Edition Release 19.0.0.0.0 - Production
Version 19.18.0.0.0

**Reconnect to DB after reboot**

[oracle@ora_01 ~]$ sqlplus system@//172.30.15.33:1521/NTAP.ec2.internal

SQL*Plus: Release 19.0.0.0.0 - Production on Fri Sep 13 15:47:24 2024
Version 19.18.0.0.0

Copyright (c) 1982, 2022, Oracle.  All rights reserved.

Enter password:
Last Successful login time: Fri Sep 13 2024 15:42:47 -04:00

Connected to:
Oracle Database 19c Enterprise Edition Release 19.0.0.0.0 - Production
Version 19.18.0.0.0

SQL> select instance_name, host_name from v$instance;

INSTANCE_NAME
----------------
HOST_NAME
----------------------------------------------------------------
NTAP
ip-172-30-15-111.ec2.internal


SQL>
-
기본 노드를 대기 모드로 전환하여 Oracle 리소스를 대기 노드로 장애 조치하여 기본 노드에서 대기 노드로 관리형 데이터베이스 장애 조치를 검증합니다.
pcs node standby <nodename>**Stopping Oracle resources on primary node in reverse order** [root@ip-172-30-15-111 ec2-user]# pcs node standby ip-172-30-15-111.ec2.internal [root@ip-172-30-15-111 ec2-user]# pcs status Cluster name: ora_ec2nfsx Cluster Summary: * Stack: corosync (Pacemaker is running) * Current DC: ip-172-30-15-111.ec2.internal (version 2.1.7-5.1.el8_10-0f7f88312) - partition with quorum * Last updated: Fri Sep 13 20:01:16 2024 on ip-172-30-15-111.ec2.internal * Last change: Fri Sep 13 20:01:08 2024 by root via root on ip-172-30-15-111.ec2.internal * 2 nodes configured * 8 resource instances configured Node List: * Node ip-172-30-15-111.ec2.internal: standby (with active resources) * Online: [ ip-172-30-15-5.ec2.internal ] Full List of Resources: * clusterfence (stonith:fence_aws): Started ip-172-30-15-5.ec2.internal * Resource Group: oracle: * privip (ocf::heartbeat:awsvip): Started ip-172-30-15-111.ec2.internal * vip (ocf::heartbeat:IPaddr2): Started ip-172-30-15-111.ec2.internal * u01 (ocf::heartbeat:Filesystem): Stopping ip-172-30-15-111.ec2.internal * u02 (ocf::heartbeat:Filesystem): Stopped * u03 (ocf::heartbeat:Filesystem): Stopped * ntap (ocf::heartbeat:oracle): Stopped * listener (ocf::heartbeat:oralsnr): Stopped Daemon Status: corosync: active/enabled pacemaker: active/enabled pcsd: active/enabled **Starting Oracle resources on standby node in sequencial order** [root@ip-172-30-15-111 ec2-user]# pcs status Cluster name: ora_ec2nfsx Cluster Summary: * Stack: corosync (Pacemaker is running) * Current DC: ip-172-30-15-111.ec2.internal (version 2.1.7-5.1.el8_10-0f7f88312) - partition with quorum * Last updated: Fri Sep 13 20:01:34 2024 on ip-172-30-15-111.ec2.internal * Last change: Fri Sep 13 20:01:08 2024 by root via root on ip-172-30-15-111.ec2.internal * 2 nodes configured * 8 resource instances configured Node List: * Node ip-172-30-15-111.ec2.internal: standby * Online: [ ip-172-30-15-5.ec2.internal ] Full List of Resources: * clusterfence (stonith:fence_aws): Started ip-172-30-15-5.ec2.internal * Resource Group: oracle: * privip (ocf::heartbeat:awsvip): Started ip-172-30-15-5.ec2.internal * vip (ocf::heartbeat:IPaddr2): Started ip-172-30-15-5.ec2.internal * u01 (ocf::heartbeat:Filesystem): Started ip-172-30-15-5.ec2.internal * u02 (ocf::heartbeat:Filesystem): Started ip-172-30-15-5.ec2.internal * u03 (ocf::heartbeat:Filesystem): Started ip-172-30-15-5.ec2.internal * ntap (ocf::heartbeat:oracle): Starting ip-172-30-15-5.ec2.internal * listener (ocf::heartbeat:oralsnr): Stopped Daemon Status: corosync: active/enabled pacemaker: active/enabled pcsd: active/enabled **NFS mount points mounted on standby node** [root@ip-172-30-15-5 ec2-user]# df -h Filesystem Size Used Avail Use% Mounted on devtmpfs 7.7G 0 7.7G 0% /dev tmpfs 7.7G 33M 7.7G 1% /dev/shm tmpfs 7.7G 17M 7.7G 1% /run tmpfs 7.7G 0 7.7G 0% /sys/fs/cgroup /dev/xvda2 50G 21G 30G 41% / tmpfs 1.6G 0 1.6G 0% /run/user/1000 172.30.15.95:/orapm01_u01 48T 47T 840G 99% /u01 172.30.15.95:/orapm01_u02 285T 285T 840G 100% /u02 172.30.15.95:/orapm01_u03 190T 190T 840G 100% /u03 tmpfs 1.6G 0 1.6G 0% /run/user/54321 **Database opened on standby node** [oracle@ora_01 ~]$ sqlplus system@//172.30.15.33:1521/NTAP.ec2.internal SQL*Plus: Release 19.0.0.0.0 - Production on Fri Sep 13 16:34:08 2024 Version 19.18.0.0.0 Copyright (c) 1982, 2022, Oracle. All rights reserved. Enter password: Last Successful login time: Fri Sep 13 2024 15:47:28 -04:00 Connected to: Oracle Database 19c Enterprise Edition Release 19.0.0.0.0 - Production Version 19.18.0.0.0 SQL> select name, open_mode from v$database; NAME OPEN_MODE --------- -------------------- NTAP READ WRITE SQL> select instance_name, host_name from v$instance; INSTANCE_NAME ---------------- HOST_NAME ---------------------------------------------------------------- NTAP ip-172-30-15-5.ec2.internal SQL> -
대기 노드에서 기본 노드로 관리형 데이터베이스 장애 복구를 검증하고 기본 노드 설정에 따라 Oracle 리소스가 자동으로 장애 복구되는지 확인합니다.
pcs node unstandby <nodename>**Stopping Oracle resources on standby node for failback to primary** [root@ip-172-30-15-111 ec2-user]# pcs node unstandby ip-172-30-15-111.ec2.internal [root@ip-172-30-15-111 ec2-user]# pcs status Cluster name: ora_ec2nfsx Cluster Summary: * Stack: corosync (Pacemaker is running) * Current DC: ip-172-30-15-111.ec2.internal (version 2.1.7-5.1.el8_10-0f7f88312) - partition with quorum * Last updated: Fri Sep 13 20:41:30 2024 on ip-172-30-15-111.ec2.internal * Last change: Fri Sep 13 20:41:18 2024 by root via root on ip-172-30-15-111.ec2.internal * 2 nodes configured * 8 resource instances configured Node List: * Online: [ ip-172-30-15-5.ec2.internal ip-172-30-15-111.ec2.internal ] Full List of Resources: * clusterfence (stonith:fence_aws): Started ip-172-30-15-5.ec2.internal * Resource Group: oracle: * privip (ocf::heartbeat:awsvip): Stopping ip-172-30-15-5.ec2.internal * vip (ocf::heartbeat:IPaddr2): Stopped * u01 (ocf::heartbeat:Filesystem): Stopped * u02 (ocf::heartbeat:Filesystem): Stopped * u03 (ocf::heartbeat:Filesystem): Stopped * ntap (ocf::heartbeat:oracle): Stopped * listener (ocf::heartbeat:oralsnr): Stopped Daemon Status: corosync: active/enabled pacemaker: active/enabled pcsd: active/enabled **Starting Oracle resources on primary node for failback** [root@ip-172-30-15-111 ec2-user]# pcs status Cluster name: ora_ec2nfsx Cluster Summary: * Stack: corosync (Pacemaker is running) * Current DC: ip-172-30-15-111.ec2.internal (version 2.1.7-5.1.el8_10-0f7f88312) - partition with quorum * Last updated: Fri Sep 13 20:41:45 2024 on ip-172-30-15-111.ec2.internal * Last change: Fri Sep 13 20:41:18 2024 by root via root on ip-172-30-15-111.ec2.internal * 2 nodes configured * 8 resource instances configured Node List: * Online: [ ip-172-30-15-5.ec2.internal ip-172-30-15-111.ec2.internal ] Full List of Resources: * clusterfence (stonith:fence_aws): Started ip-172-30-15-5.ec2.internal * Resource Group: oracle: * privip (ocf::heartbeat:awsvip): Started ip-172-30-15-111.ec2.internal * vip (ocf::heartbeat:IPaddr2): Started ip-172-30-15-111.ec2.internal * u01 (ocf::heartbeat:Filesystem): Started ip-172-30-15-111.ec2.internal * u02 (ocf::heartbeat:Filesystem): Started ip-172-30-15-111.ec2.internal * u03 (ocf::heartbeat:Filesystem): Started ip-172-30-15-111.ec2.internal * ntap (ocf::heartbeat:oracle): Starting ip-172-30-15-111.ec2.internal * listener (ocf::heartbeat:oralsnr): Stopped Daemon Status: corosync: active/enabled pacemaker: active/enabled pcsd: active/enabled **Database now accepts connection on primary node** [oracle@ora_01 ~]$ sqlplus system@//172.30.15.33:1521/NTAP.ec2.internal SQL*Plus: Release 19.0.0.0.0 - Production on Fri Sep 13 16:46:07 2024 Version 19.18.0.0.0 Copyright (c) 1982, 2022, Oracle. All rights reserved. Enter password: Last Successful login time: Fri Sep 13 2024 16:34:12 -04:00 Connected to: Oracle Database 19c Enterprise Edition Release 19.0.0.0.0 - Production Version 19.18.0.0.0 SQL> select instance_name, host_name from v$instance; INSTANCE_NAME ---------------- HOST_NAME ---------------------------------------------------------------- NTAP ip-172-30-15-111.ec2.internal SQL>
이로써 Pacemaker 클러스터링과 Amazon FSx ONTAP 데이터베이스 스토리지 백엔드로 사용하여 AWS EC2에서 Oracle HA 검증 및 솔루션 데모가 완료되었습니다.
SnapCenter 사용한 Oracle 백업, 복원 및 복제
Details
NetApp AWS EC2와 Amazon FSx ONTAP 에 배포된 Oracle 데이터베이스를 관리하기 위해 SnapCenter UI 도구를 권장합니다. TR-4979를 참조하세요"게스트 마운트 FSx ONTAP 통해 AWS에서 VMware Cloud의 간소화된 자체 관리형 Oracle" 부분 Oracle backup, restore, and clone with SnapCenter SnapCenter 설정 및 데이터베이스 백업, 복원, 복제 워크플로우 실행에 대한 자세한 내용은 다음을 참조하세요.
추가 정보를 찾을 수 있는 곳
이 문서에 설명된 정보에 대해 자세히 알아보려면 다음 문서 및/또는 웹사이트를 검토하세요.