

Investigate data in your organization with NetApp Data Classification
 Suggest changes
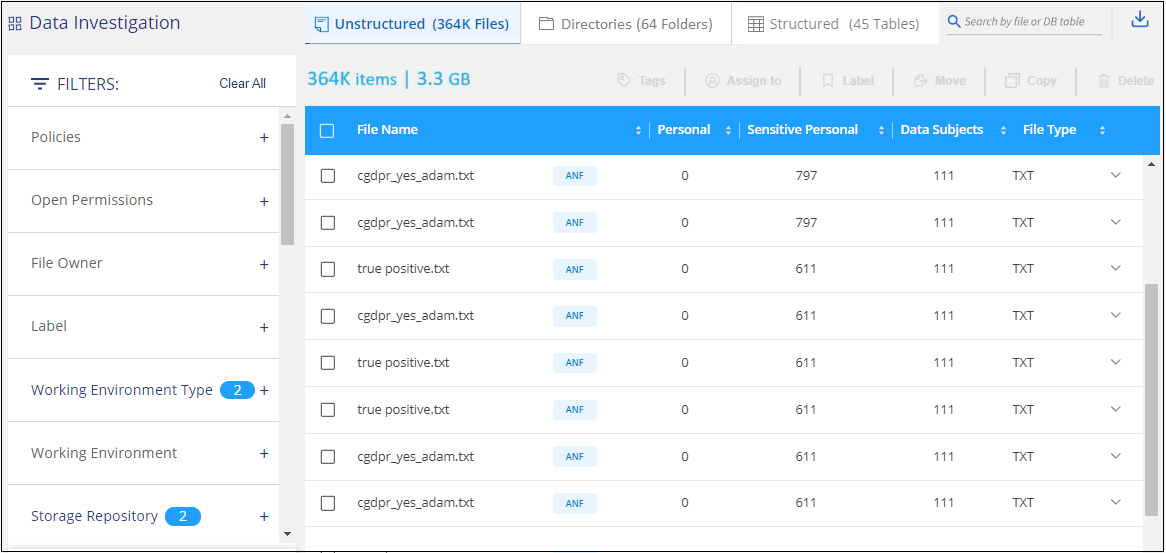
The Data Investigation dashboard displays file and directory-level insights into your data, enabling you to sort and filter results. The Data Investigation page presents insights into file and directory metadata and permissions as well as identifying duplicate files. With file-, directory-, and database-level insights, you can take actions to improve the compliance of your organization and save storage space. The Data Investigation page also supports moving, copying, and deleting files.

|
To gain insights from the Investigation page, you must perform a full classification scan on your data sources. Data sources that have had a map-only scan do not show file-level details. |
Data investigation structure
The Data Investigation page sorts data into three tabs:
-
Unstructured data: file data
-
Directories: folders and file shares
-
Structured: database
Data filters
The Data Investigation page provides numerous filters to sort through your data so you can what you need. You can use multiple filters in concert.
To add a filter, select the Add filter button.
Filter sensitivity and content
Use the following filters to view how much sensitive information is contained in your data.
| Filter | Details |
|---|---|
Category |
Select the types of categories. |
Sensitivity Level |
Select the sensitivity level: Personal, Sensitive personal, or Non sensitive. |
Number of identifiers |
Select the range of detected sensitive identifiers per file. Includes personal data and sensitive personal data. When filtering in Directories, Data Classification totals the matches from all files in each folder (and sub-folders). |
Personal Data |
Select the types of personal data. |
Sensitive Personal Data |
Select the types of sensitive personal data. |
Data Subject |
Enter a data subject's full name or known identifier. Learn more about data subjects here. |
Filter user owner and user permissions
Use the following filters to view file owners and permissions to access your data.
| Filter | Details |
|---|---|
Open Permissions |
Select the type of permissions within the data and within folders/shares. |
User / Group Permissions |
Select one or multiple user names and/or group names, or enter a partial name. |
File Owner |
Enter the file owner name. |
Number of users with access |
Select one or multiple category ranges to show which files and folders are open to a certain number of users. |
Filter chronologically
Use the following filters to view data based on time criteria.
| Filter | Details |
|---|---|
Created Time |
Select a time range when the file was created. You can also specify a custom time range to further refine the search results. |
Discovered Time |
Select a time range when Data Classification discovered the file. You can also specify a custom time range to further refine the search results. |
Last Modified |
Select a time range when the file was last modified. You can also specify a custom time range to further refine the search results. |
Last Accessed |
Select a time range when the file or directory* was last accessed. You can also specify a custom time range to further refine the search results. For the types of files that Data Classification scans, this is the last time Data Classification scanned the file. |
* Last accessed time for a directory is only available for NFS or CIFS shares.
Filter metadata
Use the following filters to view data based on location, size, and directory or file type.
| Filter | Details |
|---|---|
File Path |
Enter up to 20 partial or full paths that you want to include or exclude from the query. If you enter both include paths and exclude paths, Data Classification finds all files in the included paths first, then it removes files from excluded paths, and then it displays the results. Note that using "*" in this filter has no effect, and that you can't exclude specific folders from the scan - all the directories and files under a configured share will be scanned. |
Directory Type |
Select the directory type; either "Share" or "Folder". |
File Type |
Select the types of files. |
File Size |
Select the file size range. |
File Hash |
Enter the file's hash to find a specific file, even if the name is different. |
Filter storage type
Use the following filters to view data by storage type.
| Filter | Details |
|---|---|
System type |
Select the type of system. |
System environment name |
Select specific systems. |
Storage Repository |
Select the storage repository, for example, a volume or a schema. |
Filter query
Use the following filter to view data by saved queries.
| Filter | Details |
|---|---|
Saved query |
Select one saved query or multiples. Go to the saved queries tab to view the list of existing saved queries and create new ones. |
Tags |
Select the tag or tags that are assigned to your files. |
Filter analysis status
Use the following filter to view data by the Data Classification scan status.
| Filter | Details |
|---|---|
Analysis Status |
Select an option to show the list of files that are Pending First Scan, Completed being scanned, Pending Rescan, or that have Failed to be scanned. |
Scan Analysis Event |
Select whether you want to view files that were not classified because Data Classification couldn't revert last accessed time, or files that were classified even though Data Classification couldn't revert last accessed time. |
See details about the "last accessed time" timestamp for more information about the items that appear in the Investigation page when filtering using the Scan Analysis Event.
Filter data by duplicates
Use the following filter to view files that are duplicated in your storage.
| Filter | Details |
|---|---|
Duplicates |
Select whether the file is duplicated in the repositories. |

|
After filtering data, you can copy, move, and delete unstructured files to improve compliance or optimize storage. |
View file metadata
In addition to showing you the system and volume where the file resides, the metadata shows much more information, including the file permissions, file owner, and whether there are duplicates of this file. This information is useful if you're planning to create saved queries because you can see all the information that you can use to filter your data.
The availability of information depends on the data source. For example, volume name and permissions are not shared for database files.
-
From the Data Classification menu, select Investigation.
-
In the Data Investigation list on the right, select the down-caret
 on the right for any single file to view the file metadata.
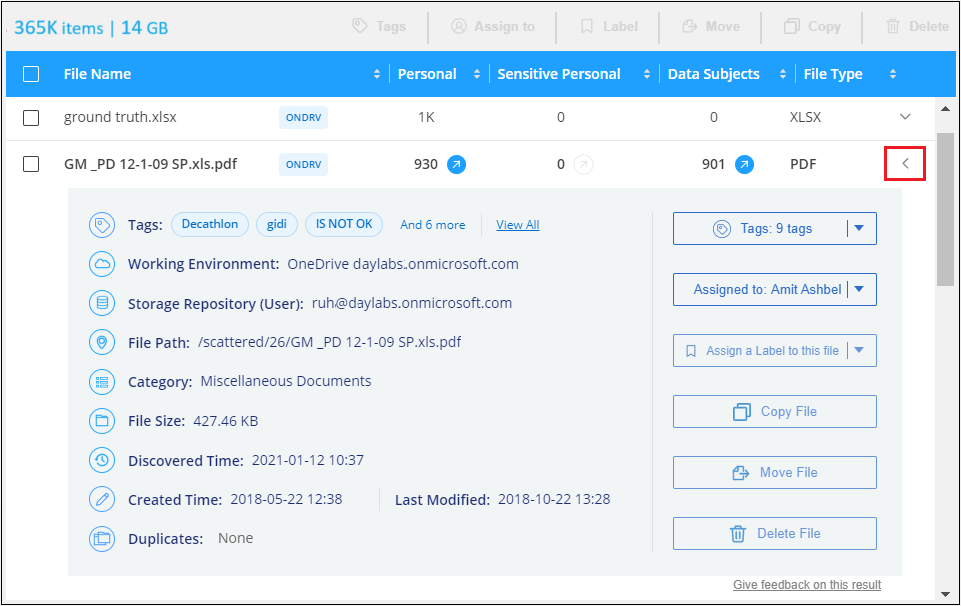
-
Optionally, you can create or add a tag to the file with the Create tag button. Select an existing tag from the dropdown menu or add a new tag with the + Add button. Tags can be used to filter data.
View user permissions for files and directories
To view a list of all users or groups who have access to a file or to a directory and the types of permissions they have, select View all Permissions. This option is available only for data in CIFS shares.
If you security identifiers (SIDs) instead of user and group names, you should integrate your Active Directory into Data Classification. For more information, see add Active Directory to Data Classification.
-
From the Data Classification menu, select Investigation.
-
In the Data Investigation list on the right, select the down-caret
on the right for any single file to view the file metadata. -
To view a list of all users or groups who have access to a file or to a directory and the types of permissions they have, in the Open Permissions field, select View all Permissions.
Data Classification shows up to 100 users in the list. -
Select the down-caret
button for any group to see the list of users who are part of the group.
You can expand one level of the group to see the users who are part of the group. -
Select the name of a user or group to refresh the Investigation page so you can see all the files and directories that the user or group has access to.
Check for duplicate files in your storage systems
You can check whether duplicate files are being stored in your storage systems. This is useful if you want to identify areas where you can save storage space. It's also good to ensure certain files that have specific permissions or sensitive information are not unnecessarily duplicated in your storage systems.
Data Classification compares all files (excluding databases) for duplicates if they are:
-
1 MB or lager
-
Or contain personal or sensitive personal information
Data Classification uses hashing technology to determine duplicate files. If any file has the same hash code as another file, the files are exact duplicates even if the file names are different.
-
From the Data Classification menu, select Investigation.
-
In Filter pane, select "File Size" along with "Duplicates" ("Has duplicates") to see which files of a certain size range are duplicated in your environment.
-
Optionally, download the list of duplicate files and send it to your storage administrator so they can decide which files, if any, can be deleted.
-
Optionally, you can delete, tag, or move the duplicate files. Select the files you want to perform an action on, then select the appropriate action.
View if a specific file is duplicated
You can see if a single file has duplicates.
-
From the Data Classification menu, select Investigation.
-
In the Data Investigation list, select
on the right for any single file to view the file metadata.If duplicates exist for a file, this information appears next to the Duplicates field.
-
To view the list of duplicate files and where they are located, select View Details.
-
In the next page select View Duplicates to view the files in the Investigation page.
-
Optionally, you can delete, tag, or move the duplicate files. Select the files you want to perform an action on, then select the appropriate action.
|
|
You can use the "file hash" value provided in this page and enter it directly in the Investigation page to search for a specific duplicate file at any time - or you can use it in a saved query. |
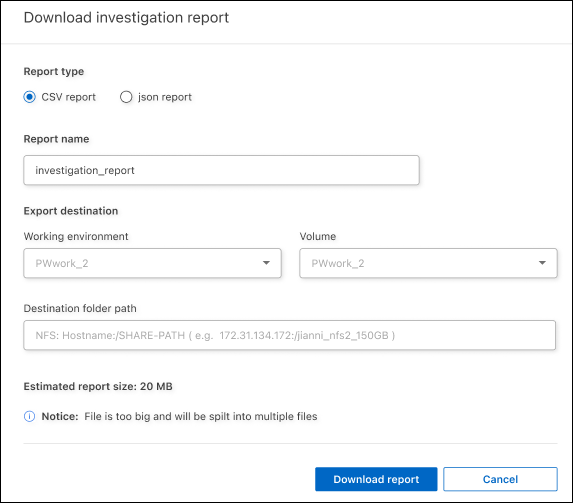
Download your report
You can download your filtered results in a CSV or JSON format.
There can be up to three report files downloaded if Data Classification is scanning files (unstructured data), directories (folders and file shares), and databases (structured data).
The files are split into files with a fixed number of rows or records:
-
JSON: 100,000 records per report that takes about 5 minutes to generate
-
CSV: 200,000 records per report that takes about 4 minutes to generate
|
|
You can download a version of the CSV file to view in this browser. This version is limited to 10,000 records. |
What's included in the downloadable report
The Unstructured Files Data Report includes the following information about your files:
-
File name
-
Location type
-
System name
-
Storage repository (for example, a volume, bucket, shares)
-
Repository type
-
File path
-
File type
-
File size (in MB)
-
Created time
-
Last modified
-
Last accessed
-
File owner
-
File owner data encompasses account name, SAM account name, and e-mail address when Active Directory is configured.
-
-
Category
-
Personal information
-
Sensitive personal information
-
Open permissions
-
Scan Analysis Error
-
Deletion detection date
The deletion detection date identifies the date that the file was deleted or moved. This enables you to identify when sensitive files have been moved. Deleted files don't contribute to the file number count that appears in the dashboard or on the Investigation page. The files only appear in the CSV reports.
The Unstructured Directories Data Report includes the following information about your folders and file shares:
-
System type
-
System name
-
Directory name
-
Storage repository (for example, a folder or file shares)
-
Directory owner
-
Created time
-
Discovered time
-
Last modified
-
Last accessed
-
Open permissions
-
Directory type
The Structured Data Report includes the following information about your database tables:
-
DB Table name
-
Location type
-
System name
-
Storage repository (for example, a schema)
-
Column count
-
Row count
-
Personal information
-
Sensitive personal information
-
From the Data Investigation page, select the
 button on the top, right of the page.
 -
Choose the report type: CSV or JSON.
-
Enter a Report name.
-
To download the complete report, select System then choose the System and Volume from the respective dropdown menus. Provide a Destination folder path.
To download the report in the browser, select Local . Note this option limits the report to the first 10,000 rows and is limited to the CSV format. You don't need to complete any other fields if you select Local.
-
Select Download Report.
A dialog displays a message that the reports are being downloaded.
Create a saved query based on selected filters
-
In the Investigation tab, define a search by selecting the filters you want to use. See Filtering data in the Investigation page for details.
-
Once you have all the filter characteristics set to your liking, select Save query.

-
Name the saved query and add a description. The name must be unique.
-
You can optionally save the query as policy:
-
To save the query as a policy, switch the Run as a policy toggle.
-
Choose to Delete permanently or Send email updates. If you choose email updates, you can email the query results to all Console users at daily, weekly, or monthly. Alternately, you can send the notification to specific email address at the same frequencies.
-
-
Select Save.

Once you've created the search or policy, you can view it in the Saved queries tab.
|
|
It can take up to 15 minutes for the results to appear on the Saved Queries page. |