

Get help
 Suggest changes
NetApp provides support for NetApp Console and its cloud services in a variety of ways. Extensive free self-support options are available 24/7, such as knowledge base (KB) articles and a community forum. Your support registration includes remote technical support via web ticketing.
Get support for a cloud provider file service
For technical support related to a cloud provider file service, its infrastructure, or any solution using the service, refer to the documentation for that product.
To receive technical support specific to NetApp and its storage solutions and data services, use the support options described below.
Use self-support options
These options are available for free, 24 hours a day, 7 days a week:
-
Documentation
The NetApp Console documentation that you're currently viewing.
-
Search through the NetApp knowledge base to find helpful articles to troubleshoot issues.
-
Join the NetApp Console community to follow ongoing discussions or create new ones.
Create a case with NetApp support
In addition to the self-support options above, you can work with a NetApp Support specialist to resolve any issues after you activate support.
-
To use the Create a Case capability, you must first associate your NetApp Support Site credentials with your Console login. Learn how to manage credentials associated with your Console login.
-
If you're opening a case for an ONTAP system that has a serial number, then your NSS account must be associated with the serial number for that system.
-
In NetApp Console, select Help > Support.
-
On the Resources page, choose one of the available options under Technical Support:
-
Select Call Us if you'd like to speak with someone on the phone. You'll be directed to a page on netapp.com that lists the phone numbers that you can call.
-
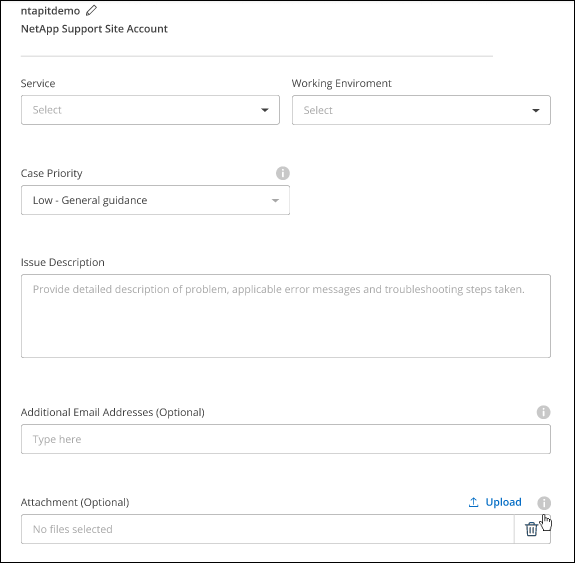
Select Create a Case to open a ticket with a NetApp Support specialist:
-
Service: Select the service that the issue is associated with. For example, NetApp Console when specific to a technical support issue with workflows or functionality within the Console.
-
System: If applicable to storage, select Cloud Volumes ONTAP or On-Prem and then the associated working environment.
The list of systems are within scope of the Console organization, and Console agent you have selected in the top banner.
-
Case Priority: Choose the priority for the case, which can be Low, Medium, High, or Critical.
To learn more details about these priorities, hover your mouse over the information icon next to the field name.
-
Issue Description: Provide a detailed description of your problem, including any applicable error messages or troubleshooting steps that you performed.
-
Additional Email Addresses: Enter additional email addresses if you'd like to make someone else aware of this issue.
-
Attachment (Optional): Upload up to five attachments, one at a time.
Attachments are limited to 25 MB per file. The following file extensions are supported: txt, log, pdf, jpg/jpeg, rtf, doc/docx, xls/xlsx, and csv.
-
-
A pop-up will appear with your support case number. A NetApp Support specialist will review your case and get back to you soon.
For a history of your support cases, you can select Settings > Timeline and look for actions named "create support case." A button to the far right lets you expand the action to see details.
It's possible that you might encounter the following error message when trying to create a case:
"You are not authorized to Create a Case against the selected service"
This error could mean that the NSS account and the company of record it's associated with is not the same company of record for the NetApp Console account serial number (ie. 960xxxx) or the working environment serial number. You can seek assistance using one of the following options:
-
Submit a non-technical case at https://mysupport.netapp.com/site/help
Manage your support cases
You can view and manage active and resolved support cases directly from the Console. You can manage the cases associated with your NSS account and with your company.
Note the following:
-
The case management dashboard at the top of the page offers two views:
-
The view on the left shows the total cases opened in the past 3 months by the user NSS account you provided.
-
The view on the right shows the total cases opened in the past 3 months at your company level based on your user NSS account.
The results in the table reflect the cases related to the view that you selected.
-
-
You can add or remove columns of interest and you can filter the contents of columns like Priority and Status. Other columns provide just sorting capabilities.
View the steps below for more details.
-
At a per-case level, we offer the ability to update case notes or close a case that is not already in Closed or Pending Closed status.
-
In the NetApp Console, select Help > Support.
-
Select Case Management and if you're prompted, add your NSS account to the Console.
The Case management page shows open cases related to the NSS account that is associated with your Console user account. This is the same NSS account that appears at the top of the NSS management page.
-
Optionally modify the information that displays in the table:
-
Under Organization's cases, select View to view all cases associated with your company.
-
Modify the date range by choosing an exact date range or by choosing a different time frame.
-
Filter the contents of the columns.
-
Change the columns that appear in the table by selecting
 and then choosing the columns that you'd like to display.
-
-
Manage an existing case by selecting
 and selecting one of the available options:
-
View case: View full details about a specific case.
-
Update case notes: Provide additional details about your problem or select Upload files to attach up to a maximum of five files.
Attachments are limited to 25 MB per file. The following file extensions are supported: txt, log, pdf, jpg/jpeg, rtf, doc/docx, xls/xlsx, and csv.
-
Close case: Provide details about why you're closing the case and select Close case.
-