

Configuring an Agent to Collect Data (Windows/Linux)
 Suggest changes
Data Infrastructure Insights uses Telegraf as its agent for collection of integration data. Telegraf is a plugin-driven server agent that can be used to collect and report metrics, events, and logs. Input plugins are used to collect the desired information into the agent by accessing the system/OS directly, by calling third-party APIs, or by listening to configured streams (i.e. Kafka, statsD, etc). Output plugins are used to send the collected metrics, events, and logs from the agent to Data Infrastructure Insights.
For information on installing on Kubernetes, see the NetApp Kubernetes Monitoring Operator page.

|
For accurate audit and data reporting, it is strongly recommended to synchronize the time on the Agent machine using Network Time Protocol (NTP) or Simple Network Time Protocol (SNTP). |
|
|
If you want to verify the installation files before installing the Agent, see the section below on Verifying Telegraf Package Checksums. |
Installing an Agent
If you are installing a Service data collector and have not yet configured an Agent, you are prompted to first install an Agent for the appropriate Operating System. This topic provides instructions for installing the Telegraf agent on the following Operating Systems:
To install an agent, regardless of the platform you are using, you must first do the following:
-
Log into the host you will use for your agent.
-
Log in to your Data Infrastructure Insights environment and navigate to Observability > Collectors.
-
Click on +Data Collector and choose a data collector to install.
-
Choose the appropriate platform for your host (Windows, Linux)
-
Follow the remaining steps for each platform.
|
|
Once you have installed an agent on a host, you do not need to install an agent again on that host. |

|
Once you have installed an agent on a server/VM, Data Infrastructure Insights collects metrics from that system in addition to collecting from any data collectors you configure. These metrics are gathered as "Node" metrics. |
|
|
If you are using a proxy, read the proxy instructions for your platform before installing the Telegraf agent. |
Log Locations
Telegraf log messages are redirected from stdout to the following log files be default:
-
RHEL/CentOS: /var/log/telegraf/telegraf.log
-
Ubuntu/Debian: /var/log/telegraf/telegraf.log
-
Windows: C:\Program Files\telegraf\telegraf.log
Windows
Pre-requisites:
-
PowerShell must be installed
-
If you are behind a proxy, you must follow the instructions in the Configuring Proxy Support for Windows section.
Configuring Proxy Support for Windows
|
|
If your environment uses a proxy, read this section before you install. |
|
|
The steps below outline the actions needed to set the http_proxy/https_proxy environment variables. For some proxy environments, users may also need to set the no_proxy environment variable. |
For systems residing behind a proxy, perform the following to set the https_proxy and/or http_proxy environment variable(s) PRIOR to installing the Telegraf agent:
[System.Environment]:SetEnvironmentVariable(“https_proxy”, “<proxy_server>:<proxy_port>”, [System.EnvironmentVariableTarget]:Machine)
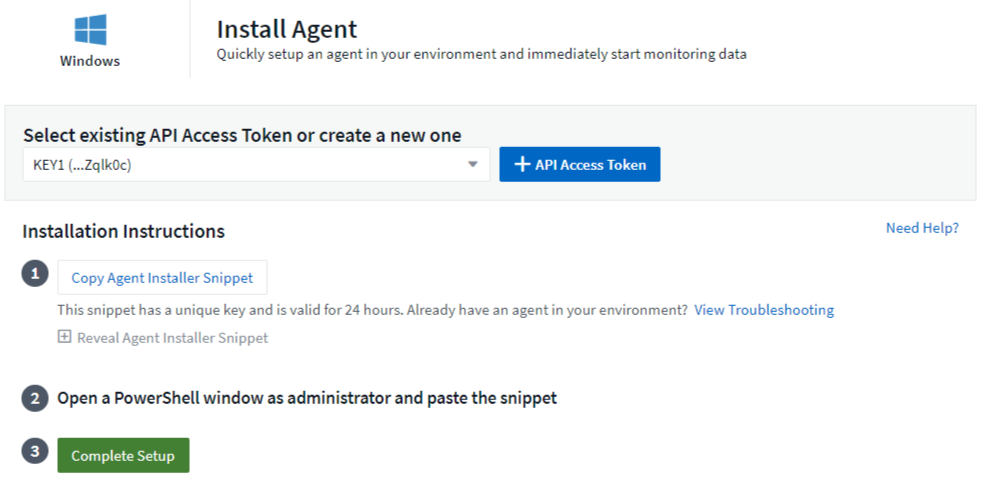
Installing the agent
-
Choose an Agent Access Key.
-
Copy the command block from the agent installation dialog. You can click the clipboard icon to quickly copy the command to the clipboard.
-
Open a PowerShell window
-
Paste the command into the PowerShell window and press Enter.
-
The command will download the appropriate agent installer, install it, and set a default configuration. When finished, it will restart the agent service. The command has a unique key and is valid for 24 hours.
-
Click Finish or Continue
After the agent is installed, you can use the following commands to start/stop the service:
Start-Service telegraf
Stop-Service telegraf
Uninstalling the Agent
To uninstall the agent on Windows, do the following in a PowerShell window:
-
Stop and delete the Telegraf service:
Stop-Service telegraf
sc.exe delete telegraf
-
Remove the certificate from the trustore:
cd Cert:\CurrentUser\Root
//rm E5FB7B68C08B1CA902708584C274F8EFC7BE8ABC
rm 1A918038E8E127BB5C87A202DF173B97A05B4996
-
Delete the C:\Program Files\telegraf folder to remove the binary, logs, and configuration files
-
Remove the SYSTEM\CurrentControlSet\Services\EventLog\Application\telegraf key from the registry
Upgrading the Agent
To upgrade the telegraf agent, do the following:
-
Stop and delete the telegraf service:
Stop-Service telegraf
sc.exe delete telegraf
-
Delete the SYSTEM\CurrentControlSet\Services\EventLog\Application\telegraf key from the registry
-
Delete C:\Program Files\telegraf\telegraf.conf
-
Delete C:\Program Files\telegraf\telegraf.exe
RHEL and CentOS
Pre-requisites:
-
The following commands must be available: curl, sudo, ping, sha256sum, openssl, and dmidecode
-
If you are behind a proxy, you must follow the instructions in the Configuring Proxy Support for RHEL/CentOS section.
Configuring Proxy Support for RHEL/CentOS
|
|
If your environment uses a proxy, read this section before you install. |
|
|
The steps below outline the actions needed to set the http_proxy/https_proxy environment variables. For some proxy environments, users may also need to set the no_proxy environment variable. |
For systems residing behind a proxy, perform the following steps PRIOR to installing the Telegraf agent:
-
Set the https_proxy and/or http_proxy environment variable(s) for the current user:
export https_proxy=<proxy_server>:<proxy_port>
-
Create /etc/default/telegraf, and insert definitions for the https_proxy and/or http_proxy variable(s):
https_proxy=<proxy_server>:<proxy_port>
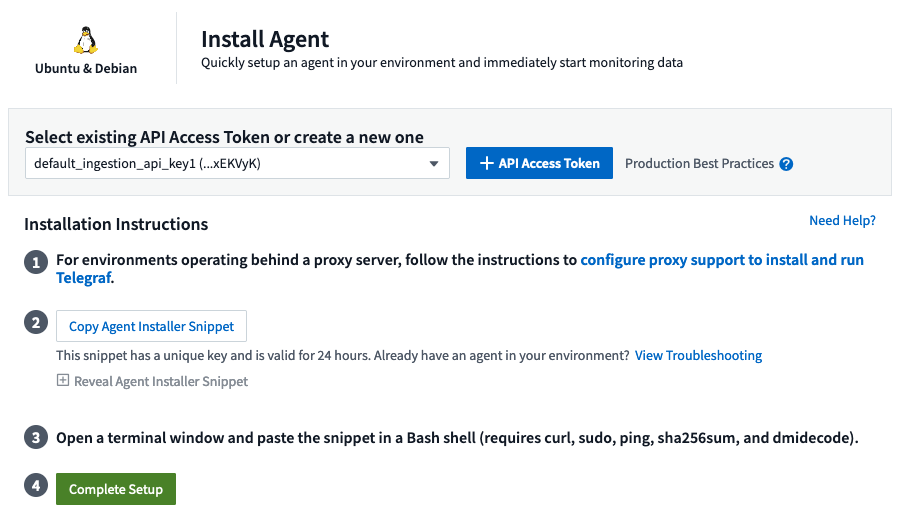
Installing the agent

-
Choose an Agent Access Key.
-
Copy the command block from the agent installation dialog. You can click the clipboard icon to quickly copy the command to the clipboard.
-
Open a Bash window
-
Paste the command into the Bash window and press Enter.
-
The command will download the appropriate agent installer, install it, and set a default configuration. When finished, it will restart the agent service. The command has a unique key and is valid for 24 hours.
-
Click Finish or Continue
After the agent is installed, you can use the following commands to start/stop the service:
If your operating system is using systemd (CentOS 7+ and RHEL 7+):
sudo systemctl start telegraf
sudo systemctl stop telegraf
If your operating system is not using systemd (CentOS 7+ and RHEL 7+):
sudo service telegraf start
sudo service telegraf stop
Uninstalling the Agent
To uninstall the agent on RHEL/CentOS, in a Bash terminal, do the following:
-
Stop the Telegraf service:
systemctl stop telegraf (If your operating system is using systemd (CentOS 7+ and RHEL 7+)
/etc/init.d/telegraf stop (for systems without systemd support)
-
Remove the Telegraf agent:
yum remove telegraf
-
Remove any configuration or log files that may be left behind:
rm -rf /etc/telegraf*
rm -rf /var/log/telegraf*
Upgrading the Agent
To upgrade the telegraf agent, do the following:
-
Stop the telegraf service:
systemctl stop telegraf (If your operating system is using systemd (CentOS 7+ and RHEL 7+)
/etc/init.d/telegraf stop (for systems without systemd support)
-
Remove the previous telegraf agent:
yum remove telegraf
Ubuntu and Debian
Pre-requisites:
-
The following commands must be available: curl, sudo, ping, sha256sum, openssl, and dmidecode
-
If you are behind a proxy, you must follow the instructions in the Configuring Proxy Support for Ubuntu/Debian section.
Configuring Proxy Support for Ubuntu/Debian
|
|
If your environment uses a proxy, read this section before you install. |
|
|
The steps below outline the actions needed to set the http_proxy/https_proxy environment variables. For some proxy environments, users may also need to set the no_proxy environment variable. |
For systems residing behind a proxy, perform the following steps PRIOR to installing the Telegraf agent:
-
Set the https_proxy and/or http_proxy environment variable(s) for the current user:
export https_proxy=<proxy_server>:<proxy_port>
-
Create /etc/default/telegraf, and insert definitions for the https_proxy and/or http_proxy variable(s):
https_proxy=<proxy_server>:<proxy_port>
Installing the agent
-
Choose an Agent Access Key.
-
Copy the command block from the agent installation dialog. You can click the clipboard icon to quickly copy the command to the clipboard.
-
Open a Bash window
-
Paste the command into the Bash window and press Enter.
-
The command will download the appropriate agent installer, install it, and set a default configuration. When finished, it will restart the agent service. The command has a unique key and is valid for 24 hours.
-
Click Finish or Continue
After the agent is installed, you can use the following commands to start/stop the service:
If your operating system is using systemd:
sudo systemctl start telegraf
sudo systemctl stop telegraf
If your operating system is not using systemd:
sudo service telegraf start
sudo service telegraf stop
Uninstalling the Agent
To uninstall the agent on Ubuntu/Debian, in a Bash terminal, run the following:
-
Stop the Telegraf service:
systemctl stop telegraf (If your operating system is using systemd)
/etc/init.d/telegraf stop (for systems without systemd support)
-
Remove the Telegraf agent:
dpkg -r telegraf
-
Remove any configuration or log files that may be left behind:
rm -rf /etc/telegraf*
rm -rf /var/log/telegraf*
Upgrading the Agent
To upgrade the telegraf agent, do the following:
-
Stop the telegraf service:
systemctl stop telegraf (If your operating system is using systemd)
/etc/init.d/telegraf stop (for systems without systemd support)
-
Remove the previous telegraf agent:
dpkg -r telegraf
Verifying Telegraf Package Checksums
The Data Infrastructure Insights agent installer performs integrity checks, but some users may want to perform their own verifications before installing the downloaded Telegraf binary. This can be done by downloading the installer and generating a checksum for the downloaded package, then comparing the checksum to the value shown in the install instructions.
Download the installer package without installing
To perform a download-only operation (as opposed to the default download-and-install), users can edit the agent installation command obtained from the UI and remove the “install” option.
Follow these steps:
-
Copy the Agent Installer snippet as directed.
-
Instead of pasting the snippet into a command window, paste it into a text editor.
-
Remove the trailing “--install” (Linux) or “-install” (Windows) from the command.
-
Copy the entire command from the text editor.
-
Now paste it into your command window (in a working directory) and run it.
Non-Windows (these examples are for Kubernetes; actual script names may vary):
-
Download and install (default):
installerName=cloudinsights-ubuntu_debian.sh … && ./$installerName --download --verify && sudo -E -H ./$installerName --install
-
Download-only:
installerName=cloudinsights-ubuntu_debian.sh … && ./$installerName --download --verify
Windows:
-
Download and install (default):
!$($installerName=".\cloudinsights-windows.ps1") … -and $(if(((Get-FileHash $installerName).Hash).ToLower() -eq "INSTALLER_CHECKSUM ") { &$installerName -download -verify -install } else { Write-Host "Install script checksum does not match"})" -
Download-only:
!$($installerName=".\cloudinsights-windows.ps1") … -and $(if(((Get-FileHash $installerName).Hash).ToLower() -eq "INSTALLER_CHECKSUM ") { &$installerName -download -verify } else { Write-Host "Install script checksum does not match"})"
The download-only command will download all required artifacts from Data Infrastructure Insights to the working directory. The artifacts include, but may not be limited to:
-
an installation script
-
an environment file
-
a Telegraf binary
-
a signature for the Telegraf binary
-
a public certificate to verify the binary signature
The install snippet downloaded and copied from DII automatically checksums the installation script, and the telegraf binary’s signature is verified by the installation script.
Verify checksum value
To generate the checksum value, perform the following command for your appropriate platform:
-
RHEL/Ubuntu:
sha256sum <package_name>
-
Windows:
Get-FileHash telegraf.zip -Algorithm SHA256 | Format-List
Install the downloaded package
Once all of the artifacts have been satisfactorily verified, the agent installation can be initiated by running:
Non-Windows:
sudo -E -H ./<installation_script_name> --install
Windows:
.\cloudinsights-windows.ps1 -install
Creating and Using API Access Tokens
To create an API access token for Telegraf data ingestion please do one of the following:
Create through the Data Collector Installation Page
-
Navigate to the Data Collector install page for the platform you wish to use (Windows, Linux).
-
Create a token with the + API Access Token button.
-
Input a name and click save.
-
The token name should now be selected in the dropdown, and will be used when installing the collector.
Manually create an API access token
-
Navigate to Admin>API Access.
-
Click + API Access Token.
-
Input a name and optionally a description.
-
Under “What type of APIs will this token be used to call?” select “Data Ingestion” only and then unselect “Acquisition Unit”.
-
Under “Permissions” select Read/Write.
-
Unselect “Automatically rotate tokens for Kubernetes”.
To use your newly created API access token, select it from the “Select existing API Access Token or create a new one” dropdown on the installer page.
Please note that only tokens with the following properties can be used:
-
API Type: “Data Ingestion” only
-
Permissions: Read/Write
-
Kubernetes Auto Rotation: Off
Troubleshooting
Some things to try if you encounter problems setting up an agent:
| Problem: | Try this: |
|---|---|
After configuring a new plugin and restarting Telegraf, Telegraf fails to start up. The logs indicate that an error resembling the following: |
The installed Telegraf version is outdated. Follow the steps on this page to Upgrade the Agent for your appropriate platform. |
I ran the installer script on an old installation and now the agent isn’t sending data |
Uninstall the telegraf agent and then re-run the installation script. Follow the Upgrade the Agent steps on this page for your appropriate platform. |
I already installed an agent using Data Infrastructure Insights |
If you have already installed an agent on your host/VM, you do not need to install the agent again. In this case, simply choose the appropriate Platform and Key in the Agent Installation screen, and click on Continue or Finish. |
I already have an agent installed but not by using the Data Infrastructure Insights installer |
Remove the previous agent and run the Data Infrastructure Insights Agent installation, to ensure proper default configuration file settings. When complete, click on Continue or Finish. |
Additional information may be found from the Support page or in the Data Collector Support Matrix.