

Back up Cloud Volumes ONTAP data to Google Cloud Storage with NetApp Backup and Recovery
 Suggest changes
Complete a few steps in NetApp Backup and Recovery to get started backing up volume data from your Cloud Volumes ONTAP systems to Google Cloud Storage.

|
To switch to and from NetApp Backup and Recovery workloads, refer to Switch to different NetApp Backup and Recovery workloads. |
Verify support for your configuration
Read the following requirements to make sure that you have a supported configuration before you start backing up volumes to Google Cloud Storage.
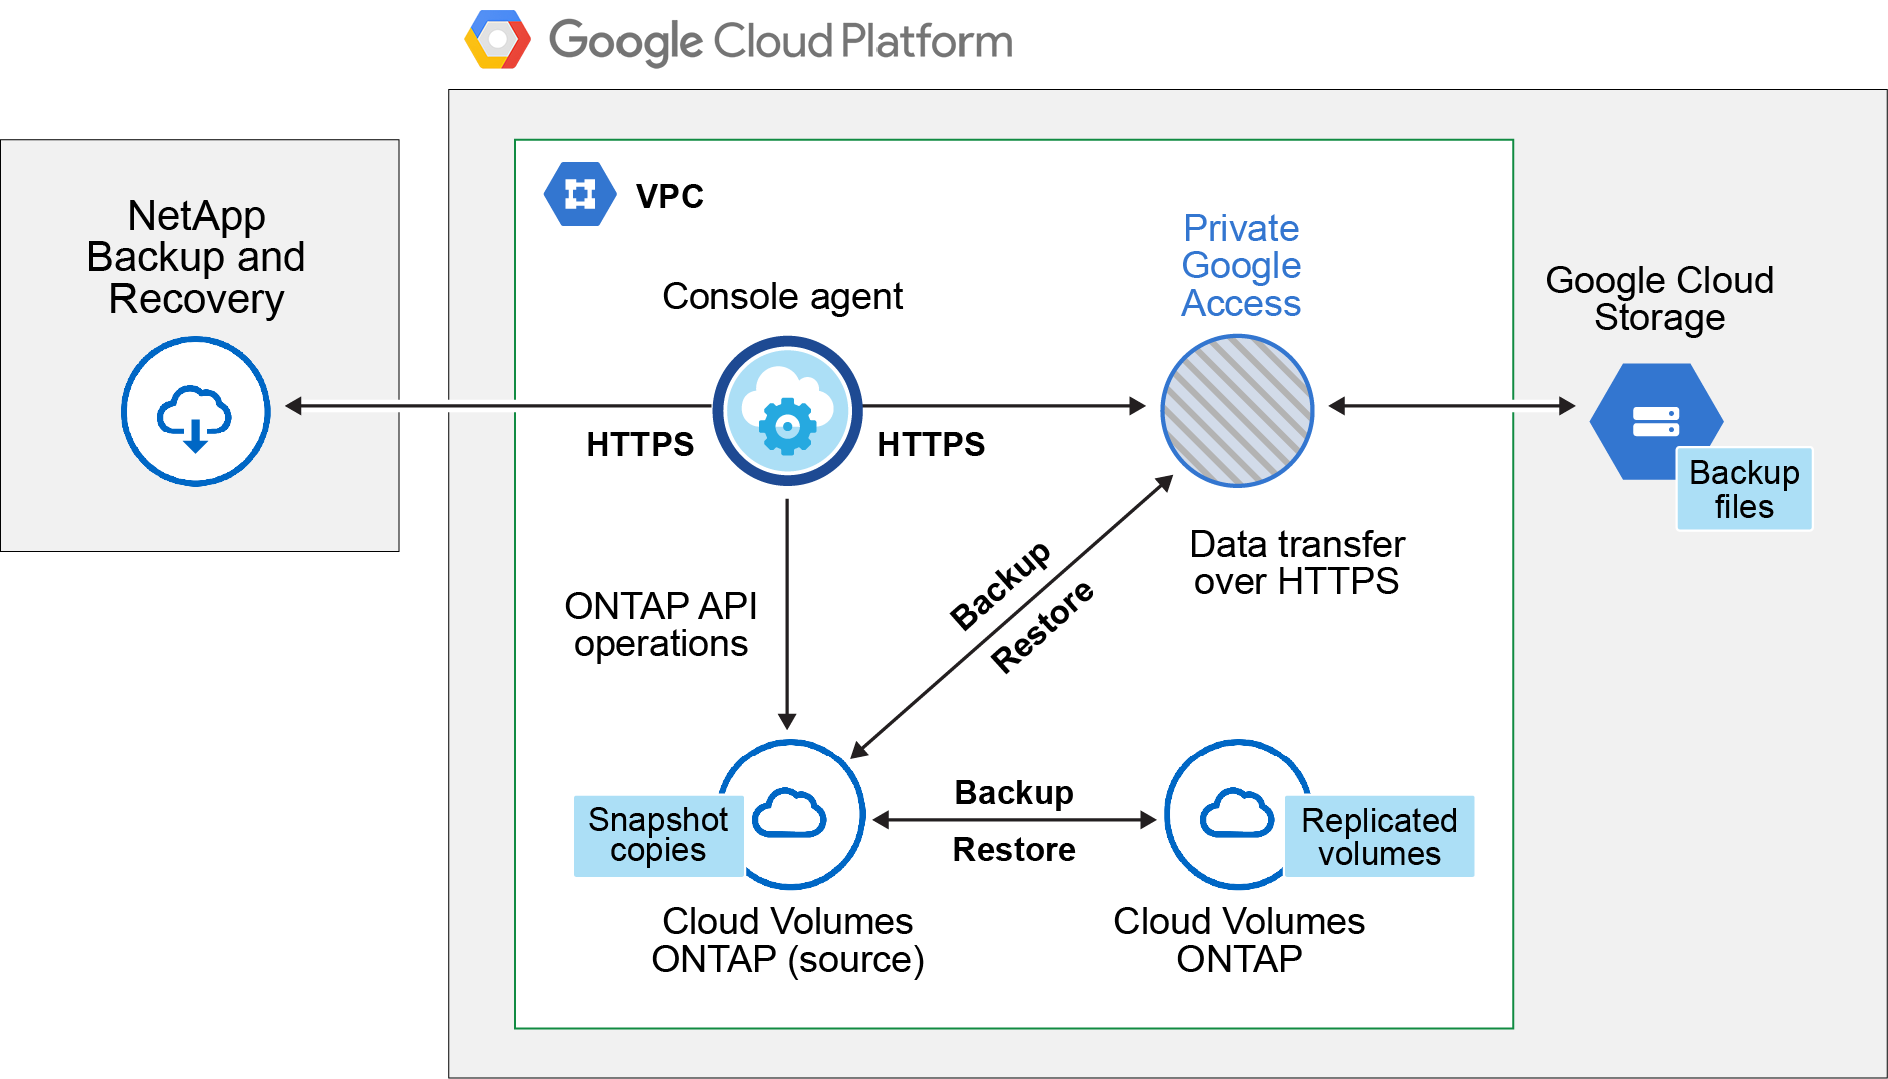
The following image shows each component and the connections that you need to prepare between them.
Optionally, you can connect to a secondary ONTAP system for replicated volumes using the public or private connection as well.
- Supported ONTAP versions
-
Minimum of ONTAP 9.8; ONTAP 9.8P13 and later is recommended.
- Supported GCP regions
-
NetApp Backup and Recovery is supported in all GCP regions.
- GCP Service Account
-
You need to have a service account in your Google Cloud Project that has the custom role. Learn how to create a service account.
Verify license requirements
For NetApp Backup and Recovery PAYGO licensing, a Console subscription is available in the Google Marketplace that enables deployments of Cloud Volumes ONTAP and NetApp Backup and Recovery. You need to subscribe to this Console subscription before you enable NetApp Backup and Recovery. Billing for NetApp Backup and Recovery is done through this subscription. You can subscribe from the Details & Credentials page of the system wizard.
For NetApp Backup and Recovery BYOL licensing, you need the serial number from NetApp that enables you to use the service for the duration and capacity of the license. Learn how to manage your BYOL licenses.
And you need to have a Google subscription for the storage space where your backups will be located.
Prepare your Console agent
The Console agent must be installed in a Google region with internet access.
Verify or add permissions to the Console agent
To use the NetApp Backup and Recovery "Search & Restore" functionality, you need to have specific permissions in the role for the Console agent so that it can access the Google Cloud BigQuery service. See the permissions below, and follow the steps if you need to modify the policy.
-
In the Google Cloud Console, go to the Roles page.
-
Using the drop-down list at the top of the page, select the project or organization that contains the role that you want to edit.
-
Select a custom role.
-
Select Edit Role to update the role's permissions.
-
Select Add Permissions to add the following new permissions to the role.
bigquery.jobs.get bigquery.jobs.list bigquery.jobs.listAll bigquery.datasets.create bigquery.datasets.get bigquery.jobs.create bigquery.tables.get bigquery.tables.getData bigquery.tables.list bigquery.tables.create -
Select Update to save the edited role.
Required information for using customer-managed encryption keys (CMEK)
You can use your own customer-managed keys for data encryption instead of using the default Google-managed encryption keys. Both cross-region and cross-project keys are supported, so you can choose a project for a bucket that is different than the project of the CMEK key. If you're planning to use your own customer-managed keys:
-
You'll need to have the Key Ring and the Key Name so you can add this information in the activation wizard. Learn more about customer-managed encryption keys.
-
You'll need to verify that these required permissions are included in the role for the Console agent:
cloudkms.cryptoKeys.get
cloudkms.cryptoKeys.getIamPolicy
cloudkms.cryptoKeys.list
cloudkms.cryptoKeys.setIamPolicy
cloudkms.keyRings.get
cloudkms.keyRings.getIamPolicy
cloudkms.keyRings.list
cloudkms.keyRings.setIamPolicy-
You'll need to verify that the Google "Cloud Key Management Service (KMS)" API is enabled in your project. See the Google Cloud documentation: Enabling APIs for details.
CMEK considerations:
-
Both HSM (hardware-backed) and software-generated keys are supported.
-
Both newly created or imported Cloud KMS keys are supported.
-
Only regional keys are supported; global keys are not supported.
-
Currently, only the "Symmetric encrypt/decrypt" purpose is supported.
-
The service agent associated with the Storage Account is assigned the "CryptoKey Encrypter/Decrypter (roles/cloudkms.cryptoKeyEncrypterDecrypter)" IAM role by NetApp Backup and Recovery.
Create your own buckets
By default, the service creates buckets for you. If you want to use your own buckets, you can create them before you start the backup activation wizard and then select those buckets in the wizard.
Verify ONTAP networking requirements for replicating volumes
If you plan to create replicated volumes on a secondary ONTAP system using NetApp Backup and Recovery, make sure that the source and destination systems meet the following networking requirements.
On-premises ONTAP networking requirements
-
If the cluster is on-premises, you should have a connection from your corporate network to your virtual network in the cloud provider. This is typically a VPN connection.
-
ONTAP clusters must meet additional subnet, port, firewall, and cluster requirements.
Because you can replicate to Cloud Volumes ONTAP or an on-premises systems, review peering requirements for on-premises ONTAP systems. View prerequisites for cluster peering in the ONTAP documentation.
Cloud Volumes ONTAP networking requirements
-
The instance's security group must include the required inbound and outbound rules: specifically, rules for ICMP and ports 11104 and 11105. These rules are included in the predefined security group.
-
To replicate data between two Cloud Volumes ONTAP systems in different subnets, the subnets must be routed together (this is the default setting).
Enable NetApp Backup and Recovery on Cloud Volumes ONTAP
Enabling NetApp Backup and Recovery steps differ slightly depending on whether you have an existing Cloud Volumes ONTAP system or a new one.
Enable NetApp Backup and Recovery on a new system
NetApp Backup and Recovery can be enabled when you complete the system wizard to create a new Cloud Volumes ONTAP system.
You must have a Service Account already configured. If you don't select a service account when you create the Cloud Volumes ONTAP system, then you'll need to turn off the system and add the service account to Cloud Volumes ONTAP from the GCP console.
See Launching Cloud Volumes ONTAP in GCP for requirements and details for creating your Cloud Volumes ONTAP system.
-
From the Console Systems page, select Add system, choose the cloud provider, and select Add New. Select Create Cloud Volumes ONTAP.
-
Choose a Location: Select Google Cloud Platform.
-
Choose Type: Select Cloud Volumes ONTAP (either single-node or high-availability).
-
Details & Credentials: Enter the following information:
-
Click Edit Project and select a new project if the one you want to use is different than the default Project (where the Console agent resides).
-
Specify the cluster name.
-
Enable the Service Account switch and select the Service Account that has the predefined Storage Admin role. This is required to enable backups and tiering.
-
Specify the credentials.
Make sure that a GCP Marketplace subscription is in place.
-
-
Services: Leave NetApp Backup and Recovery enabled and click Continue.
-
Complete the pages in the wizard to deploy the system as described in Launching Cloud Volumes ONTAP in GCP.
NetApp Backup and Recovery is enabled on the system. After you've created volumes on these Cloud Volumes ONTAP systems, launch NetApp Backup and Recovery and activate backup on each volume that you want to protect.
Enable NetApp Backup and Recovery on an existing system
You can enable NetApp Backup and Recovery at any time directly from the system.
-
From the Console Systems page, select the system and select Enable next to Backup and Recovery in the right-panel.
If the Google Cloud Storage destination for your backups exists as a system on the Console Systems page, you can drag the cluster onto the Google Cloud Storage system to initiate the setup wizard.
Prepare Google Cloud Storage as your backup target
Preparing Google Cloud Storage as your backup target involves the following steps:
-
Set up permissions.
-
(Optional) Create your own buckets. (The service will create buckets for you if you want.)
-
(Optional) Set up customer-managed keys for data encryption
Set up permissions
You need to provide storage access keys for a service account that has specific permissions using a custom role. A service account enables NetApp Backup and Recovery to authenticate and access Cloud Storage buckets used to store backups. The keys are required so that Google Cloud Storage knows who is making the request.
-
In the Google Cloud Console, go to the Roles page.
-
Create a new role with the following permissions:
storage.buckets.create storage.buckets.delete storage.buckets.get storage.buckets.list storage.buckets.update storage.buckets.getIamPolicy storage.multipartUploads.create storage.objects.create storage.objects.delete storage.objects.get storage.objects.list storage.objects.update -
In the Google Cloud console, go to the Service accounts page.
-
Select your Cloud project.
-
Select Create service account and provide the required information:
-
Service account details: Enter a name and description.
-
Grant this service account access to project: Select the custom role that you just created.
-
Select Done.
-
-
Go to GCP Storage Settings and create access keys for the service account:
-
Select a project, and select Interoperability. If you haven't already done so, select Enable interoperability access.
-
Under Access keys for service accounts, select Create a key for a service account, select the service account that you just created, and click Create Key.
You'll need to enter the keys in NetApp Backup and Recovery later when you configure the backup service.
-
Create your own buckets
By default, the service creates buckets for you. Or, if you want to use your own buckets, you can create them before you start the backup activation wizard and then select those buckets in the wizard.
Set up customer-managed encryption keys (CMEK) for data encryption
You can use your own customer-managed keys for data encryption instead of using the default Google-managed encryption keys. Both cross-region and cross-project keys are supported, so you can choose a project for a bucket that is different than the project of the CMEK key.
If you're planning to use your own customer-managed keys:
-
You'll need to have the Key Ring and the Key Name so you can add this information in the activation wizard. Learn more about customer-managed encryption keys.
-
You'll need to verify that these required permissions are included in the role for the Console agent:
cloudkms.cryptoKeys.get cloudkms.cryptoKeys.getIamPolicy cloudkms.cryptoKeys.list cloudkms.cryptoKeys.setIamPolicy cloudkms.keyRings.get cloudkms.keyRings.getIamPolicy cloudkms.keyRings.list cloudkms.keyRings.setIamPolicy -
You'll need to verify that the Google "Cloud Key Management Service (KMS)" API is enabled in your project. See the Google Cloud documentation: Enabling APIs for details.
CMEK considerations:
-
Both HSM (Hardware-backed) and Software-generated keys are supported.
-
Both newly created or imported Cloud KMS keys are supported.
-
Only regional keys are supported, global keys are not supported.
-
Currently, only the "Symmetric encrypt/decrypt" purpose is supported.
-
The service agent associated with the Storage Account is assigned the "CryptoKey Encrypter/Decrypter (roles/cloudkms.cryptoKeyEncrypterDecrypter)" IAM role by NetApp Backup and Recovery.
Activate backups on your ONTAP volumes
Activate backups at any time directly from your on-premises system.
A wizard takes you through the following major steps:
You can also Show the API commands at the review step, so you can copy the code to automate backup activation for future systems.
Start the wizard
-
Access the Activate backup and recovery wizard using one of the following ways:
-
From the Console Systems page*, select the system and select Enable > Backup Volumes next to Backup and Recovery in the right-panel.
If the GCP destination for your backups exists as a system on the Console Systems page, you can drag the ONTAP cluster onto the GCP object storage.
-
Select Volumes in the Backup and Recovery bar. From the Volumes tab, select the Actions
 icon and select Activate Backup for a single volume (that does not already have replication or backup to object storage already enabled).
The Introduction page of the wizard shows the protection options including local Snapshots, replication, and backups. If you did the second option in this step, the Define Backup Strategy page appears with one volume selected.
-
-
Continue with the following options:
-
If you already have a Console agent, you're all set. Just select Next.
-
If you don't already have a Console agent, the Add a Console agent option appears. Refer to Prepare your Console agent.
-
Select the volumes that you want to back up
Choose the volumes you want to protect. A protected volume is one that has one or more of the following: Snapshot policy, replication policy, backup to object policy.
You can choose to protect FlexVol or FlexGroup volumes; however, you cannot select a mix of these volumes when activating backup for a system. See how to activate backup for additional volumes in the system (FlexVol or FlexGroup) after you have configured backup for the initial volumes.
|
|
|
Note that if the volumes you choose already have Snapshot or replication policies applied, then the policies you select later will overwrite these existing policies.
-
In the Select Volumes page, select the volume or volumes you want to protect.
-
Optionally, filter the rows to show only volumes with certain volume types, styles, and more to make the selection easier.
-
After you select the first volume, then you can select all FlexVol volumes (FlexGroup volumes can be selected one at a time only). To back up all existing FlexVol volumes, check one volume first and then check the box in the title row.
-
To back up individual volumes, check the box for each volume.
-
-
Select Next.
Define the backup strategy
Defining the backup strategy involves setting the following options:
-
Whether you want one or all of the backup options: local Snapshots, replication, and backup to object storage
-
Architecture
-
Local snapshot policy
-
Replication target and policy
If the volumes you choose have different Snapshot and replication policies than the policies you select in this step, the existing policies will be overwritten. -
Backup to object storage information (provider, encryption, networking, backup policy, and export options).
-
In the Define backup strategy page, choose one or all of the following. All three are selected by default:
-
Local Snapshots: If you are performing replication or back up to object storage, local snapshots must be created.
-
Replication: Creates replicated volumes on another ONTAP storage system.
-
Backup: Backs up volumes to object storage.
-
-
Architecture: If you chose replication and backup, choose one of the following flows of information:
-
Cascading: Information flows from the primary storage system to the secondary, and from secondary to object storage.
-
Fan out: Information flows from the primary storage system to the secondary and from the primary to object storage.
For details about these architectures, refer to Plan your protection journey.
-
-
Local Snapshot: Choose an existing snapshot policy or create one.

To create a custom policy before activating the backup, refer to Create a policy. To create a policy, select Create new policy and do the following:
-
Enter the name of the policy.
-
Select up to five schedules, typically of different frequencies.
-
For backup-to-object policies, configure Datalock and Ransomware protection. For details on Datalock and Ransomware protection, refer to Backup-to-object policy settings.
-
Select Create.
-
-
Replication: Set the following options:
-
Replication target: Select the destination system and SVM. Optionally, select the destination aggregate or aggregates and prefix or suffix that will be added to the replicated volume name.
-
Replication policy: Choose an existing replication policy or create one.
To create a custom policy before activating the replication, refer to Create a policy. To create a policy, select Create new policy and do the following:
-
Enter the name of the policy.
-
Select up to five schedules, typically of different frequencies.
-
Select Create.
-
-
-
Back up to Object: If you selected Backup, set the following options:
-
Provider: Select Google Cloud.
-
Provider settings: Enter the provider details and region where the backups will be stored.
Either create a new bucket or select an existing one.
-
Encryption key: If you created a new Google bucket, enter encryption key information given to you from the provider. Choose whether you'll use the default Google Cloud encryption keys, or choose your own customer-managed keys from your Google account, to manage encryption of your data.
If you choose to use your own customer-managed keys, enter the key vault and key information.
If you chose an existing Google Cloud bucket, encryption information is already available, so you don't need to enter it now. -
Backup policy: Select an existing backup-to-object storage policy or create one.
To create a custom policy before activating the backup, refer to Create a policy. To create a policy, select Create new policy and do the following:
-
Enter the name of the policy.
-
Select up to five schedules, typically of different frequencies.
-
Select Create.
-
-
Export existing snapshots to object storage as backup copies: If there are any local snapshots for volumes in this system that match the backup schedule label you just selected for this system (for example, daily, weekly, etc.), this additional prompt is displayed. Check this box to have all historic Snapshots copied to object storage as backup files to ensure the most complete protection for your volumes.
-
-
Select Next.
Review your selections
This is the chance to review your selections and make adjustments, if necessary.
-
In the Review page, review your selections.
-
Optionally check the box to Automatically synchronize the Snapshot policy labels with the replication and backup policy labels. This creates Snapshots with a label that matches the labels in the replication and backup policies.
-
Select Activate Backup.
NetApp Backup and Recovery starts taking the initial backups of your volumes. The baseline transfer of the replicated volume and the backup file includes a full copy of the primary storage system data. Subsequent transfers contain differential copies of the primary storage system data contained in snapshots.
A replicated volume is created in the destination cluster that will be synchronized with the primary storage system volume.
A Google Cloud Storage bucket is created in the service account indicated by the Google access key and secret key you entered, and the backup files are stored there.
Backups are associated with the Standard storage class by default. You can use the lower cost Nearline, Coldline, or Archive storage classes. However, you configure the storage class through Google, not through the NetApp Backup and Recovery UI. See the Google topic Changing the default storage class of a bucket for details.
The Volume Backup Dashboard is displayed so you can monitor the state of the backups.
You can also monitor the status of backup and restore jobs using the Job Monitoring page.
Show the API commands
You might want to display and optionally copy the API commands used in the Activate backup and recovery wizard. You might want to do this to automate backup activation in future systems.
-
From the Activate backup and recovery wizard, select View API request.
-
To copy the commands to the clipboard, select the Copy icon.
What's next?
-
You can manage your backup files and backup policies. This includes starting and stopping backups, deleting backups, adding and changing the backup schedule, and more.
-
You can manage cluster-level backup settings. This includes changing the storage keys ONTAP uses to access cloud storage, changing the network bandwidth available to upload backups to object storage, changing the automatic backup setting for future volumes, and more.
-
You can also restore volumes, folders, or individual files from a backup file to a Cloud Volumes ONTAP system in AWS, or to an on-premises ONTAP system.