

The RTFI process
 Suggest changes
You can begin the Return to Factory Image (RTFI) process by interacting with the node through text console prompts that appear before the system boots.

|
The RTFI process is data destructive and securely erases all data and configuration details from the node and installs a new operating system. Verify that the node used for the RTFI process is not active as part of a cluster. |
The RTFI process performs the following high-level operations:
-
Starts the installation after user confirmation and validates the image.
-
Unlocks all drives on a node.
-
Validates and flashes firmware.
-
Checks hardware.
-
Tests hardware.
-
Secure erases all selected drives.
-
Partitions the root drive and creates file systems.
-
Mounts and unpacks the image.
-
Configures the host name, networking (Dynamic Host Configuration Protocol), default cluster configuration, and GRUB bootloader.
-
Stops all services, collects logs, and reboots.
To configure your node after the RTFI process successfully completes, see the documentation for your Element software version. After a node successfully completes the RTFI process, it transitions to the available (unconfigured) state by default.
Perform the RTFI process
Use the following procedure to restore the Element software on your SolidFire node.
For information on creating a USB key or using the BMC to perform the RTFI process, see RTFI deployment and installation options.
Verify that you meet the following requirements:
-
You have access to a console for the SolidFire node.
-
The node on which you are performing the RTFI process is powered up and connected to a network.
-
The node on which you are performing the RTFI process is not part of an active cluster.
-
You have access to bootable installation media that contains the image of the relevant Element software version for your configuration.
Contact NetApp Support if you have any concerns before performing the RTFI process.
-
Connect a monitor and keyboard to the back of the node, or connect to the BMC IP UI, and bring up the iKVM/HTML5 console from the Remote Control tab in the UI.
-
Insert a USB key with an appropriate image in one of the two USB slots in the back of the node.
-
Power on or power reset the node. During the boot-up, select Boot Device by selecting F11:

You must select F11 multiple times in quick succession because the Boot Device screen goes by quickly. -
In the Boot Device selection menu, highlight the USB option.
The options that appear depend on the USB brand that you are using.
If there are no USB devices listed, go into the BIOS, verify that the USB is listed in the boot order, reboot, and try again.
If that does not resolve the issue, go into the BIOS, browse to the Save and Exit tab, select Restore to Optimized Defaults, accept and save the settings, and reboot.
-
A list of the images that are on the highlighted USB device appear. Select the desired version and select enter to start the RTFI process.
The RTFI image Element software name and version number appear.
-
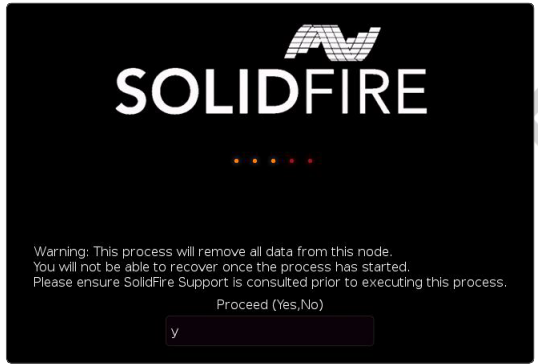
At the initial prompt, you are notified that the process will remove all data from the node and that data is not recoverable after the process begins. Enter Yes to begin.
All data and configuration details are permanently erased from the node after the process is initiated. If you elect not to proceed, you are directed to the RTFI options menu.
If you want to watch the console during the RTFI process, you can press the ALT+F8 keys to toggle to the verbose mode console. Press ALT+F7 to return to the primary GUI. -
Enter No when prompted to perform extensive hardware tests unless you have a reason to suspect hardware failure or are directed to perform the tests by NetApp Support.
A message indicates that the RTFI process has finished and the system powers off.
-
If necessary, remove all bootable installation media after the node powers off.
The node is now ready to be powered on and configured. See the Element software set up storage documentation to configure the storage node.
If you encountered an error message during the RTFI process, see RTFI options menu.