

Solution validation
 Suggest changes
In this section, we review some solution use cases.
-
One of the primary use cases for SnapMirror is data backup. SnapMirror can be used as a primary backup tool by replicating data within the same cluster or to remote targets.
-
Using the DR environment to run application development testing (dev/test).
-
DR in the event of a disaster in production.
-
Data distribution and remote data access.
Notably, the relatively few use cases validated in this solution do not represent the entire functionality of SnapMirror replication.
Application development and testing (dev/test)
To accelerate application development, you can quickly clone replicated data at the DR site and use it to dev/test applications. The colocation of DR and dev/test environments can significantly improve the utilization of backup or DR facilities, and on-demand dev/test clones provide as many data copies as you need to get to production more quickly.
NetApp FlexClone technology can be used to quickly create a read-write copy of a SnapMirror destination FlexVol volume in case you want to have read-write access of the secondary copy to confirm if all the production data is available.
Complete the following steps to use the DR environment to perform application dev/test:
-
Make a copy of production data. To do so, perform an application snapshot of an on-premises volume. Application snapshot creation consist of three steps:
Lock,Snap, andUnlock.-
Quiesce the file system so that I/O is suspended and applications maintain consistency. Any application writes hitting the filesystem stay in a wait state until the unquiesce command is issued in step c. Steps a, b, and c are executed through a process or a workflow that is transparent and does not affect the application SLA.
[root@hc-cloud-secure-1 ~]# fsfreeze -f /file1
This option requests the specified filesystem to be frozen from new modifications. Any process attempting to write to the frozen filesystem is blocked until the filesystem is unfrozen.
-
Create a snapshot of the on-prem volume.
A400-G0312::> snapshot create -vserver Healthcare_SVM -volume hc_iscsi_vol -snapshot kamini
-
Unquiesce the file system to restart I/O.
[root@hc-cloud-secure-1 ~]# fsfreeze -u /file1
This option is used to un-freeze the filesystem and allow operations to continue. Any filesystem modifications that were blocked by the freeze are unblocked and allowed to complete.
Application-consistent snapshot can also be performed using NetApp SnapCenter, which has the complete orchestration of the workflow outlined above as part of SnapCenter. For detailed information, see here.
-
-
Perform a SnapMirror update operation to keep the production and DR systems in sync.
singlecvoaws::> snapmirror update -destination-path svm_singlecvoaws:hc_iscsi_vol_copy -source-path Healthcare_SVM:hc_iscsi_vol

Operation is queued: snapmirror update of destination “svm_singlecvoaws:hc_iscsi_vol_copy”.
A SnapMirror update can also be performed through the NetApp Console GUI under the Replication tab.
-
Create a FlexClone instance based on the application snapshot that was taken earlier.
singlecvoaws::> volume clone create -flexclone kamini_clone -type RW -parent-vserver svm_singlecvoaws -parent-volume hc_iscsi_vol_copy -junction-active true -foreground true -parent-snapshot kamini

[Job 996] Job succeeded: Successful
For the previous task, a new snapshot can also be created, but you must follow the same steps as above to ensure application consistency.
-
Activate a FlexClone volume to bring up the EHR instance in the cloud.
singlecvoaws::> lun mapping create -vserver svm_singlecvoaws -path /vol/kamini_clone/iscsi_lun1 -igroup ehr-igroup -lun-id 0 singlecvoaws::> lun mapping show Vserver Path Igroup LUN ID Protocol ---------- -------------- --------------- ----- -------- ------ --------- svm_singlecvoaws /vol/kamini_clone/iscsi_lun1 ehr-igroup 0 iscsi -
Execute the following commands on the EHR instance in the cloud to access the data or filesystem.
-
Discover ONTAP storage. Check the multipathing status.
sudo rescan-scsi-bus.sh sudo iscsiadm -m discovery -t sendtargets -p <iscsi-lif-ip> sudo iscsiadm -m node -L all sudo sanlun lun show Output: controller(7mode/E-Series)/ device host lun vserver(cDOT/FlashRay) lun-pathname filename adapter protocol size product ----------------------------------------------------------------------------- svm_singlecvoaws /dev/sda host2 iSCSI 200g cDOT /vol/kamini_clone/iscsi_lun1 sudo multipath -ll Output: 3600a09806631755a452b543041313053 dm-0 NETAPP,LUN C-Mode size=200G features='3 queue_if_no_path pg_init_retries 50' hwhandler='1 alua' wp=rw `-+- policy='service-time 0' prio=50 status=active `- 2:0:0:0 sda 8:0 active ready running -
Activate the volume group.
sudo vgchange -ay datavg
Output:
1 logical volume(s) in volume group "datavg" now active
-
Mount the file system and display the summary of filesystem information.
sudo mount -t xfs /dev/datavg/datalv /file1

cd /file1
df -k .
Output:
Filesystem                 1K-blocks  Used     Available  Use%  Mounted on
/dev/mapper/datavg-datalv  209608708 183987096  25621612  88%    /file1
This validates that you can use the DR environment for application dev/test. Performing application dev/test on your DR storage allows you to get more use out of resources that might otherwise sit idle much of the time.
-
Disaster recovery
SnapMirror technology is also used as a part of DR plans. If critical data is replicated to a different physical location, a serious disaster does not have to cause extended periods of data unavailability for business-critical applications. Clients can access replicated data across the network until the recovery of the production site from corruption, accidental deletion, natural disaster, and so on.
In the case of failback to the primary site, SnapMirror provides an efficient means of resynchronizing the DR site with the primary site, transferring only changed or new data back to the primary site from the DR site by simply reversing the SnapMirror relationship. After the primary production site resumes normal application operations, SnapMirror continues the transfer to the DR site without requiring another baseline transfer.
To perform the validation of a successful DR scenario, complete the following steps:
-
Simulate a disaster on the source (production) side by stopping the SVM that hosts the on-premises ONTAP volume (
hc_iscsi_vol).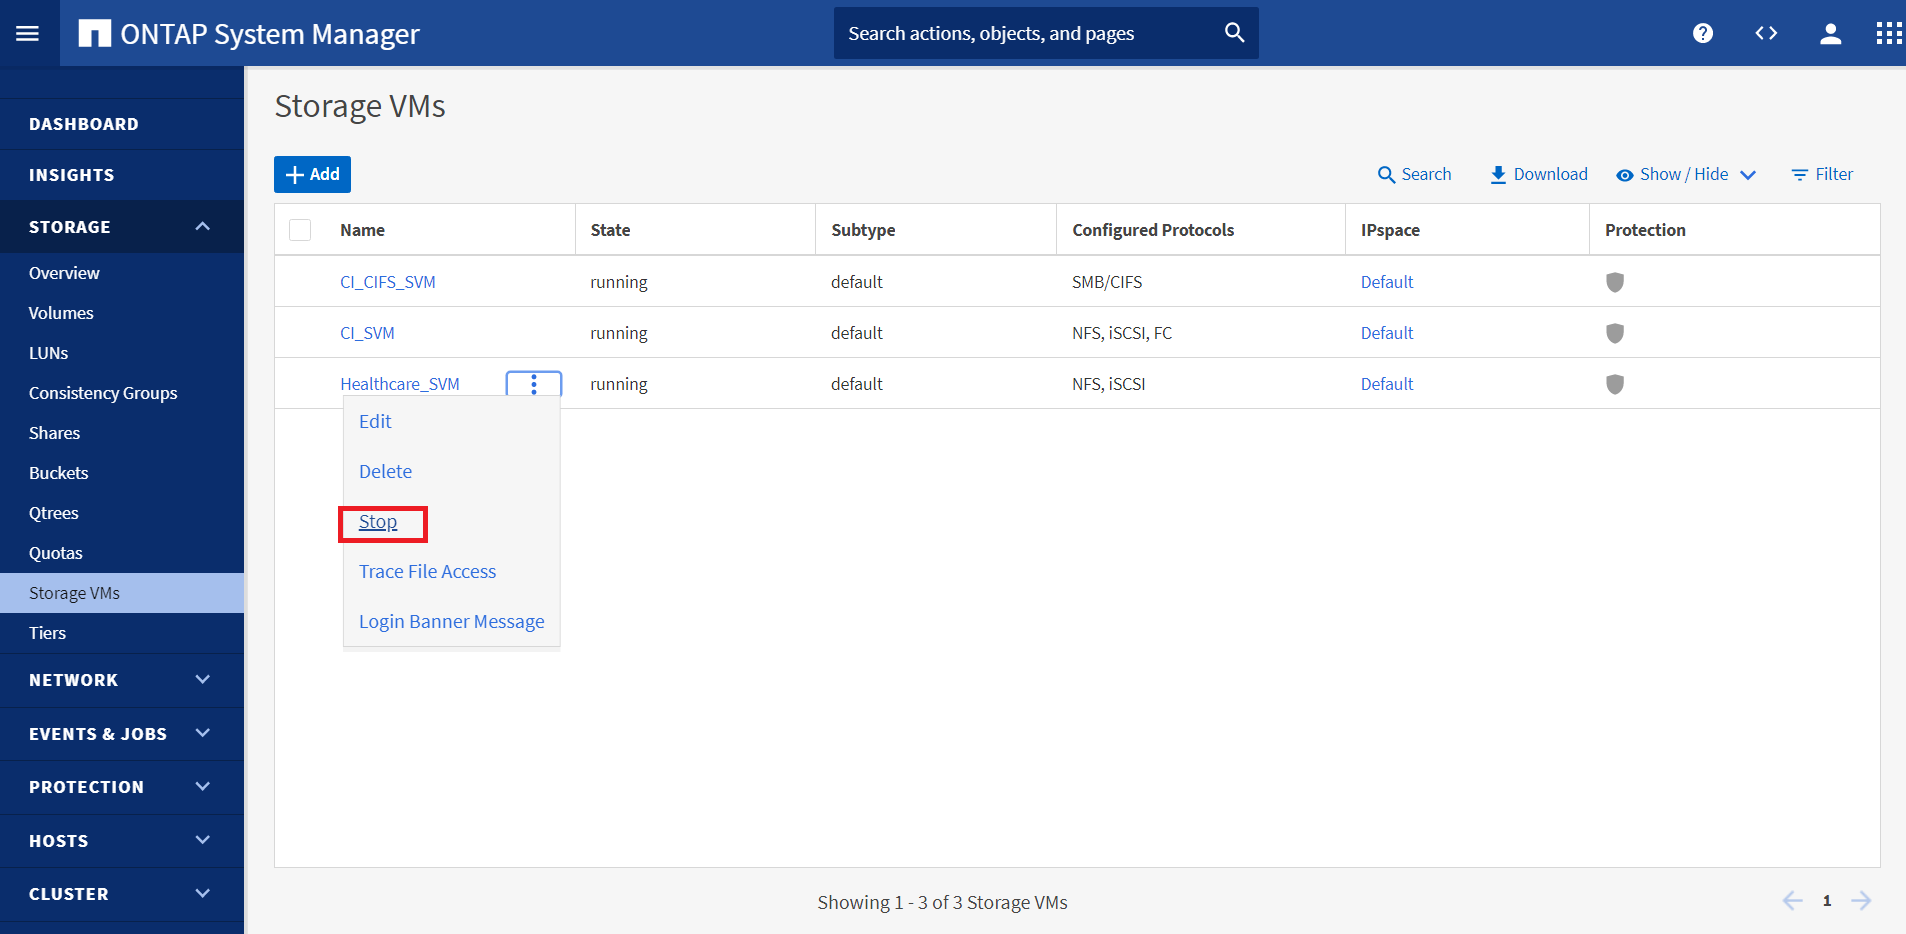
Make sure that SnapMirror replication is already set up between the on-premises ONTAP in FlexPod instance and Cloud Volumes ONTAP in AWS, so that you can create frequent application snapshots.
After the SVM has been stopped, the
hc_iscsi_volvolume is not visible in the Console. -
Activate DR in CVO.
-
Break the SnapMirror replication relationship between on-prem ONTAP and Cloud Volumes ONTAP and promote the CVO destination volume (
hc_iscsi_vol_copy) to production.After the SnapMirror relationship is broken, the destination volume type changes from data protection (DP) to read/write (RW).
singlecvoaws::> volume show -volume hc_iscsi_vol_copy -fields typev
server          volume            type
---------------- ----------------- ----
svm_singlecvoaws hc_iscsi_vol_copy RW
-
Activate the destination volume in Cloud Volumes ONTAP to bring up the EHR instance on an EC2 instance in the cloud.
singlecvoaws::> lun mapping create -vserver svm_singlecvoaws -path /vol/hc_iscsi_vol_copy/iscsi_lun1 -igroup ehr-igroup -lun-id 0 singlecvoaws::> lun mapping show Vserver Path Igroup LUN ID Protocol ---------- ---------------------------------- -------- ------ --------- svm_singlecvoaws /vol/hc_iscsi_vol_copy/iscsi_lun1 ehr-igroup 0 iscsi -
To access the data and filesystem on the EHR instance in the cloud, first discover the ONTAP storage and verify multipathing status.
sudo rescan-scsi-bus.sh sudo iscsiadm -m discovery -t sendtargets -p <iscsi-lif-ip> sudo iscsiadm -m node -L all sudo sanlun lun show Output: controller(7mode/E-Series)/ device host lun vserver(cDOT/FlashRay) lun-pathname filename adapter protocol size product ----------------------------------------------------------------------------- svm_singlecvoaws /dev/sda host2 iSCSI 200g cDOT /vol/hc_iscsi_vol_copy/iscsi_lun1 sudo multipath -ll Output: 3600a09806631755a452b543041313051 dm-0 NETAPP,LUN C-Mode size=200G features='3 queue_if_no_path pg_init_retries 50' hwhandler='1 alua' wp=rw `-+- policy='service-time 0' prio=50 status=active `- 2:0:0:0 sda 8:0 active ready running -
Then activate the volume group.
sudo vgchange -ay datavg
Output:
1 logical volume(s) in volume group "datavg" now active
-
Finally, mount the file system and display the filesystem information.
sudo mount -t xfs /dev/datavg/datalv /file1

cd /file1
df -k .
Output:
Filesystem                 1K-blocks  Used      Available  Use%  Mounted on
/dev/mapper/datavg-datalv  209608708  183987096  25621612  88%   /file1
This output shows that users can access replicated data across the network until the recovery of the production site from disaster.
-
Reverse the SnapMirror relationship. This operation reverses the roles of the source and destination volumes.
When this operation is performed, the contents from the original source volume are overwritten by the contents of the destination volume. This is helpful when you want to reactivate a source volume that went offline.
Now the CVO volume (
hc_iscsi_vol_copy) becomes the source volume, and the on-premises volume (hc_iscsi_vol) becomes the destination volume.Any data written to the original source volume between the last data replication and the time that the source volume was disabled is not preserved.
-
To verify write access to the CVO volume, create a new file on the EHR instance in the cloud.
cd /file1/
sudo touch newfile
-
When the production site is down, clients can still access the data and also perform writes to the Cloud Volumes ONTAP volume, which is now the source volume.
In the case of failback to the primary site, SnapMirror provides an efficient means of resynchronizing the DR site with the primary site, transferring only changed or new data back to the primary site from the DR site by simply reversing the SnapMirror relationship. After the primary production site resumes normal application operations, SnapMirror continues the transfer to the DR site without requiring another baseline transfer.
This section illustrates the successful resolution of a DR scenario when the production site is hit by disaster. Data can now be safely consumed by applications that can now serve the clients while the source site goes through restoration.
Verification of data on the production site
After the production site is restored, you must make sure that the original configuration is restored and clients are able to access the data from the source site.
In this section, we talk about bringing up the source site, restoring the SnapMirror relationship between on-premises ONTAP and Cloud Volumes ONTAP, and finally performed a data integrity check on the source end.
The following procedure can be used for the verification of data on the production site:
-
Make sure that the source site is now up. To do so, start the SVM that hosts the on-premises ONTAP volume (
hc_iscsi_vol).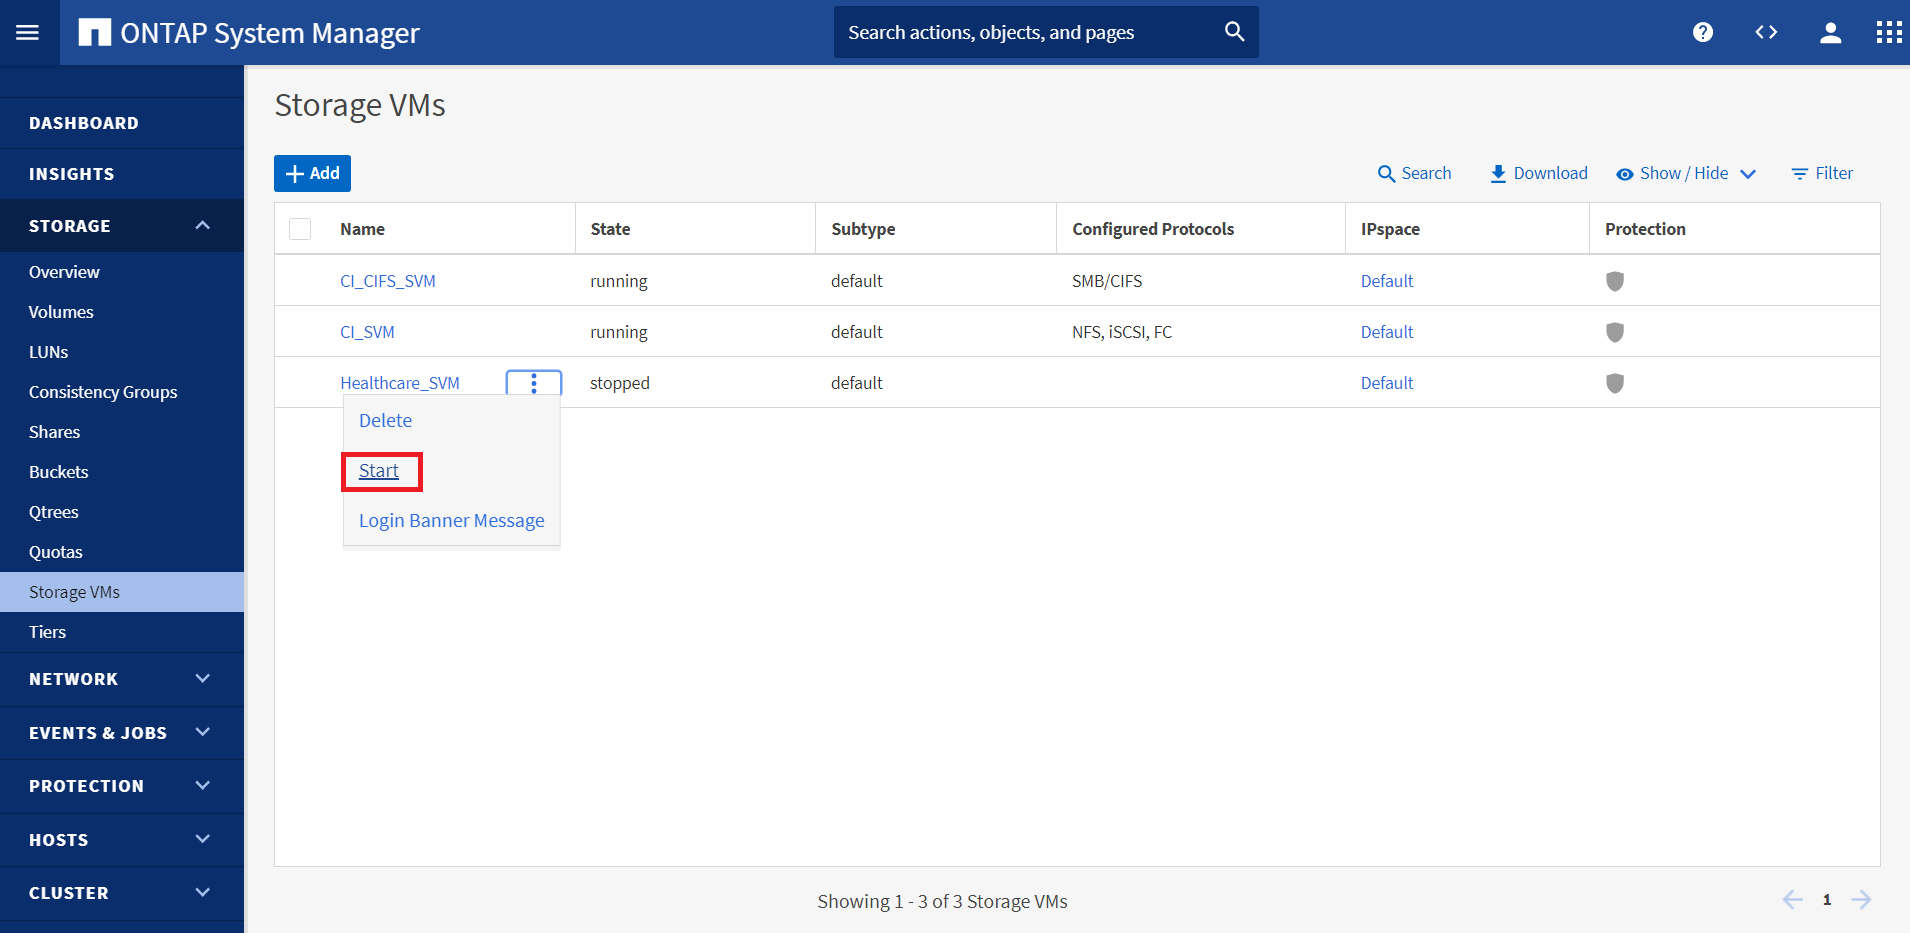
-
Break the SnapMirror replication relationship between Cloud Volumes ONTAP and on-premises ONTAP and promote the on-premises volume (
hc_iscsi_vol) back to production.After the SnapMirror relationship is broken, the on-premises volume type changes from data protection (DP) to read/write (RW).
A400-G0312::> volume show -volume hc_iscsi_vol -fields type
vserver        volume       type
-------------- ------------ ----
Healthcare_SVM hc_iscsi_vol RW
-
Reverse the SnapMirror relationship. Now, the on-premises ONTAP volume (
hc_iscsi_vol) becomes the source volume as it was earlier, and the Cloud Volumes ONTAP volume (hc_iscsi_vol_copy) becomes the destination volume.By following these steps, we have successfully restored the original configuration.
-
Reboot the on-premises EHR instance. Mount the filesystem and verify that the
newfilethat you created on the EHR instance in the cloud when production was down now exists here as well.
We can infer that the data replication from the source to the destination has been completed successfully and that data integrity has been maintained. This completes the verification of data on the production site.