

Implementing Disaster Recovery with NetApp SnapMirror and BlueXP DRaaS
 Suggest changes
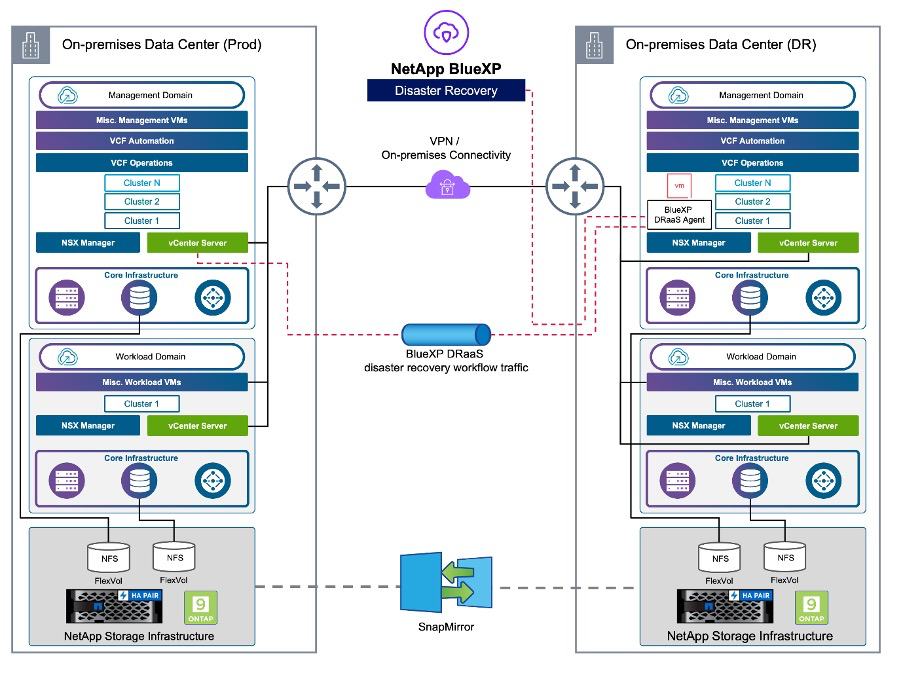
VCF disaster recovery solution for NFS datastore with NetApp SnapMirror and BlueXP DRaaS
Block-level replication from a production site to a disaster recovery (DR) site offers a resilient and cost-effective strategy for protecting workloads against site outages and data corruption events, including ransomware attacks. NetApp SnapMirror replication enables VMware VCF 9 workload domains running on on-premises ONTAP systems—using either NFS or VMFS datastores—to be replicated to a secondary ONTAP system located in a designated recovery datacenter where VMware is also deployed.
This section outlines the configuration of BlueXP Disaster Recovery as a Service (DRaaS) to establish DR for on-premises VMware virtual machines.
The setup includes:
-
Creating a BlueXP account and deploying a BlueXP Connector.
-
Adding ONTAP arrays to the BlueXP canvas to facilitate communication between VMware vCenter and ONTAP storage.
-
Configuring replication between sites using SnapMirror.
-
Setting up and testing a recovery plan to validate failover readiness.
The BlueXP disaster recovery service, integrated within the NetApp BlueXP console, enables organizations to seamlessly discover their on-premises VMware vCenters and ONTAP storage systems. Once discovered, administrators can define resource groupings, create disaster recovery plans, associate them with the appropriate resources, and initiate or test failover and failback operations.
NetApp SnapMirror provides efficient block-level replication, ensuring that the DR site remains synchronized with the production environment through incremental updates. This enables a Recovery Point Objective (RPO) as low as five minutes.
BlueXP DRaaS also supports non-disruptive disaster recovery testing. Leveraging ONTAP’s FlexClone technology, it creates space-efficient, temporary copies of the NFS datastore from the most recent replicated Snapshot—without impacting production workloads or incurring additional storage costs. After testing, the environment can be easily torn down, preserving the integrity of the replicated data.
In the event of an actual failover, BlueXP orchestrates the recovery process, automatically bringing up protected virtual machines at the designated DR site with minimal user intervention. When the primary site is restored, the service reverses the SnapMirror relationship and replicates any changes back to the original site, enabling a smooth and controlled failback.
All these capabilities are delivered at a significantly lower cost compared to traditional disaster recovery solutions.
Getting started
To get started with BlueXP disaster recovery, use BlueXP console and then access the service.
-
Log in to BlueXP.
-
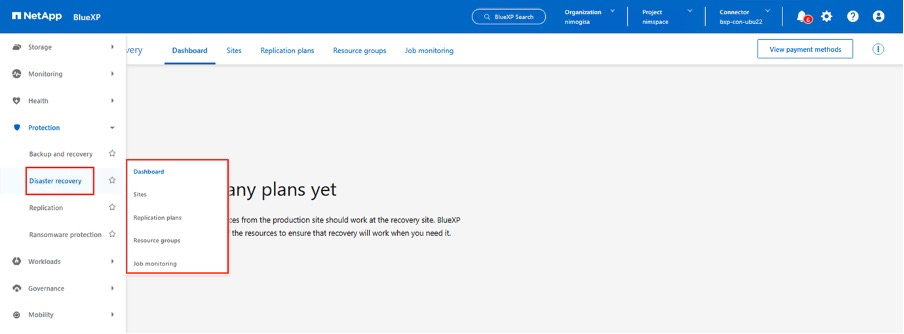
From the BlueXP left navigation, select Protection > Disaster recovery.
-
The BlueXP disaster recovery Dashboard appears.
Before configuring disaster recovery plan, ensure the following pre-requisites are met:
-
BlueXP Connector is set up in NetApp BlueXP.
-
BlueXP connector instance have connectivity to the source and destination workload domain vCenter and storage systems.
-
NetApp Data ONTAP cluster to provide storage NFS or VMFS datastores.
-
On-premises NetApp storage systems hosting NFS or VMFS datastores for VMware are added in BlueXP.
-
DNS resolution should be in place when using DNS names. Otherwise, use IP addresses for the vCenter.
-
SnapMirror replication is configured for the designated NFS or VMFS based datastore volumes.
-
Make sure that the environment has supported versions of vCenter Server and ESXi servers.
Once the connectivity is established between the source and destination sites, proceed with configuration steps, which should take couple of clicks and about 3 to 5 minutes.
Note: NetApp recommends deploying the BlueXP connector in the destination site or in a third site, so that the BlueXP connector can communicate through the network with source and destination resources.
In this demonstration, the workload domains are configured with ONTAP NFS storage. The steps in terms of workflow remains the same for VMFS based datastores.
BlueXP disaster recovery configuration
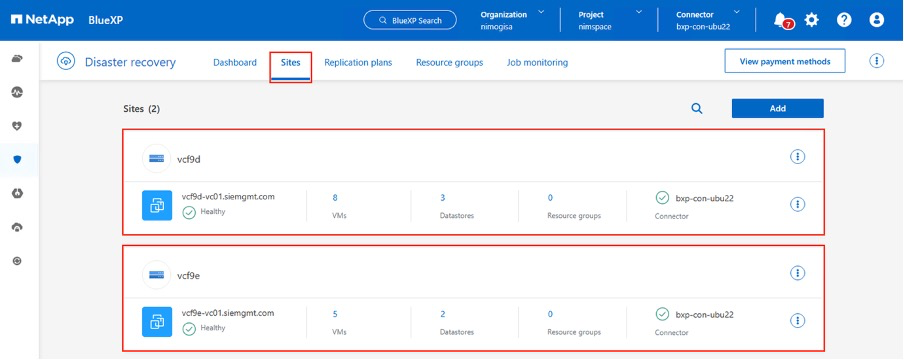
The first step in preparing for disaster recovery is to discover and add the source vCenter and storage resources to BlueXP disaster recovery.
Open BlueXP console and select Protection > Disaster Recovery from left navigation. Select Discover vCenter servers or use top menu, Select Sites > Add > Add vCenter.
Add the following platforms:
-
Source workload domain vCenter
-
Destination workload domain vCenter.
Once the vCenters are added, automated discovery is triggered.
Configuring Storage replication between source site array and destination site array
SnapMirror provides data replication in a NetApp environment. Built on NetApp Snapshot® technology, SnapMirror replication is extremely efficient because it replicates only the blocks that have been changed or added since the previous update. SnapMirror is easily configured by using either NetApp OnCommand® System Manager or the ONTAP CLI. BlueXP DRaaS also creates the SnapMirror relationship provided cluster and SVM peering is configured beforehand.
For cases in which the primary storage is not completely lost, SnapMirror provides an efficient means of resynchronizing the primary and DR sites. SnapMirror can resynchronize the two sites, transferring only changed or new data back to the primary site from the DR site by simply reversing the SnapMirror relationships. This means replication plans in BlueXP DRaaS can be resynchronized in either direction after a failover without recopying the entire volume. If a relationship is resynchronized in the reverse direction, only new data that was written since the last successful synchronization of the Snapshot copy is sent back to the destination.

|
If SnapMirror relationship is already configured for the volume via CLI or System Manager, BlueXP DRaaS picks up the relationship and continues with the rest of the workflow operations. |
How to set it up for VMware Disaster Recovery
The process to create SnapMirror replication remains the same for any given application. The process can be manual or automated. The easiest way is to leverage BlueXP DRaaS which will automate the same provided the following two criteria’s are met:
-
Source and destination clusters have a peer relationship.
-
Source SVM and destination SVM have a peer relationship.
BlueXP also provides an alternate option to configure SnapMirror replication by using simple drag & drop of the source ONTAP system in the environment onto the destination to trigger the wizard that guides through the rest of the process.
What can BlueXP disaster recovery do for you?
After the source and destination sites are added, BlueXP disaster recovery performs automatic deep discovery and displays the VMs along with associated metadata. BlueXP disaster recovery also automatically detects the networks and port groups used by the VMs and populates them.
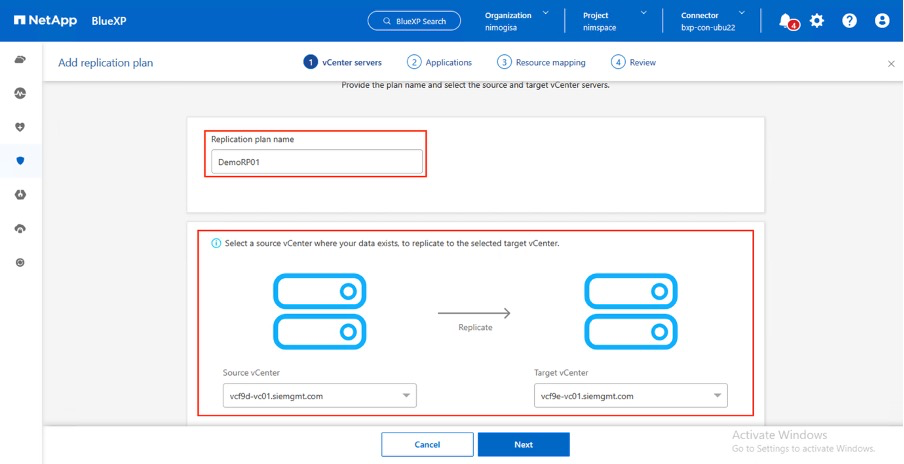
After the sites have been added, configure the replication plan by selecting the source and destination vCenter platforms from the drop down and pick the resource groups to be included in the plan, along with the grouping of how applications should be restored and powered on and mapping of clusters and networks. To define the recovery plan, navigate to the Replication Plan tab and click Add Plan.
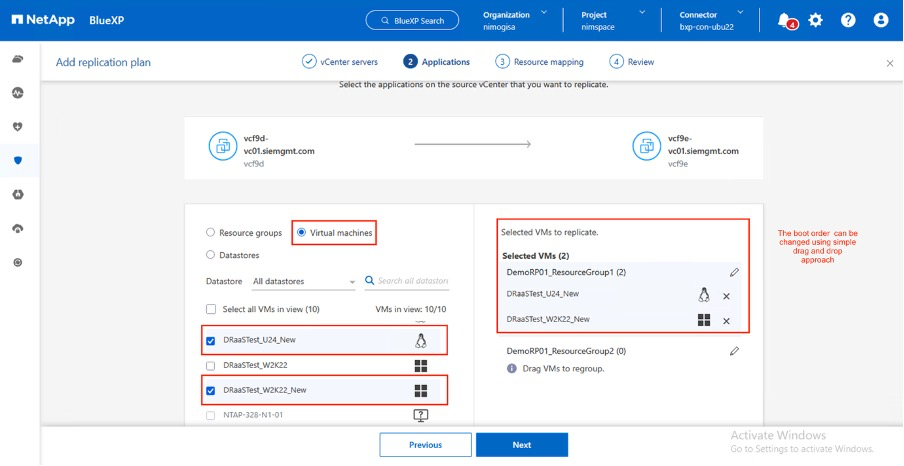
In this step, the VMs can be grouped into resource groups. BlueXP disaster recovery resource groups allow you to group a set of dependent VMs into logical groups that contain their boot orders and boot delays that can be executed upon recovery. The resource group can also be created using Resource group tab.
First, select the source vCenter and then select the destination vCenter.
The next step is to select existing resource groups. If no resource groups created, then the wizard helps to group the required virtual machines (basically create functional resource groups) based on the recovery objectives. This also helps define the operation sequence of how application virtual machines should be restored.
|
|
Resource group allows to set boot order using the drag and drop functionality. It can be used to easily modify the order in which the VMs would be powered on during the recovery process. |
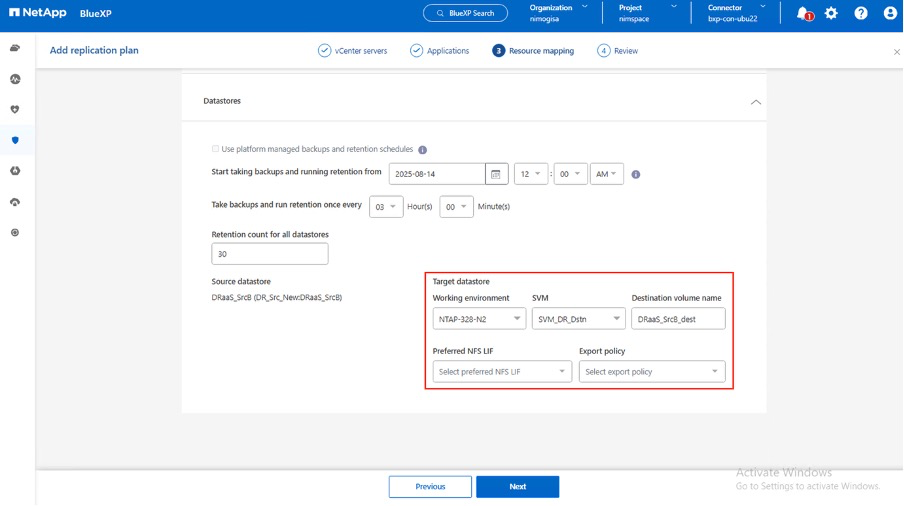
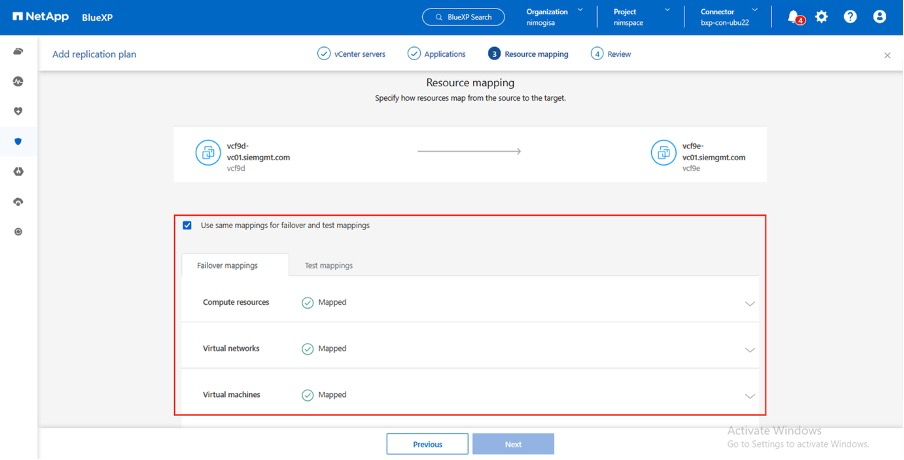
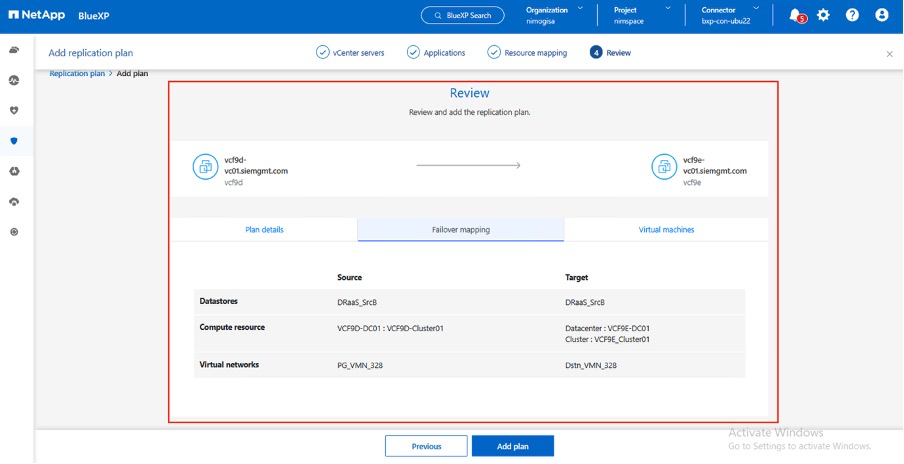
Once the resource groups are created via replication plan, the next step is to select the blueprint or a mapping to recover virtual machines and applications in the event of a disaster. In this step, specify how the resources from the source environment maps to the destination. This includes compute resources, virtual networks, IP customization, pre- and post-scripts, boot delays, application consistency and so on. For detailed information, refer to Create a replication plan. As mentioned in the prerequisites, SnapMirror replication can be configured beforehand or DRaaS can configure it using the RPO and retention count specified during creation of the replication plan.
Note: By default, same mapping parameters are used for both test and failover operations. To set different mappings for test environment, select the Test mapping option after unchecking the checkbox “Use same mappings for failover and test mappings”. Once the resource mapping is complete, click Next.
Once done, review the created mappings and then click on Add plan.
|
|
VMs from different volumes and SVMs can be included in a replication plan. Depending on the VM placement (be it on same volume or separate volume within the same SVM, separate volumes on different SVMs), the BlueXP disaster recovery creates a Consistency Group Snapshot. |
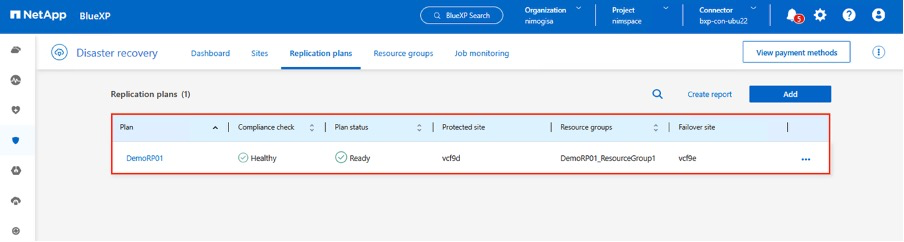
As soon as the plan is created, a series of validations are triggered and SnapMirror replication and schedules are configured as per the selection.
BlueXP DRaaS consists of the following workflows:
-
Test failover (including periodic automated simulations)
-
Cleanup failover test
-
Failover:
-
Planned migration (extend the usecase for one time failover)
-
Disaster recovery
-
-
Failback
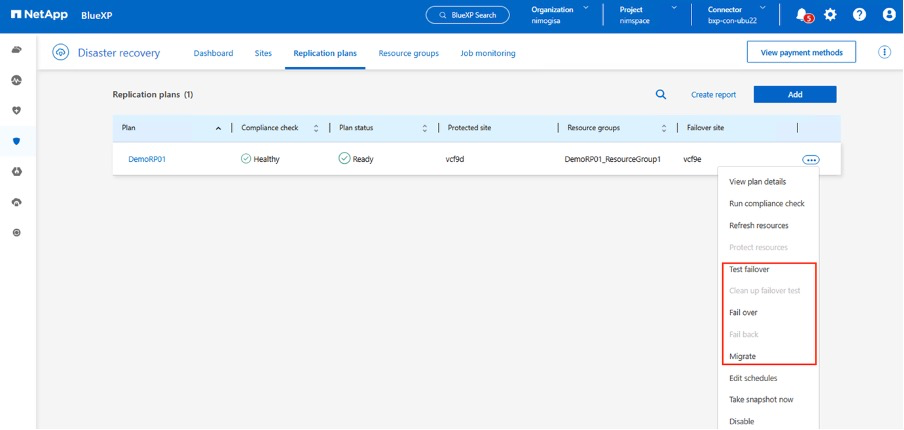
Test failover
Test failover in BlueXP DRaaS is an operational procedure that allows VMware administrators to fully validate their recovery plans without disrupting their production environments.
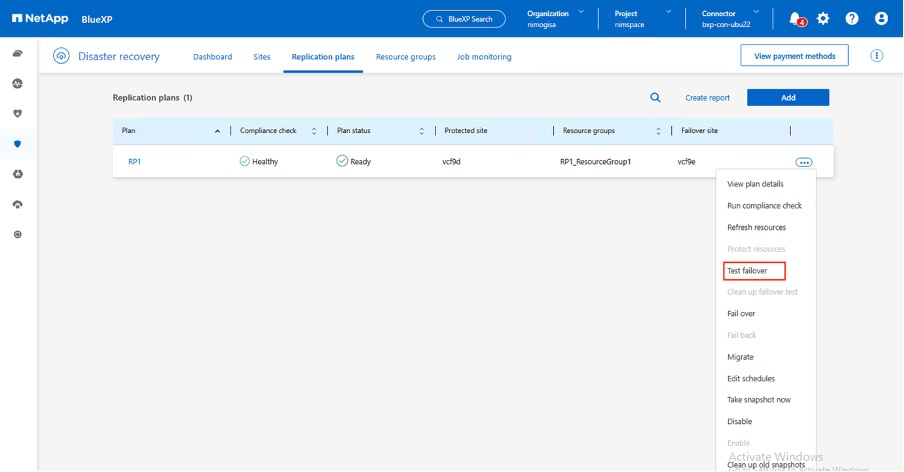
BlueXP DRaaS incorporates the ability to select the snapshot as an optional capability in the test failover operation. This capability allows the VMware administrator to verify that any changes that were recently made in the environment are replicated to the destination site and thus are present during the test. Such changes include patches to the VM guest operating system.
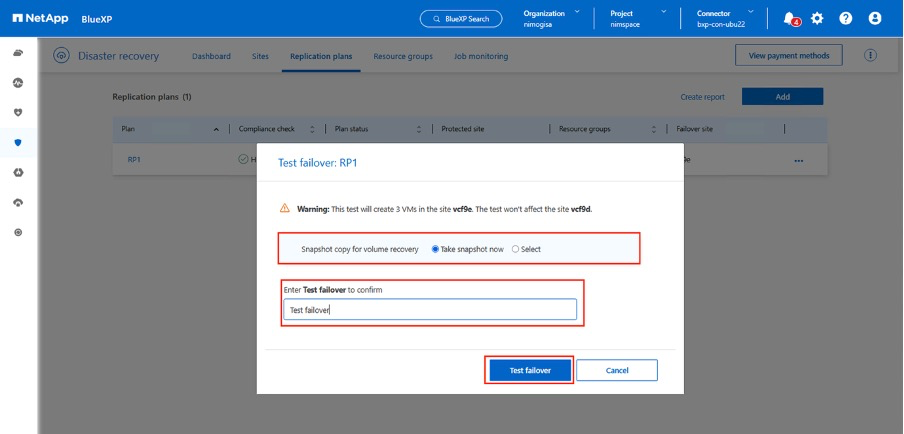
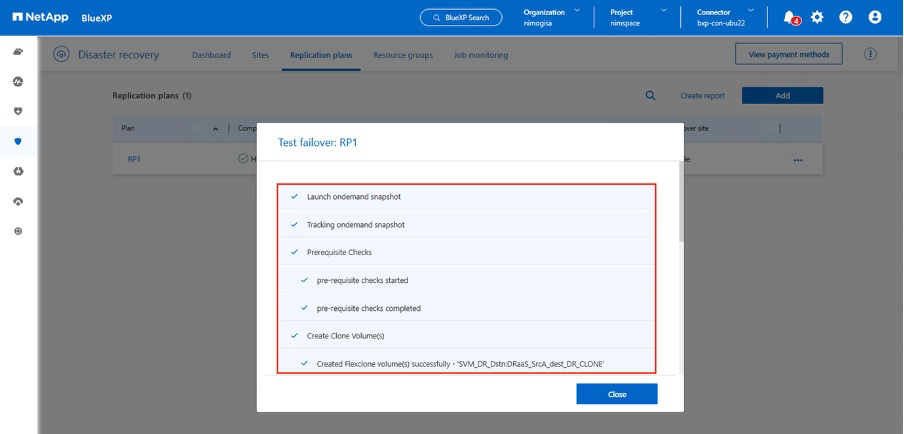
When the VMware administrator runs a test failover operation, BlueXP DRaaS automates the following tasks:
-
Triggering SnapMirror relationships to update storage at the destination site with any recent changes that were made at the production site.
-
Creating NetApp FlexClone volumes of the FlexVol volumes on the DR storage array.
-
Connecting the datastores in the FlexClone volumes to the ESXi hosts at the DR site.
-
Connecting the VM network adapters to the test network specified during the mapping.
-
Reconfiguring the VM guest operating system network settings as defined for the network at the DR site.
-
Executing any custom commands that have been stored in the replication plan.
-
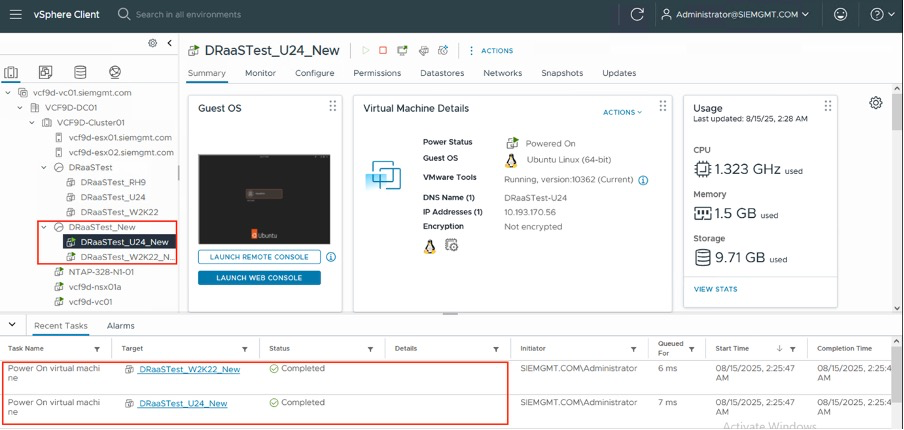
Powering on the VMs in the order that is defined in the replication plan.
Cleanup failover test Operation
The cleanup failover test operation occurs after the replication plan test has been completed and the VMware administrator responds to the cleanup prompt.
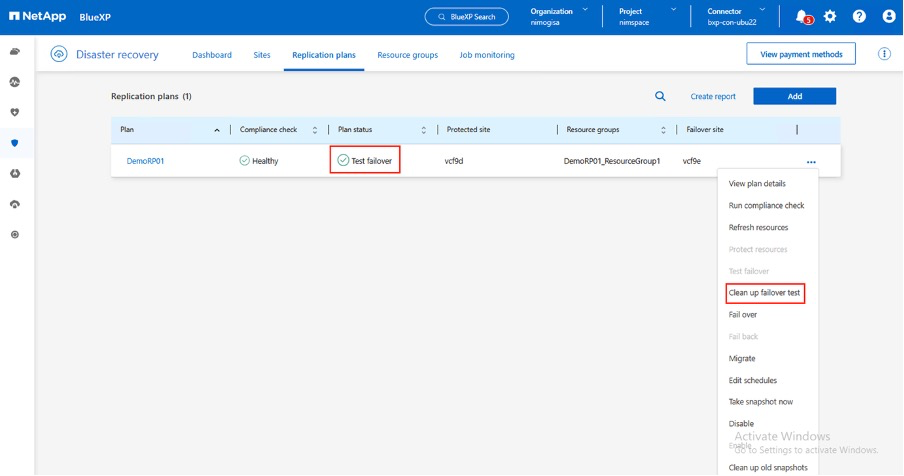
This action will reset the virtual machines (VMs) and the status of the replication plan to the ready state.
When the VMware administrator performs a recovery operation, BlueXP DRaaS completes the following process:
-
It powers off each recovered VM in the FlexClone copy that was used for testing.
-
It deletes the FlexClone volume that was used to present the recovered VMs during the test.
Planned Migration and Fail over
BlueXP DRaaS has two methods for performing a real failover: planned migration and fail over. The first method, planned migration, incorporates VM shutdown and storage replication synchronization into the process to recover or effectively move the VMs to the destination site. Planned migration requires access to the source site. The second method, failover, is a planned/unplanned failover in which the VMs are recovered at the destination site from the last storage replication interval that was able to complete. Depending on the RPO that was designed into the solution, some amount of data loss can be expected in the DR scenario.
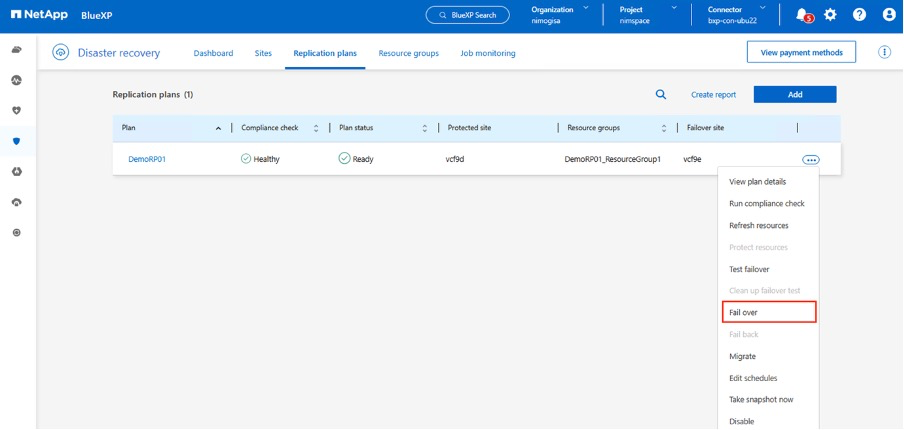
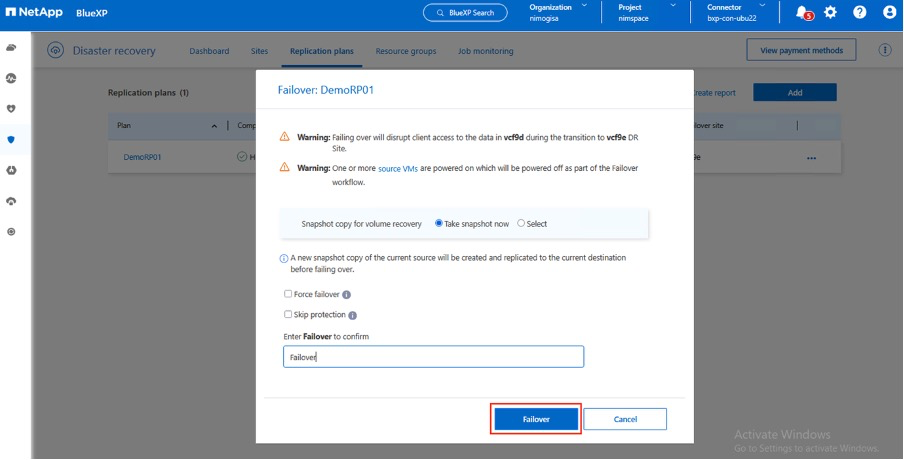
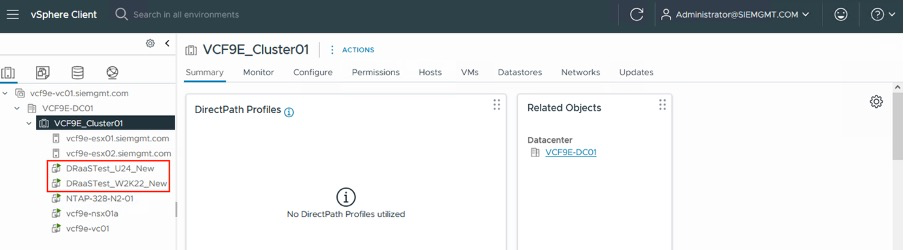
When the VMware administrator performs a failover operation, BlueXP DRaaS automates the following tasks:
-
Break and fail over the NetApp SnapMirror relationships.
-
Connect the replicated datastores to the ESXi hosts at the DR site.
-
Connect the VM network adapters to the appropriate destination site network.
-
Reconfigure the VM guest operating system network settings as defined for the network at the destination site.
-
Execute any custom commands (if any) that have been stored in the replication plan.
-
Power on the VMs in the order that was defined in the replication plan.
Failback
A failback is an optional procedure that restores the original configuration of the source and destination sites after a recovery.

VMware administrators can configure and run a failback procedure when they are ready to restore services to the original source site.
|
|
BlueXP DRaaS replicates (resyncs) any changes back to the original source virtual machine before reversing the replication direction. |
This process starts from a relationship that has completed failing over to a target and involves the following steps:
-
Power off and unregister the virtual machines and volumes on the destination site are unmounted.
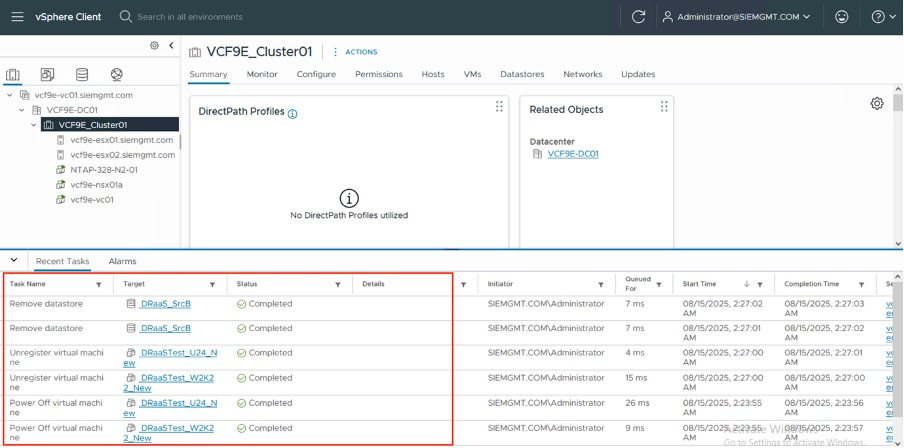
-
Break the SnapMirror relationship on the original source is broken to make it read/write.
-
Resynchronize the SnapMirror relationship to reverse the replication.
-
Mount the volume on the source, power on and register the source virtual machines.
For more details about accessing and configuring BlueXP DRaaS, see the Learn about BlueXP Disaster Recovery for VMware.
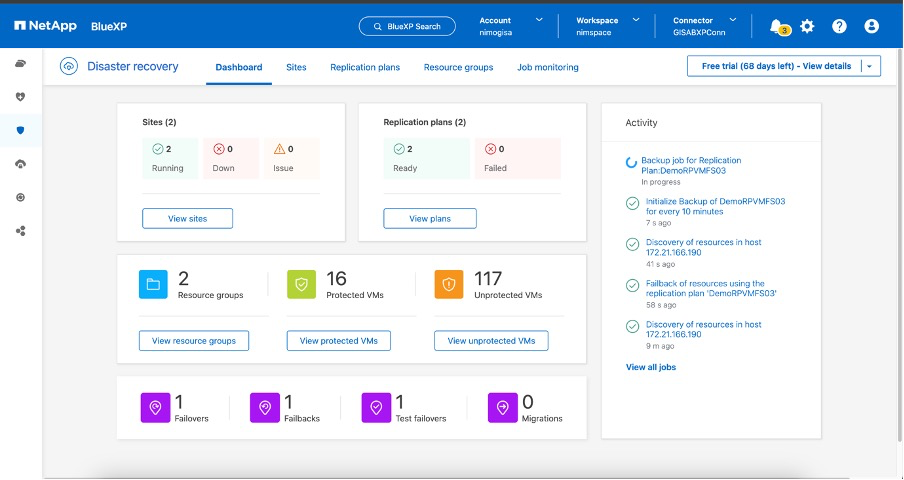
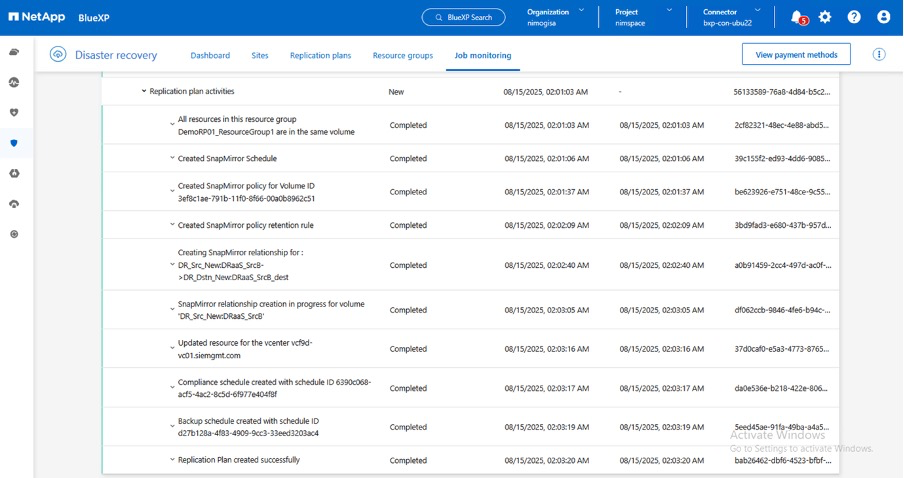
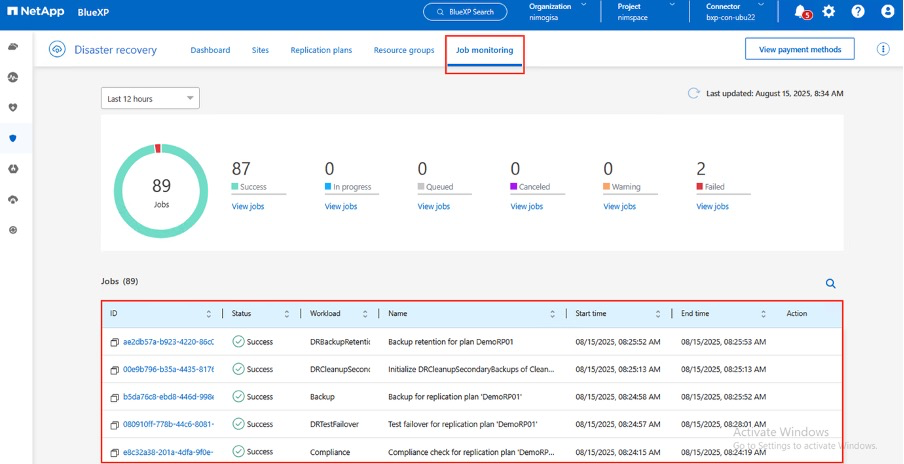
Monitoring and Dashboard
From BlueXP or the ONTAP CLI, you can monitor the replication health status for the appropriate datastore volumes, and the status of a failover or test failover can be tracked via Job Monitoring.
|
|
If a job is currently in progress or queued, and you wish to stop it, there is an option to cancel it. |
With the BlueXP disaster recovery dashboard, confidently evaluate the status of disaster recovery sites and replication plans. This enables administrators to swiftly identify healthy, disconnected, or degraded sites and plans.
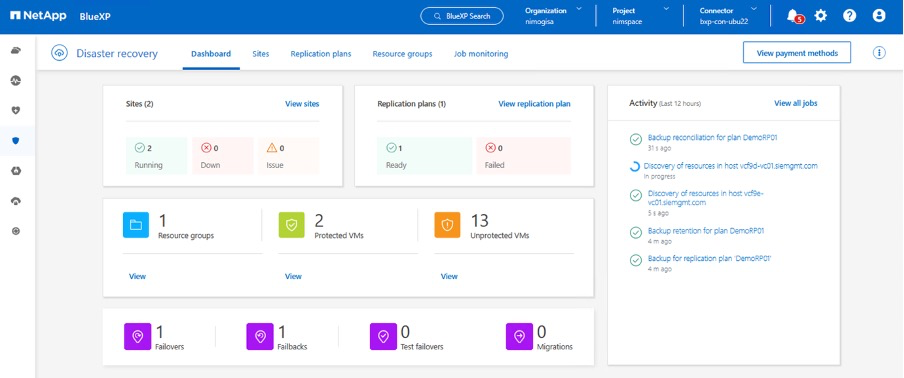
This provides a powerful solution to handle a tailored and customized disaster recovery plan. Failover can be done as planned failover or failover with a click of a button when disaster occurs and decision is made to activate the DR site.