

Use SnapCenter Plug-in for VMware vSphere to protect VMs on VCF Workload Domains
 Suggest changes
In this scenario we will demonstrate how to deploy and use the SnapCenter Plug-in for VMware vSphere (SCV) to backup and restore VM's and datastores on a VCF workload domain. SCV uses ONTAP snapshot technology to take fast and efficient backup copies of the ONTAP storage volumes hosting vSphere datastores. SnapMirror and SnapVault technology are used to create secondary backups on a separate storage system and with retention policies that mimic the original volume or can be independent of the original volume for longer term retention.
iSCSI is used as the storage protocol for the VMFS datastore in this solution.
Author: Josh Powell
Scenario Overview
This scenario covers the following high level steps:
-
Deploy the SnapCenter Plug-in for VMware vSphere (SCV) on the VI workload domain.
-
Add storage systems to SCV.
-
Create backup policies in SCV.
-
Create Resource Groups in SCV.
-
Use SCV to backup datastores or specific VMs.
-
Use SCV to restores VMs to an alternate location in the cluster.
-
Use SCV to restores files to a windows file system.
Prerequisites
This scenario requires the following components and configurations:
-
An ONTAP ASA storage system with iSCSI VMFS datastores allocated to the workload domain cluster.
-
A secondary ONTAP storage system configured to received secondary backups using SnapMirror.
-
VCF management domain deployment is complete and the vSphere client is accessible.
-
A VI workload domain has been previously deployed.
-
Virtual machines are present on the cluster SCV is designated to protect.
For information on configuring iSCSI VMFS datastores as supplemental storage refer to iSCSI as supplemental storage for Management Domains in this documentation. The process for using OTV to deploy datastores is identical for management and workload domains.

|
In addition to replicating backups taken with SCV to secondary storage, offsite copies of data can be made to object storage on one of the three (3) leading cloud providers using NetApp BlueXP backup and recovery for VMs. For more information refer to the solution 3-2-1 Data Protection for VMware with SnapCenter Plug-in and BlueXP backup and recovery for VMs. |

Deployment Steps
To deploy the SnapCenter Plug-in and use it to create backups, and restore VMs and datastores, complete the following steps:
Deploy and use SCV to protect data in a VI workload domain
Complete the following steps to deploy, configure, and use SCV to protect data in a VI workload domain:
Deploy the SnapCenter Plug-in for VMware vSphere
The SnapCenter Plug-in is hosted on the VCF management domain but registered to the vCenter for the VI workload domain. One SCV instance is required for each vCenter instance and, keep in mind that, a Workload domain can include multiple clusters managed by a single vCenter instance.
Complete the following steps from the vCenter client to deploy SCV to the VI workload domain:
-
Download the OVA file for the SCV deployment from the download area of the NetApp support site HERE.
-
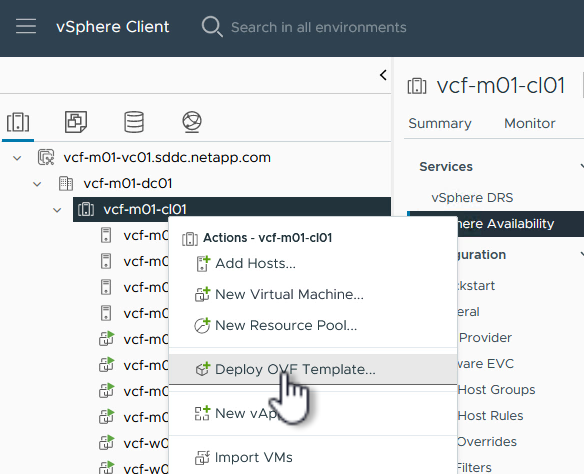
From the management domain vCenter Client, select to Deploy OVF Template….
-
In the Deploy OVF Template wizard, click on the Local file radio button and then select to upload the previously downloaded OVF template. Click on Next to continue.

-
On the Select name and folder page, provide a name for the SCV data broker VM and a folder on the management domain. Click on Next to continue.
-
On the Select a compute resource page, select the management domain cluster or specific ESXi host within the cluster to install the VM to.
-
Review information pertaining to the OVF template on the Review details page and agree to the licensing terms on the Licensing agreements page.
-
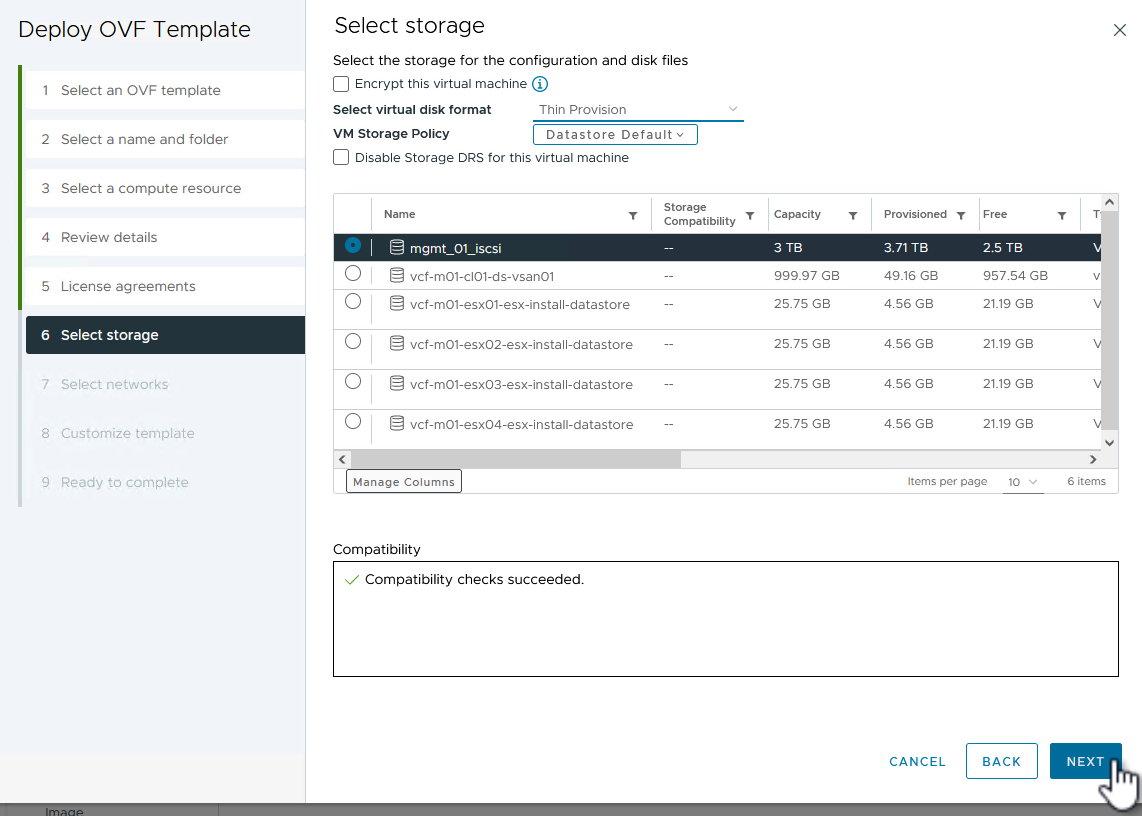
On the Select storage page choose the datastore which the VM will be installed to and select the virtual disk format and VM Storage Policy. In this solution, the VM will be installed on an iSCSI VMFS datastore located on an ONTAP storage system, as previously deployed in a separate section of this documentation. Click on Next to continue.
-
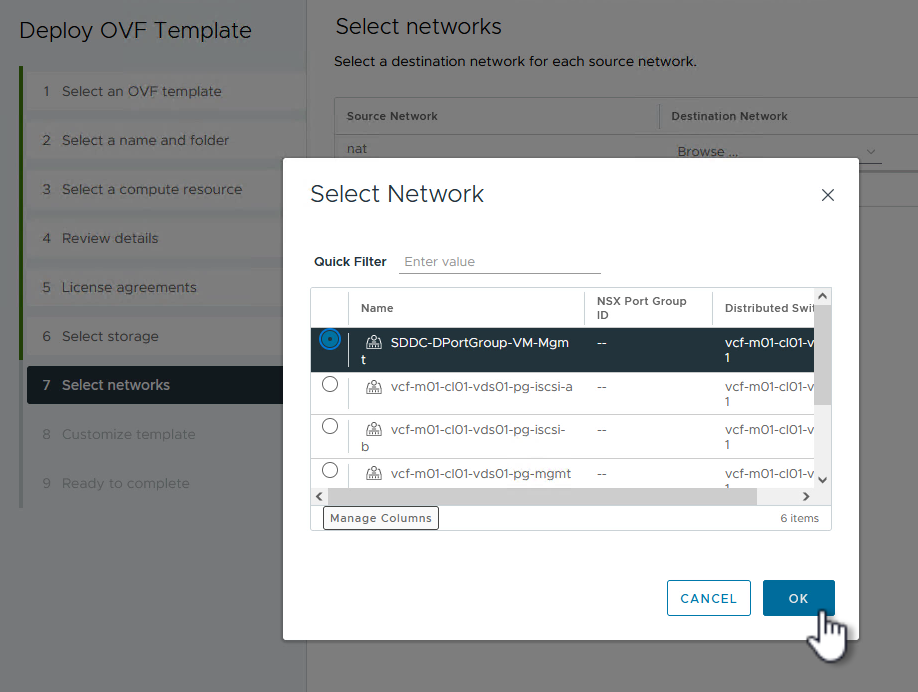
On the Select network page, select the management network that is able to communicate with the workload domain vCenter appliance and both the primary and secondary ONTAP storage systems.
-
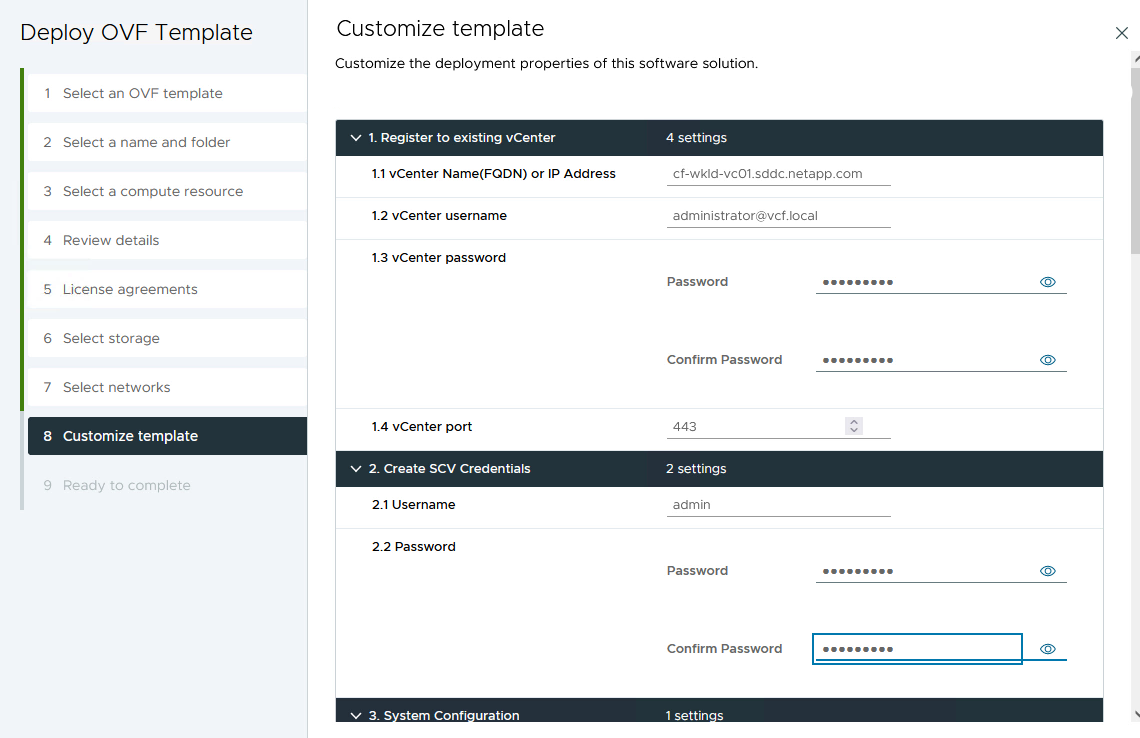
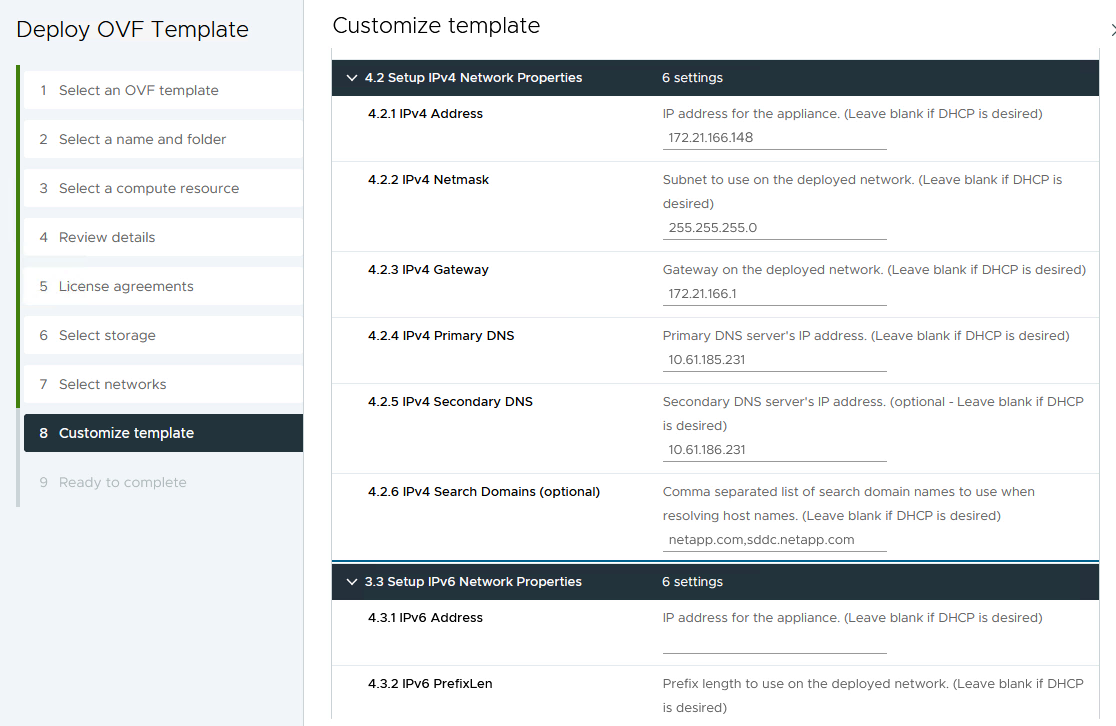
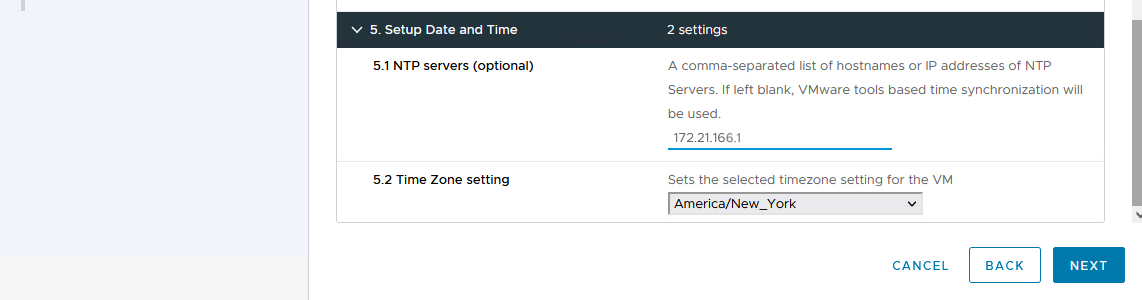
On the Customize template page fill out all information required for the deployment:
-
FQDN or IP, and credentials for the workload domain vCenter appliance.
-
Credentials for the SCV administrative account.
-
Credentials for the SCV maintenance account.
-
IPv4 Network Properties details (IPv6 can also be used).
-
Date and Time settings.
Click on Next to continue.
-
-
Finally, on the Ready to complete page, review all settings and click on Finish to start the deployment.
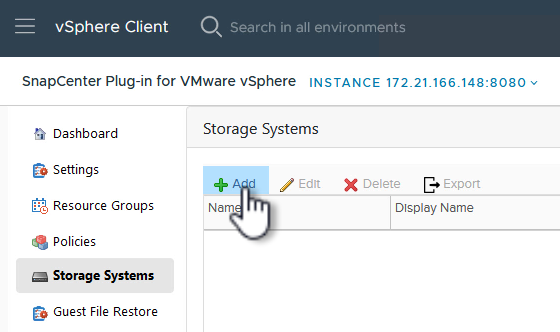
Add Storage Systems to SCV
Once the SnapCenter Plug-in is installed complete the following steps to add storage systems to SCV:
-
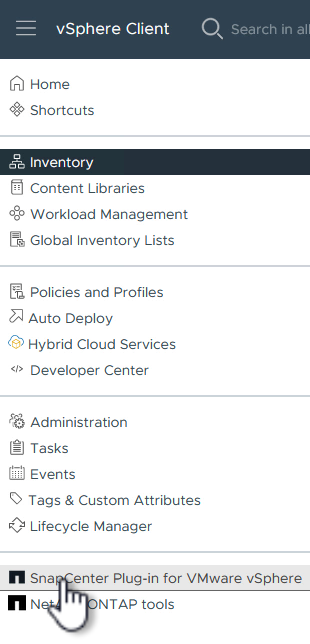
SCV can be accessed from the main menu in the vSphere Client.
-
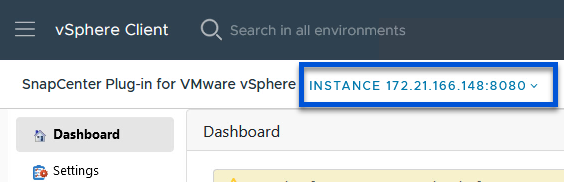
At the top of the SCV UI interface, select the correct SCV instance that matches the vSphere cluster to be protected.
-
Navigate to Storage Systems in the left-hand menu and click on Add to get started.
-
On the Add Storage System form, fill in the IP address and credentials of the ONTAP storage system to be added, and click on Add to complete the action.
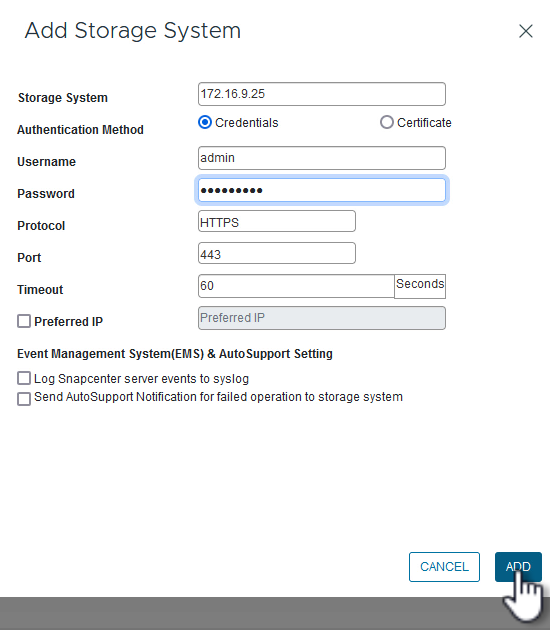
-
Repeat this procedure for any additional storage systems to be managed, including any systems to be used as secondary backup targets.
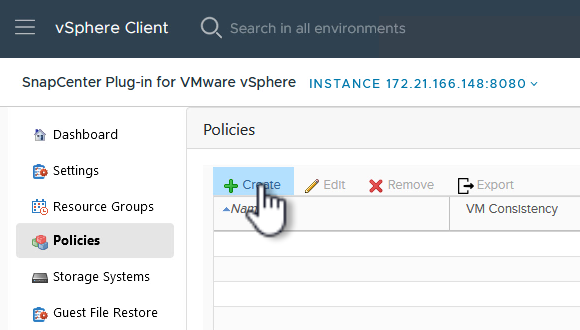
Configure backup policies in SCV
For more information on creating SCV backup policies refer to Create backup policies for VMs and datastores.
Complete the following steps to create a new backup policy:
-
From the left-hand menu select Policies and click on Create to begin.
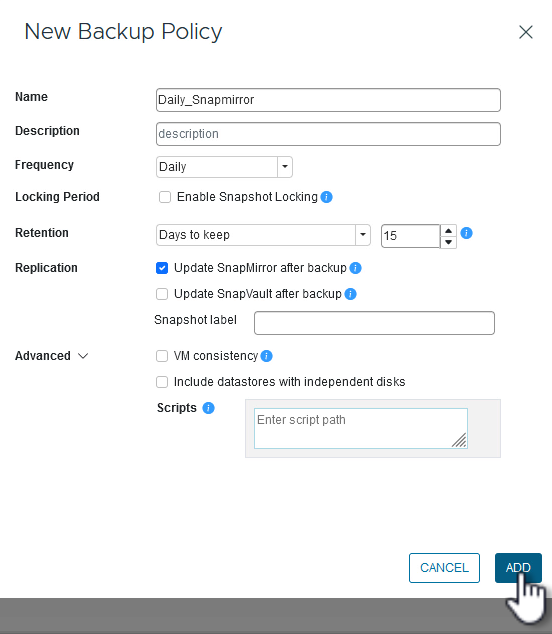
-
On the New Backup Policy form, provide a Name and Description for the policy, the Frequency at which the backups will take place, and the Retention period which specifies how long the backup is retained.
Locking Period enables the ONTAP SnapLock feature to create tamper proof snapshots and allows configuration of the locking period.
For Replication Select to update the underlying SnapMirror or SnapVault relationships for the ONTAP storage volume.
SnapMirror and SnapVault replication are similar in that they both utilize ONTAP SnapMirror technology to asynchronously replicate storage volumes to a secondary storage system for increased protection and security. For SnapMirror relationships, the retention schedule specified in the SCV backup policy will govern retention for both the primary and secondary volume. With SnapVault relationships, a separate retention schedule can be established on the secondary storage system for longer term or differing retention schedules. In this case the snapshot label is specified in the SCV backup policy and in the policy associated with the secondary volume, to identify which volumes to apply the independent retention schedule to. Choose any additional advanced options and click on Add to create the policy.
Create resource groups in SCV
For more information on creating SCV Resource Groups refer to Create resource groups.
Complete the following steps to create a new resource group:
-
From the left-hand menu select Resource Groups and click on Create to begin.

-
On the General info & notification page, provide a name for for the resource group, notification settings, and any additional options for the naming of the snapshots.
-
On the Resource page select the datastores and VM's to be protected in the resource group. Click on Next to continue.
Even when only specific VMs are selected, the entire datastore is always backed up. This is because ONTAP takes snapshots of the volume hosting the datastore. However, note that selecting only specific VMs for backup limits the ability to restore to only those VMs. 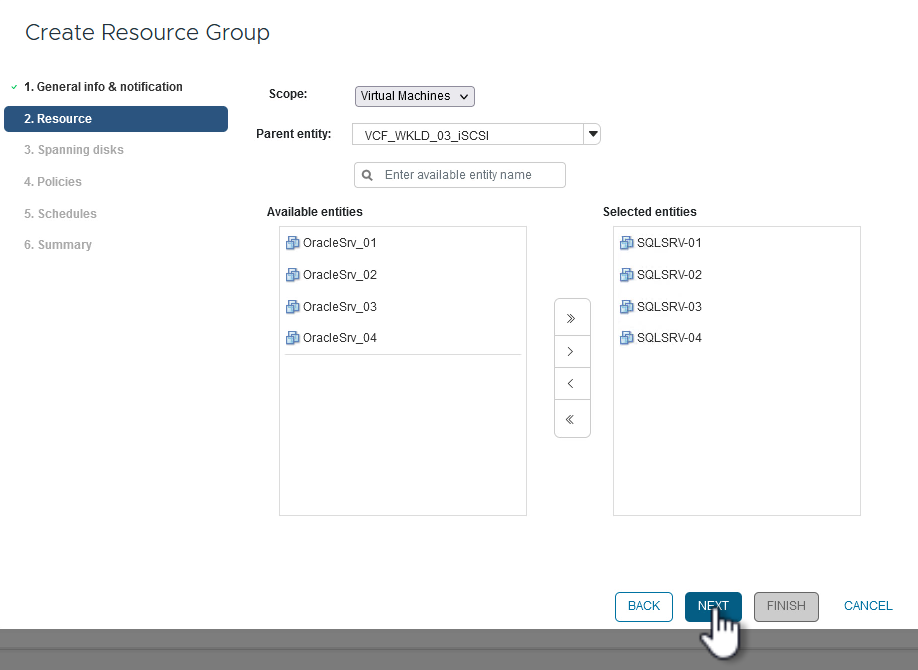
-
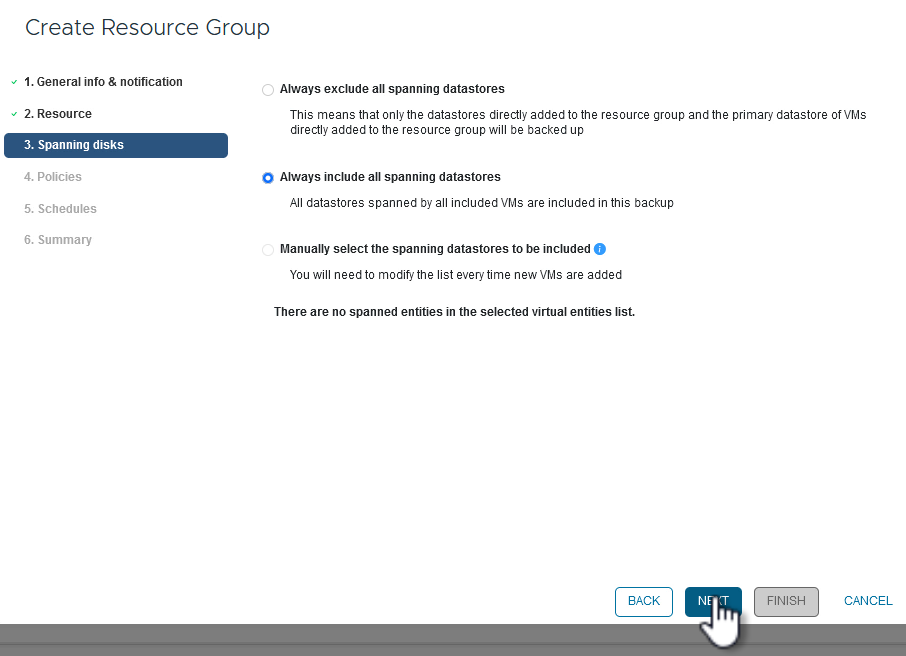
On the Spanning disks page select the option for how to handle VMs with VMDK's that span multiple datastores. Click on Next to continue.
-
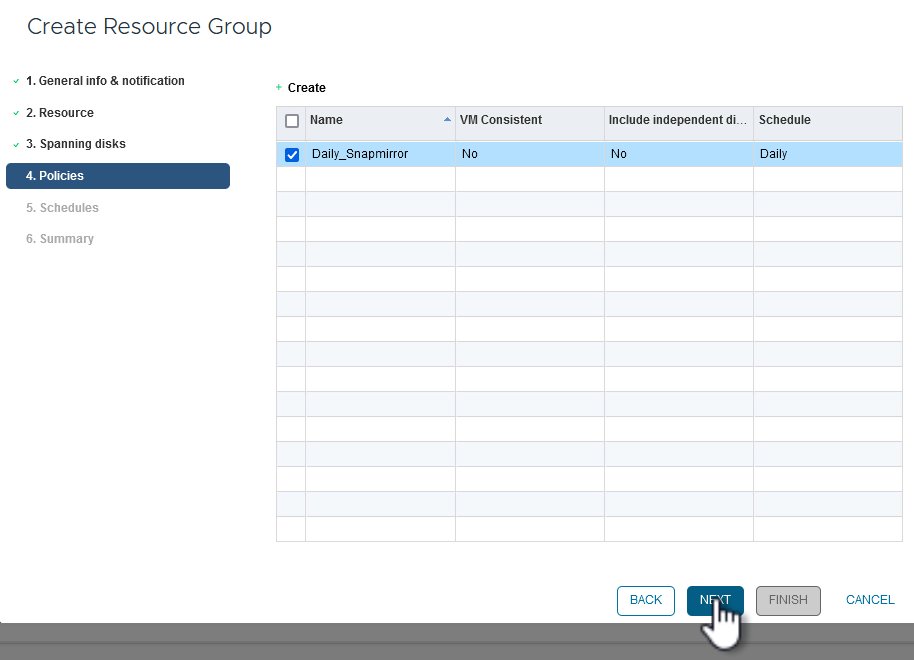
On the Policies page select a previously created policy or multiple policies that will be used with this resource group. Click on Next to continue.
-
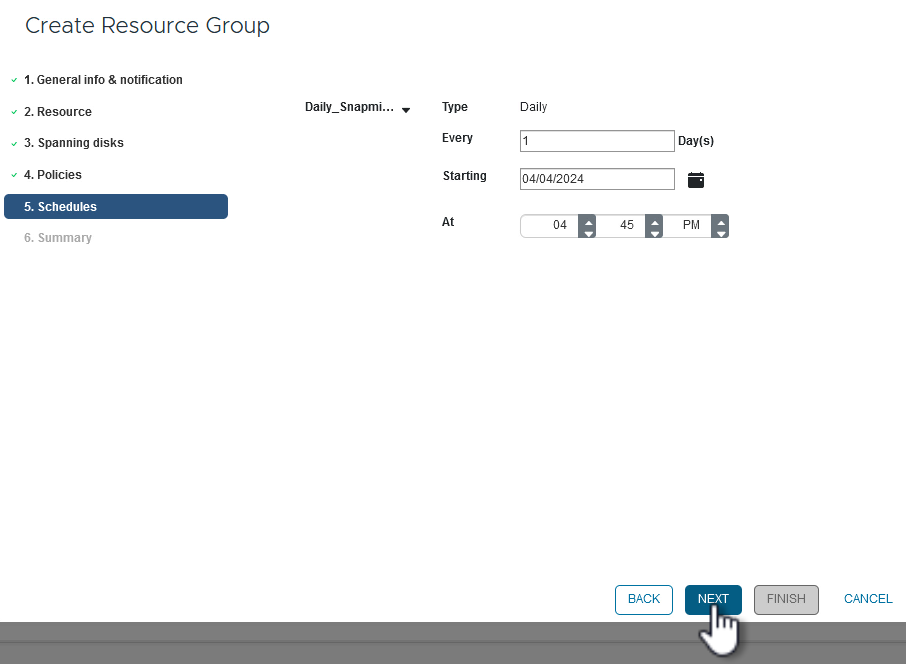
On the Schedules page establish for when the backup will run by configuring the recurrence and time of day. Click on Next to continue.
-
Finally review the Summary and click on Finish to create the resource group.
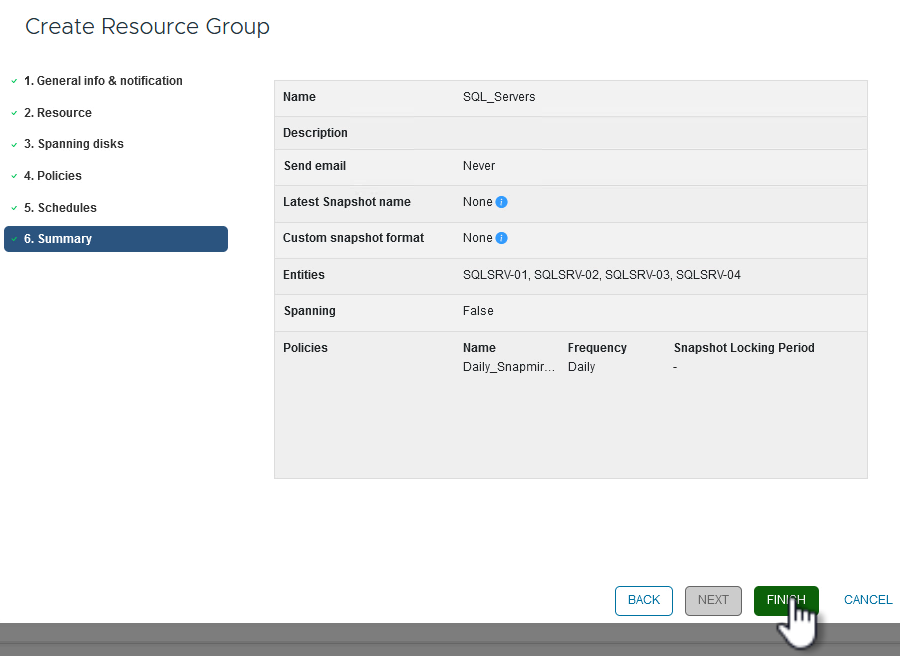
-
With the resource group created click on the Run Now button to run the first backup.
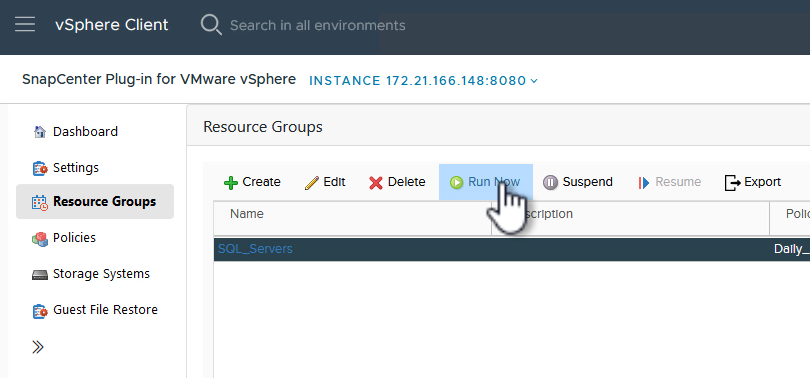
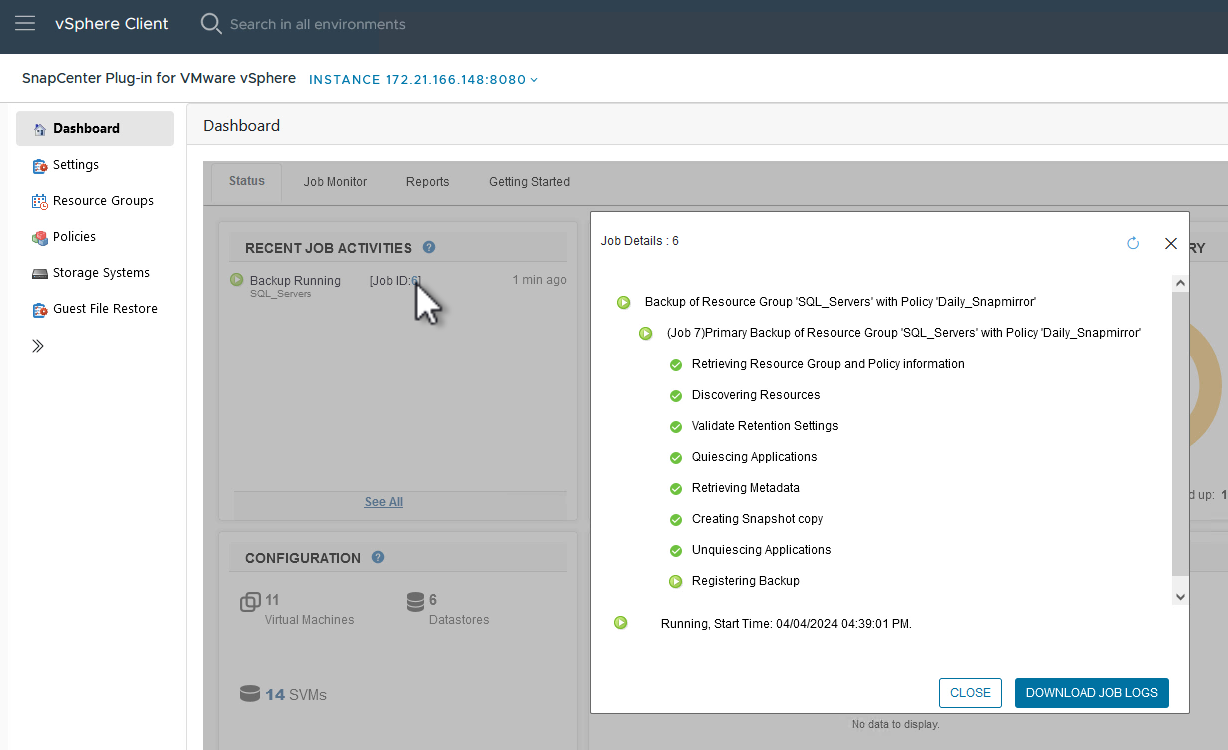
-
Navigate to the Dashboard and, under Recent Job Activities click on the number next to Job ID to open the job monitor and view the progress of the running job.
Use SCV to restore VMs, VMDKs and files
The SnapCenter Plug-in allows restores of VMs, VMDKs, files, and folders from primary or secondary backups.
VMs can be restored to the original host, or to an alternate host in the same vCenter Server, or to an alternate ESXi host managed by the same vCenter or any vCenter in linked mode.
vVol VMs can be restored to the original host.
VMDKs in traditional VMs can be restored to either the original or to an alternate datastore.
VMDKs in vVol VMs can be restored to the original datastore.
Individual files and folders in a guest file restore session can be restored, which attaches a backup copy of a virtual disk and then restores the selected files or folders.
Complete the following steps to restore VMs, VMDKs or individual folders.
Restore VMs using SnapCenter Plug-in
Complete the following steps to restore a VM with SCV:
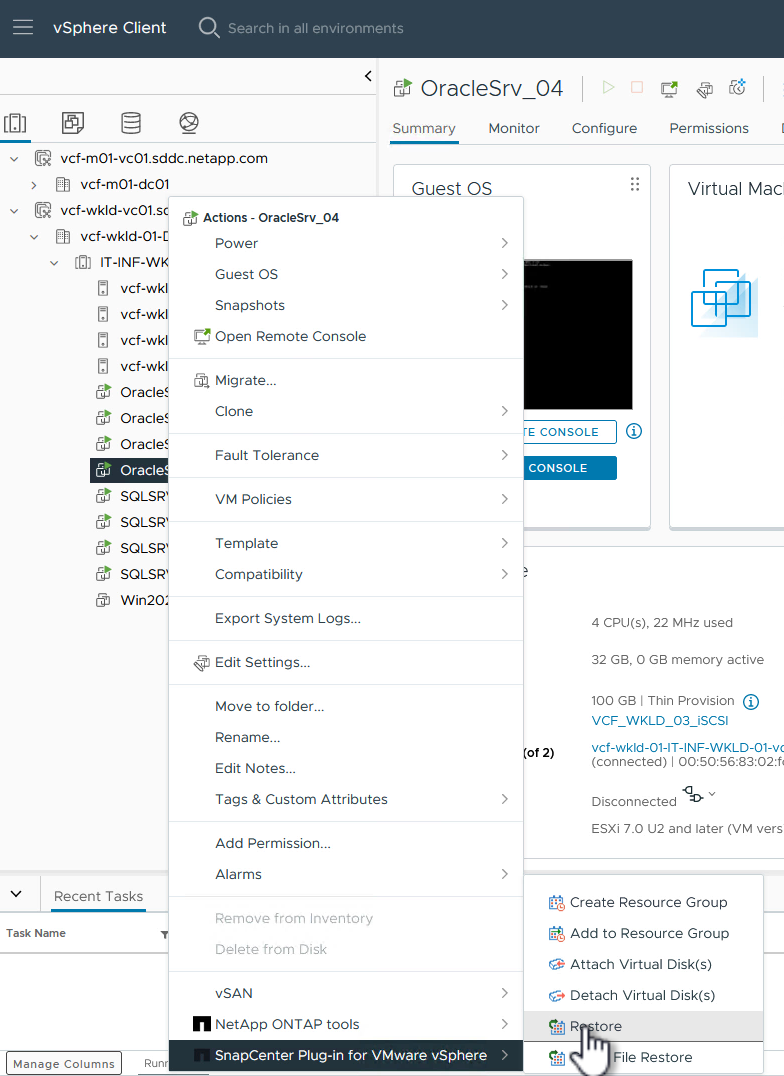
-
Navigate to the VM to be restored in the vSphere client, right click and navigate to SnapCenter Plug-in for VMware vSphere. Select Restore from the sub-menu.
An alternative is to navigate to the datastore in inventory and then under the Configure tab go to SnapCenter Plug-in for VMware vSphere > Backups. From the chosen backup, select the VMs to be restored. 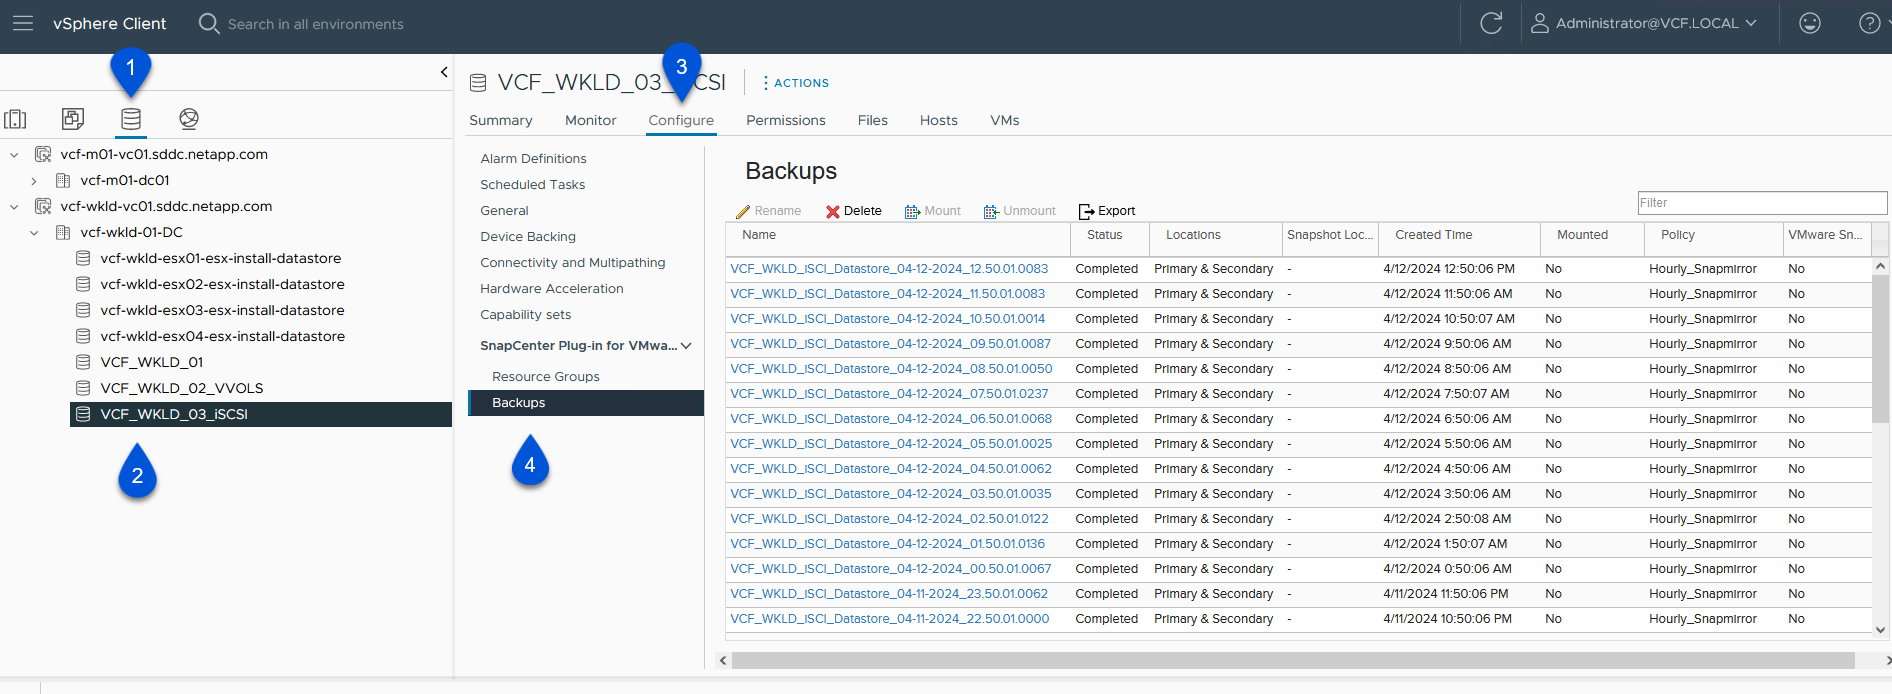
-
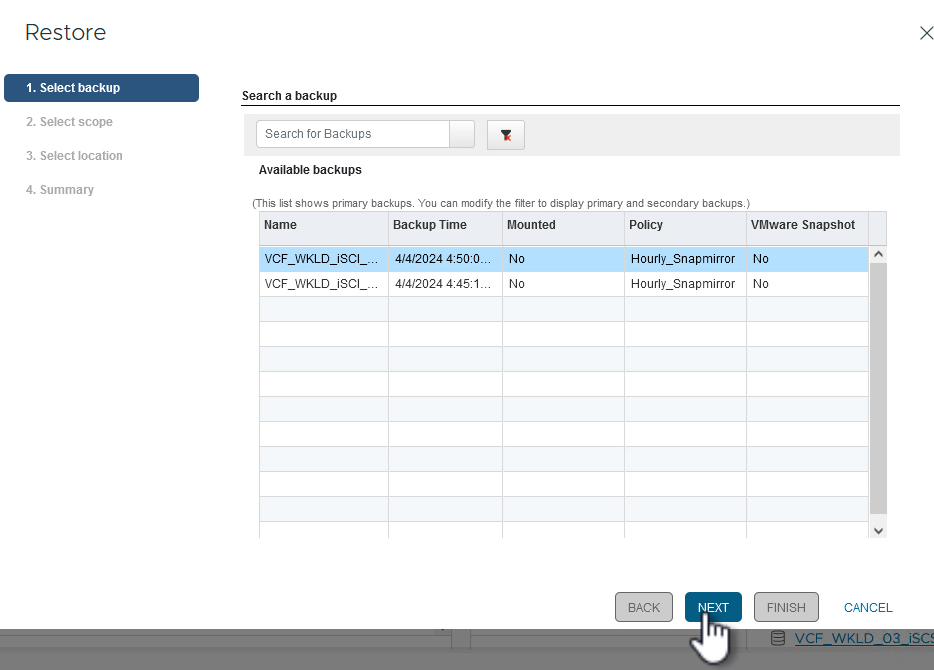
In the Restore wizard select the backup to be used. Click on Next to continue.
-
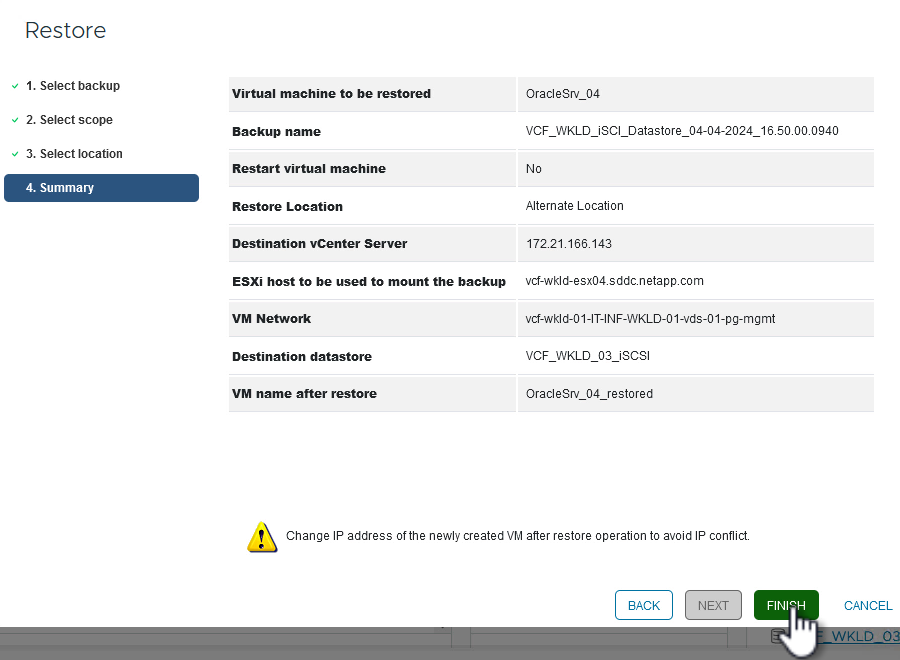
On the Select scope page fill out all required fields:
-
Restore scope - Select to restore the entire virtual machine.
-
Restart VM - Choose whether to start the VM after the restore.
-
Restore Location - Choose to restore to the orginal location or to an alternate location. When choosing alternate location select the options from each of the fields:
-
Destination vCenter Server - local vCenter or alternate vCenter in linked mode
-
Destination ESXi host
-
Network
-
VM name after restore
-
Select datastore:
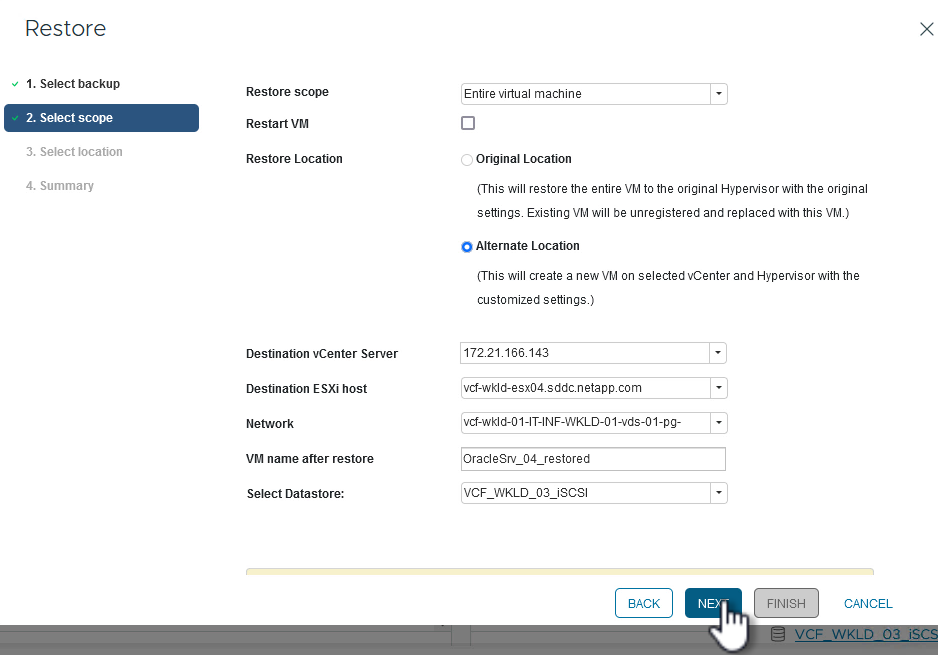
Click on Next to continue.
-
-
-
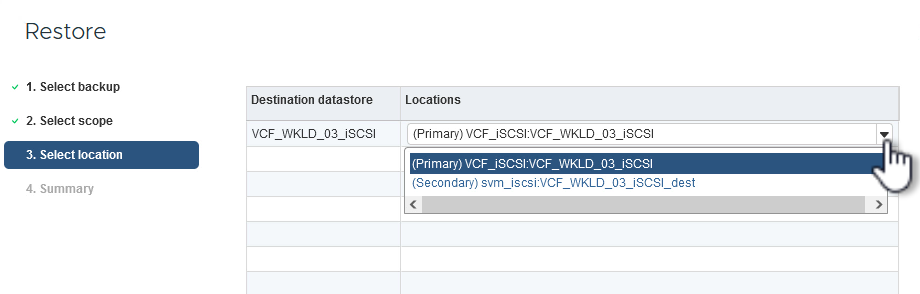
On the Select location page, choose to restore the VM from the primary or secondary ONTAP storage system. Click on Next to continue.
-
Finally, review the Summary and click on Finish to start the restore job.
-
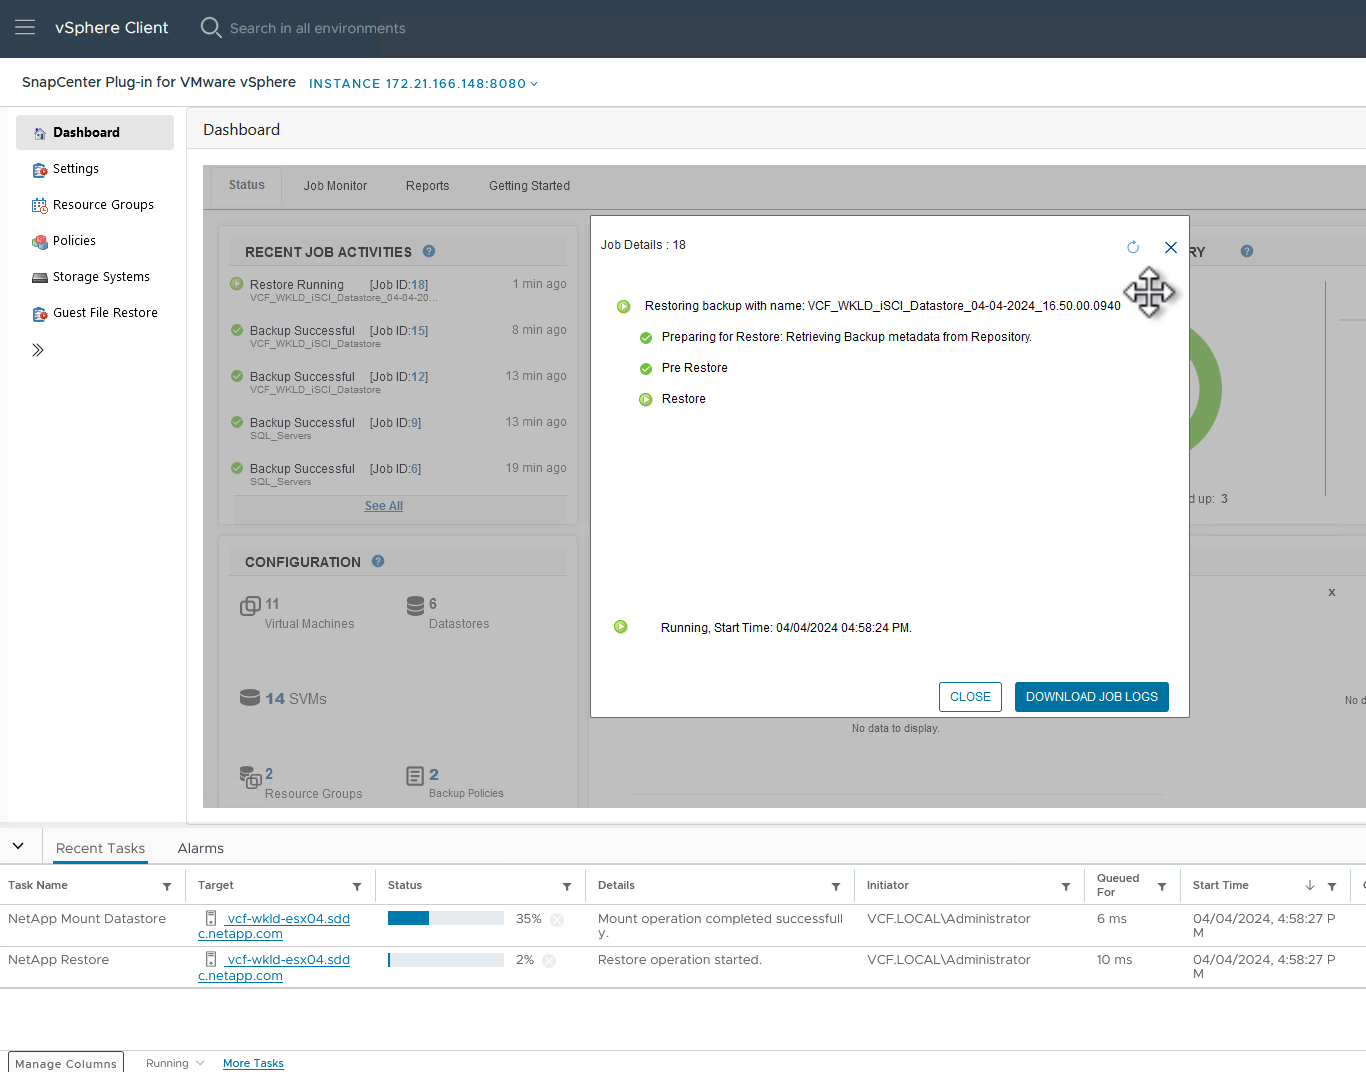
The restore job progress can be monitored from the Recent Tasks pane in the vSphere Client and from the job monitor in SCV.
Restore VMDKs using SnapCenter Plug-in
ONTAP Tools allows full restore of VMDK's to their original location or the ability to attach a VMDK as a new disk to a host system. In this scenario a VMDK will be attached to a Windows host in order to access the file system.
To attach a VMDK from a backup, complete the following steps:
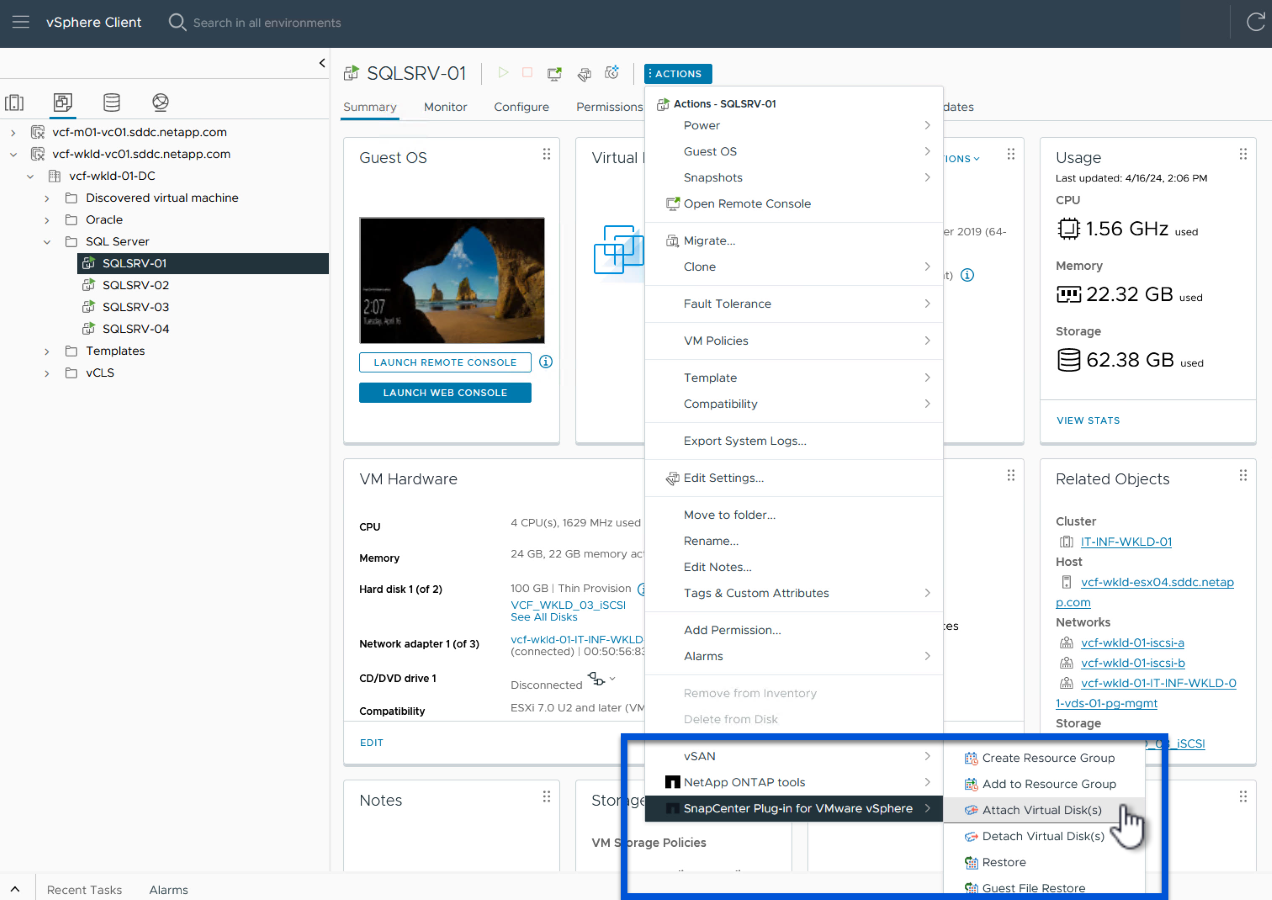
-
In the vSphere Client navigate to a VM and, from the Actions menu, select SnapCenter Plug-in for VMware vSphere > Attach Virtual Disk(s).
-
In the Attach Virtual Disk(s) wizard, select the backup instance to be used and the particular VMDK to be attached.
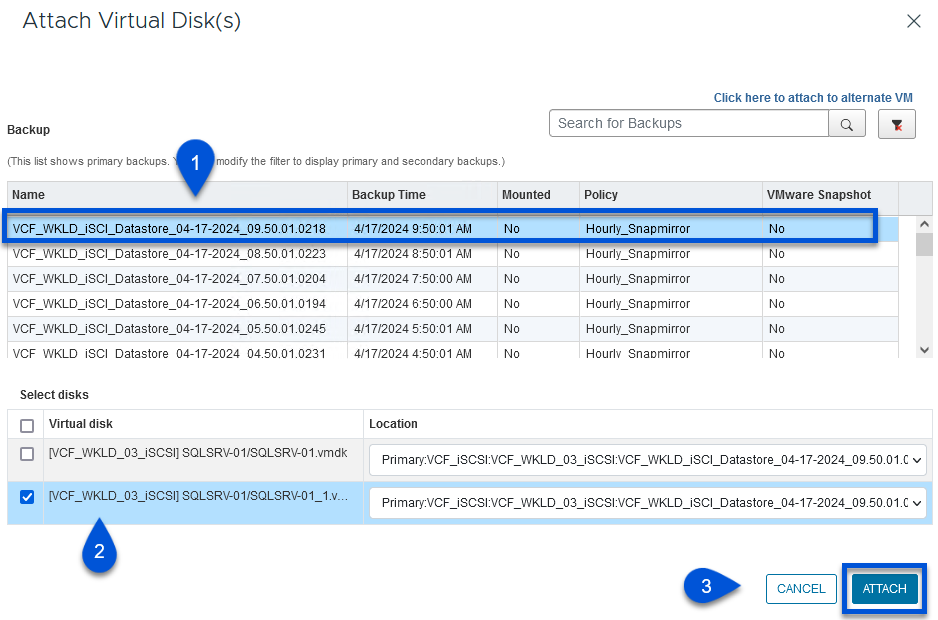
Filter options can be used to locate backups and to display backups from both primary and secondary storage systems. 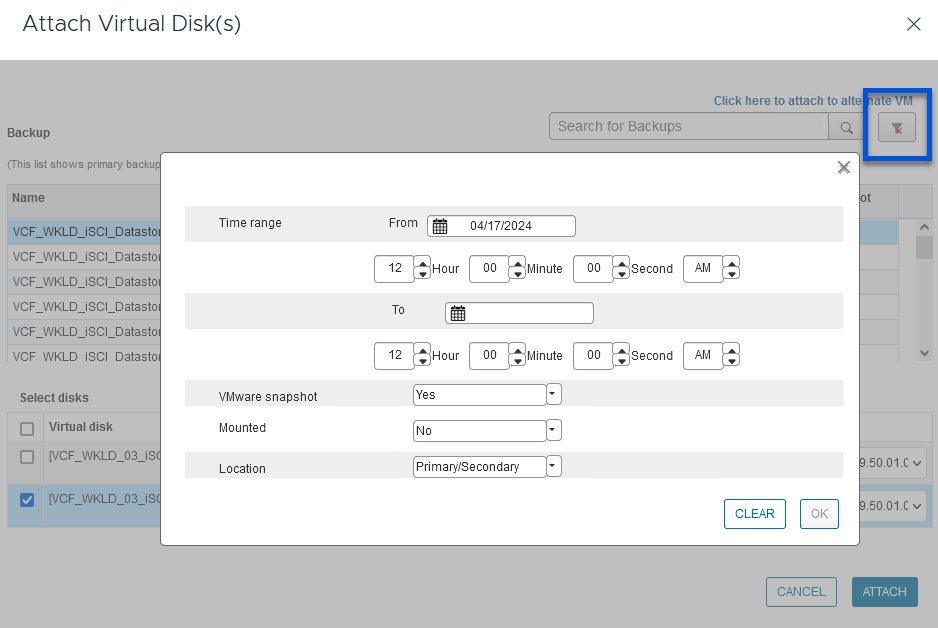
-
After selecting all options, click on the Attach button to begin the restore process and attached the VMDK to the host.
-
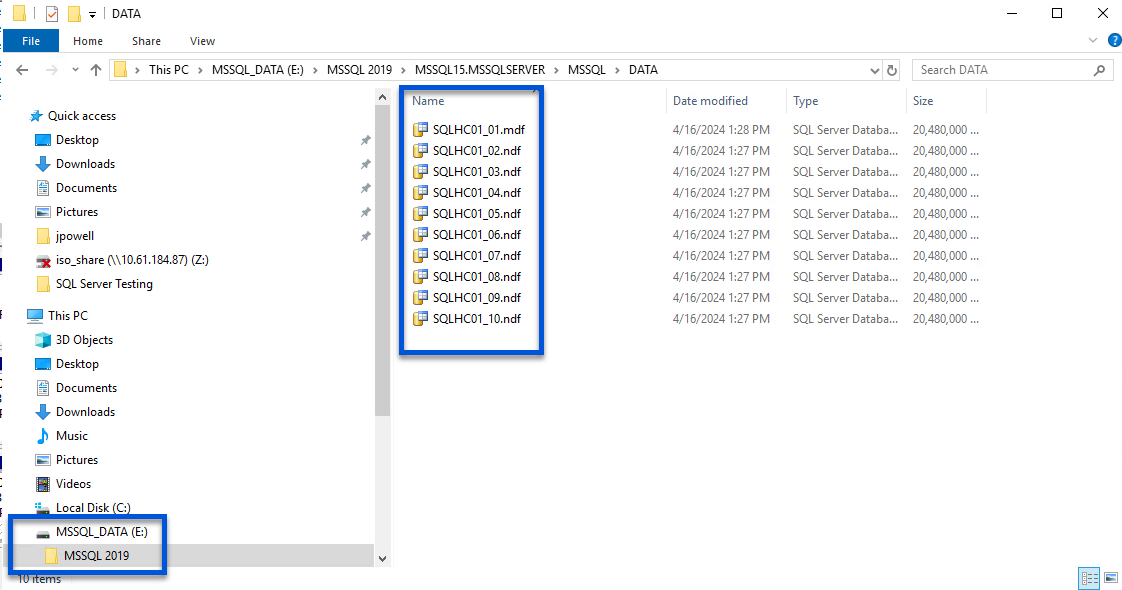
Once the attach procedure is complete the disk can be accessed from the OS of the host system. In this case SCV attached the disk with its NTFS file system to the E: drive of our Windows SQL Server and the SQL database files on the file system are accessible through File Explorer.
Guest File System Restore using SnapCenter Plug-in
ONTAP Tools features guest file system restores from a VMDK on Windows Server OSes. This is preformed centrally from the SnapCenter Plug-in interface.
For detailed information refer to Restore guest files and folders at the SCV documentation site.
To perform a guest file system restore for a Windows system, complete the following steps:
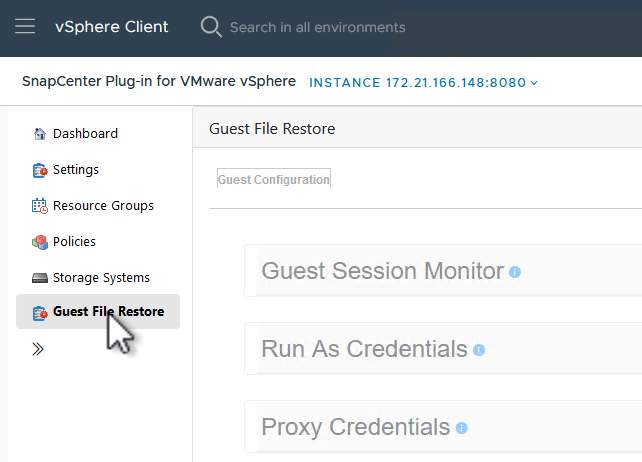
-
The first step is to create Run As credentials to provide access to the Windows host system. In the vSphere Client navigate to the CSV plug-in interface and click on Guest File Restore in the main menu.
-
Under Run As Credentials click on the + icon to open the Run As Credentials window.
-
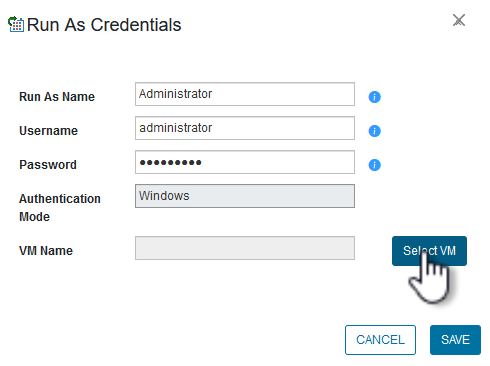
Fill in a name for the credentials record, an administrator username and password for the Windows system, and then click on the Select VM button to select an optional Proxy VM to be used for the restore.
-
On the Proxy VM page provide a name for the VM and locate it by searching by ESXi host or by name. Once selected, click on Save.
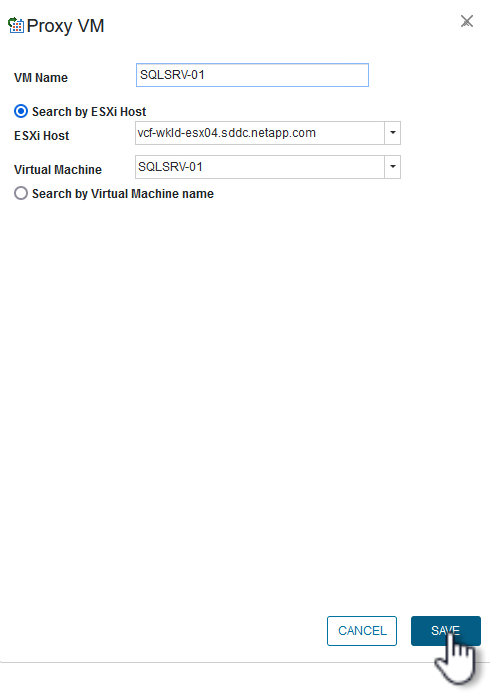
-
Click on Save again in the Run As Credentials window to complete saving the record.
-
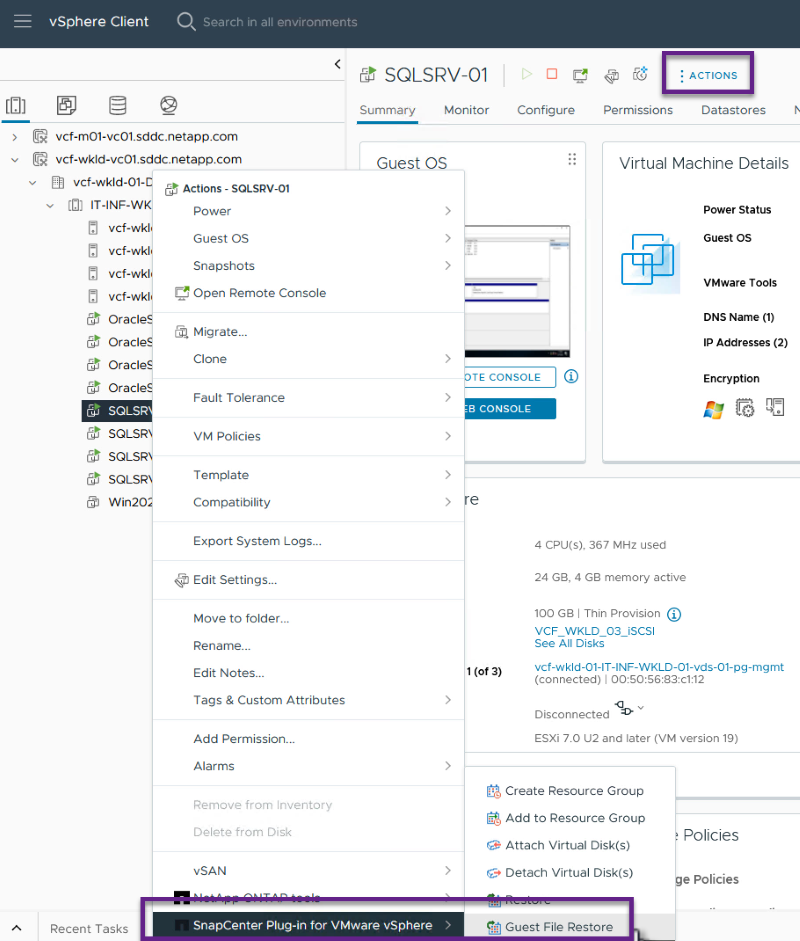
Next, navigate to a VM in the inventory. From the Actions menu, or by right-clicking on the VM, select SnapCenter Plug-in for VMware vSphere > Guest File Restore.
-
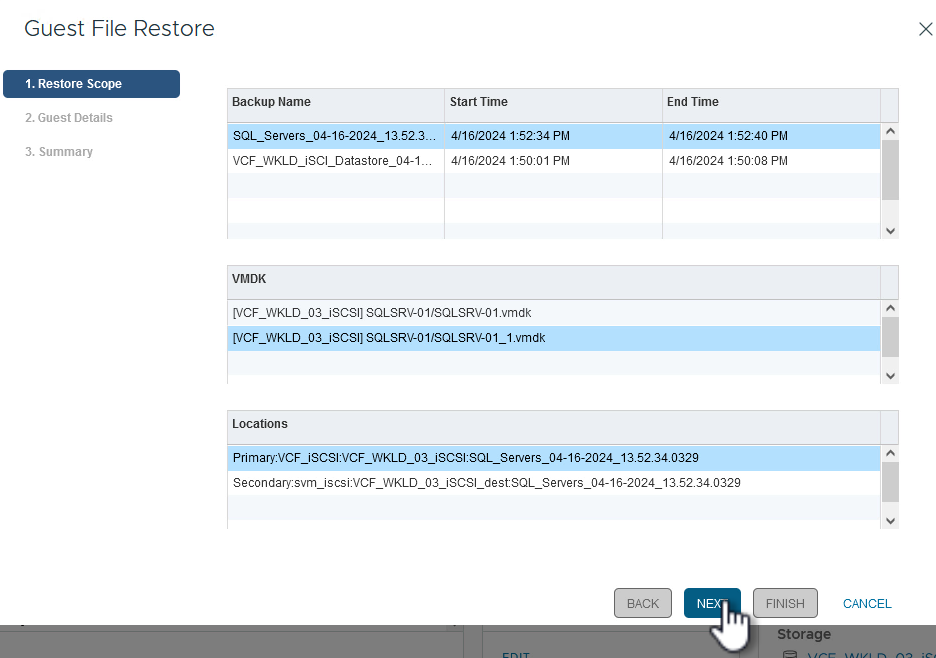
On the Restore Scope page of the Guest File Restore wizard, select the backup to restore from, the particular VMDK, and the location (primary or secondary) to restore the VMDK from. Click on Next to continue.
-
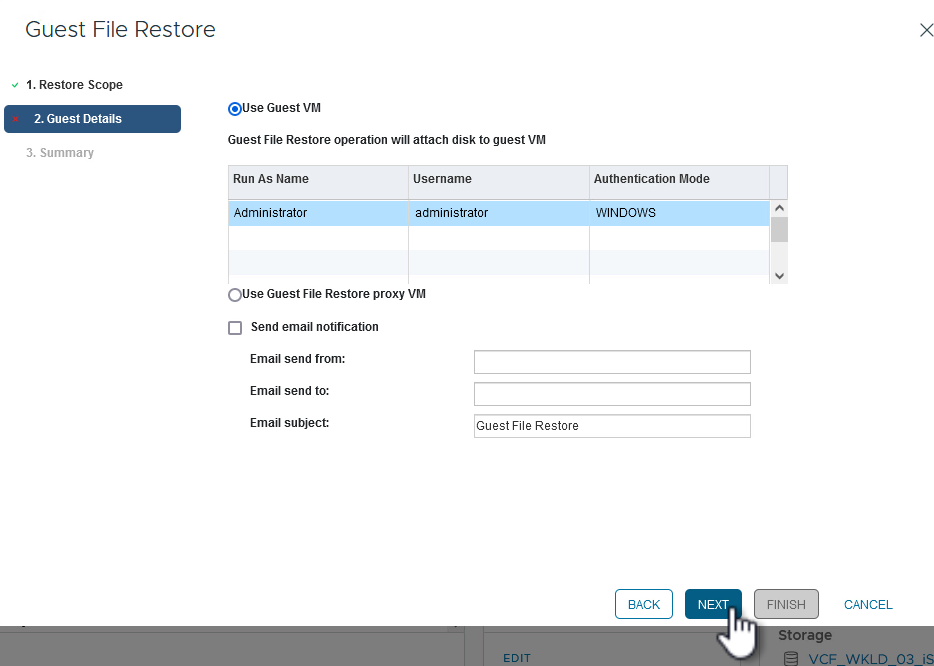
On the Guest Details page, select to use Guest VM or Use Gues File Restore proxy VM for the restore. Also, fill out email notification settings here if desired. Click on Next to continue.
-
Finally, review the Summary page and click on Finish to begin the Guest File System Restore session.
-
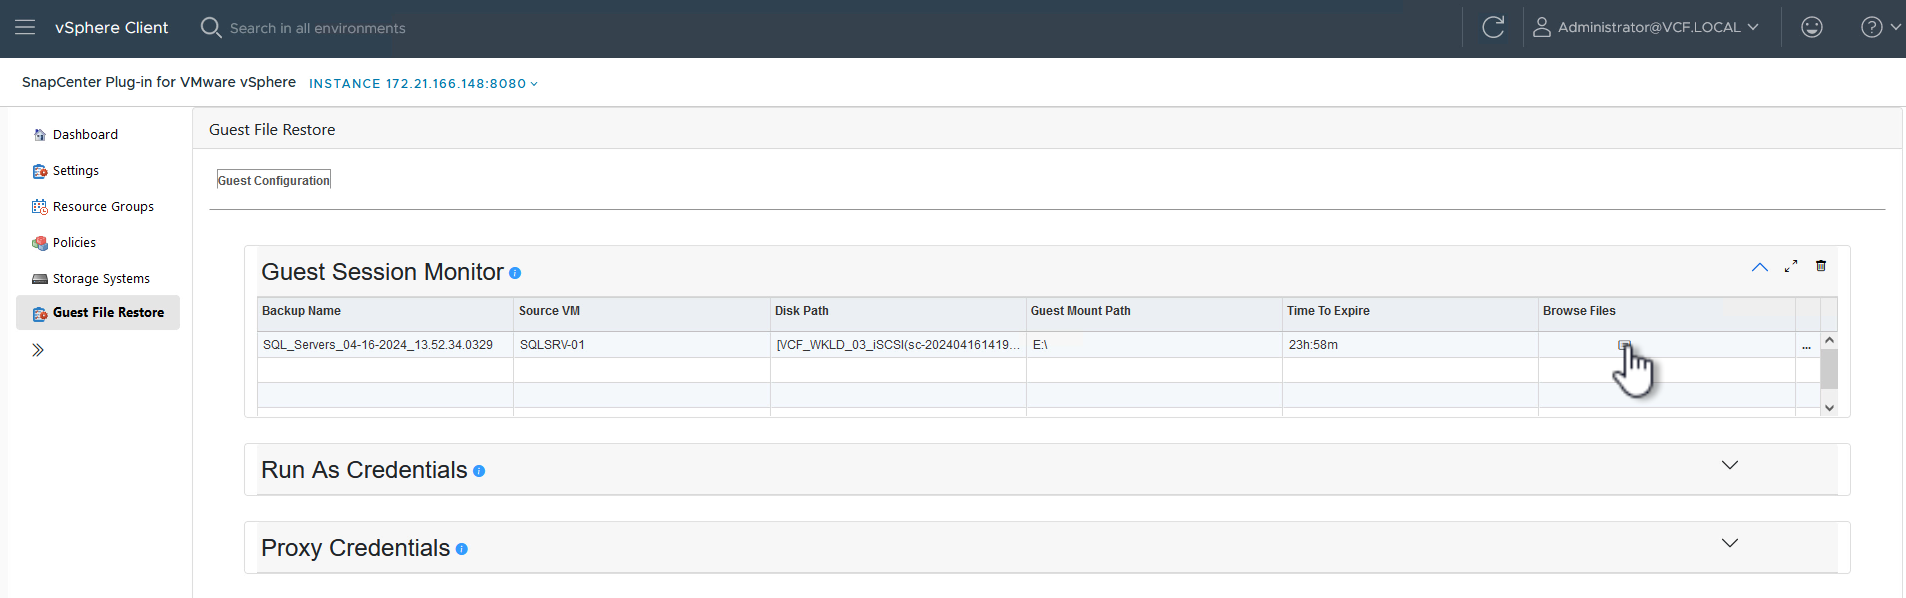
Back in the SnapCenter Plug-in interface, navigate to Guest File Restore again and view the running session under Guest Session Monitor. Click on the icon under Browse Files to continue.
-
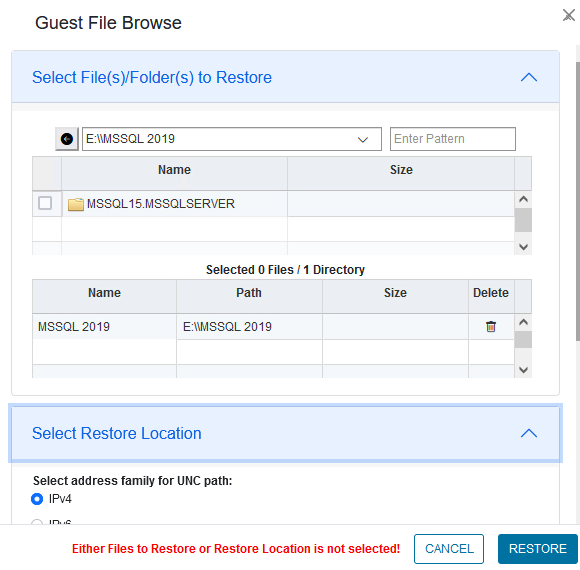
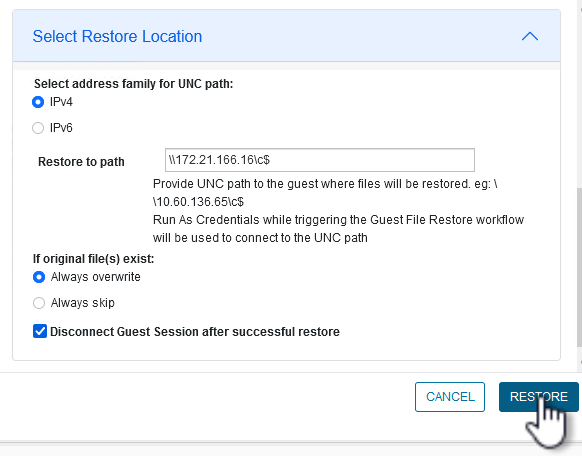
In the Guest File Browse wizard select the folder or files to restore and the file system location to restore them to. Finally, click on Restore to start the Restore process.
-
The restore job can be monitored from the vSphere Client task pane.
Additional information
For information on configuring VCF refer to VMware Cloud Foundation Documentation.
For information on configuring ONTAP storage systems refer to the ONTAP 9 Documentation center.
For information on using the SnapCenter Plug-in for VMware vSphere refer to the SnapCenter Plug-in for VMware vSphere documentation.