


Remove a DR group from a MetroCluster configuration


 Suggest changes

 PDFs
PDFs
Beginning with ONTAP 9.8, you can remove a disaster recovery (DR) group from an eight-node MetroCluster configuration to create a four-node MetroCluster configuration.

|
You use these steps during the transition and system refresh workflows. You might have already completed some steps in this procedure as part of these workflows. |
Enable console logging
NetApp strongly recommends that you enable console logging on the devices that you are using and take the following actions when performing this procedure:
-
Leave AutoSupport enabled during maintenance.
-
Trigger a maintenance AutoSupport message before and after maintenance to disable case creation for the duration of the maintenance activity.
See the Knowledge Base article How to suppress automatic case creation during scheduled maintenance windows.
-
Enable session logging for any CLI session. For instructions on how to enable session logging, review the "Logging Session Output" section in the Knowledge Base article How to configure PuTTY for optimal connectivity to ONTAP systems.
Remove the DR group nodes from each cluster
This procedure is supported beginning with ONTAP 9.8. For systems running ONTAP 9.7 or earlier, see the Knowledge Base article: How to remove a DR group from a MetroCluster configuration.
-
You must perform this task on both clusters.
-
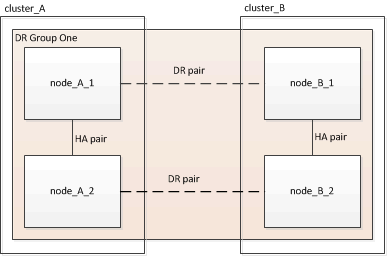
An eight-node configuration includes eight-nodes organized as two four-node DR groups.
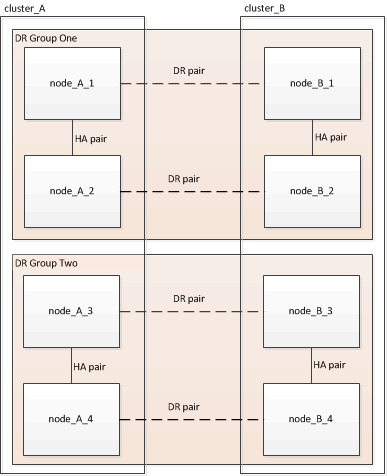
When you remove a DR group, four nodes remain in the configuration.
-
Prepare to remove the DR group if you have not already.
-
Move all data volumes to another DR group.
-
If the DR group to be removed has load-sharing mirror volumes, re-create all load-sharing mirror volumes in another DR group and delete them from the DR group to be removed.
-
Move all MDV_CRS metadata volumes to another DR group by following the Moving a metadata volume in MetroCluster configurations procedure.
-
Delete all MDV_aud metadata volumes that might exist in the DR group to be removed.
-
Delete all data aggregates in the DR group to be removed:
ClusterA::> storage aggregate show -node ClusterA-01, ClusterA-02 -fields aggregate ,node
ClusterA::> aggr delete -aggregate aggregate_name
ClusterB::> storage aggregate show -node ClusterB-01, ClusterB-02 -fields aggregate ,node
ClusterB::> aggr delete -aggregate aggregate_name
Root aggregates are not deleted. -
Migrate all NAS data LIFs that you use for NFS and CIFS (SMB) to home nodes in another DR group.
network interface show -home-node <old_node>network interface migrate -vserver <svm_name> -lif <data_lif> -destination-node <new_node> -destination-port <port> -
Move the data LIFs to the new home node in another DR group.
network interface modify -vserver <svm-name> -lif <data-lif> -home-node <new_node> -home-port <port> -
Migrate the cluster management LIF to a home node in another DR group.
network interface show -role cluster-mgmtnetwork interface modify -vserver <svm-name> -lif <cluster_mgmt> -home-node <new_node> -home-port <port-id>
-
Node management and inter-cluster LIFs are not migrated. Create new node management and inter-cluster LIFs on nodes of the DR group as required.
-
You cannot migrate or move FCP interfaces used for block access (SAN) between the nodes. Create new FCP interfaces as needed.
-
iSCSI SAN LIFs need to be down before the home node and home port can be updated.
-
-
Transfer epsilon to a node in another DR group if required.
ClusterA::> set advanced -prompt-timestamp above
ClusterA::*> cluster show
Move epsilon if needed
ClusterA::*> cluster modify -node nodename -epsilon false
ClusterA::*> cluster modify -node nodename -epsilon true

ClusterB::> set advanced -prompt-timestamp above
ClusterB::*> cluster show
ClusterB::*> cluster modify -node nodename -epsilon false
ClusterB::*> cluster modify -node nodename -epsilon true
ClusterB::*> set admin
-
-
Identify and remove the DR group.
-
Identify the correct DR group for removal:
metrocluster node show -
Remove the DR group nodes:
metrocluster remove-dr-group -dr-group-id 1
The metrocluster remove-dr-groupcommand is supported only on ONTAP 9.8 and later.The following example shows the removal of the DR group configuration on cluster_A.
Example
cluster_A::*>

Warning: Nodes in the DR group that are removed from the MetroCluster
         configuration will lose their disaster recovery protection.

         Local nodes "node_A_1-FC, node_A_2-FC"will be removed from the
         MetroCluster configuration. You must repeat the operation on the
         partner cluster "cluster_B"to remove the remote nodes in the DR group.
Do you want to continue? {y|n}: y

Info: The following preparation steps must be completed on the local and partner
      clusters before removing a DR group.

      1. Move all data volumes to another DR group.
      2. Move all MDV_CRS metadata volumes to another DR group.
      3. Delete all MDV_aud metadata volumes that may exist in the DR group to
      be removed.
      4. Delete all data aggregates in the DR group to be removed. Root
      aggregates are not deleted.
      5. Migrate all data LIFs to home nodes in another DR group.
      6. Migrate the cluster management LIF to a home node in another DR group.
      Node management and inter-cluster LIFs are not migrated.
      7. Transfer epsilon to a node in another DR group.

      The command is vetoed if the preparation steps are not completed on the
      local and partner clusters.
Do you want to continue? {y|n}: y
[Job 513] Job succeeded: Remove DR Group is successful.

cluster_A::*>
-
-
Repeat the previous step on the partner cluster.
-
Disable storage failover on the nodes of the old DR group:
storage failover modify -node <node-name> -enable false -
If you are in a MetroCluster IP configuration, perform the following steps to delete the remote plexes of the root aggregates and remove disk ownership on the nodes of the old DR group.
In a MetroCluster FC configuration, go to the step for removing the old DR group nodes.
These steps need to be performed for both nodes in the HA pair at each site.
-
Display the remote plexes of root aggregates on the nodes in the DR group that is to be deleted:
storage aggregate plex show -aggregate <root_aggr_name> -pool 1 -
Delete the remote plexes:
storage aggregate plex delete -aggregate <root_aggr_name> -plex <plex_from_previous_step> -
Identify the remote disks owned by the nodes in the DR group.
The commands you use depend on whether you are using partitioned/shared disks or whole disks:
Use a comma-separated list in the -owner <node_names>field to specify the node names in the DR group that is to be deleted.Partitioned/shared disks:-
Set the privilege level to advanced:
set advanced -prompt-timestamp above -
Display the remote disks:
storage disk show -pool Pool1 -owner <node_names> -partition-ownership
Whole disks:-
Set the privilege level to advanced:
set advanced -prompt-timestamp above -
Display the remote disks:
storage disk show -pool Pool1 -owner <node_names>
-
-
Disable disk auto assignment:
disk option modify -node <node_names_in_the_DR_group_to_be_deleted> -autoassign off -
Remove ownership of pool1 disks on each DR group node to be deleted. Perform these steps on each node to be removed. In the examples used in this step, node_A_1 is being removed.
-
Go to the nodeshell:
run -node <node_name> -
Identify the pool1 disks:
disk showAll disks are displayed, including the Pool1 disks owned by the node. The following example shows truncated output where disk 0n.4 and its partitions are assigned to Pool1. The output will vary depending on your configuration.
  DISK       OWNER                 POOL   SERIAL NUMBER         HOME                    DR HOME
------------ -------------         -----  -------------         -------------           -------------
0n.4         node_A1(537102267)    Pool1  S3N9NX0J500267        node_A1(537102267)
0n.4P1       node_A1(537102267)    Pool1  S3N9NX0J500267NP001   node_A1(537102267)
0n.4P2       node_A1(537102267)    Pool1  S3N9NX0J500267NP002   node_A1(537102267)
0n.4P3       node_A1(537102267)    Pool1  S3N9NX0J500267NP003   node_A1(537102267)
-
Set the privilege level to advanced:
set -privilege advanced -prompt-timestamp above -
Remove disk ownership for each pool1 disk:
If your configuration contains partitioned disks, you first remove ownership of each partitioned disk, and then remove the container disk ownership:
disk remove_ownership <disk_name>In the following example, the ownership of the partitioned disks is removed before the ownership of the container disk
0n.4is removed:*> disk remove_ownership 0n.4P1 Volumes must be taken offline. Are all impacted volumes offline(y/n)?? y Removing the ownership of aggregate disks may lead to partition of aggregates between high-availability pair. Do you want to continue(y/n)? y *> disk remove_ownership 0n.4P2 Volumes must be taken offline. Are all impacted volumes offline(y/n)?? y Removing the ownership of aggregate disks may lead to partition of aggregates between high-availability pair. Do you want to continue(y/n)? y *> disk remove_ownership 0n.4P3 Volumes must be taken offline. Are all impacted volumes offline(y/n)?? y Removing the ownership of aggregate disks may lead to partition of aggregates between high-availability pair. Do you want to continue(y/n)? y *> disk remove_ownership 0n.4 Volumes must be taken offline. Are all impacted volumes offline(y/n)?? y *>
-
-
-
If you are in a MetroCluster IP configuration, remove the MetroCluster connections on the nodes of the old DR group.
In a MetroCluster FC configuration, go to the step for removing the old DR group nodes.
These commands can be issued from either cluster and apply to the entire DR group spanning both of the clusters.
-
Disconnect the connections:
metrocluster configuration-settings connection disconnect -dr-group-id <dr_group_id>Example
cluster_A::*> metrocluster configuration-settings connection disconnect -dr-group-id 1 Warning: For the nodes in the DR group 1, this command will remove the existing connections that are used to mirror NV logs and access remote storage. Do you want to continue? {y|n}: y Warning: Before proceeding with disconnect, you must verify the following: 1. Unmirrored aggregates do not have disks in remote plexes. 2. Aggregates are not mirrored. 3. No disks are assigned in Pool1. 4. Storage failover is not enabled. Follow the "MetroCluster Installation and Configuration guide" for detailed instructions to verify this. Do you want to continue? {y|n}: y -
Delete the MetroCluster interfaces on the nodes of the old DR group:
This step must be repeated on each node of the DR group. metrocluster configuration-settings interface delete -
Delete the old DR group's configuration.
metrocluster configuration-settings dr-group delete
-
-
Remove the nodes in the old DR group.
Perform this step on each cluster.
-
Set the advanced privilege level:
set -privilege advanced -prompt-timestamp above -
Remove the node:
cluster remove-node -node <node-name>Repeat this step for the other local node in the old DR group.
-
Set the admin privilege level:
set -privilege admin
-
-
Check that cluster HA is enabled in the new DR group. If required, re-enable cluster HA:
cluster ha modify -configured truePerform this step on each cluster.
-
Halt, power down, and remove the old controller modules and storage shelves.
Learn more about the commands used in this procedure in the ONTAP command reference.