

Manage volumes on Cloud Volumes ONTAP systems
 Suggest changes
You can manage volumes and CIFS servers in the NetApp Console. You can also move volumes to avoid capacity issues.
You can manage volumes in the NetApp Console Standard View or through ONTAP System Manager that is included within the Console for advanced volume management. The Standard View provides a limited set of options to modify your volumes. System Manager provides advanced level of management, such as cloning, resizing, changing settings for anti-ransomware, analytics, protection, and activity tracking, and moving volumes across tiers. For information, refer to Administer Cloud Volumes ONTAP using System Manager.
Manage volumes
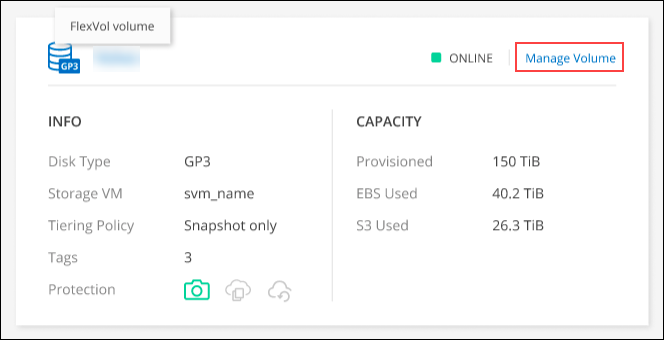
By using the Standard View of the Console, you can manage volumes according to your storage needs. You can view, edit, clone, restore, and delete volumes.
-
From the left navigation menu, select Storage > Management.
-
On the Systems page, double-click the Cloud Volumes ONTAP system on which you want to manage volumes.
-
Select the Volumes tab.
-
On the required volume tile, click Manage volume.
Task Action View information about a volume
Under Volume Actions in the Manage volumes panel, click View volume details.
Get the NFS mount command
-
Under Volume Actions in the Manage volumes panel, click Mount Command.
-
Click Copy.
Clone a volume
-
Under Volume Actions in the Manage volumes panel, click Clone the volume.
-
Modify the clone name as needed, and then click Clone.
This process creates a FlexClone volume. A FlexClone volume is a writable, point-in-time copy that is space-efficient because it uses a small amount of space for metadata, and then only consumes additional space as data is changed or added.
To learn more about FlexClone volumes, refer to the ONTAP 9 Logical Storage Management Guide.
Edit a volume (read-write volumes only)
-
Under Volume Actions in the Manage volumes panel, click Edit volume settings
-
Modify the volume's Snapshot policy, NFS protocol version, NFS access control list (export policy), or share permissions, and then click Apply.

If you need custom Snapshot policies, you can create them by using ONTAP System Manager. Delete a volume
-
Under Volume Actions in the Manage volumes panel, click Delete the volume.
-
Under the Delete Volume window, enter the name of the volume you want to delete.
-
Click Delete again to confirm.
Create a Snapshot copy on demand
-
Under Protection Actions in the Manage Volumes panel, click Create a Snapshot copy.
-
Change the name, if needed, and then click Create.
Restore data from a Snapshot copy to a new volume
-
Under Protection Actions in the Manage Volumes panel, click Restore from Snapshot copy.
-
Select a Snapshot copy, enter a name for the new volume, and then click Restore.
Change the underlying disk type
-
Under Advanced Actions in the Manage Volumes panel, click Change Disk Type.
-
Select the disk type, and then click Change.
The Console moves the volume to an existing aggregate that uses the selected disk type or it creates a new aggregate for the volume. Change the tiering policy
-
Under Advanced Actions in the Manage Volumes panel, click Change Tiering Policy.
-
Select a different policy and click Change.
The Console moves the volume to an existing aggregate that uses the selected disk type with tiering, or it creates a new aggregate for the volume. Delete a volume
-
Select a volume, and then click Delete.
-
Type the name of the volume in the dialog.
-
Click Delete again to confirm.
-
Resize a volume
By default, a volume automatically grows to a maximum size when it's out of space. The default value is 1,000, which means the volume can grow to 11 times its size. This value is configurable in the Console agent's settings.
If you need to resize your volume, you can do it from ONTAP System Manager in the Console.
-
Click the System Manager view to resize a volume through ONTAP System Manager. Refer to How to get started.
-
From the left navigation menu, select Storage > Volumes.
-
From the list of volumes, identify the one that you should resize.
-
Click the options icon
 .
. -
Select Resize.
-
On the Resize Volume screen, edit the capacity and Snapshot reserve percentage as required. You can compare the existing, available space with the modified capacity.
-
Click Save.
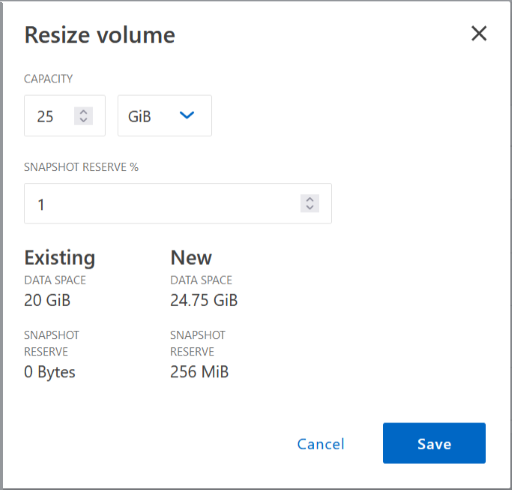
Be sure to take your system's capacity limits into consideration as you resize volumes. Go to the Cloud Volumes ONTAP Release Notes for more information.
Modify the CIFS server
If you change your DNS servers or Active Directory domain, you need to modify the CIFS server in Cloud Volumes ONTAP so that it can continue to serve storage to clients.
-
From the Overview tab of the Cloud Volumes ONTAP system, click the Feature tab under the right-side panel.
-
Under the CIFS Setup field, click the pencil icon to display the CIFS Setup window.
-
Specify settings for the CIFS server:
Task Action Select Storage VM (SVM)
Selecting the Cloud Volume ONTAP storage virtual machine (SVM) displays it's configured CIFS information.
Active Directory Domain to join
The FQDN of the Active Directory (AD) domain that you want the CIFS server to join.
Credentials authorized to join the domain
The name and password of a Windows account with sufficient privileges to add computers to the specified Organizational Unit (OU) within the AD domain.
DNS Primary and Secondary IP Address
The IP addresses of the DNS servers that provide name resolution for the CIFS server.
The listed DNS servers must contain the service location records (SRV) needed to locate the Active Directory LDAP servers and domain controllers for the domain that the CIFS server will join.
If you're configuring Google Managed Active Directory, AD can be accessed by default with the 169.254.169.254 IP address.DNS Domain
The DNS domain for the Cloud Volumes ONTAP storage virtual machine (SVM). In most cases, the domain is the same as the AD domain.
CIFS server NetBIOS name
A CIFS server name that is unique in the AD domain.
Organizational Unit
The organizational unit within the AD domain to associate with the CIFS server. The default is CN=Computers.
-
To configure AWS Managed Microsoft AD as the AD server for Cloud Volumes ONTAP, enter OU=Computers,OU=corp in this field.
-
To configure Azure AD Domain Services as the AD server for Cloud Volumes ONTAP, enter OU=AADDC Computers or OU=AADDC Users in this field.
Azure Documentation: Create an Organizational Unit (OU) in an Azure AD Domain Services managed domain -
To configure Google Managed Microsoft AD as the AD server for Cloud Volumes ONTAP, enter OU=Computers,OU=Cloud in this field.
Google Cloud Documentation: Organizational Units in Google Managed Microsoft AD
-
-
Click Set.
Cloud Volumes ONTAP updates the CIFS server with the changes.
Move a volume
Move volumes for capacity utilization, improved performance, and to satisfy service-level agreements.
You can move a volume in ONTAP System Manager by selecting a volume and the destination aggregate, starting the volume move operation, and optionally monitoring the volume move job. When using System Manager, a volume move operation finishes automatically.
-
Use ONTAP System Manager or the ONTAP CLI to move the volumes to the aggregate.
In most situations, you can use System Manager to move volumes.
For instructions, refer to the ONTAP 9 Volume Move Express Guide.
Move a volume when Console displays an Action Required message
The Console might display an Action Required message that says moving a volume is necessary to avoid capacity issues, but that you need to correct the issue yourself. If this happens, you need to identify how to correct the issue and then move one or more volumes.

|
The Console displays these Action Required messages when an aggregate has reached 90% used capacity. If data tiering is enabled, the messages display when an aggregate has reached 80% used capacity. By default, 10% free space is reserved for data tiering. Learn more about the free space ratio for data tiering. |
-
Based on your analysis, move volumes to avoid capacity issues:
Identify how to correct capacity issues
If the Console can't provide recommendations for moving a volume to avoid capacity issues, you must identify the volumes that you need to move and whether you should move them to another aggregate on the same system or to another system.
-
View the advanced information in the Action Required message to identify the aggregate that has reached its capacity limit.
For example, the advanced information should say something similar to the following: Aggregate aggr1 has reached its capacity limit.
-
Identify one or more volumes to move out of the aggregate:
-
In the Cloud Volumes ONTAP system, click the Aggregates tab.
-
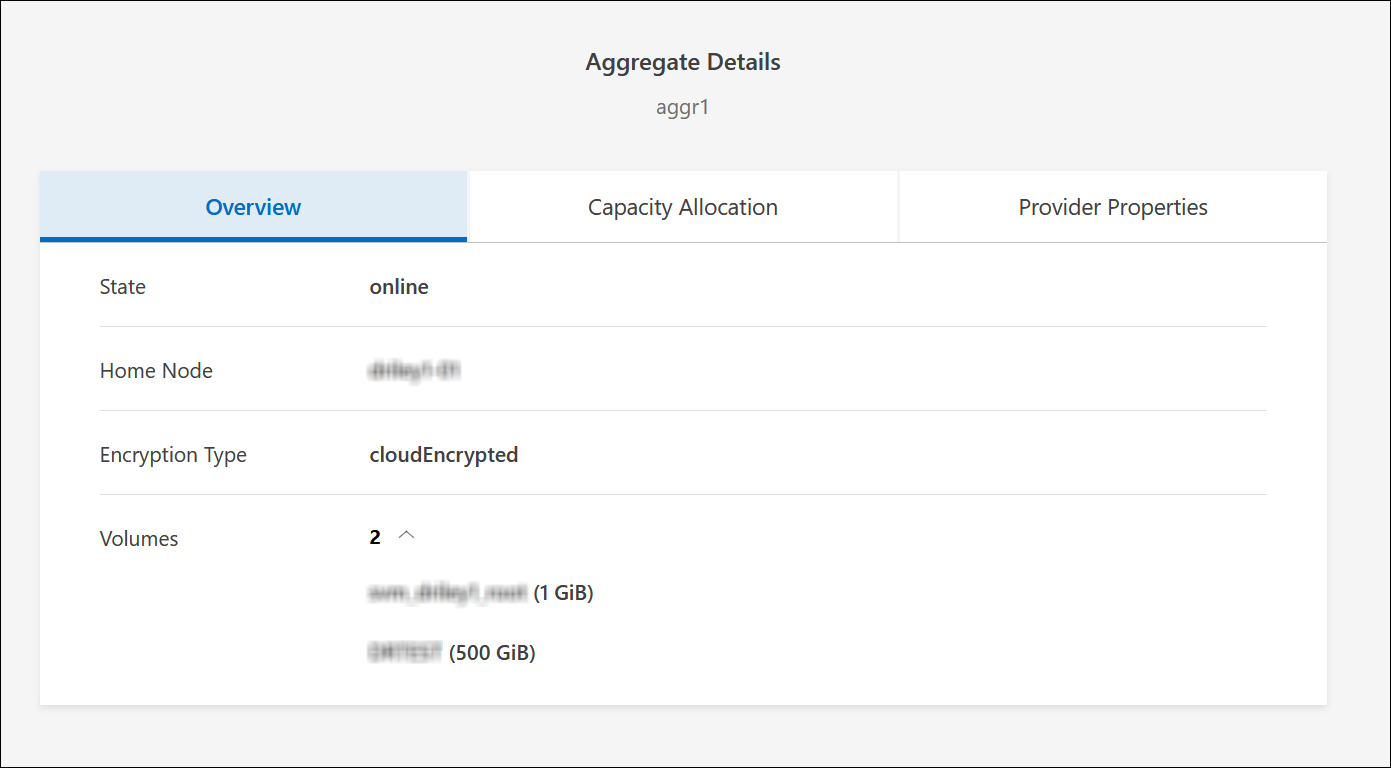
On the aggregate tile, click the
 icon and then click View aggregate details.
 -
Under the Overview tab of the Aggregate Details screen, review the size of each volume and choose one or more volumes to move out of the aggregate.
You should choose volumes that are large enough to free space in the aggregate so that you avoid additional capacity issues in the future.
-
-
If the system has not reached the disk limit, you should move the volumes to an existing aggregate or a new aggregate on the same system.
For information, refer to Move volumes to another aggregate to avoid capacity issues.
-
If the system has reached the disk limit, do any of the following:
-
Delete any unused volumes.
-
Rearrange volumes to free space on an aggregate.
For information, refer to Move volumes to another aggregate to avoid capacity issues.
-
Move two or more volumes to another system that has space.
For information, refer to Move volumes to another aggregate to avoid capacity issues.
-
Move volumes to another system to avoid capacity issues
You can move one or more volumes to another Cloud Volumes ONTAP system to avoid capacity issues. You might need to do this if the system reached its disk limit.
You can follow the steps in this task to correct the following Action Required message:
Moving a volume is necessary to avoid capacity issues; however, the Console cannot perform this action for you because the system has reached the disk limit.
-
Identify a Cloud Volumes ONTAP system that has available capacity, or deploy a new system.
-
Drag and drop the source system to the target system to perform a one-time data replication of the volume.
For information, refer to Replicating data between systems.
-
Go to the Replication Status page, and then break the SnapMirror relationship to convert the replicated volume from a data protection volume to a read/write volume.
For information, refer to Managing data replication schedules and relationships.
-
Configure the volume for data access.
For information about configuring a destination volume for data access, refer to the ONTAP 9 Volume Disaster Recovery Express Guide.
-
Delete the original volume.
For information, refer to Manage volumes.
Move volumes to another aggregate to avoid capacity issues
You can move one or more volumes to another aggregate to avoid capacity issues.
You can follow the steps in this task to correct the following Action Required message:
Moving two or more volumes is necessary to avoid capacity issues; however, the Console cannot perform this action for you.
-
Verify whether an existing aggregate has available capacity for the volumes that you need to move:
-
On Cloud Volumes ONTAP system, click the Aggregates tab.
-
On the required aggregate tile, click the
icon and then View aggregate details to view the available capacity (provisioned size minus used aggregate capacity).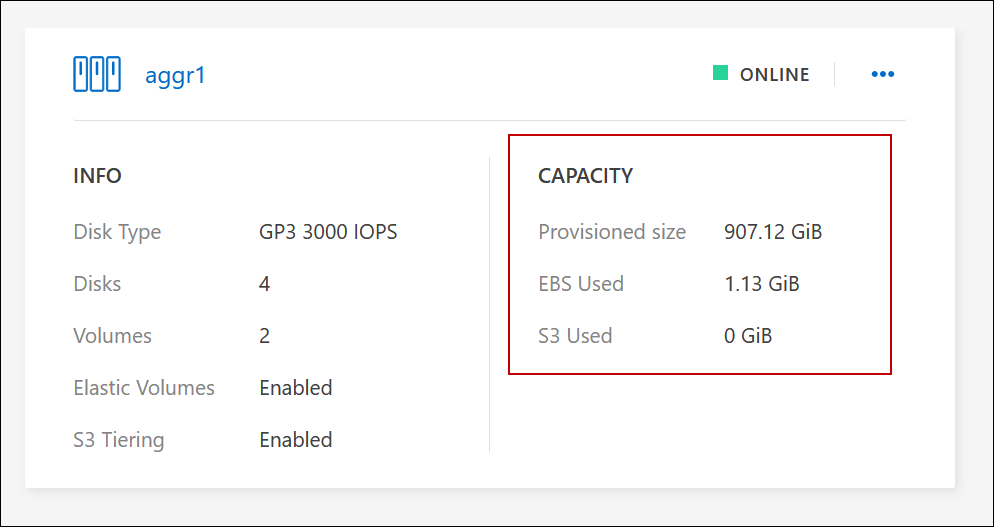
-
-
If needed, add disks to an existing aggregate:
-
Select the aggregate, then click the
icon > Add Disks. -
Select the number of disks to add, and then click Add.
-
-
If no aggregates have available capacity, create a new aggregate.
For information, refer to Creating aggregates.
-
Use ONTAP System Manager or the ONTAP CLI to move the volumes to the aggregate.
-
In most situations, you can use System Manager to move volumes.
For instructions, refer to the ONTAP 9 Volume Move Express Guide.
Reasons why a volume move might perform slowly
Moving a volume might take longer than you expect if any of the following conditions are true for Cloud Volumes ONTAP:
-
The volume is a clone.
-
The volume is a parent of a clone.
-
The source or destination aggregate has a single Throughput Optimized HDD (st1) disk.
-
One of the aggregates uses an older naming scheme for objects. Both aggregates have to use the same name format.
An older naming scheme is used if data tiering was enabled on an aggregate in the 9.4 release or earlier.
-
The encryption settings don't match on the source and destination aggregates, or a rekey is in progress.
-
The -tiering-policy option was specified on the volume move to change the tiering policy.
-
The -generate-destination-key option was specified on the volume move.
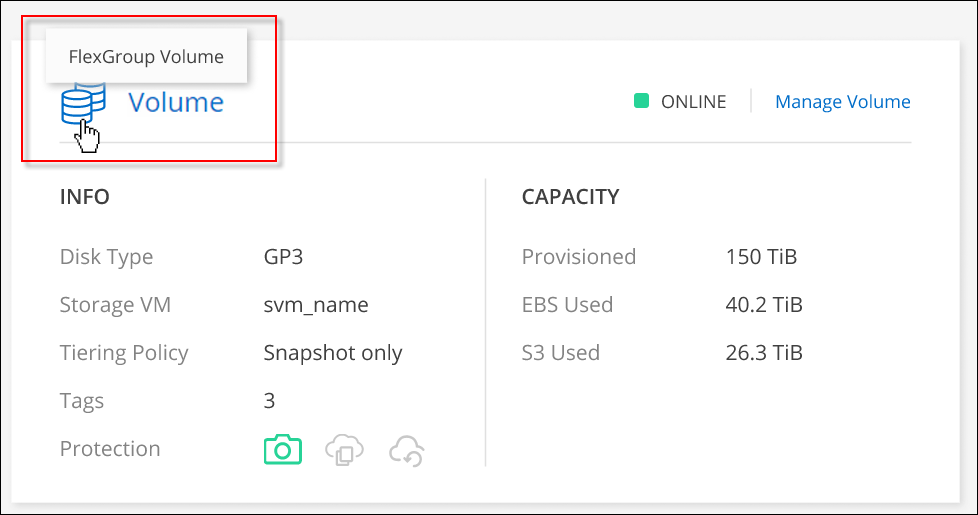
View FlexGroup Volumes
You can view FlexGroup volumes created through ONTAP System Manager or the ONTAP CLI directly through the Volumes tab in the Console. You can see detailed information for the FleGroup volumes through a dedicated Volumes tile, where you can identify each FlexGroup volume group through the icon's hover text. Additionally, you can identify and sort FlexGroup volumes under the volumes list view through the Volume Style column.
|
|
Currently, you can only view existing FlexGroup volumes under the Console. You can't create FlexGroup volumes in the Console. |