


Subscribe and deploy Cloud Volumes ONTAP from AWS Marketplace

 Suggest changes

 PDFs
PDFs
Subscribe to Cloud Volumes ONTAP from AWS Marketplace and let NetApp Console guide you through onboarding. With a simple path from subscription to deployment, you can quickly get up-and-running with Cloud Volumes ONTAP. The guided experience simplifies the process from AWS Marketplace subscription to deployment, helping you deploy Cloud Volumes ONTAP without requiring extensive cloud or ONTAP expertise.
Subscription and deployment of Cloud Volumes ONTAP from AWS Marketplace include these steps:
-
Subscription to Cloud Volumes ONTAP in AWS Marketplace.
-
Signup to the Console.
-
Creating your organization (if needed) and associating the marketplace subscription.
-
Deployment of a Console agent in AWS.
-
Adding your first Cloud Volumes ONTAP system.
Simplified onboarding offers automated agent deployment with minimal input from you for subscription association, IAM role configuration, agent provisioning, and system initialization. Backend orchestration automatically handles CloudFormation stack creation, VPC connectivity validation, and resource dependencies. This reduces manual configuration steps and screen transitions, so you can deploy Cloud Volumes ONTAP faster with fewer setup errors and interruptions. As you progress through deployment, you can track your progress in the right panel.
Review these prerequisites before you start the onboarding workflow.
-
You need an AWS account with permissions to subscribe in AWS Marketplace. To use the automated IAM setup, you must be an AWS administrator or have the permissions shown below.
{ "Version": "2012-10-17", "Statement": [ { "Sid": "CloudFormationStack", "Effect": "Allow", "Action": [ "cloudformation:CreateStack", "cloudformation:DeleteStack", "cloudformation:DescribeStacks", "cloudformation:DescribeStackEvents", "cloudformation:GetTemplateSummary", "iam:CreateRole", "iam:DeleteRole", "iam:GetRole", "iam:PutRolePolicy", "iam:DeleteRolePolicy", "iam:GetRolePolicy", "iam:PassRole", "lambda:CreateFunction", "lambda:DeleteFunction", "lambda:GetFunction", "lambda:InvokeFunction" ] } -
You can create or use IAM roles in AWS for agent deployment.
-
You can sign in to or create an account in the NetApp Console.
For full AWS agent deployment prerequisites, see Deploy a NetApp Console agent from the AWS Marketplace.
Subscribe in AWS Marketplace
Start the onboarding process by locating the Cloud Volumes ONTAP offering in AWS Marketplace.
-
Go to AWS Marketplace using your AWS account.
-
Locate the NetApp Cloud Volumes ONTAP offering. There are two offerings for Cloud Volumes ONTAP in AWS Marketplace:
-
The standalone offering for Cloud Volumes ONTAP annual subscriptions
-
The NetApp Intelligent Service (NIS) combined offering for NetApp data services and Cloud Volumes ONTAP subscriptions.
Choose the standalone offering for this onboarding workflow.
-
-
Review listing details and pricing terms.
-
Subscribe and complete the checkout.
-
After subscribing, AWS redirects you to the Console sign-up or sign-in page.
Sign up or sign in to NetApp Console
Access the Console to continue with the setup after you complete the marketplace subscription.
-
On the Console page, select one:
-
Sign up if you are a new user.
-
Sign in to NetApp Console if you already have an account.
-
-
If you selected Sign up, complete the following:
-
Enter the required fields:
-
Email
-
Password
-
Full name
-
Company
-
Country
-
-
Select Next.
-
Optional: Enter contact details such as address, city, state, postal code, and phone number.
-
Select Sign up.
-
Accept the license terms.
-
Verify your email address using the message from service@console.netapp.com.
-
-
Sign in to the Console and complete authentication.
Create your organization
Complete this step only if you are a first-time user or you do not already belong to a NetApp Console organization.
If you already belong to an organization, skip this section and continue to Associate your subscription.
Create an organization to manage users, roles, permissions, licenses, and systems.
-
Enter an organization name.
-
Optional: associate a NetApp Support Site (NSS) account.
-
Select Create.
Associate your subscription
After you create your organization, the Console automatically tries to link your marketplace subscription to the organization.
If automatic association fails, manually associate your subscription. Learn how to manage subscriptions.
Deploy a Console agent in AWS
After you associate the subscription, the Console automatically opens the agent deployment flow to manage your AWS resources and Cloud Volumes ONTAP systems.
To learn more about the permissions used during the agent deployment, see AWS permissions reference.
-
You can follow the steps mentioned in the introduction page for minimum permission to deploy an agent, or continue to automatically create a role for agent deployment.
-
On the AWS credentials page, select one of the following options to provide credentials for agent deployment:
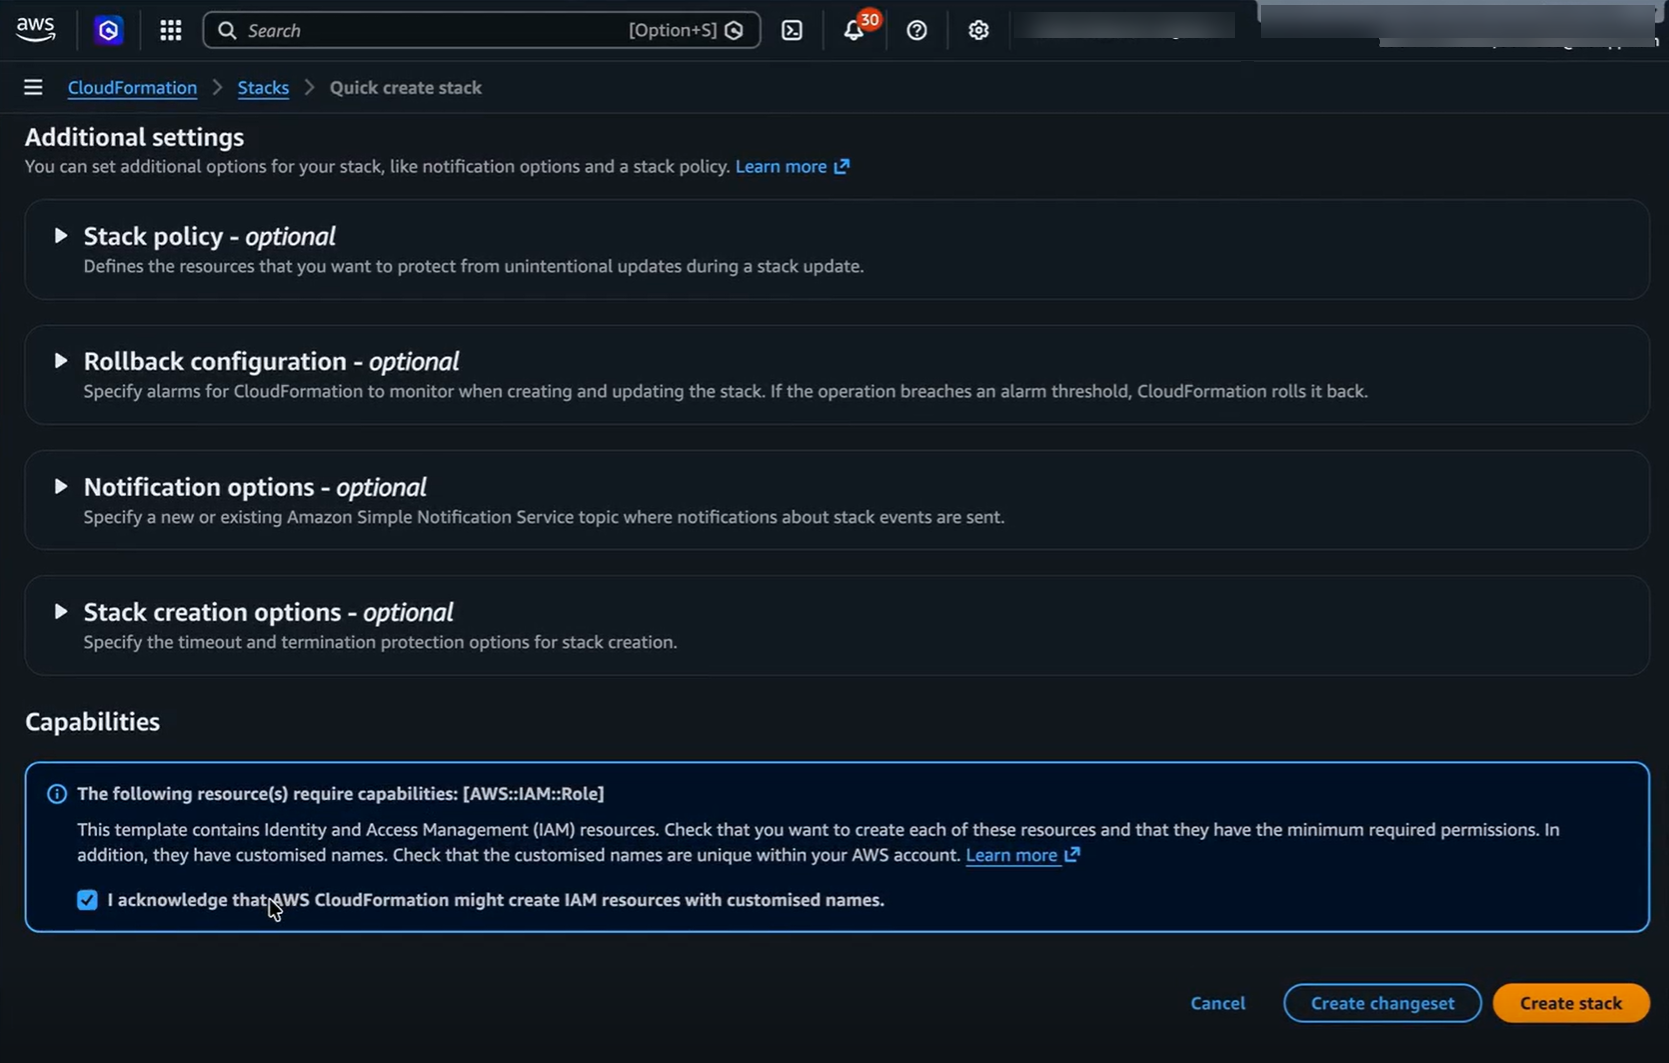
Create role for me (recommended)Selecting this option opens an AWS CloudFormation Quick Create flow to create the agent deployment role. If you are a user with admin privileges, you can use this option to automatically use a CloudFormation stack to create the policy, role, and authenticate the user to create the agent.
-
Add the AWS account ID and optionally, the external ID. The Console sets a default role name.
-
Acknowledge the terms and select Create stack.
-
When the IAM role is configured in AWS and the ARN is generated, confirm and save the role.
Assume roleThis is a part of the manual role assignment workflow. Enter an existing IAM role ARN. For information about editing this role, refer to Manage AWS credentials and marketplace subscriptions for NetApp Console.
AWS keysThis is a part of the manual role assignment workflow. Enter an AWS access key and secret key. For information, refer to Manage AWS credentials and marketplace subscriptions for NetApp Console.
-
-
Deploy the AWS agent:
-
On the AWS agent details page, set or confirm the agent instance name and agent role.
-
On the Network page, select VPC, subnet, key pair, public IP behavior, and proxy settings.
-
Configure Security group. Allow inbound HTTP (80), HTTPS (443), and SSH (22) for troubleshooting access to the agent VM.
-
-
Review the section summaries and select Add to deploy.
For full networking and permissions requirements, see:
-
Track the deployment progress dialog until it finishes. You can expand event logs to review detailed activity.
When deployment completes, you can create your first Cloud Volumes ONTAP system or stay on the Systems page to add a system later.
Add your first Cloud Volumes ONTAP system
After the agent is ready, create your first Cloud Volumes ONTAP system in AWS.
-
From the post-deployment prompt, select Add system.
-
Start the Cloud Volumes ONTAP system creation workflow.
-
Complete the system configuration.
For detailed system deployment instructions, refer to Deploy Cloud Volumes ONTAP with Quick create in AWS.
Troubleshooting and recovery
Use this section if you leave the onboarding flow before completion or if agent deployment fails. These steps help you resume where you left off or recover and retry deployment.
Resume setup
If you leave before completion, you can resume the setup from the last completed step.
-
Go to the NetApp Console home page.
-
Select Resume setup to continue onboarding.
Recover from deployment failure
If deployment fails:
-
Download the deployment report.
-
Review your configuration and logs.
-
Select Start over to retry the deployment.
Use these resources for related setup tasks and troubleshooting.