

Manage AWS credentials and marketplace subscriptions for NetApp Console
 Suggest changes
Add and manage AWS credentials so that you can deploy and manage cloud resources in your AWS accounts from the NetApp Console. If you manage multiple AWS Marketplace subscriptions, you can assign each one of them to different AWS credentials from the Credentials page.
Overview
You can add AWS credentials to an existing Console agent or directly to the Console:
-
Add additional AWS credentials to an existing agent
Add AWS credentials to a Console agent to manage cloud resources. Learn how to add AWS credentials to a Console agent.
-
Add AWS credentials to the Console for creating a Console agent
Adding new AWS credentials to the Console provides the permissions needed to create a Console agent. Learn how to add AWS credentials to the NetApp Console.
-
Add AWS credentials to the Console for FSx for ONTAP
Add new AWS credentials to the Console to create and manage FSx for ONTAP. Learn how to set up permissions for FSx for ONTAP
How to rotate credentials
The NetApp Console enables you to provide AWS credentials in a few ways: an IAM role associated with the agent instance, by assuming an IAM role in a trusted account, or by providing AWS access keys. Learn more about AWS credentials and permissions.
With the first two options, the Console uses the AWS Security Token Service to obtain temporary credentials that rotate constantly. This process is the best practice because it's automatic and it's secure.
Manually rotate AWS access keys by updating them in the Console.
Add additional credentials to a Console agent
Add additional AWS credentials to a Console agent so that it has the permissions needed to manage resources and processes within your public cloud environment. You can either provide the ARN of an IAM role in another account or provide AWS access keys.
Grant permissions
Grant permissions before adding AWS credentials to a Console agent. The permissions allow a Console agent to manage resources and processes within that AWS account. You can provide the permissions with the ARN of a role in a trusted account or AWS keys.

|
If you deployed a Console agent from the Console, it automatically added AWS credentials for the account in which you deployed a Console agent. This ensures the necessary permissions are in place for managing resources. |
Choices
Grant permissions by assuming an IAM role in another account
You can set up a trust relationship between the source AWS account in which you deployed a Console agent and other AWS accounts by using IAM roles. You would then provide the Console with the ARN of the IAM roles from the trusted accounts.
If a Console agent is installed on-premises, you can't use this authentication method. You must use AWS keys.
-
Go to the IAM console in the target account in which you want to provide a Console agent with permissions.
-
Under Access Management, select Roles > Create Role and follow the steps to create the role.
Be sure to do the following:
-
Under Trusted entity type, select AWS account.
-
Select Another AWS account and enter the ID of the account where a Console agent instance resides.
-
Create the required policies by copying and pasting the contents of the IAM policies for a Console agent.
-
-
Copy the Role ARN of the IAM role so that you can paste it in the Console later on.
The account has the required permissions. You can now add the credentials to a Console agent.
Grant permissions by providing AWS keys
If you want to provide the Console with AWS keys for an IAM user, then you need to grant the required permissions to that user. The Console IAM policy defines the AWS actions and resources that the Console is allowed to use.
You must use this authentication method if a Console agent is installed on-premises. You can't use an IAM role.
-
From the IAM console, create policies by copying and pasting the contents of the IAM policies for a Console agent.
-
Attach the policies to an IAM role or an IAM user.
Add the credentials to an existing agent
After you provide an AWS account with the required permissions, you can add the credentials for that account to an existing agent. This enables you to launch Cloud Volumes ONTAP systems in that account using the same agent.
|
|
New credentials in your cloud provider may take a few minutes to become available. |
-
Use the top navigation bar to select a Console agent to which you want to add credentials.
-
In the left navigation bar, select Administration > Credentials.
-
On the Organization credentials page, select Add Credentials and follow the steps in the wizard.
-
Credentials Location: Select Amazon Web Services > Agent.
-
Define Credentials: Provide the ARN (Amazon Resource Name) of a trusted IAM role, or enter an AWS access key and secret key.
-
Marketplace Subscription: Associate a Marketplace subscription with these credentials by subscribing now or by selecting an existing subscription.
To pay for services at an hourly rate (PAYGO) or with an annual contract, you must associate AWS credentials with your AWS Marketplace subscription.
-
Review: Confirm the details about the new credentials and select Add.
-
You can now switch to a different set of credentials from the Details and Credentials page when adding a subscription to the Console.
Add credentials to the Console for creating a Console agent
Add AWS credentials by providing the ARN of an IAM role that gives the permissions needed to create a Console agent. You can choose these credentials when creating a new agent.
Set up the IAM role
Set up an IAM role that enables the NetApp Console software as a service (SaaS) application to assume the role.
-
Go to the IAM console in the target account.
-
Under Access Management, select Roles > Create Role and follow the steps to create the role.
Be sure to do the following:
-
Under Trusted entity type, select AWS account.
-
Select Another AWS account and enter the ID of the NetApp Console SaaS: 952013314444
-
For Amazon FSx for NetApp ONTAP specifically, edit the Trust relationships policy to include "AWS": "arn:aws:iam::952013314444:root".
For example, the policy should look like this:
{
  "Version": "2012-10-17",
  "Statement": [
    {
      "Effect": "Allow",
      "Principal": {
        "AWS": "arn:aws:iam::952013314444:root",
        "Service": "ec2.amazonaws.com"
      },
      "Action": "sts:AssumeRole"
    }
  ]
}
Refer to AWS Identity and Access Management (IAM) documentation for more information on cross account resource access in IAM.
-
Create a policy that includes the permissions required to create a Console agent.
-
-
Copy the Role ARN of the IAM role so that you can paste it in the Console in the next step.
The IAM role now has the required permissions. You can now add it to the Console.
Add the credentials
After you provide the IAM role with the required permissions, add the role ARN to the Console.
If you just created the IAM role, it might take a few minutes until it is available for use. Wait a few minutes before you add the credentials to the Console.
-
Select Administration > Credentials.

-
On the Organization credentials page, select Add Credentials and follow the steps in the wizard.
-
Credentials Location: Select Amazon Web Services > Console.
-
Define Credentials: Provide the ARN (Amazon Resource Name) of the IAM role.
-
Review: Confirm the details about the new credentials and select Add.
-
Add credentials to the Console for Amazon FSx for ONTAP
For details, refer to the Console documentation for Amazon FSx for ONTAP
Configure an AWS subscription
After you add your AWS credentials, you can configure an AWS Marketplace subscription with those credentials. The subscription enables you to pay for NetApp data services and Cloud Volumes ONTAP at an hourly rate (PAYGO) or using an annual contract.
There are two scenarios in which you might configure an AWS Marketplace subscription after you've already added the credentials:
-
You didn't configure a subscription when you initially added the credentials.
-
You want to change the AWS Marketplace subscription that is configured to the AWS credentials.
Replacing the current marketplace subscription with a new subscription changes the marketplace subscription for any existing Cloud Volumes ONTAP systems and all new systems.
You need to create a Console agent before you can configure a subscription. Learn how to create a Console agent.
-
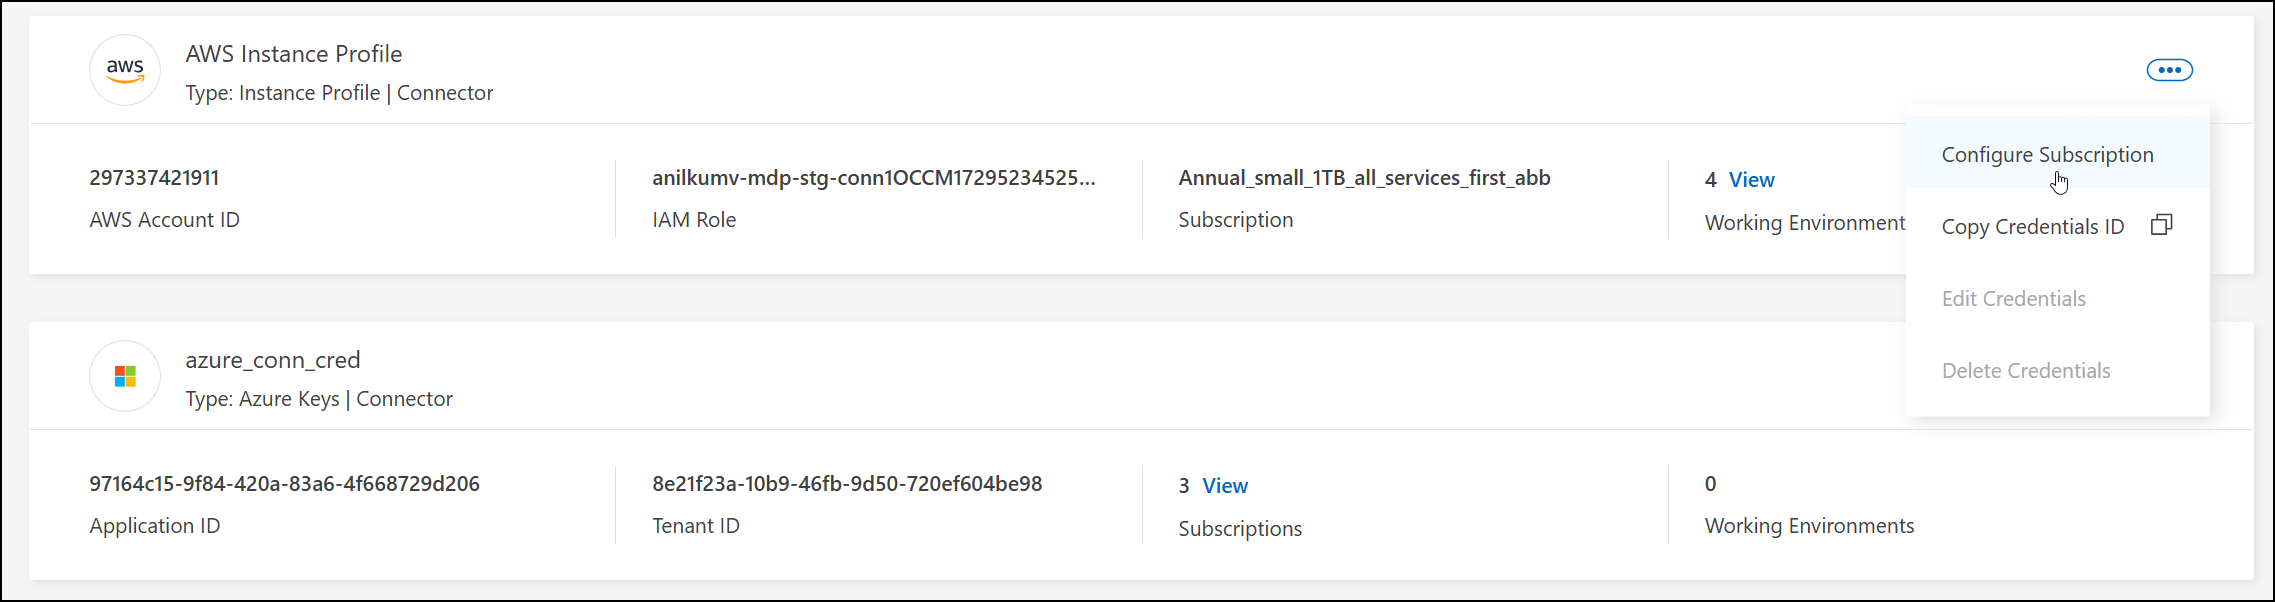
Select Administration > Credentials.
-
Select Organization credentials.
-
Select the action menu for a set of credentials that are associated with a Console agent and then select Configure Subscription.
You must select credentials that are associated with a Console agent. You can't associate a marketplace subscription with credentials that are associated with the NetApp Console.
-
To associate the credentials with an existing subscription, select the subscription from the drop-down list and select Configure.
-
To associate the credentials with a new subscription, select Add Subscription > Continue and follow the steps in the AWS Marketplace:
-
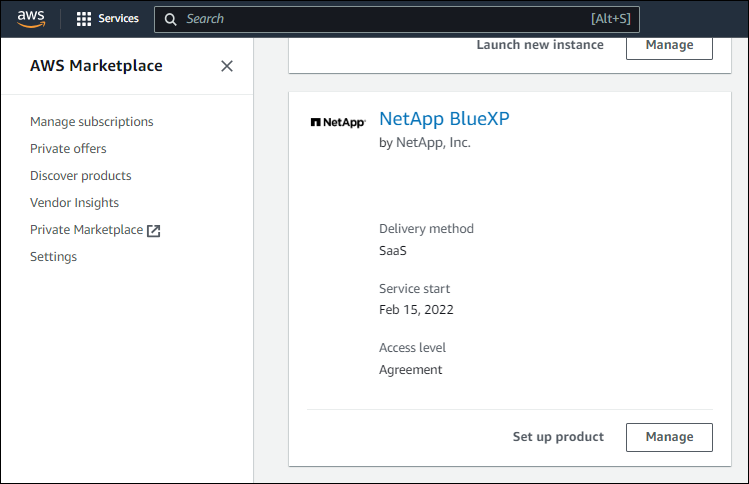
Select View purchase options.
-
Select Subscribe.
-
Select Set up your account.
You'll be redirected to the NetApp Console.
-
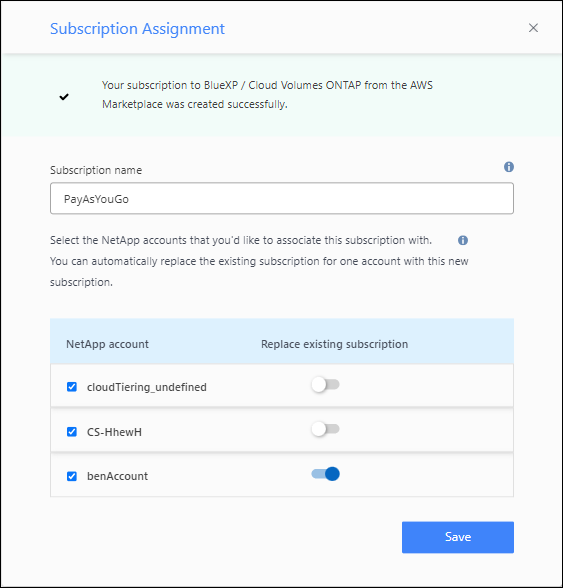
From the Subscription Assignment page:
-
Select the Console organizations or accounts that you'd like to associate this subscription with.
-
In the Replace existing subscription field, choose whether you'd like to automatically replace the existing subscription for one organization or account with this new subscription.
The Console replaces the existing subscription for all credentials in the organization or account with this new subscription. If a set of credentials wasn't ever associated with a subscription, then this new subscription won't be associated with those credentials.
For all other organizations or accounts, you'll need to manually associate the subscription by repeating these steps.
-
Select Save.
-
-
Associate an existing subscription with your organization
When you subscribe from the AWS Marketplace, the last step in the process is to associate the subscription with your organization. If you didn't complete this step, then you can't use the subscription with your organization.
Follow the steps below if you subscribed to NetApp Intelligent Services from the AWS Marketplace, but you missed the step to associate the subscription with your account.
-
Confirm that you didn't associate your subscription with your Console organization.
-
From the navigation menu, select Administration > Licenses and subscriptions.
-
Select Subscriptions.
-
Verify that your subscription doesn't appear.
You'll only see the subscriptions that are associated with the organization or account that you're currently viewing. If you don't see your subscription, proceed with the following steps.
-
-
Log in to the AWS Console and navigate to AWS Marketplace Subscriptions.
-
Find the subscription.
-
Select Set up product.
The subscription offer page should load in a new browser tab or window.
-
Select Set up your account.
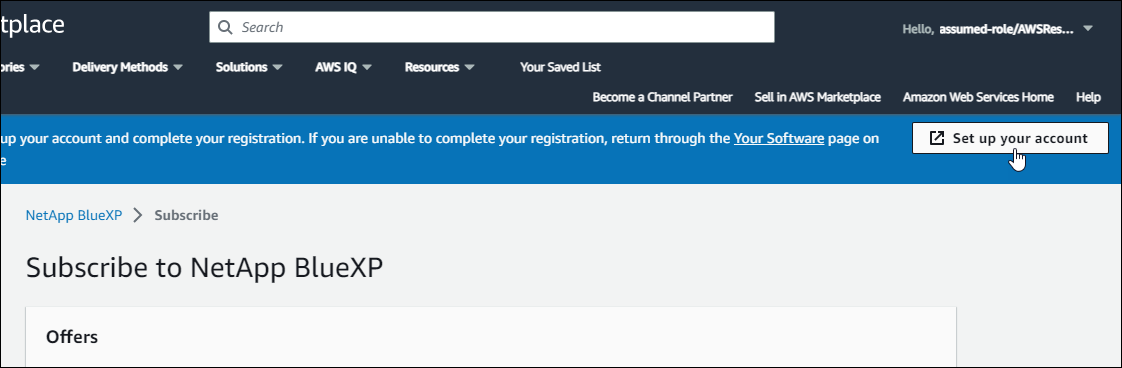
The Subscription Assignment page on netapp.com should load in a new browser tab or window.
Note that you might be prompted to log in to the Console first.
-
From the Subscription Assignment page:
-
Select the Console organizations or accounts that you'd like to associate this subscription with.
-
In the Replace existing subscription field, choose whether you'd like to automatically replace the existing subscription for one organization or account with this new subscription.
The Console replaces the existing subscription for all credentials in the organization or account with this new subscription. If a set of credentials wasn't ever associated with a subscription, then this new subscription won't be associated with those credentials.
For all other organizations or accounts, you'll need to manually associate the subscription by repeating these steps.
-
-
Confirm that the subscription is associated with your organization.
-
From the navigation menu, select Administration > License and subscriptions.
-
Select Subscriptions.
-
Verify that your subscription appears.
-
-
Confirm that the subscription is associated with your AWS credentials.
-
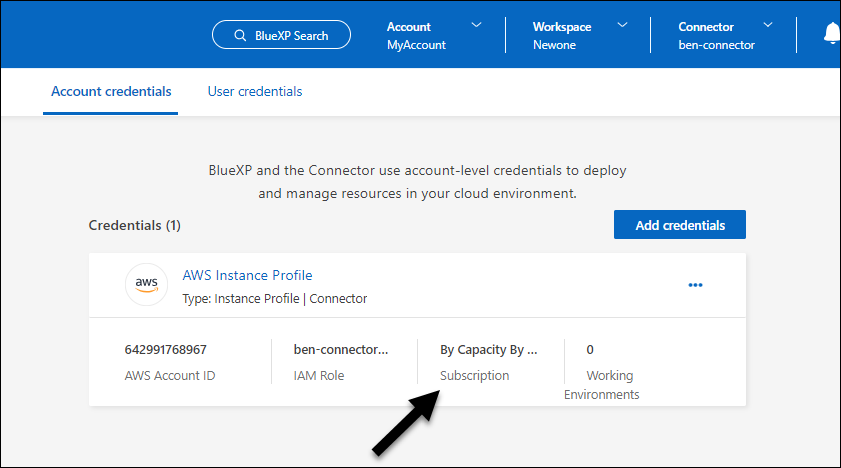
Select Administration > Credentials.
-
On the Organization credentials page, verify that the subscription is associated with your AWS credentials.
Here's an example.
-
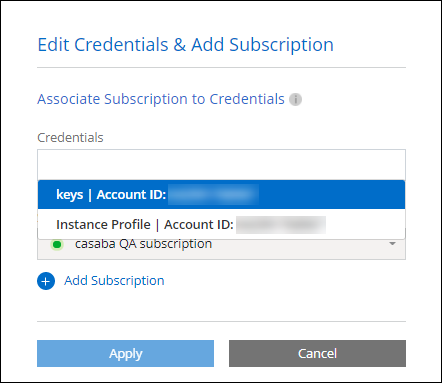
Edit credentials
Edit your AWS credentials by changing the account type (AWS keys or assume role), by editing the name, or by updating the credentials themselves (the keys or the role ARN).
|
|
You can't edit the credentials for an instance profile that are associated with a Console agent instance or an Amazon FSx for ONTAP instance. You can only rename the credentials for an FSx for ONTAP instance. |
-
Select Administration > Credentials.
-
On the Organization credentials page, select the action menu for a set of credentials and then select Edit Credentials.
-
Make the required changes and then select Apply.
Delete credentials
If you no longer need a set of credentials, you can delete them. You can only delete credentials that aren't associated with a system.

|
You can't delete the credentials for an instance profile that is associated with a Console agent. |
-
Select Administration > Credentials.
-
On the Organization credentials or Account credentials page, select the action menu for a set of credentials and then select Delete Credentials.
-
Select Delete to confirm.