

Configure StorageGRID IP addresses
 Suggest changes
You use the StorageGRID Appliance Installer to configure the IP addresses and routing information used for the services appliance or appliance Storage Node on the StorageGRID Grid, Admin, and Client Networks.
If you are using ConfigBuilder to generate a JSON file, you can configure IP addresses automatically. See Automate appliance installation and configuration.
You must either assign a static IP for the appliance on each connected network or assign a permanent lease for the address on the DHCP server.
To change the link configuration, see the following instructions:
-
In the StorageGRID Appliance Installer, select Configure Networking > IP Configuration.
The IP Configuration page appears.
-
To configure the Grid Network, select either Static or DHCP in the Grid Network section of the page.
-
If you selected Static, follow these steps to configure the Grid Network:
-
Enter the static IPv4 address, using CIDR notation.
-
Enter the gateway.
If your network does not have a gateway, re-enter the same static IPv4 address.
-
If you want to use jumbo frames, change the MTU field to a value suitable for jumbo frames, such as 9000. Otherwise, keep the default value of 1500.

The MTU value of the network must match the value configured on the switch port the node is connected to. Otherwise, network performance issues or packet loss might occur.
For the best network performance, all nodes should be configured with similar MTU values on their Grid Network interfaces. The Grid Network MTU mismatch alert is triggered if there is a significant difference in MTU settings for the Grid Network on individual nodes. The MTU values don't have to be the same for all network types. -
Click Save.
When you change the IP address, the gateway and list of subnets might also change.
If you lose your connection to the StorageGRID Appliance Installer, re-enter the URL using the new static IP address you just assigned. For example,
https://appliance_IP:8443 -
Confirm that the list of Grid Network subnets is correct.
If you have grid subnets, the Grid Network gateway is required. All grid subnets specified must be reachable through this gateway. These Grid Network subnets must also be defined in the Grid Network Subnet List on the primary Admin Node when you start StorageGRID installation.

The default route is not listed. If the Client Network is not enabled, the default route will use the Grid Network gateway. -
To add a subnet, click the insert icon
 to the right of the last entry.
 -
To remove an unused subnet, click the delete icon
 .
.
-
-
Click Save.
-
-
If you selected DHCP, follow these steps to configure the Grid Network:
-
After you select the DHCP radio button, click Save.
The IPv4 Address, Gateway, and Subnets fields are automatically populated. If the DHCP server is set up to assign an MTU value, the MTU field is populated with that value, and the field becomes read-only.
Your web browser is automatically redirected to the new IP address for the StorageGRID Appliance Installer.
-
Confirm that the list of Grid Network subnets is correct.
If you have grid subnets, the Grid Network gateway is required. All grid subnets specified must be reachable through this gateway. These Grid Network subnets must also be defined in the Grid Network Subnet List on the primary Admin Node when you start StorageGRID installation.
The default route is not listed. If the Client Network is not enabled, the default route will use the Grid Network gateway. -
To add a subnet, click the insert icon
to the right of the last entry. -
To remove an unused subnet, click the delete icon
.
-
-
If you want to use jumbo frames, change the MTU field to a value suitable for jumbo frames, such as 9000. Otherwise, keep the default value of 1500.
The MTU value of the network must match the value configured on the switch port the node is connected to. Otherwise, network performance issues or packet loss might occur.
For the best network performance, all nodes should be configured with similar MTU values on their Grid Network interfaces. The Grid Network MTU mismatch alert is triggered if there is a significant difference in MTU settings for the Grid Network on individual nodes. The MTU values don't have to be the same for all network types. -
Click Save.
-
-
To configure the Admin Network, select either Static or DHCP in the Admin Network section of the page.
To configure the Admin Network, you enable the Admin Network on the Link Configuration page. 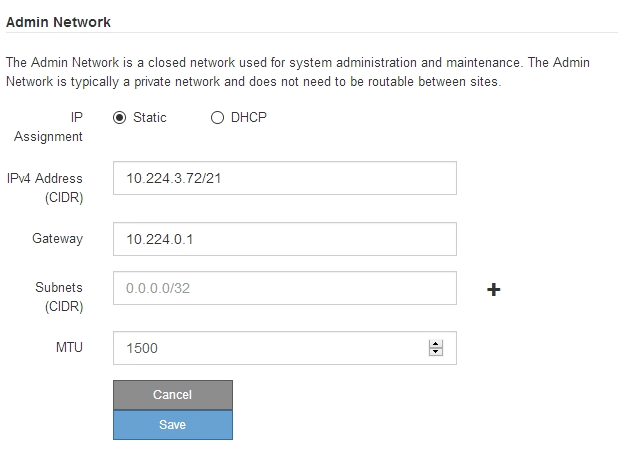
-
If you selected Static, follow these steps to configure the Admin Network:
-
Enter the static IPv4 address, using CIDR notation, for Management Port 1 on the appliance.
Management Port 1 is the left of the two 1-GbE RJ45 ports on the right end of the appliance.
-
Enter the gateway.
If your network does not have a gateway, re-enter the same static IPv4 address.
-
If you want to use jumbo frames, change the MTU field to a value suitable for jumbo frames, such as 9000. Otherwise, keep the default value of 1500.
The MTU value of the network must match the value configured on the switch port the node is connected to. Otherwise, network performance issues or packet loss might occur. -
Click Save.
When you change the IP address, the gateway and list of subnets might also change.
If you lose your connection to the StorageGRID Appliance Installer, re-enter the URL using the new static IP address you just assigned. For example,
https://appliance:8443 -
Confirm that the list of Admin Network subnets is correct.
You must verify that all subnets can be reached using the gateway you provided.
The default route can't be made to use the Admin Network gateway. -
To add a subnet, click the insert icon
to the right of the last entry. -
To remove an unused subnet, click the delete icon
.
-
-
Click Save.
-
-
If you selected DHCP, follow these steps to configure the Admin Network:
-
After you select the DHCP radio button, click Save.
The IPv4 Address, Gateway, and Subnets fields are automatically populated. If the DHCP server is set up to assign an MTU value, the MTU field is populated with that value, and the field becomes read-only.
Your web browser is automatically redirected to the new IP address for the StorageGRID Appliance Installer.
-
Confirm that the list of Admin Network subnets is correct.
You must verify that all subnets can be reached using the gateway you provided.
The default route can't be made to use the Admin Network gateway. -
To add a subnet, click the insert icon
to the right of the last entry. -
To remove an unused subnet, click the delete icon
.
-
-
If you want to use jumbo frames, change the MTU field to a value suitable for jumbo frames, such as 9000. Otherwise, keep the default value of 1500.
The MTU value of the network must match the value configured on the switch port the node is connected to. Otherwise, network performance issues or packet loss might occur. -
Click Save.
-
-
To configure the Client Network, select either Static or DHCP in the Client Network section of the page.
To configure the Client Network, you enable the Client Network on the Link Configuration page. 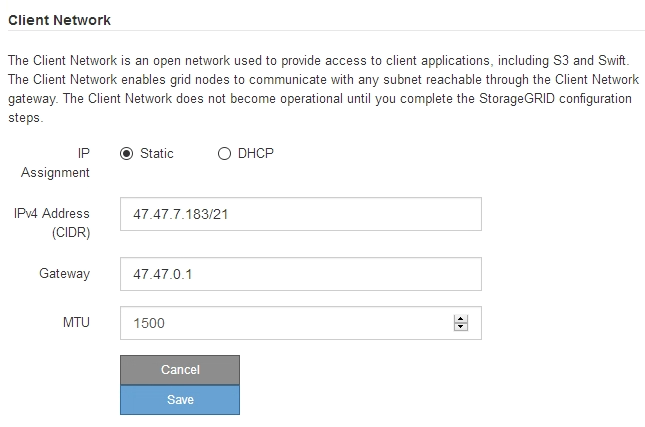
-
If you selected Static, follow these steps to configure the Client Network:
-
Enter the static IPv4 address, using CIDR notation.
-
Click Save.
-
Confirm that the IP address for the Client Network gateway is correct.
If the Client Network is enabled, the default route is displayed. The default route uses the Client Network gateway and can't be moved to another interface while the Client Network is enabled. -
If you want to use jumbo frames, change the MTU field to a value suitable for jumbo frames, such as 9000. Otherwise, keep the default value of 1500.
The MTU value of the network must match the value configured on the switch port the node is connected to. Otherwise, network performance issues or packet loss might occur. -
Click Save.
-
-
If you selected DHCP, follow these steps to configure the Client Network:
-
After you select the DHCP radio button, click Save.
The IPv4 Address and Gateway fields are automatically populated. If the DHCP server is set up to assign an MTU value, the MTU field is populated with that value, and the field becomes read-only.
Your web browser is automatically redirected to the new IP address for the StorageGRID Appliance Installer.
-
Confirm that the gateway is correct.
If the Client Network is enabled, the default route is displayed. The default route uses the Client Network gateway and can't be moved to another interface while the Client Network is enabled. -
If you want to use jumbo frames, change the MTU field to a value suitable for jumbo frames, such as 9000. Otherwise, keep the default value of 1500.
The MTU value of the network must match the value configured on the switch port the node is connected to. Otherwise, network performance issues or packet loss might occur.
-