

Manage Microsoft SQL Server inventory with BlueXP backup and recovery
 Suggest changes
BlueXP backup and recovery enables you to manage your Microsoft SQL Server workload host information, database information, and instances information. You can view, edit, and delete protection settings of your inventory.
You can accomplish the following tasks related to managing your inventory:
-
Manage host information
-
Suspend schedules
-
Edit or delete hosts
-
-
Manage instances information
-
Associate credentials with a resource
-
Back up now by starting an on-demand backup
-
Edit protection settings
-
-
Manage database information
-
Protect databases
-
Restore databases
-
Edit protection settings
-
Back up now by starting an on-demand backup
-
-
Configure the log directory (from Inventory > Hosts). If you want to back up logs for your database hosts in the snapshot, first configure the logs in BlueXP backup and recovery. For details, refer to Configure BlueXP backup and recovery settings.
Manage host information
You can manage host information to ensure that the right hosts are protected. You can view, edit, and delete host information.
Required BlueXP role
Organization admin, Folder or project admin, Backup and Recovery super admin, Backup and Recovery backup admin, Backup and Recovery restore admin, or Backup and Recovery clone admin role. Learn about BlueXP access roles for all services.
-
Configure log directory. For details, refer to Configure BlueXP backup and recovery settings.
-
Suspend schedules
-
Edit a host
-
Delete a host
Manage hosts
You can manage the hosts that are discovered in your working environment. You can manage them separately or as a group.

|
You can manage only those hosts that show an "Unmanaged" status in the Hosts column. If the status is "Managed", it means that the host is already being managed by BlueXP backup and recovery. |
After you manage the hosts in BlueXP backup and recovery, SnapCenter no longer manages the resources on those hosts.
Required BlueXP role
Organization admin, Folder or project admin, or Backup and Recovery super admin. Learn about BlueXP access roles for all services.
-
From the menu, select Inventory.
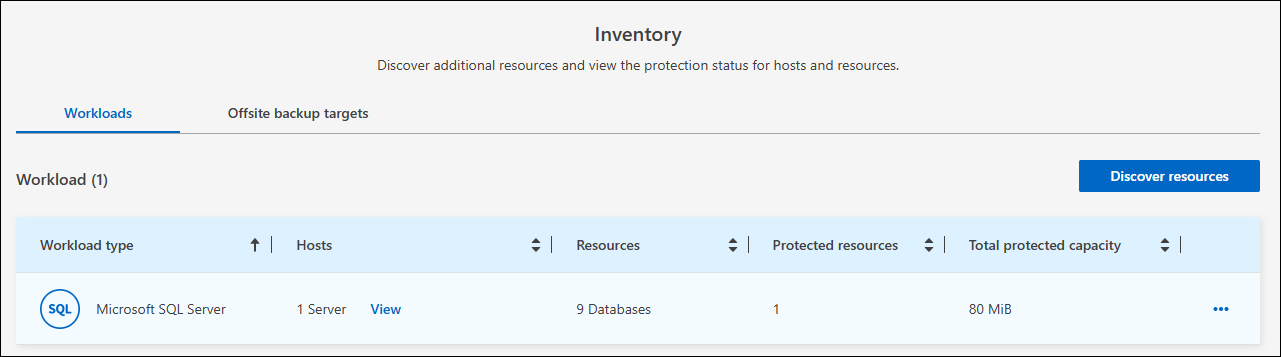
-
Select a workload to view the protection details.
-
Select the Actions icon
 > View details.
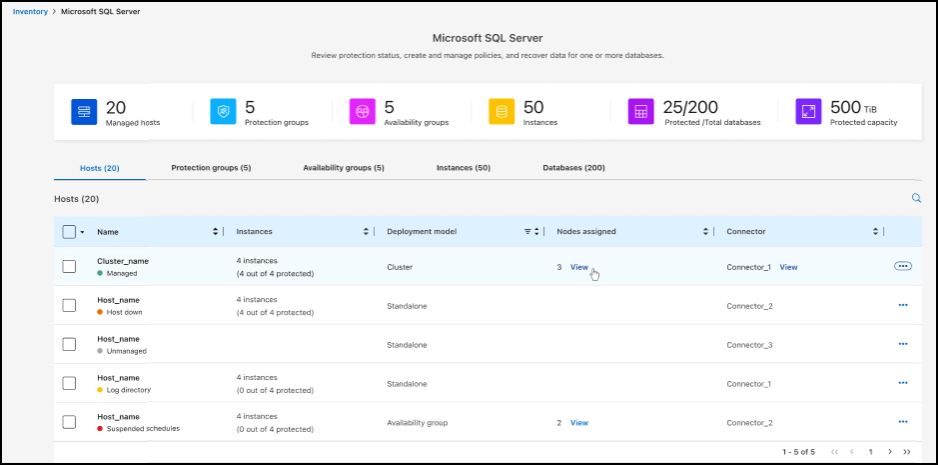
-
Select the Hosts tab.
-
Select one or more hosts. If you select multiple hosts, a Bulk actions option appears where you can select Manage (up to 5 hosts).
-
Select the Actions icon
> Manage.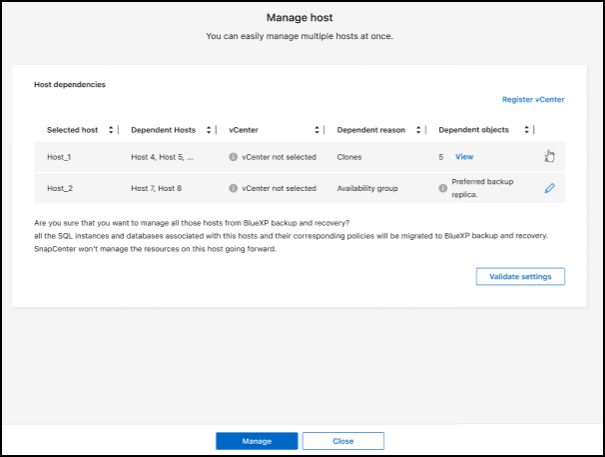
-
Review the host dependencies:
-
If the vCenter does not display, select the pencil icon to add or edit the vCenter details.
-
If you add a vCenter, you must also register the vCenter by selecting Register vCenter.
-
-
Select Validate settings to test your settings.
-
Select Manage to manage the host.
Suspend schedules
You can suspend schedules to stop the backup and restore operations for a host. You might want to do this if you need to perform maintenance activities on the host.
-
From the BlueXP backup and recovery menu, select Inventory.
-
Select the host on which you want to suspend schedules.
-
Select the Actions
icon, and select Suspend schedules. -
In the confirmation dialog box, select Suspend.
Edit a host
You can change the vCenter server information, host registration credentials, and advanced settings options.
-
From the BlueXP backup and recovery menu, select Inventory.
-
Select the host that you want to edit.
-
Select the Actions
icon, and select Edit host.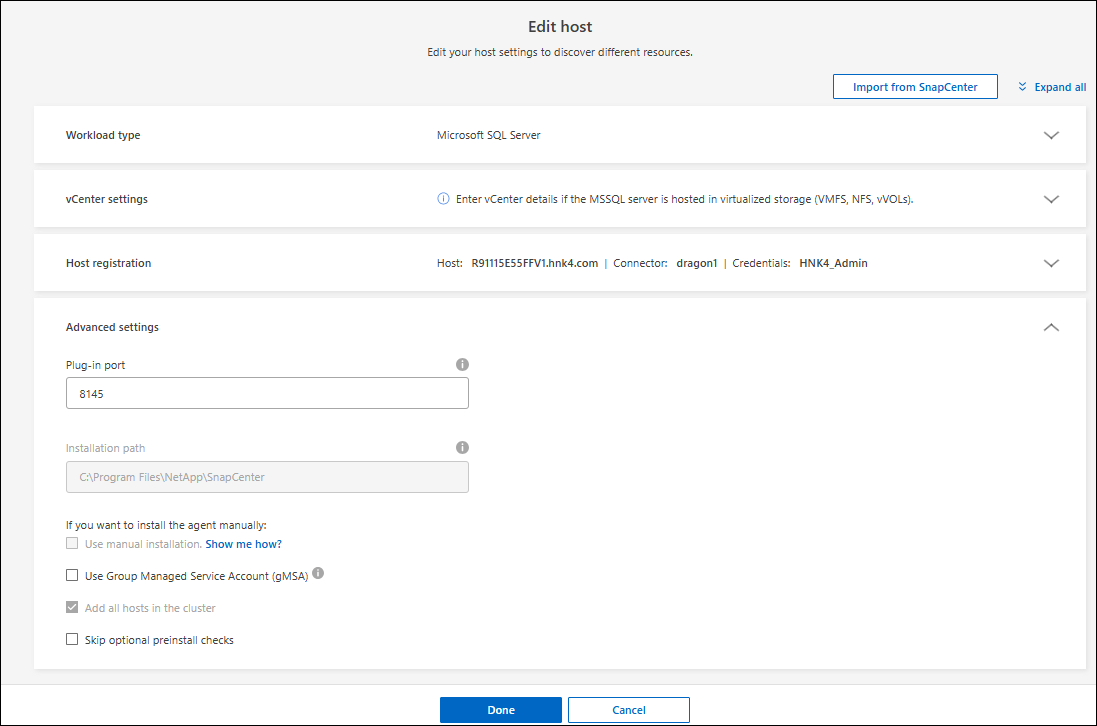
-
Edit the host information.
-
Select Done.
Delete a host
You can delete the host information to stop service charges.
-
From the BlueXP backup and recovery menu, select Inventory.
-
Select the host that you want to delete.
-
Select the Actions
icon, and select Delete host. -
Review the confirmation information and select Delete.
Manage instances information
You can manage instances information to ensure that resources have the appropriate credentials for protection and you can back up resources in the following ways:
-
Protect instances
-
Associate credentials
-
Disassociate credentials
-
Edit protection
-
Back up now
Required BlueXP role
Organization admin, Folder or project admin, Backup and Recovery super admin, Backup and Recovery backup admin, Backup and Recovery restore admin, or Backup and Recovery clone admin role. Learn about BlueXP access roles for all services.
Protect database instances
You can assign a policy to a database instance using policies that govern the schedules and retention of resource protection.
-
From the BlueXP backup and recovery menu, select Inventory.
-
Select the workload that you want to view and select View.
-
Select the Instances tab.
-
Select the instance.
-
Select the Actions
icon, and select Protect. -
Select a policy or create a new one.
For details about creating a policy, refer to Create a policy.
-
Provide information on the scripts that you want to run before and after the backup.
-
Pre-script: Enter your script filename and location to run it automatically before the protect action is triggered. This is helpful for performing additional tasks or configurations that need to be executed before the protection workflow.
-
Post-script: Enter your script filename and location to run it automatically after the protection action is complete. This is helpful for performing additional tasks or configurations that need to be executed after the protection workflow.
-
-
Provide information on how you want the snapshot to be verified:
-
Storage location: Select the location where the verification snapshot will be stored.
-
Verification resource: Select whether the resource that you want to verify is on the local snapshot and on ONTAP secondary storage.
-
Verification schedule: Select the frequency of hourly, daily, weekly, monthly, or yearly.
-
Associate credentials with a resource
You can associate credentials with a resource so that protection can occur.
For details, see Configure BlueXP backup and recovery settings, including credentials.
-
From the BlueXP backup and recovery menu, select Inventory.
-
Select the workload that you want to view and select View.
-
Select the Instances tab.
-
Select the instance.
-
Select the Actions
icon, and select Associate credentials. -
Use existing credentials or create new ones.
Edit protection settings
You can change the policy, create a new policy, set a schedule, and set retention settings.
-
From the BlueXP backup and recovery menu, select Inventory.
-
Select the workload that you want to view and select View.
-
Select the Instances tab.
-
Select the instance.
-
Select the Actions
icon, and select Edit protection.For details about creating a policy, refer to Create a policy.
Back up now
You can back up your data now to ensure that your data is protected immediately.
-
From the BlueXP backup and recovery menu, select Inventory.
-
Select the workload that you want to view and select View.
-
Select the Instances tab.
-
Select the instance.
-
Select the Actions
icon, and select Back up now. -
Choose the backup type and set the schedule.
For details about creating an ad hoc backup, refer to Create a policy.
Manage database information
You can manage database information in the following ways:
-
Protect databases
-
Restore databases
-
View protection details
-
Edit protection settings
-
Back up now
Protect databases
You can change the policy, create a new policy, set a schedule, and set retention settings.
Required BlueXP role
Organization admin, Folder or project admin, Backup and Recovery super admin, Backup and Recovery backup admin role. Learn about BlueXP access roles for all services.
-
From the BlueXP backup and recovery menu, select Inventory.
-
Select the workload that you want to view and select View.
-
Select the Databases tab.
-
Select the database.
-
Select the Actions
icon, and select Protect.For details about creating a policy, refer to Create a policy.
Restore databases
You can restore a database to ensure that your data is protected.
Required BlueXP role
Organization admin, Folder or project admin, Backup and Recovery super admin, Backup and Recovery restore admin role. Learn about BlueXP access roles for all services.
-
From the BlueXP backup and recovery menu, select Inventory.
-
Select the workload that you want to view and select View.
-
Select the Databases tab.
-
Select the database.
-
Select the Actions
icon, and select Restore.For information about restoring workloads, refer to Restore workloads.
Edit protection settings
You can change the policy, create a new policy, set a schedule, and set retention settings.
Required BlueXP role
Organization admin, Folder or project admin, Backup and Recovery super admin, Backup and Recovery backup admin role. Learn about BlueXP access roles for all services.
-
From the BlueXP backup and recovery menu, select Inventory.
-
Select the workload that you want to view and select View.
-
Select the Databases tab.
-
Select the database.
-
Select the Actions
icon, and select Edit protection.For details about creating a policy, refer to Create a policy.
Back up now
You can back up your Microsoft SQL Server instances and databases now to ensure that your data is protected immediately.
Required BlueXP role
Organization admin, Folder or project admin, Backup and Recovery super admin, Backup and Recovery backup admin role. Learn about BlueXP access roles for all services.
-
From the BlueXP backup and recovery menu, select Inventory.
-
Select the workload that you want to view and select View.
-
Select the Instances or Databases tab.
-
Select the instance or database.
-
Select the Actions
icon, and select Back up now.