

Install a Console agent on-premises using vCenter
 Suggest changes
If you are a VMware user, you can use an OVA to deploy a Console agent in your vCenter. The OVA download or URL is available through the NetApp Console.

|
When you deploy a Console agent with your vCenter tools, you can use the VM web console to perform maintenance tasks. Learn more about the VM console for the agent. |
Prepare to install the Console agent
Before installation, make sure your VM host meets the requirements and the Console agent can access the internet and targeted networks. To use NetApp data services or Cloud Volumes ONTAP, create cloud provider credentials for the Console agent to perform actions on your behalf.
Review Console agent host requirements
Make sure your host machine meets installation requirements before installing the Console agent.
-
CPU: 8 cores or 8 vCPUs
-
RAM: 32 GB
-
Disk space: 165 GB (thick provisioned)
-
vSphere 7.0 or higher
-
ESXi host 7.03 or higher
|
|
Install the agent in a vCenter environment rather than directly on an ESXi host. |
Set up network access for the Console agent
Work with your network administrator to ensure the Console agent has outbound access to the required endpoints and connections to targeted networks.
- Connections to target networks
-
The Console agent requires a network connection to the location where you're planning to create and manage systems. For example, the network where you plan to create Cloud Volumes ONTAP systems or a storage system in your on-premises environment.
- Outbound internet access
-
The network location where you deploy the Console agent must have an outbound internet connection to contact specific endpoints.
- Endpoints contacted from computers when using the web-based NetApp Console
-
Computers that access the Console from a web browser must have the ability to contact several endpoints.
- Endpoints contacted from the Console agent
-
The Console agent requires outbound internet access to contact the following endpoints to manage resources and processes within your public cloud environment for day-to-day operations.
The endpoints listed below are all CNAME entries.
|
|
You can't manage resources in Google Cloud with a Console agent installed on your premises. To manage Google Cloud resources, install an agent in Google Cloud. |
These endpoints are required for all Console agent deployments. Additional endpoints are required to manage NetApp resources in AWS or Azure.
| Endpoints | Purpose |
|---|---|
https://mysupport.netapp.com |
To obtain licensing information and to send AutoSupport messages to NetApp Support. |
https://signin.b2c.netapp.com |
To update NetApp Support Site (NSS) credentials or to add new NSS credentials to the NetApp Console. |
https://support.netapp.com |
To obtain licensing information and to send AutoSupport messages to NetApp Support as well as to receive software updates for Cloud Volumes ONTAP. |
https://api.bluexp.netapp.com |
To provide features and services within the NetApp Console. |
https://bluexpinfraprod.eastus2.data.azurecr.io |
To obtain images for Console agent upgrades. |
When the Console agent is installed on-premises, it needs network access to the following additional AWS endpoints to manage NetApp systems (such as Cloud Volumes ONTAP) deployed in AWS.
| Endpoints | Purpose |
|---|---|
AWS services (amazonaws.com):
|
To manage AWS resources. The endpoint depends on your AWS region. Refer to AWS documentation for details |
Amazon FSx for NetApp ONTAP:
|
The web-based console contacts this endpoint to interact with the Workload Factory APIs to manage and operate FSx for ONTAP-based workloads. |
When the Console agent is installed on-premises, it needs network access to the following additional Azure endpoints to manage NetApp systems (such as Cloud Volumes ONTAP) deployed in Azure.
| Endpoints | Purpose |
|---|---|
https://management.azure.com |
To manage resources in Azure public regions. |
https://management.chinacloudapi.cn |
To manage resources in Azure China regions. |
- Proxy server
-
NetApp supports both explicit and transparent proxy configurations. If you are using a transparent proxy, you only need to provide the certificate for the proxy server. If you are using an explicit proxy, you'll also need the IP address and credentials.
-
IP address
-
Credentials
-
HTTPS certificate
-
- Ports
-
There's no incoming traffic to the Console agent, unless you initiate it or it is used as a proxy to send AutoSupport messages from Cloud Volumes ONTAP to NetApp Support.
-
HTTP (80) and HTTPS (443) provide access to the local UI, which you'll use in rare circumstances.
-
SSH (22) is only needed if you need to connect to the host for troubleshooting.
-
Inbound connections over port 3128 are required if you deploy Cloud Volumes ONTAP systems in a subnet where an outbound internet connection isn't available.
If Cloud Volumes ONTAP systems don't have an outbound internet connection to send AutoSupport messages, the Console automatically configures those systems to use a proxy server that's included with the Console agent. The only requirement is to ensure that the Console agent's security group allows inbound connections over port 3128. You'll need to open this port after you deploy the Console agent.
-
- Enable NTP
-
If you're planning to use NetApp Data Classification to scan your corporate data sources, you should enable a Network Time Protocol (NTP) service on both the Console agent and the NetApp Data Classification system so that the time is synchronized between the systems. Learn more about NetApp Data Classification.
Create Console agent cloud permissions for AWS or Azure
If you want to use NetApp data services in AWS or Azure with an on-premises Console agent, then you need to set up permissions in your cloud provider so that you can add the credentials to the Console agent after you install it.
|
|
You can't manage resources in Google Cloud with a Console agent installed on your premises. If you want to manage Google Cloud resources, you need to install an agent in Google Cloud. |
For on-premises Console agents, provide AWS permissions by adding IAM user access keys.
Use IAM user access keys for on-premises Console agents; IAM roles are not supported for on-premises Console agents.
-
Log in to the AWS console and navigate to the IAM service.
-
Create a policy:
-
Select Policies > Create policy.
-
Select JSON and copy and paste the contents of the IAM policy for the Console agent.
-
Finish the remaining steps to create the policy.
Depending on the NetApp data services that you're planning to use, you might need to create a second policy.
For standard regions, the permissions are spread across two policies. Two policies are required due to a maximum character size limit for managed policies in AWS. Learn more about IAM policies for the Console agent.
-
-
Attach the policies to an IAM user.
-
Ensure that the user has an access key that you can add to the NetApp Console after you install the Console agent.
You should now have IAM user access keys with the required permissions. After you install the Console agent, associate these credentials with the Console agent from the Console.
When the Console agent is installed on-premises, you need to give the Console agent Azure permissions by setting up a service principal in Microsoft Entra ID and getting the Azure credentials that the Console agent needs.
-
Ensure that you have permissions in Azure to create an Active Directory application and to assign the application to a role.
For details, refer to Microsoft Azure Documentation: Required permissions
-
From the Azure portal, open the Microsoft Entra ID service.

-
In the menu, select App registrations.
-
Select New registration.
-
Specify details about the application:
-
Name: Enter a name for the application.
-
Account type: Select an account type (any will work with the NetApp Console).
-
Redirect URI: You can leave this field blank.
-
-
Select Register.
You've created the AD application and service principal.
-
Create a custom role:
Note that you can create an Azure custom role using the Azure portal, Azure PowerShell, Azure CLI, or REST API. The following steps show how to create the role using the Azure CLI. If you would prefer to use a different method, refer to Azure documentation
-
Copy the contents of the custom role permissions for the Console agent and save them in a JSON file.
-
Modify the JSON file by adding Azure subscription IDs to the assignable scope.
You should add the ID for each Azure subscription from which users will create Cloud Volumes ONTAP systems.
Example
"AssignableScopes": [ "/subscriptions/d333af45-0d07-4154-943d-c25fbzzzzzzz", "/subscriptions/54b91999-b3e6-4599-908e-416e0zzzzzzz", "/subscriptions/398e471c-3b42-4ae7-9b59-ce5bbzzzzzzz" ] -
Use the JSON file to create a custom role in Azure.
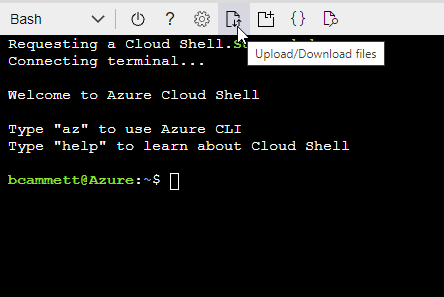
The following steps describe how to create the role by using Bash in Azure Cloud Shell.
-
Start Azure Cloud Shell and choose the Bash environment.
-
Upload the JSON file.
-
Use the Azure CLI to create the custom role:
az role definition create --role-definition agent_Policy.jsonYou should now have a custom role called Console Operator that you can assign to the Console agent virtual machine.
-
-
-
Assign the application to the role:
-
From the Azure portal, open the Subscriptions service.
-
Select the subscription.
-
Select Access control (IAM) > Add > Add role assignment.
-
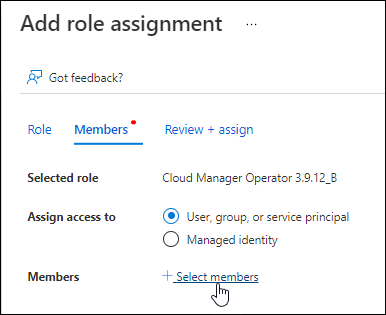
In the Role tab, select the Console Operator role and select Next.
-
In the Members tab, complete the following steps:
-
Keep User, group, or service principal selected.
-
Select Select members.
-
Search for the name of the application.
Here's an example:
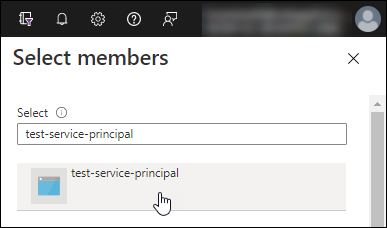
-
Select the application and select Select.
-
Select Next.
-
-
Select Review + assign.
The service principal now has the required Azure permissions to deploy the Console agent.
If you want to deploy Cloud Volumes ONTAP from multiple Azure subscriptions, then you must bind the service principal to each of those subscriptions. In the NetApp Console, you can select the subscription that you want to use when deploying Cloud Volumes ONTAP.
-
-
In the Microsoft Entra ID service, select App registrations and select the application.
-
Select API permissions > Add a permission.
-
Under Microsoft APIs, select Azure Service Management.
-
Select Access Azure Service Management as organization users and then select Add permissions.
-
In the Microsoft Entra ID service, select App registrations and select the application.
-
Copy the Application (client) ID and the Directory (tenant) ID.
When you add the Azure account to the Console, you need to provide the application (client) ID and the directory (tenant) ID for the application. The Console uses the IDs to programmatically sign in.
-
Open the Microsoft Entra ID service.
-
Select App registrations and select your application.
-
Select Certificates & secrets > New client secret.
-
Provide a description of the secret and a duration.
-
Select Add.
-
Copy the value of the client secret.
Install a Console agent in your vCenter environment
NetApp supports installing the Console agent in your vCenter environment. The OVA file includes a pre-configured VM image that you can deploy in your VMware environment. A file download or URL deployment is available directly from the NetApp Console. It includes the Console agent software and a self-signed certificate.
Download the OVA or copy the URL
Download the OVA or copy the OVA URL directly from the NetApp Console.
-
Select Administration > Agents.
-
On the Overview page, select Deploy agent > On-Premises.
-
Select With OVA.
-
Choose to either download the OVA or copy the URL to use in vCenter.
Deploy the agent in your vCenter environment
Log into your vCenter environment to deploy the agent.
-
Upload the self-signed certificate to your trusted certificates if your environment requires it. You replace this certificate after installation.
-
Deploy the OVA from the content library or local system.
From the local system
From the content library
a. Right-click and select Deploy OVF template….
b. Choose the OVA file from the URL or browse to its location, then select Next.a. Go to your content library and select the Console agent OVA.
b. Select Actions > New VM from this template -
Complete the Deploy OVF Template wizard to deploy the Console agent.
-
Select a name and folder for the VM, then select Next.
-
Select a compute resource, then select Next.
-
Review the details of the template, then select Next.
-
Accept the license agreement, then select Next.
-
Choose the type of proxy configuration you want to use: explicit proxy, transparent proxy, or no proxy.
-
Select the datastore where you want to deploy the VM, then select Next. Be sure it meets host requirements.
-
Select the network to which you want to connect the VM, then select Next. Ensure the network is IPv4 and has outbound internet access to the required endpoints.
-
In the Customize template window, complete the following fields:
-
Proxy information
-
If you selected explicit proxy, enter the proxy server hostname or IP address and port number, as well as the username and password.
-
If you selected transparent proxy, upload the respective certificate.
-
-
Virtual Machine Configuration
-
Skip config check: This check box is unchecked by default which means the agent runs a configuration check to validate network access.
-
NetApp recommends leaving this box unchecked so that the installation includes a configuration check of the agent. The configuration check validates that the agent has network access to the required endpoints. If the deployment fails because of connectivity issues, you can access the validation report and logs from the agent host. In some cases, if you are confident that the agent has network access, you can choose to skip the check. For example, if you are still using the previous endpoints used for agent upgrades, the validation fails with an error. To avoid this, select the check box to install without a validation check. Learn how to update your endpoint list.
-
-
Maintenance password: Set the password for the
maintuser that allows access to the agent maintenance console. -
NTP servers: Specify one or more NTP servers for time synchronization.
-
Hostname: Set the hostname for this VM. It must not include the search domain. For example, an FQDN of console10.searchdomain.company.com should be entered as console10.
-
Primary DNS: Specify the primary DNS server to use for name resolution.
-
Secondary DNS: Specify the secondary DNS server to use for name resolution.
-
Search domains: Specify the search domain name to use when resolving the hostname. For example, if the FQDN is console10.searchdomain.company.com, then enter searchdomain.company.com.
-
IPv4 address: The IP address that is mapped to the hostname.
-
IPv4 subnet mask: The subnet mask for the IPv4 address.
-
IPv4 gateway address: The gateway address for the IPv4 address.
-
-
-
Select Next.
-
Review the details in the Ready to complete window, and then select Finish.
The vSphere task bar shows the progress as the Console agent is deployed.
-
Power on the VM.
|
|
If the deployment fails, you can access the validation report and logs from the agent host. Learn how to troubleshoot installation issues. |
Register the Console agent with NetApp Console
Log into the Console and associate the Console agent with your organization. How you log in depends on the mode in which you are using the Console. If you are using the Console in standard mode, you log in through the SaaS website. If you are using the Console in restricted or private mode, you log in locally from the Console agent host.
-
Open a web browser and enter the Console agent host URL:
The Console host URL can be a localhost, a private IP address, or a public IP address, depending on the configuration of the host. For example, if the Console agent is in the public cloud without a public IP address, you must enter a private IP address from a host that has a connection to the Console agent host.
-
Sign up or log in.
-
After you log in, set up the Console:
-
Specify the Console organization to associate with the Console agent.
-
Enter a name for the system.
-
Under Are you running in a secured environment? keep restricted mode disabled.
Restricted mode isn't supported when the Console agent is installed on-premises.
-
Select Let's start.
-
Add cloud provider credentials to the Console
After you install and set up the Console agent, add your cloud credentials so that the Console agent has the required permissions to perform actions in AWS or Azure.
If you just created these AWS credentials, they may take a few minutes to become available. Wait a few minutes before you add the credentials to the Console.
-
Select Administration > Credentials.
-
Select Organization credentials.
-
Select Add Credentials and follow the steps in the wizard.
-
Credentials Location: Select Amazon Web Services > Agent.
-
Define Credentials: Enter an AWS access key and secret key.
-
Marketplace Subscription: Associate a Marketplace subscription with these credentials by subscribing now or by selecting an existing subscription.
-
Review: Confirm the details about the new credentials and select Add.
-
You can now go to the NetApp Console to start using the Console agent.
If you just created these Azure credentials, they may take a few minutes to become available. Wait a few minutes before you add the credentials to the Console agent.
-
Select Administration > Credentials.
-
Select Add Credentials and follow the steps in the wizard.
-
Credentials Location: Select Microsoft Azure > Agent.
-
Define Credentials: Enter information about the Microsoft Entra service principal that grants the required permissions:
-
Application (client) ID
-
Directory (tenant) ID
-
Client Secret
-
-
Marketplace Subscription: Associate a Marketplace subscription with these credentials by subscribing now or by selecting an existing subscription.
-
Review: Confirm the details about the new credentials and select Add.
-
The Console agent now has the permissions that it needs to perform actions in Azure on your behalf. You can now go to the NetApp Console to start using the Console agent.