

Upgrade from ONTAP tools for VMware vSphere 10.x to 10.4
 Suggest changes
You can upgrade from ONTAP tools for VMware vSphere 10.2 or 10.3 to 10.4. However, direct upgrade from ONTAP tools 10.0 or 10.1 to 10.4 is not supported.
NOTE:
-
In ASA r2 systems, you should upgrade to ONTAP tools for VMware vSphere 10.4 with ONTAP 9.16.1 before adding more storage availability zones (SAZs).
-
If the upgrade from ONTAP tools for VMware vSphere 10.2 or 10.3 to 10.4 release fails, rollback is not supported. To recover the setup, use RPO for ONTAP tools for VMware vSphere 10.2 and near-zero RPO or snapshot recovery for ONTAP tools for VMware vSphere 10.3.
For a non-HA upgrade, power off the ONTAP tools VM, and for an HA upgrade, power off the ONTAP tools management node before making the following changes to the virtual machine (VM) settings.
If you're upgrading from ONTAP tools for VMware vSphere 10.2 or 10.3, you need to complete the following steps before proceeding with the upgrade task: * Add an additional 100 GB hard disk to each node, because the service data is stored locally on the VM. * Change the CPU and memory for the powered-off VM according to the flavor of your deployment. Enable the hot plugin for CPU and RAM.
+
| Deployment Type | CPU(Core) per node | Memory(GB) per node | Disk Space(GB) per node | Total CPU(Core) | Memory(GB) | Total Disk Space(GB) |
|---|---|---|---|---|---|---|
Non-HA Small |
9 |
18 |
350 |
9 |
18 |
350 |
Non-HA Medium |
13 |
26 |
350 |
13 |
26 |
350 |
HA Small |
9 |
18 |
350 |
27 |
54 |
1050 |
HA Medium |
13 |
26 |
350 |
39 |
78 |
1050 |
HA Large |
17 |
34 |
350 |
51 |
102 |
1050 |
-
Power ON the VM after the changes are done and wait for the services to come to a running state.
-
In case of HA deployment, make the resource changes, enable the hot plugin for CPU and RAM, and add 100 GB hard disks for the second and the third node as well. There is no need to reboot these nodes.
-
If the appliance was deployed as a local path (easy deployment) with ONTAP tools 10.2, you need to take a quiesce snapshot before upgrading.
If you're upgrading from ONTAP tools for VMware vSphere 10.0 to 10.1, you need to complete the following steps before proceeding with the upgrade task: Enable Diagnostics
-
From the vCenter Server, open a console to ONTAP tools.
-
Log in as the maintenance user.
-
Enter 4 to select Support and Diagnostics.
-
Enter 2 to select Enable remote diagnostic access.
-
Enter y to set the password of your choice.
-
Log in to the VM IP address from the terminal/putty with the user as 'diag' and the password that was set in the previous step.
Take a backup of MongoDB
Run the following commands to take a backup of MongoDB:
-
kn exec -it ntv-mongodb-0 sh - kn is an alias of kubectl -n ntv-system.
-
Run env | grep MONGODB_ROOT_PASSWORD command inside the pod.
-
Run exit command to come out of the pod.
-
Run kn exec ntv-mongodb-0 --mongodump -u root -p MONGODB_ROOT_PASSWORD --archive=/tmp/mongodb-backup.gz --gzip command to replace the MONGO_ROOT_PASSWORD set from the above command.
-
Run kn cp ntv-mongodb-0:/tmp/mongodb-backup.gz ./mongodb-backup.gz command to copy the mongodb backup created using the above command from the pod to the host.
Take the quaise snapshot of all the volumes
-
Run 'kn get pvc' command and save the command output.
-
Take snapshots of all the volumes one by one using one of the following methods:
-
From CLI, run the command volume snapshot create -vserver <vserver_name> -volume <volume_name> -snapshot <snapshot_name>
-
From the ONTAP System Manager user interface, search the volume by its name in the search bar, then open that volume by selecting on the name. Go to snapshot and add the snapshot of that volume.
-
Take the snapshot of ONTAP tools for VMware vSphere VMs in vCenter (3VMs in case of HA Deployment, 1 VM in case of non-HA deployment)
-
In the vSphere client user interface, select the VM.
-
Go to the snapshots tab and select the Take Snapshot button. Take a quiesced snapshot of the VM. Refer to Take a Snapshot of a Virtual Machine for details.
Before performing the upgrade, delete the completed pods from the log bundle with the prefix “generate-support-bundle-job.” If support bundle generation is in progress, wait for it to complete and then delete the pod.
For any type of upgrade, you need to add an additional 100 GB hard Disk Drive (HDD). To add an HDD, perform the following task.
-
Select the VM in single node configuration or all three VMs in HA configuration.
-
Right-click on the VM(s) and select Add New Device > Hard Disk
-
Add a 100 GB HDD in the New Hard disk field.
-
Select Apply
After adding the hard disk, update the VM's resources for the respective configurations and restart the primary VM.
A new HDD will be created. Dynamic storage provisioner uses this HDD to generate or replicate the volumes.
-
Upload ONTAP tools for VMware vSphere upgrade ISO to content library.
-
In the primary VM page, select Actions > Edit Settings. To identify the primary VM name:
-
Enable diag shell on any node
-
Run the following command:
grep sourceHost /opt/netapp/meta/ansible_vars.yaml
-
-
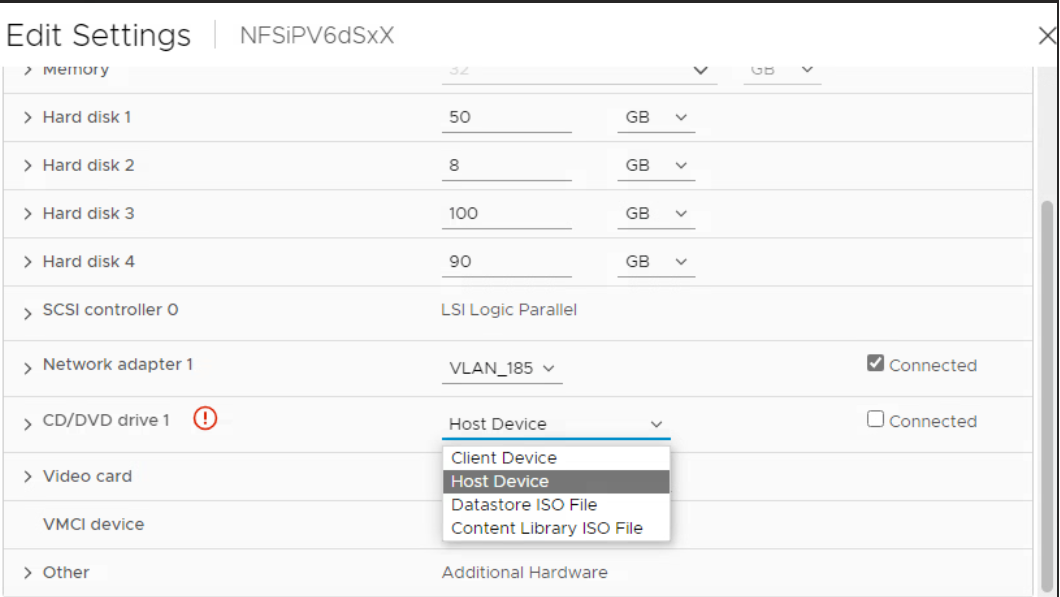
Select the content library ISO file in the edit settings window under the CD/DVD drive field.
-
Select the ISO file and select OK. Choose the connected checkbox across the CD/DVD drive field.
-
From the vCenter Server, open a console to ONTAP tools.
-
Log in as the maintenance user.
-
Enter 2 to select the System Configuration menu.
-
Enter 7 to select the upgrade option.
-
When you upgrade, the following actions are performed automatically:
-
Certificate upgrade
-
Remote plug-in upgrade
-
After upgrading to ONTAP tools for VMware vSphere 10.4, you can:
-
Disable the services from the manager user interface
-
Move from a non-HA setup to an HA setup
-
Scale up a non-HA small configuration a non-HA medium or to a HA medium or large configuration.
-
In case of a non-HA upgrade, reboot the ONTAP tools VM to reflect the changes. In case of an HA upgrade, reboot the ONTAP tools management node to reflect the changes on the node.
After you upgrade from previous releases of ONTAP tools for VMware vSphere to 10.4, rescan the SRA adapters to verify that the details are updated on the VMware Live Site Recovery Storage Replication Adapters page.
After you upgrade successfully, delete the Trident volumes from ONTAP manually using the following procedure:

|
These steps are not required if the ONTAP tools for VMware vSphere 10.1 or 10.2 was in non-HA small or medium (local path) configurations. |
-
From the vCenter Server, open a console to ONTAP tools.
-
Log in as the maintenance user.
-
Enter 4 to select the Support and Diagnostics menu.
-
Enter 1 to select the Access diagnostics shell option.
-
Run the following command
sudo python3 /home/maint/scripts/ontap_cleanup.py
-
Enter the ONTAP username and password
This deletes all the Trident volumes in ONTAP used in ONTAP tools for VMware vSphere 10.1/10.2.