

Upgrade Cloud Volumes ONTAP
 Suggest changes
Upgrade Cloud Volumes ONTAP from the NetApp Console to gain access to the latest new features and enhancements. You should prepare Cloud Volumes ONTAP systems before you upgrade the software.
Upgrade overview
You should be aware of the following before you start the Cloud Volumes ONTAP upgrade process.
Upgrade from Console only
You should not upgrade Cloud Volumes ONTAP by using ONTAP System Manager or the ONTAP CLI, but only the Console. Otherwise, it might impact system stability.
The Console provides two ways to upgrade Cloud Volumes ONTAP:
-
By following upgrade notifications that appear on the system
-
By placing the upgrade image at an HTTPS location and then providing the Console with the URL
Supported upgrade paths
The Cloud Volumes ONTAP version you can upgrade to depends on the version you are currently running. Each generic or patch version in a release in the following tables represents the base version available for upgrade. For details about the available patches, refer to the versioned release notes for each release.
Supported upgrade paths for AWS
| Current version | Versions that you can directly upgrade to |
|---|---|
9.17.1 P1 |
9.18.1 |
9.16.1 |
9.17.1 P1 |
9.15.1 |
9.16.1 |
9.15.0 |
9.15.1 |
9.14.1 |
9.15.1 |
9.15.0 |
|
9.14.0 |
9.14.1 |
9.13.1 |
9.14.1 |
9.14.0 |
|
9.13.0 |
9.13.1 |
9.12.1 |
9.13.1 |
9.13.0 |
|
9.12.0 |
9.12.1 |
9.11.1 |
9.12.1 |
9.12.0 |
|
9.11.0 |
9.11.1 |
9.10.1 |
9.11.1 |
9.11.0 |
|
9.10.0 |
9.10.1 |
9.9.1 |
9.10.1 |
9.10.0 |
|
9.9.0 |
9.9.1 |
9.8 |
9.9.1 |
9.7 |
9.8 |
9.6 |
9.7 |
9.5 |
9.6 |
9.4 |
9.5 |
9.3 |
9.4 |
9.2 |
9.3 |
9.1 |
9.2 |
9.0 |
9.1 |
8.3 |
9.0 |
Supported upgrade paths for Azure
| Current version | Versions that you can directly upgrade to |
|---|---|
9.17.1 P1 |
9.18.1 |
9.16.1 P3 |
9.17.1 P1 |
9.15.1 P10 |
9.16.1 P3 |
9.14.1 P13 |
9.15.1 P10 |
9.13.1 P16 |
9.14.1 P13 |
9.12.1 P18 |
9.13.1 P16 |
9.11.1 P20 |
9.12.1 P18 |
If you have a lower version of Cloud Volumes ONTAP in Azure, you must first upgrade to the next version and follow the supported upgrade paths to reach your target version. For example, if you have Cloud Volumes ONTAP 9.7 P7, follow this upgrade path:
-
9.7 P7 → 9.8 P18
-
9.8 P18 → 9.9.1 P15
-
9.9.1 P15 → 9.10.1 P12
-
9.10.1 P12 → 9.11.1 P20
Supported upgrade paths for Google Cloud
| Current version | Versions that you can directly upgrade to |
|---|---|
9.18.1 |
9.19.1 RC |
9.17.1 P1 |
9.18.1 |
9.16.1 |
9.17.1 P1 |
9.15.1 |
9.16.1 |
9.15.0 |
9.15.1 |
9.14.1 |
9.15.1 |
9.15.0 |
|
9.14.0 |
9.14.1 |
9.13.1 |
9.14.1 |
9.14.0 |
|
9.13.0 |
9.13.1 |
9.12.1 |
9.13.1 |
9.13.0 |
|
9.12.0 |
9.12.1 |
9.11.1 |
9.12.1 |
9.12.0 |
|
9.11.0 |
9.11.1 |
9.10.1 |
9.11.1 |
9.11.0 |
|
9.10.0 |
9.10.1 |
9.9.1 |
9.10.1 |
9.10.0 |
|
9.9.0 |
9.9.1 |
9.8 |
9.9.1 |
9.7 |
9.8 |
9.6 |
9.7 |
9.5 |
9.6 |
9.4 |
9.5 |
9.3 |
9.4 |
9.2 |
9.3 |
9.1 |
9.2 |
9.0 |
9.1 |
8.3 |
9.0 |
Note the following:
-
The supported upgrade paths for Cloud Volumes ONTAP are different than they are for an on-premises ONTAP cluster.
-
If you upgrade by following the notifications that appear in a system, the Console will prompt you to upgrade to a release that follows these supported upgrade paths.
-
If you upgrade by placing an upgrade image at an HTTPS location, be sure to follow these supported upgrade paths.
-
In some cases, you might need to upgrade a few times to reach your target release.
For example, if you're running version 9.8 and you want to upgrade to 9.10.1, you first need to upgrade to version 9.9.1 and then to 9.10.1.
Patch releases
Starting in January 2024, patch upgrades are only available if there's a patch release for the three latest versions of Cloud Volumes ONTAP. Patch versions are occasionally available for deployment, when the RC or GA version isn't available for deployment.
We use the latest GA release to determine the three latest versions to display in the Console. For example, if the current GA release is 9.13.1, patches for 9.11.1-9.13.1 appear in the Console.
For patch versions 9.11.1 or below, you will need to use a manual upgrade procedure by downloading the ONTAP image.
As a general rule for patch releases, you can upgrade from a lower patch version to any higher patch version in the same or the next Cloud Volumes ONTAP release.
Here are a couple of examples:
-
9.13.0 → 9.13.1 P15
-
9.12.1 → 9.13.1 P2
Reverting or downgrading
Reverting or downgrading Cloud Volumes ONTAP to a previous release is not supported.
Support registration
Cloud Volumes ONTAP must be registered with NetApp Support in order to upgrade the software using any of the methods described on this page. This applies to both pay-as-you-go (PAYGO) and bring your own license (BYOL). You'll need to manually register PAYGO systems, while BYOL systems are registered by default.

|
A system that isn't registered for support will still receive the software update notifications that appear in the Console when a new version is available. But you will need to register the system before you can upgrade the software. |
Upgrades of the HA mediator
The Console also updates the mediator instance as needed during the Cloud Volumes ONTAP upgrade process.
Upgrades in AWS with c4, m4, and r4 EC2 instance types
Cloud Volumes ONTAP no longer supports the c4, m4, and r4 EC2 instance types. You can upgrade existing deployments to Cloud Volumes ONTAP versions 9.8-9.12.1 with these instance types. Before you upgrade we recommend that you change the instance type. If you can't change the instance type, you need to enable enhanced networking before you upgrade. Read the following sections to learn more about changing the instance type and enabling enhanced networking.
In Cloud Volumes ONTAP running versions 9.13.0 and above, you cannot upgrade with c4, m4, and r4 EC2 instance types. In this case, you need to reduce the number of disks and then change the instance type or deploy a new HA-pair configuration with the c5, m5, and r5 EC2 instance types and migrate the data.
Change the instance type
c4, m4, and r4 EC2 instance types allow for more disks per node than the c5, m5, and r5 EC2 instance types. If the disk count per node for the c4, m4, or r4 EC2 instance you're running is below the max disk allowance per node for c5, m5, and r5 instances, you can change the EC2 instance type to c5, m5, or r5.
If you can't change the instance type, follow the steps in Enable enhanced networking.
Enable enhanced networking
To upgrade to Cloud Volumes ONTAP versions 9.8 and later, you must enable enhanced networking on the cluster running the c4, m4, or r4 instance type. To enable ENA, refer to the Knowledge Base article "How to enable Enhanced networking like SR-IOV or ENA on AWS Cloud Volumes ONTAP instances".
Prepare to upgrade
Before performing an upgrade, you must verify that your systems are ready and make any required configuration changes.
Plan for downtime
When you upgrade a single-node system, the upgrade process takes the system offline for up to 25 minutes, during which I/O is interrupted.
In many cases, upgrading an HA pair is nondisruptive and I/O is uninterrupted. During this nondisruptive upgrade process, each node is upgraded in tandem to continue serving I/O to clients.
Session-oriented protocols might cause adverse effects on clients and applications in certain areas during upgrades. For details, refer to the ONTAP documentation
Verify that automatic giveback is still enabled
Automatic giveback must be enabled on a Cloud Volumes ONTAP HA pair (this is the default setting). If it isn't, then the operation will fail.
Suspend SnapMirror transfers
If a Cloud Volumes ONTAP system has active SnapMirror relationships, it is best to suspend transfers before you update the Cloud Volumes ONTAP software. Suspending the transfers prevents SnapMirror failures. You must suspend the transfers from the destination system.

|
Even though NetApp Backup and Recovery uses an implementation of SnapMirror to create backup files (called SnapMirror Cloud), backups do not need to be suspended when a system is upgraded. |
These steps describe how to use ONTAP System Manager for version 9.3 and later.
-
Log in to System Manager from the destination system.
You can log in to System Manager by pointing your web browser to the IP address of the cluster management LIF. You can find the IP address in the Cloud Volumes ONTAP system.
The computer from which you are accessing the Console must have a network connection to Cloud Volumes ONTAP. For example, you might need to log in to the Console from a jump host that's in your cloud provider network. -
Click Protection > Relationships.
-
Select the relationship and click Operations > Quiesce.
Verify that aggregates are online
Aggregates for Cloud Volumes ONTAP must be online before you update the software. Aggregates should be online in most configurations, but if they are not, then you should bring them online.
These steps describe how to use ONTAP System Manager for version 9.3 and later.
-
On the Cloud Volumes ONTAP system, click the Aggregates tab.
-
On the required aggregate tile, click the
 icon, and then select View Aggregate details.
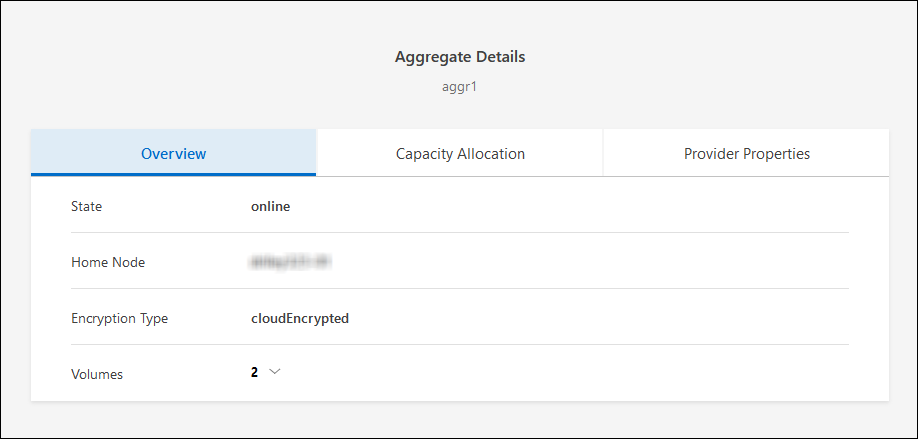
-
If the aggregate is offline, use ONTAP System Manager to bring the aggregate online:
-
Click Storage > Aggregates & Disks > Aggregates.
-
Select the aggregate, and then click More Actions > Status > Online.
-
Verify that all LIFs are on home ports
Before you upgrade, all LIFs must be on home ports. Refer to the ONTAP documentation to verify that all LIFs are on home ports.
If an upgrade failure error occurs, consult the Knowledge Base (KB) article Cloud Volumes ONTAP upgrade fails.
Upgrade Cloud Volumes ONTAP
The Console notifies you when a new version is available for upgrade. You can start the upgrade process from this notification. For more information, see Upgrade from Console notifications.
Another way to perform software upgrades by using an image on an external URL. This option is helpful if the Console can't access the S3 bucket to upgrade the software or if you were provided with a patch. For more information, see Upgrade from an image available at a URL.
Upgrade from Console notifications
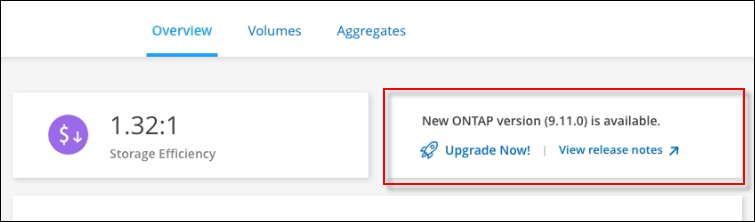
The Console displays a notification in Cloud Volumes ONTAP working environments when a new version of Cloud Volumes ONTAP is available:
|
|
Before you can upgrade Cloud Volumes ONTAP through the notifications, you must have a NetApp Support Site account. |
You can start the upgrade process from this notification, which automates the process by obtaining the software image from an S3 bucket, installing the image, and then restarting the system.
Operations such as volume or aggregate creation must not be in progress on the Cloud Volumes ONTAP system.
-
From the left navigation menu, select Storage > Management.
-
Select a Cloud Volumes ONTAP system.
A notification appears in the Overview tab if a new version is available:
-
If you want to upgrade the installed version of Cloud Volumes ONTAP, click Upgrade Now! By default, you see the latest, compatible version for upgrade.
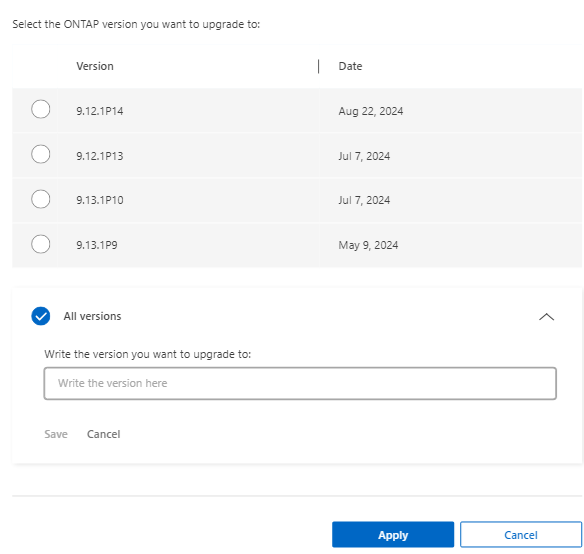
If you want to upgrade to another version, click Select other versions. You see the latest Cloud Volumes ONTAP versions listed that are also compatible with the installed version on your system.
For example, the installed version on your system is 9.12.1P3, and the following compatible versions are available:-
9.12.1P4 to 9.12.1P14
-
9.13.1 and 9.13.1P1
You see 9.13.1P1 as the default version for upgrade, and 9.12.1P13, 9.13.1P14, 9.13.1, and 9.13.1P1 as the other available versions.
-
-
Optionally, you can click All versions to enter another version that you want to upgrade to (say, the next patch of the installed version). For a compatible upgrade path of your current Cloud Volumes ONTAP version, refer to Supported upgrade paths.
-
Click Save, and then Apply.
-
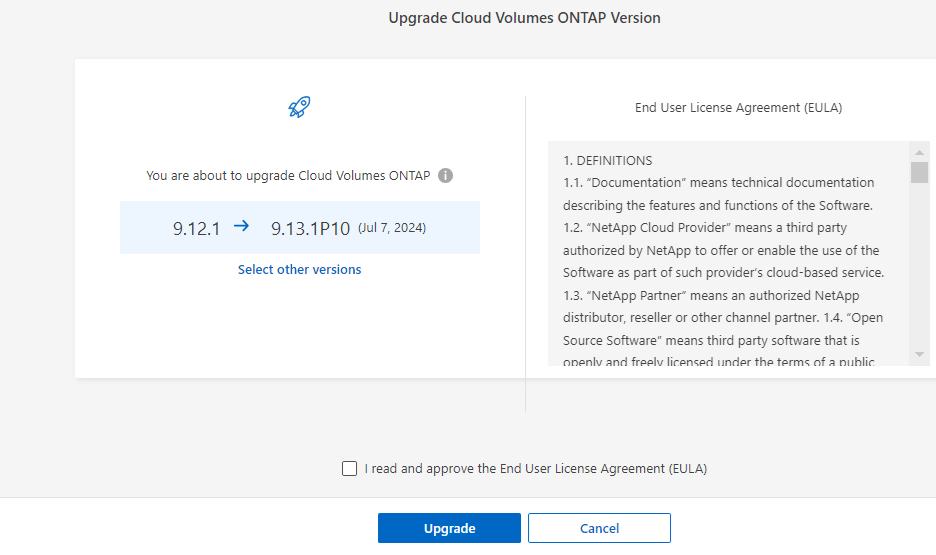
In the Upgrade Cloud Volumes ONTAP page, read the EULA, and then select I read and approve the EULA.
-
Select Upgrade.
-
To view the progress, on the Cloud Volumes ONTAP system, select Audit.
The Console starts the software upgrade. You can perform actions on the system when the software update is complete.
If you suspended SnapMirror transfers, use System Manager to resume the transfers.
Upgrade from an image available at a URL
You can place the Cloud Volumes ONTAP software image on the Console agent or on an HTTP server and then initiate the software upgrade from the Console. You might use this option if the Console can't access the S3 bucket to upgrade the software.
-
Operations such as volume or aggregate creation must not be in progress on the Cloud Volumes ONTAP system.
-
If you use HTTPS to host ONTAP images, the upgrade can fail due to SSL authentication issues, which are caused by missing certificates. The workaround is to generate and install a CA-signed certificate to be used for authentication between ONTAP and the Console.
Go to the NetApp Knowledge Base to view step-by-step instructions:
-
Optional: Set up an HTTP server that can host the Cloud Volumes ONTAP software image.
If you have a VPN connection to the virtual network, you can place the Cloud Volumes ONTAP software image on an HTTP server in your own network. Otherwise, you must place the file on an HTTP server in the cloud.
-
If you use your own security group for Cloud Volumes ONTAP, ensure that the outbound rules allow HTTP connections so Cloud Volumes ONTAP can access the software image.
The predefined Cloud Volumes ONTAP security group allows outbound HTTP connections by default. -
Obtain the software image from the NetApp Support Site.
-
Copy the software image to a directory on the Console agent or on an HTTP server from which the file will be served.
Two paths are available. The correct path depends on your Console agent version.
-
/opt/application/netapp/cloudmanager/docker_occm/data/ontap/images/ -
/opt/application/netapp/cloudmanager/ontap/images/
-
-
On the system, click the
icon, and then click Update Cloud Volumes ONTAP. -
On the Update Cloud Volumes ONTAP version page, enter the URL, and then click Change Image.
If you copied the software image to the Console agent in the path shown above, you would enter the following URL:
http://<Console_agent_private-IP-address>/ontap/images/<image-file-name>
In the URL, image-file-name must follow the format "cot.image.9.13.1P2.tgz". -
Click Proceed to confirm.
The Console starts the software update. You can perform actions on the system once the software update is complete.
If you suspended SnapMirror transfers, use System Manager to resume the transfers.
Fix download failures when using a Google Cloud NAT gateway
The Console agent automatically downloads software updates for Cloud Volumes ONTAP. The download can fail if your configuration uses a Google Cloud NAT gateway. You can correct this issue by limiting the number of parts that the software image is divided into. You must use the APIs to complete this step.
-
Submit a PUT request to `/occm/`config with the following JSON as body:
{
  "maxDownloadSessions": 32
}
The value for maxDownloadSessions can be 1 or any integer greater than 1. If the value is 1, then the downloaded image will not be divided.
Note that 32 is an example value. The value that you should use depends on your NAT configuration and the number of sessions that you can have simultaneously.