

Manage object storage used for data tiering in NetApp Cloud Tiering
 Suggest changes
After you've configured your on-premises ONTAP clusters to tier data to a particular object storage, you can perform additional object storage tasks using NetApp Cloud Tiering. You can add new object storage, mirror your tiered data to a secondary object storage, swap the primary and mirror object storage, remove a mirrored object store from an aggregate, and more.
View object stores configured for a cluster
You can view all the object stores that have been configured for each cluster and to which aggregates they are attached.
-
From the Clusters page, select the menu icon for a cluster and select Object Store Info.
-
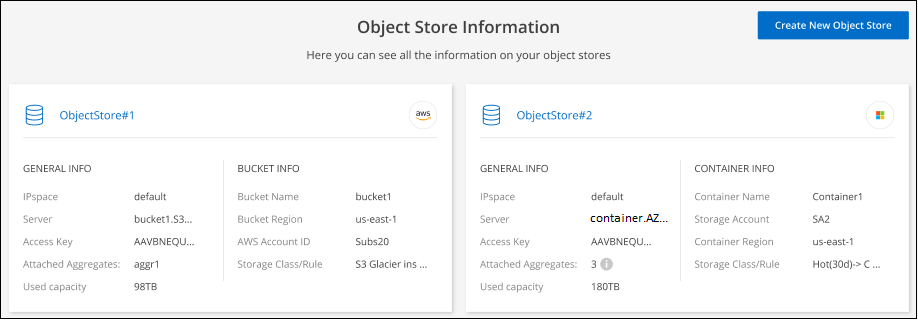
Review details about the object stores.
This example shows both an Amazon S3 and Azure Blob object store attached to different aggregates on a cluster.
Add a new object store
You can add a new object store for aggregates in your cluster. After you create it, you can attach it to an aggregate.
-
From the Clusters page, select the menu icon for a cluster and select Object Store Info.
-
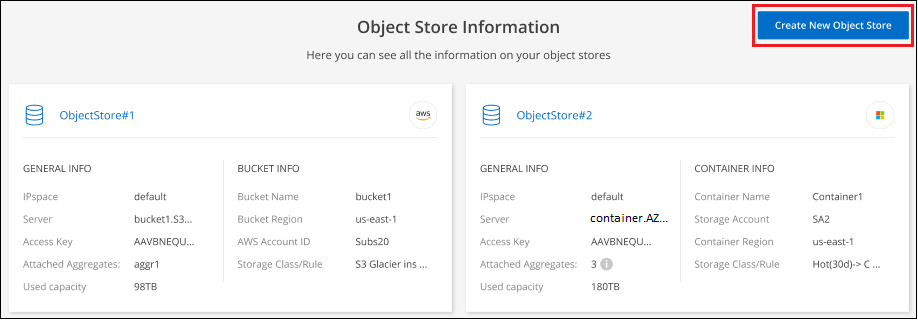
From the Object Store Information page, select Create New Object Store.
The object store wizard starts. The example below shows how to create an object store in Amazon S3.
-
Define Object Storage Name: Enter a name for this object storage. It must be unique from any other object storage you may be using with aggregates on this cluster.
-
Select Provider: Select the provider, for example Amazon Web Services, and select Continue.
-
Complete the steps on the Create Object Storage pages:
-
S3 Bucket: Add a new S3 bucket or select an existing S3 bucket that starts with the prefix fabric-pool. Then enter the AWS Account ID that provides access to the bucket, select the bucket region, and select Continue.
The fabric-pool prefix is required because the IAM policy for the Console agent enables the instance to perform S3 actions on buckets named with that exact prefix. For example, you could name the S3 bucket fabric-pool-AFF1, where AFF1 is the name of the cluster.
-
Storage Class Lifecycle: Cloud Tiering manages the lifecycle transitions of your tiered data. Data starts in the Standard class, but you can create a rule to apply a different storage class to the data after a certain number of days.
Select the S3 storage class that you want to transition the tiered data to and the number of days before the data is assigned to that class, and select Continue. For example, the screenshot below shows that tiered data is assigned to the Standard-IA class from the Standard class after 45 days in object storage.
If you choose Keep data in this storage class, then the data remains in the Standard storage class and no rules are applied. See supported storage classes.
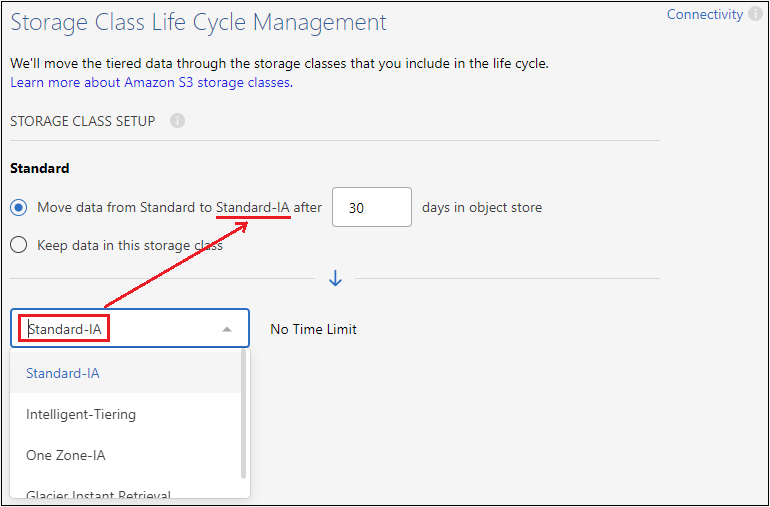
Note that the lifecycle rule is applied to all objects in the selected bucket.
-
Credentials: Enter the access key ID and secret key for an IAM user who has the required S3 permissions, and select Continue.
The IAM user must be in the same AWS account as the bucket that you selected or created on the S3 Bucket page. See the required permissions in the section about activating tiering.
-
Cluster Network: Select the IPspace that ONTAP should use to connect to object storage, and select Continue.
Selecting the correct IPspace ensures that Cloud Tiering can set up a connection from ONTAP to your cloud provider's object storage.
-
The object store is created.
Now you can attach the object store to an aggregate in your cluster.
Attach a second object store to an aggregate for mirroring
You can attach a second object store to an aggregate to create a FabricPool mirror to synchronously tier data to two object stores. You must have one object store already attached to the aggregate. Learn more about FabricPool mirrors.
When you use a MetroCluster configuration, it's a best practice to use object stores in the public cloud that are in different availability zones. Learn more about MetroCluster requirements in the ONTAP documentation. Within a MetroCluster, it is not recommended to use unmirrored aggregates, doing so will give you an error message.
When you use StorageGRID as your object store in a MetroCluster configuration, both ONTAP systems can perform FabricPool tiering to a single StorageGRID system. Each ONTAP system must tier data to different buckets.
-
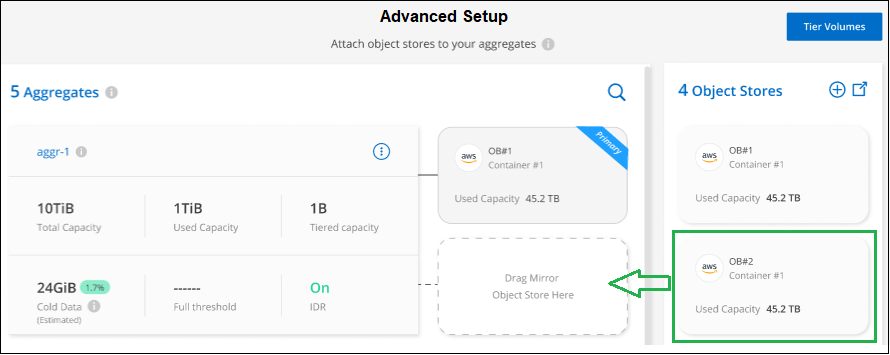
From the Clusters page, select Advanced setup for the selected cluster.

-
From the Advanced Setup page, drag the object store you want to use to the location for the mirror object store.
-
In the Attach Object Store dialog, select Attach and the second object store is attached to the aggregate.
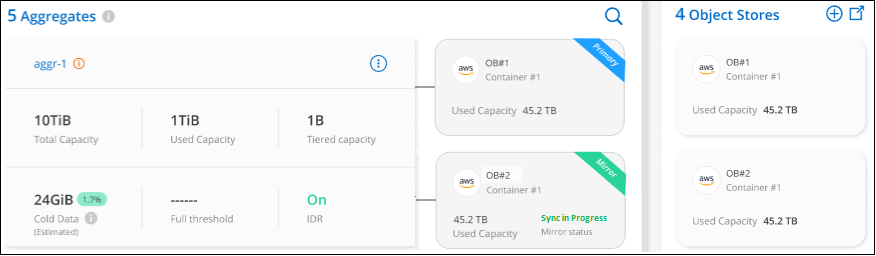
The Mirror status will appear as "Sync in progress" while the 2 object stores are synchronizing. The status will change to "Synchronized" when synchronization is complete.
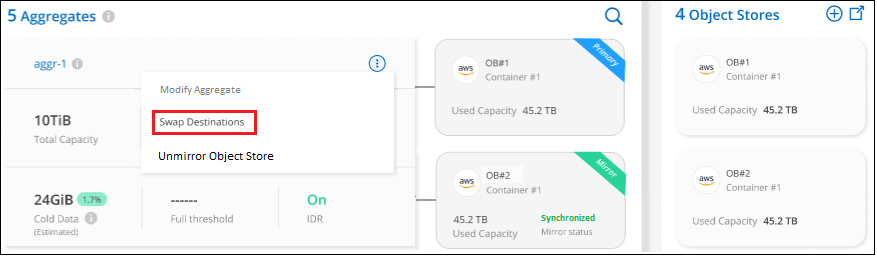
Swap the primary and mirror object store
You can swap the primary and mirror object store for an aggregate. The object store mirror becomes the primary, and the original primary becomes the mirror.
-
From the Clusters page, select Advanced setup for the selected cluster.
-
From the Advanced Setup page, select the menu icon for the aggregate and select Swap Destinations.
-
Approve the action in the dialog box and the primary and mirror objects stores are swapped.
Remove a mirror object store from an aggregate
You can remove a FabricPool mirror if you no longer need to replicate to an additional object store.
-
From the Clusters page, select Advanced setup for the selected cluster.
-
From the Advanced Setup page, select the menu icon for the aggregate and select Unmirror Object Store.
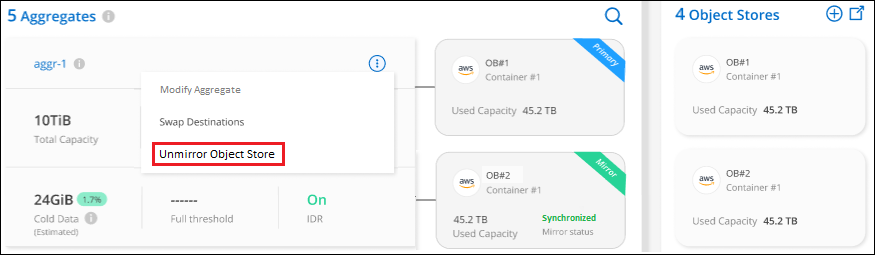
The mirror object store is removed from the aggregate and the tiered data is no longer replicated.

|
When removing the mirror object store from a MetroCluster configuration, you'll be prompted whether you want to remove the primary object store as well. You can choose to keep the primary object store attached to the aggregate, or to remove it. |
Migrate your tiered data to a different cloud provider
Cloud Tiering enables you to easily migrate your tiered data to a different cloud provider. For example, if you want to move from Amazon S3 to Azure Blob, you can follow the steps listed above in this order:
-
Add an Azure Blob object store.
-
Attach this new object store as the mirror to the existing aggregate.
-
Swap the primary and mirror object stores.
-
Unmirror the Amazon S3 object store.