

Protect apps with snapshots and backups
 Suggest changes
Protect all apps by taking snapshots and backups using an automated protection policy or on an ad-hoc basis. You can use the Astra Control Center UI or the Astra Control API to protect apps.
-
Helm deployed apps: If you use Helm to deploy apps, Astra Control Center requires Helm version 3. Managing and cloning apps deployed with Helm 3 (or upgraded from Helm 2 to Helm 3) are fully supported. Apps deployed with Helm 2 are not supported.
-
(OpenShift clusters only) Add policies: When you create a project for hosting an app on an OpenShift cluster, the project (or Kubernetes namespace) is assigned a SecurityContext UID. To enable Astra Control Center to protect your app and move the app to another cluster or project in OpenShift, you need to add policies that enable the app to run as any UID. As an example, the following OpenShift CLI commands grant the appropriate policies to a WordPress app.
oc new-project wordpress
oc adm policy add-scc-to-group anyuid system:serviceaccounts:wordpress
oc adm policy add-scc-to-user privileged -z default -n wordpress
You can do the following tasks related to protecting your app data:
Configure a protection policy
A protection policy protects an app by creating snapshots, backups, or both at a defined schedule. You can choose to create snapshots and backups hourly, daily, weekly, and monthly, and you can specify the number of copies to retain. You can define a protection policy using either the Astra Control web UI or a custom resource (CR) file.
If you need backups or snapshots to run more frequently than once per hour, you can use the Astra Control REST API to create snapshots and backups.

|
If you are defining a protection policy that creates immutable backups to write once read many (WORM) buckets, ensure that the retention time for the backups is not shorter than the retention period configured for the bucket. |

|
Offset backup and replication schedules to avoid schedule overlaps. For example, perform backups at the top of the hour every hour and schedule replication to start with a 5-minute offset and a 10-minute interval. |
-
Select Applications and then select the name of an app.
-
Select Data Protection.
-
Select Configure Protection Policy.
-
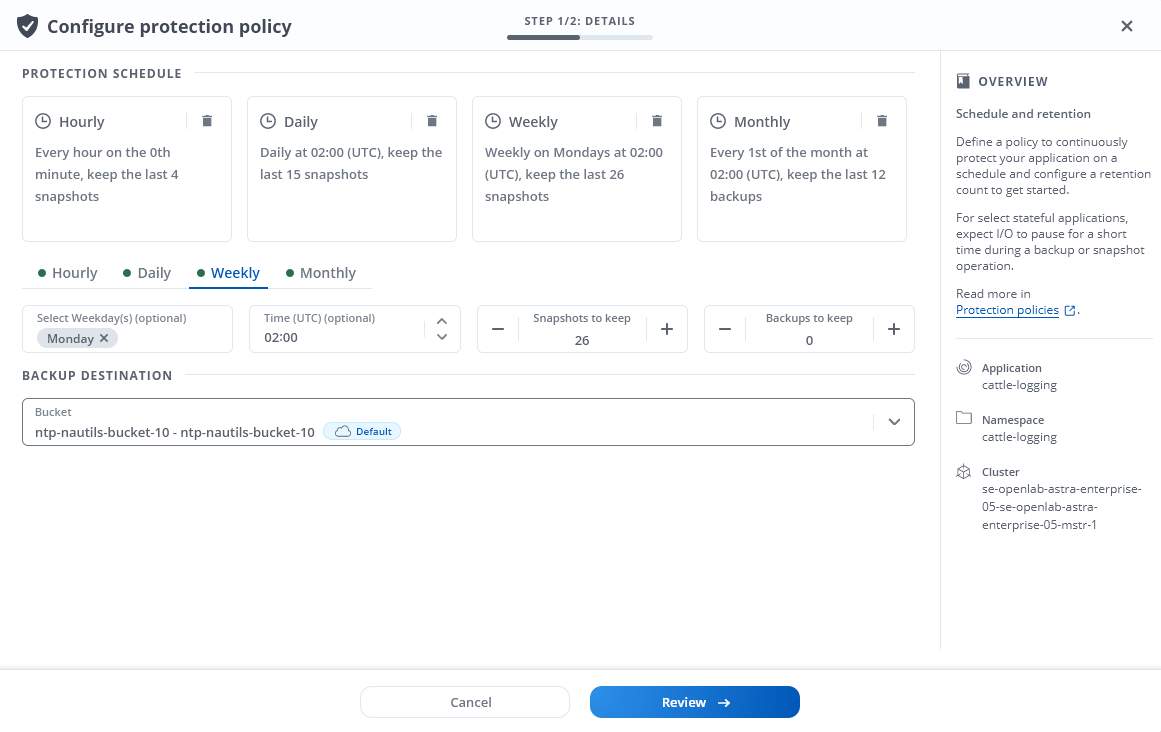
Define a protection schedule by choosing the number of snapshots and backups to keep hourly, daily, weekly, and monthly.
You can define the hourly, daily, weekly, and monthly schedules concurrently. A schedule won't turn active until you set a retention level.
When you set a retention level for backups, you can choose the bucket where you'd like to store the backups.
The following example sets four protection schedules: hourly, daily, weekly, and monthly for snapshots and backups.
-
[Tech preview] Choose a destination bucket for the backups or snapshots from the list of storage buckets.
-
Select Review.
-
Select Set Protection Policy.
-
Create the custom resource (CR) file and name it
astra-control-schedule-cr.yaml. Update the values in brackets <> to match your Astra Control environment, cluster configuration, and data protection needs:-
<CR_NAME>: The name of this custom resource; choose a unique and sensible name for your environment.
-
<APPLICATION_NAME>: The Kubernetes name of the application to back up.
-
<APPVAULT_NAME>: The name of the AppVault where the backup contents should be stored.
-
<BACKUPS_RETAINED>: The number of backups to retain. Zero indicates that no backups should be created.
-
<SNAPSHOTS_RETAINED>: The number of snapshots to retain. Zero indicates that no snapshots should be created.
-
<GRANULARITY>: The frequency at which the schedule should run. Possible values, along with required associated fields:
-
hourly(requires that you specifyspec.minute) -
daily(requires that you specifyspec.minuteandspec.hour) -
weekly(requires that you specifyspec.minute,spec.hour, andspec.dayOfWeek) -
monthly(requires that you specifyspec.minute,spec.hour, andspec.dayOfMonth)
-
-
<DAY_OF_MONTH>: (Optional) The day of the month (1 - 31) that the schedule should run. This field is required if the granularity is set to
monthly. -
<DAY_OF_WEEK>: (Optional) The day of the week (0 - 7) that the schedule should run. Values of 0 or 7 indicate Sunday. This field is required if the granularity is set to
weekly. -
<HOUR_OF_DAY>: (Optional) The hour of the day (0 - 23) that the schedule should run. This field is required if the granularity is set to
daily,weekly, ormonthly. -
<MINUTE_OF_HOUR>: (Optional) The minute of the hour (0 - 59) that the schedule should run. This field is required if the granularity is set to
hourly,daily,weekly, ormonthly.apiVersion: astra.netapp.io/v1 kind: Schedule metadata: namespace: astra-connector name: <CR_NAME> spec: applicationRef: <APPLICATION_NAME> appVaultRef: <APPVAULT_NAME> backupRetention: "<BACKUPS_RETAINED>" snapshotRetention: "<SNAPSHOTS_RETAINED>" granularity: <GRANULARITY> dayOfMonth: "<DAY_OF_MONTH>" dayOfWeek: "<DAY_OF_WEEK>" hour: "<HOUR_OF_DAY>" minute: "<MINUTE_OF_HOUR>"
-
-
After you populate the
astra-control-schedule-cr.yamlfile with the correct values, apply the CR:kubectl apply -f astra-control-schedule-cr.yaml
Astra Control implements the data protection policy by creating and retaining snapshots and backups using the schedule and retention policy that you defined.
Create a snapshot
You can create an on-demand snapshot at any time.
Astra Control supports snapshot creation using storage classes backed by the following drivers:
-
ontap-nas -
ontap-san -
ontap-san-economy

|
If your app uses a storage class backed by the ontap-nas-economy driver, snapshots can't be created. Use an alternate storage class for snapshots.
|
-
Select Applications.
-
From the Options menu in the Actions column for the desired app, select Snapshot.
-
Customize the name of the snapshot and then select Next.
-
[Tech preview] Choose a destination bucket for the snapshot from the list of storage buckets.
-
Review the snapshot summary and select Snapshot.
-
Create the custom resource (CR) file and name it
astra-control-snapshot-cr.yaml. Update the values in brackets <> to match your Astra Control environment and cluster configuration:-
<CR_NAME>: The name of this custom resource; choose a unique and sensible name for your environment.
-
<APPLICATION_NAME>: The Kubernetes name of the application to snapshot.
-
<APPVAULT_NAME>: The name of the AppVault where the snapshot contents should be stored.
-
<RECLAIM_POLICY>: (Optional) Defines what happens to a snapshot when the snapshot CR is deleted. Valid options:
-
Retain -
Delete(default)apiVersion: astra.netapp.io/v1 kind: Snapshot metadata: namespace: astra-connector name: <CR_NAME> spec: applicationRef: <APPLICATION_NAME> appVaultRef: <APPVAULT_NAME> reclaimPolicy: <RECLAIM_POLICY>
-
-
-
After you populate the
astra-control-snapshot-cr.yamlfile with the correct values, apply the CR:kubectl apply -f astra-control-snapshot-cr.yaml
The snapshot process begins. A snapshot is successful when the status is Healthy in the State column on the Data protection > Snapshots page.
Create a backup
You can back up an app at any time.
Buckets in Astra Control do not report available capacity. Before backing up or cloning apps managed by Astra Control, check bucket information in the appropriate storage management system.
If your app uses a storage class backed by the ontap-nas-economy driver, you need to enable backup and restore functionality. Be sure that you have defined a backendType parameter in your Kubernetes storage object with a value of ontap-nas-economy before performing any protection operations.
|
|
Astra Control supports backup creation using storage classes backed by the following drivers:
|
-
Select Applications.
-
From the Options menu in the Actions column for the desired app, select Back up.
-
Customize the name of the backup.
-
Choose whether to back up the app from an existing snapshot. If you select this option, you can choose from a list of existing snapshots.
-
[Tech preview] Choose a destination bucket for the backup from the list of storage buckets.
-
Select Next.
-
Review the backup summary and select Back up.
-
Create the custom resource (CR) file and name it
astra-control-backup-cr.yaml. Update the values in brackets <> to match your Astra Control environment and cluster configuration:-
<CR_NAME>: The name of this custom resource; choose a unique and sensible name for your environment.
-
<APPLICATION_NAME>: The Kubernetes name of the application to back up.
-
<APPVAULT_NAME>: The name of the AppVault where the backup contents should be stored.
apiVersion: astra.netapp.io/v1
kind: Backup
metadata:
  namespace: astra-connector
  name: <CR_NAME>
spec:
  applicationRef: <APPLICATION_NAME>
  appVaultRef: <APPVAULT_NAME>
-
-
After you populate the
astra-control-backup-cr.yamlfile with the correct values, apply the CR:kubectl apply -f astra-control-backup-cr.yaml
Astra Control creates a backup of the app.
|
|
|
Enable backup and restore for ontap-nas-economy operations
Astra Control Provisioner provides backup and restore functionality that can be enabled for storage backends that are using the ontap-nas-economy storage class.
-
You have enabled Astra Control Provisioner.
-
You have defined an application in Astra Control. This application will have limited protection functionality until you complete this procedure.
-
You have
ontap-nas-economyselected as the default storage class for your storage backend.
-
Do the following on the ONTAP storage backend:
-
Find the SVM that is hosting the
ontap-nas-economy-based volumes of the application. -
Log in to a terminal connected to ONTAP where the volumes are created.
-
Hide the snapshot directory for the SVM:
This change affects the entire SVM. The hidden directory will continue to be accessible. nfs modify -vserver <svm name> -v3-hide-snapshot enabled
Verify that the snapshot directory on the ONTAP storage backend is hidden. Failure to hide this directory might lead to loss of access to your application, especially if it is using NFSv3.
-
-
Do the following in Astra Control Provisioner:
-
Enable the snapshot directory for each PV that is
ontap-nas-economybased and associated with the application:tridentctl update volume <pv name> --snapshot-dir=true --pool-level=true -n trident -
Confirm that the snapshot directory has been enabled for each associated PV:
tridentctl get volume <pv name> -n trident -o yaml | grep snapshotDirResponse:
snapshotDirectory: "true"
-
-
In Astra Control, refresh the application after enabling all associated snapshot directories so that Astra Control recognizes the changed value.
The application is ready to backup and restore using Astra Control. Each PVC is also available to be used by other applications for backups and restores.
Create an immutable backup
An immutable backup cannot be modified, deleted, or overwritten as long as the retention policy on the bucket that stores the backup forbids it. You can create immutable backups by backing up applications to buckets that have a retention policy configured. Refer to Data protection for important information about working with immutable backups.
You need to configure the destination bucket with a retention policy. How you do this will differ depending on which storage provider you use. Refer to the storage provider documentation for more information:
|
|
Buckets in Astra Control do not report available capacity. Before backing up or cloning apps managed by Astra Control, check bucket information in the appropriate storage management system. |
|
|
If your app uses a storage class backed by the ontap-nas-economy driver, be sure that you have defined a backendType parameter in your Kubernetes storage object with a value of ontap-nas-economy before performing any protection operations.
|
-
Select Applications.
-
From the Options menu in the Actions column for the desired app, select Back up.
-
Customize the name of the backup.
-
Choose whether to back up the app from an existing snapshot. If you select this option, you can choose from a list of existing snapshots.
-
Choose a destination bucket for the backup from the list of storage buckets. A write once read many (WORM) bucket is indicated with a status of "Locked" next to the bucket name.
If the bucket is an unsupported type, this is indicated when you hover over or select the bucket. -
Select Next.
-
Review the backup summary and select Back up.
Astra Control creates an immutable backup of the app.
|
|
|
View snapshots and backups
You can view the snapshots and backups of an app from the Data Protection tab.
|
|
An immutable backup is indicated with a status of "Locked" next to the bucket it is using. |
-
Select Applications and then select the name of an app.
-
Select Data Protection.
The snapshots display by default.
-
Select Backups to see the list of backups.
Delete snapshots
Delete the scheduled or on-demand snapshots that you no longer need.
|
|
You cannot delete a snapshot that currently is being replicated. |
-
Select Applications and then select the name of a managed app.
-
Select Data Protection.
-
From the Options menu in the Actions column for the desired snapshot, select Delete snapshot.
-
Type the word "delete" to confirm deletion and then select Yes, Delete snapshot.
Astra Control deletes the snapshot.
Cancel backups
You can cancel a backup that is in progress.
|
|
To cancel a backup, the backup must be in Running state. You cannot cancel a backup that is in Pending state.
|
|
|
You cannot cancel a running immutable backup. |
-
Select Applications and then select the name of an app.
-
Select Data Protection.
-
Select Backups.
-
From the Options menu in the Actions column for the desired backup, select Cancel.
-
Type the word "cancel" to confirm the operation and then select Yes, cancel backup.
Delete backups
Delete the scheduled or on-demand backups that you no longer need. You cannot delete a backup made to an immutable bucket until the bucket's retention policy enables you to do so.
|
|
You cannot delete an immutable backup before the retention period expires. |
|
|
If you need to cancel a running backup, use the instructions in Cancel backups. To delete the backup, wait until it has completed and then use these instructions. |
-
Select Applications and then select the name of an app.
-
Select Data Protection.
-
Select Backups.
-
From the Options menu in the Actions column for the desired backup, select Delete backup.
-
Type the word "delete" to confirm deletion and then select Yes, Delete backup.
Astra Control deletes the backup.