

Restore from ONTAP backups using Search and Restore
 Suggest changes
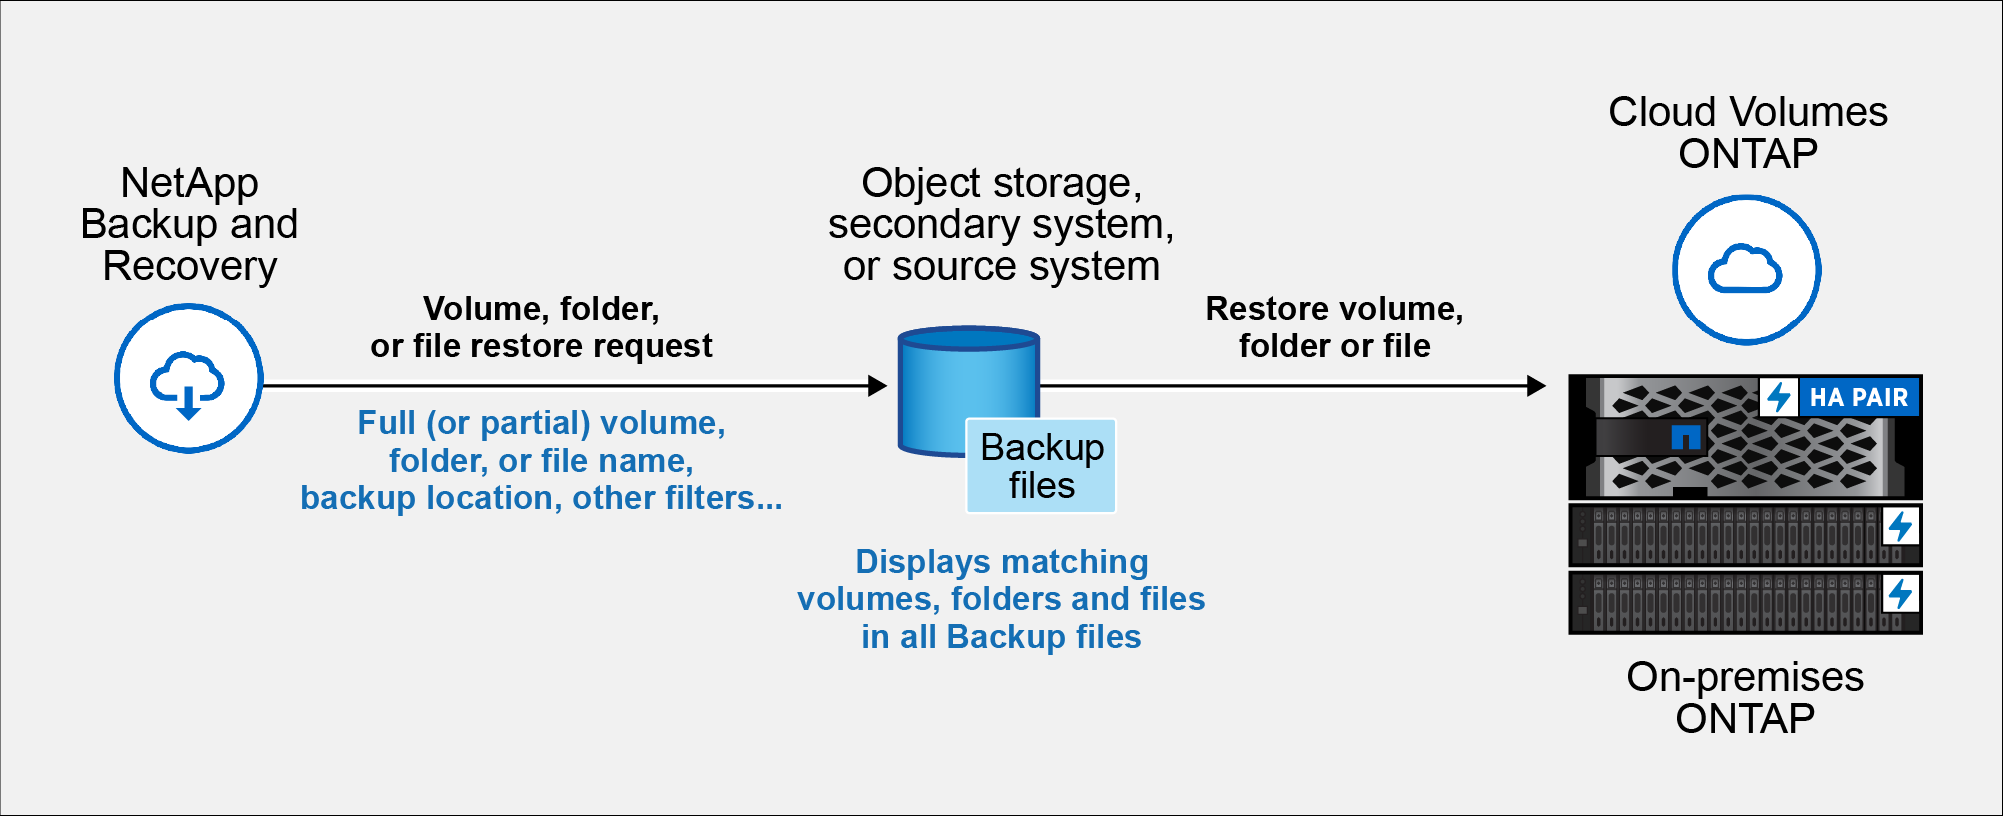
You can use Search and Restore to recover volumes, folders, or files from ONTAP backup files. Search and Restore enables you to search across all backups (including local snapshots, replicated volumes, and object storage) without needing exact system, volume, or file names.
Restoring from local snapshots or replicated volumes is typically faster and less expensive than restoring from object storage.
When restoring a full volume, NetApp Backup and Recovery creates a new volume using the backup data. You can restore to the original system, another system within the same cloud account, or an on-premises ONTAP system. Folders and files can be restored to their original location, a different volume in the same system, another system in the same cloud account, or an on-premises system.
Restore capabilities depend on your ONTAP version:
-
Folders: Using ONTAP 9.13.0 or greater, you can restore folders with all files and sub-folders; with earlier versions, you can restore only files in the folder.
-
Archival Storage: Restoring from archival storage (available with ONTAP 9.10.1 or greater) is slower and might incur additional costs.
-
Destination Cluster Requirements:
-
Volume restore: ONTAP 9.10.1 or greater
-
File restore: ONTAP 9.11.1 or greater
-
Google Archive and StorageGRID: ONTAP 9.12.1 or greater
-
Folder restore: ONTAP 9.13.1 or greater
-
Learn more about restoring from AWS archival storage.
Learn more about restoring from Azure archival storage.
Learn more about restoring from Google archival storage.

|
|
Before you start, you should have some idea of the name or location of the volume or file you want to restore.
Search & Restore supported systems and object storage providers
You can restore ONTAP data from a backup file that resides in a secondary system (a replicated volume) or in object storage (a backup file) to the following systems. Snapshots reside on the source system and can be restored only to that same system.
Note: You can restore volumes and files from any type of backup file, but you can restore a folder only from backup files in object storage at this time.
| Backup File Location | Destination system | |
|---|---|---|
Object Store (Backup) |
Secondary System (Replication) |
|
Amazon S3 |
Cloud Volumes ONTAP in AWS |
Cloud Volumes ONTAP in AWS |
Azure Blob |
Cloud Volumes ONTAP in Azure |
Cloud Volumes ONTAP in Azure |
Google Cloud Storage |
Cloud Volumes ONTAP in Google |
Cloud Volumes ONTAP in Google |
NetApp StorageGRID |
On-premises ONTAP system |
On-premises ONTAP system |
ONTAP S3 |
On-premises ONTAP system |
On-premises ONTAP system |
For Search & Restore, the Console agent can be installed in the following locations:
-
For Amazon S3, the Console agent can be deployed in AWS or in your premises
-
For Azure Blob, the Console agent can be deployed in Azure or in your premises
-
For Google Cloud Storage, the Console agent must be deployed in your Google Cloud Platform VPC
-
For StorageGRID, the Console agent must be deployed in your premises; with or without internet access
-
For ONTAP S3, the Console agent can be deployed in your premises (with or without internet access) or in a cloud provider environment
Note that references to "on-premises ONTAP systems" includes FAS, AFF, and ONTAP Select systems.
Search & Restore prerequisites
Ensure your environment meets these requirements before enabling Search & Restore:
-
Cluster requirements:
-
The ONTAP version must be 9.8 or greater.
-
You must configure an IPv4 NFS data LIF on the storage VM and an NFS export for the volume. Search & Restore supports both NFS and SMB/CIFS volumes.
-
The SnapDiff RPC Server must be activated on the storage VM. The Console does this automatically when you enable Indexing on the system. (SnapDiff is the technology that quickly identifies the file and directory differences between snapshots.)
-
-
NetApp recommends mounting a separate volume on the Console agent to increase resiliency of Search & Restore. For instructions, refer to mount the volume to reindex the catalog.
Legacy Search & Restore prerequisites (using Indexed Catalog v1)
The following are the requirements for Search & Restore when using legacy indexing:
Details
-
AWS requirements:
-
Specific Amazon Athena, AWS Glue, and AWS S3 permissions must be added to the user role that provides the Console with permissions. Make sure all the permissions are configured correctly.
Note that if you were already using NetApp Backup and Recovery with a Console agent you configured in the past, you'll need to add the Athena and Glue permissions to the Console user role now. They are required for Search & Restore.
-
-
Azure requirements:
-
You must register the Azure Synapse Analytics Resource Provider (called "Microsoft.Synapse") with your Subscription. See how to register this resource provider for your subscription. You must be the Subscription Owner or Contributor to register the resource provider.
-
Specific Azure Synapse Workspace and Data Lake Storage Account permissions must be added to the user role that provides the Console with permissions. Make sure all the permissions are configured correctly.
Note that if you were already using NetApp Backup and Recovery with a Console agent you configured in the past, you'll need to add the Azure Synapse Workspace and Data Lake Storage Account permissions to the Console user role now. They are required for Search & Restore.
-
The Console agent must be configured without a proxy server for HTTP communication to the internet. If you have configured an HTTP proxy server for your Console agent, you can't use Search & Restore functionality.
-
-
Google Cloud requirements:
-
Specific Google BigQuery permissions must be added to the user role that provides the NetApp Console with permissions. Make sure all the permissions are configured correctly.
If you were already using NetApp Backup and Recovery with a Console agent you configured in the past, you'll need to add the BigQuery permissions to the Console user role now. They are required for Search & Restore.
-
-
StorageGRID and ONTAP S3 requirements:
Depending on your configuration, there are 2 ways that Search & Restore is implemented:
-
If there are no cloud provider credentials in your account, then the Indexed Catalog information is stored on the Console agent.
For information about the Indexed Catalog v2, see the section below about how to enable the Indexed Catalog.
-
If you are using a Console agent in a private (dark) site, then the Indexed Catalog information is stored on the Console agent (requires Console agent version 3.9.25 or greater).
-
If you have AWS credentials or Azure credentials in the account, then the Indexed Catalog is stored at the cloud provider, just like with a Console agent deployed in the cloud. (If you have both credentials, AWS is selected by default.)
Even though you are using an on-premises Console agent, the cloud provider requirements must be met for both Console agent permissions and cloud provider resources. See the AWS and Azure requirements above when using this implementation.
-
Search & Restore process
The process goes like this:
-
Before you can use Search & Restore, you need to enable "Indexing" on each source system from which you'll want to restore volume data. This allows the Indexed Catalog to track the backup files for every volume.
Backup and Recovery does not index any snapshots whose creation timestamp exactly matches another snapshot of the same volume. -
When you want to restore a volume or files from a volume backup, under Search & Restore, select Search & Restore.
-
Enter the search criteria for a volume, folder, or file by partial or full volume name, partial or full file name, backup location, size range, creation date range, other search filters, and select Search.
The Search Results page displays all the locations that have a file or volume that matches your search criteria.
-
Select View All Backups for the location you want to use to restore the volume or file, and then select Restore on the actual backup file you want to use.
-
Select the location where you want the volume, folder, or file(s) to be restored and select Restore.
-
The volume, folder, or file(s) are restored.
You only need to know a partial name and NetApp Backup and Recovery searches through all backup files that match your search.
Enable the Indexed Catalog for each system
Before you can use Search & Restore, you need to enable "Indexing" on each source system from which you're planning to restore volumes or files. This allows the Indexed Catalog to track every volume and every backup file - making your searches very quick and efficient.
The Indexed Catalog is a database that stores metadata about all the volumes and backup files in your system. It is used by the Search & Restore functionality to quickly find the backup files that contain the data you want to restore.
NetApp Backup and Recovery does not provision a separate bucket when you use the Indexed Catalog. Instead, for backups stored in AWS, Azure, Google Cloud Platform, StorageGRID, or ONTAP S3, the service provisions space on the Console agent or on the cloud provider environment.
The Indexed Catalog supports the following:
-
Global search efficiency in less than 3 minutes
-
Up to 5 billion files
-
Up to 5000 volumes per cluster
-
Up to 100K snapshots per volume
-
Maximum time for baseline indexing is less than 7 days. The actual time will vary depending on your environment.
If Indexing has already been enabled for your system, go to the next section to restore your data.
You will first need to mount a separate volume to hold catalog files. This prevents data loss if the size of the files that hold the snapshots becomes too large. This is not required on every cluster; you can mount any one volume from any of the clusters in your environment. If you don't do this, indexing might not function correctly.
For the mounted volume, use the following sizing guidance:
-
Use a NetApp NFS volume
-
Recommended AFF storage with 300 MB/s disk throughput. Less throughput will impact search and other operations.
-
Enable NetApp snapshots to secure the catalog metadata in addition to the catalog backup zip files
-
50 GB per 1 billion files
-
20 GB for the catalog data with additional space for zip file creation and temporary files
-
Mount the volume to
/opt/application/netapp/cbsby entering the following command, where:-
volume nameis the volume on the cluster where the catalog files will be stored -
/opt/application/netapp/cbsis the path where it is being mountedmount <cluster IP address>:/<volume name> /opt/application/netapp/cbsExample:
mount 10.192.24.17:/CATALOG_SCALE_234 /opt/application/netapp/cbs
-
-
Do one of the following:
-
If no systems have been indexed, on the Restore Dashboard under Search & Restore, select Enable Indexing for systems.
-
If at least one system has already been indexed, on the Restore Dashboard under Search & Restore, select Indexing Settings.
-
-
Select Enable Indexing for the system.
After all the services are provisioned and the Indexed Catalog has been activated, the system is shown as "Active".
Depending on the size of the volumes in the system, and the number of backup files in all 3 backup locations, the initial indexing process could take up to an hour. After that it is transparently updated hourly with incremental changes to stay current.
Restore volumes, folders, and files using Search & Restore
After you have enabled Indexing for your system, you can restore volumes, folders, and files using Search & Restore. This allows you to use a broad range of filters to find the exact file or volume that you want to restore from all backup files.
-
From the Console menu, select Protection > Backup and recovery.
-
Select the Restore tab and the Restore Dashboard is displayed.
-
From the Search & Restore section, select Search & Restore.
-
From the Search & Restore section, select Search & Restore.
-
From the Search & Restore page:
-
In the Search bar, enter a full or partial volume name, folder name, or file name.
-
Select the type of resource: Volumes, Files, Folders, or All.
-
In the Filter by area, select the filter criteria. For example, you can select the system where the data resides and the file type, for example a .JPEG file. Or you can select the type of Backup Location if you want to search for results only within available snapshots or backup files in object storage.
-
-
Select Search and the Search Results area displays all the resources that have a file, folder, or volume that matches your search.
-
Locate the resource that has the data you want to restore and select View All Backups to display all the backup files that contain the matching volume, folder, or file.
-
Locate the backup file that you want to use to restore the data and select Restore.
Note that the results identify local volume snapshots and remote Replicated volumes that contain the file in your search. You can choose to restore from the cloud backup file, from the snapshot, or from the Replicated volume.
-
Select the destination location where you want the volume, folder, or file(s) to be restored and select Restore.
-
For volumes, you can select the original destination system or you can select an alternate system. When restoring a FlexGroup volume you'll need to choose multiple aggregates.
-
For folders, you can restore to the original location or you can select an alternate location; including the system, volume, and folder.
-
For files, you can restore to the original location or you can select an alternate location; including the system, volume, and folder. When selecting the original location, you can choose to overwrite the source file(s) or to create new file(s).
If you select an on-premises ONTAP system and you haven't already configured the cluster connection to the object storage, you are prompted for additional information:
-
When restoring from Amazon S3, select the IPspace in the ONTAP cluster where the destination volume will reside, enter the access key and secret key for the user you created to give the ONTAP cluster access to the S3 bucket, and optionally choose a private VPC endpoint for secure data transfer. See details about these requirements.
-
When restoring from Azure Blob, select the IPspace in the ONTAP cluster where the destination volume will reside, and optionally choose a private endpoint for secure data transfer by selecting the VNet and Subnet. See details about these requirements.
-
When restoring from Google Cloud Storage, select the IPspace in the ONTAP cluster where the destination volume will reside, and the Access Key and Secret Key to access the object storage. See details about these requirements.
-
When restoring from StorageGRID, enter the FQDN of the StorageGRID server and the port that ONTAP should use for HTTPS communication with StorageGRID, enter the Access Key and Secret Key needed to access the object storage, and the IPspace in the ONTAP cluster where the destination volume resides. See details about these requirements.
-
When restoring from ONTAP S3, enter the FQDN of the ONTAP S3 server and the port that ONTAP should use for HTTPS communication with ONTAP S3, select the Access Key and Secret Key needed to access the object storage, and the IPspace in the ONTAP cluster where the destination volume will reside. See details about these requirements.
-
-
The volume, folder, or file(s) are restored and you are returned to the Restore Dashboard so you can review the progress of the restore operation. You can also select the Job Monitoring tab to see the restore progress.
See Job monitor page.