

Migrate VMs using the Shift Toolkit
 Suggest changes
Use the Shift Toolkit to migrate VMs between virtualization platforms. The process involves preparing the VMs, converting disk formats, and configuring network settings on the target environment.
Supported migrations
The Shift Toolkit provides flexibility in multi-hypervisor environments by supporting bidirectional migration between the following hypervisors:
Migration workflow
After creating a blueprint, you can initiate the migration process. During migration, the Shift Toolkit performs a series of steps to convert disk formats and create virtual machines on the target host as defined in the blueprint.
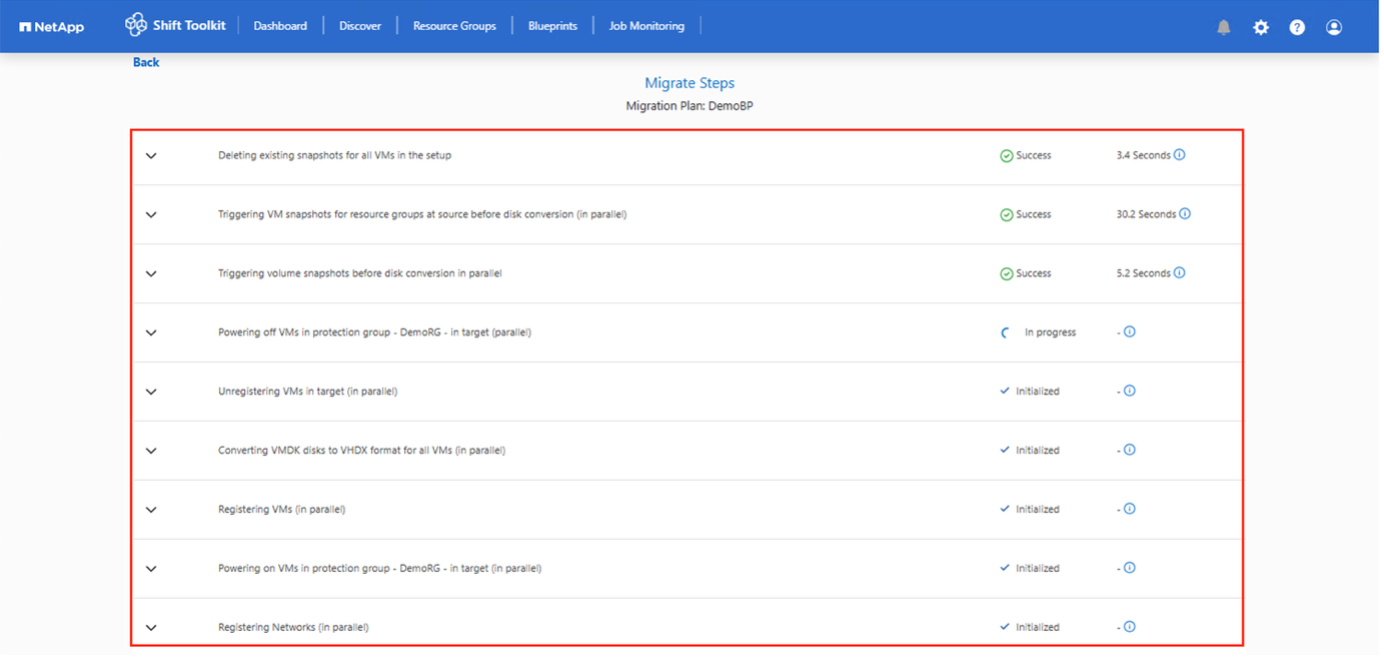
The Shift Toolkit performs the following steps during migration:
-
Delete existing snapshots for all VMs in the blueprint
-
Trigger VM snapshots for the blueprint at the source
-
Trigger volume snapshot before disk conversion
-
Clone and convert VMDK to VHDx format for all VMs
-
Power on VMs in the protection group at the target
-
Register the networks on each VM
-
Remove VMware Tools and assign IP addresses using trigger scripts or cron jobs depending on the OS type
Network tips and considerations
Consider the following network requirements and behaviors when planning your migration. The Shift Toolkit automatically copies network settings from source VMs and reapplies them to migrated VMs, but interface naming and network adapter configurations may vary between Windows and Linux systems.
-
Ensure static IP addresses are available and not assigned to another VM
-
The prepare script copies network configuration details (IP address space, gateway address, DNS servers)
-
The trigger script reapplies network settings during migration for single or multiple NICs based on blueprint mapping
-
After migration, Windows Device Manager may display old network adapter information from pre-migration, which doesn't affect the new adapter or cause IP conflicts
-
Upgrade to v4.0 to automatically remove orphaned network devices from the registry and Device Manager
-
The prepare script copies network configuration details (IP address space, routes, DNS servers, network device names)
-
The script identifies the Linux distribution's networking type and applies IP settings accordingly
-
The network reassignment script is configured as a cron job using crontab and triggered on boot
-
The script reapplies network settings for single or multiple NICs based on blueprint mapping
-
Converted VMs may have interface names like
eth0orensp0instead of the source interface names (for example,ens192orens33) -
The script updates network configuration details to match new interface names
-
If predictable names are used with proper udev matching rules and the interface name is retained on the target hypervisor, the script skips network configuration, removes VMware Tools, and reboots the VM

|
The Shift Toolkit allows overriding network preparation, enabling administrators to run custom scripts for IP assignment or other configurations. |
-
NetworkManager
-
Netplan
-
ifconfig
-
wicked
The Shift Toolkit retains IP addresses as specified in the blueprint.
Migration phases
The following are the migration phases you will follow to migrate VMs using the Shift Toolkit.
-
Prepare VM: Prepare VMs for migration and verify that all prerequisites are completed.
-
Migrate and validate: After preparation is complete, migrate VMware VMs to the target hypervisor.
After migration completes, verify that VMs boot successfully and data has migrated properly.
-
Test the migration: Test migration simulates the migration by converting the VMDK to the appropriate format and creating VMs using the converted virtual disk file on the qtree.
Test migration does not include network mapping configuration, which should be performed manually to a test network.
|
|
The Shift Toolkit does not alter the source VM except for copying scripts needed for VM preparation. This allows for swift rollback in case of conversion failures. |
Execute a migration
To trigger the migration workflow with the configuration specified in the blueprint, click Migrate.
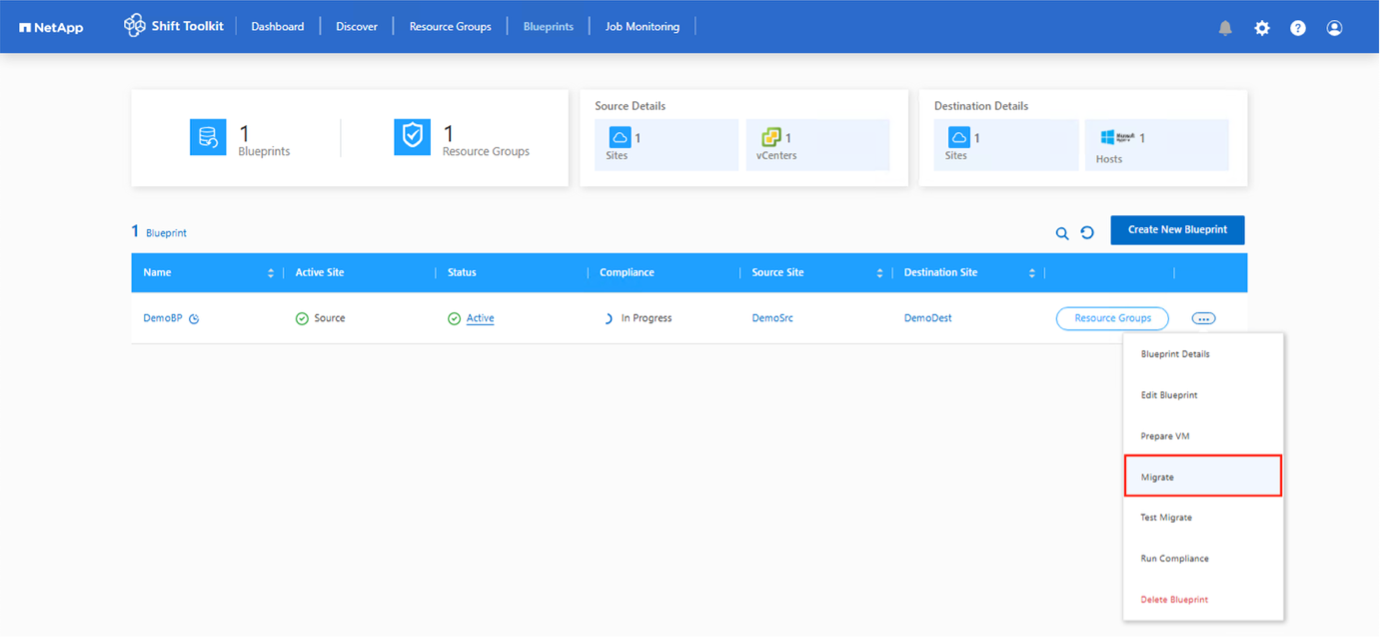
Once initiated, the workflow activates and the conversion process follows the outlined steps to register the VM. If VMs within the blueprint are not powered off, the Shift Toolkit prompts for a graceful shutdown before proceeding.

|
|
NetApp recommends triggering no more than ten conversions in parallel from the same source to the same destination. |
The conversion of VMDK to any file format completes in seconds, making this the fastest option available. This approach helps reduce VM downtime during migration.

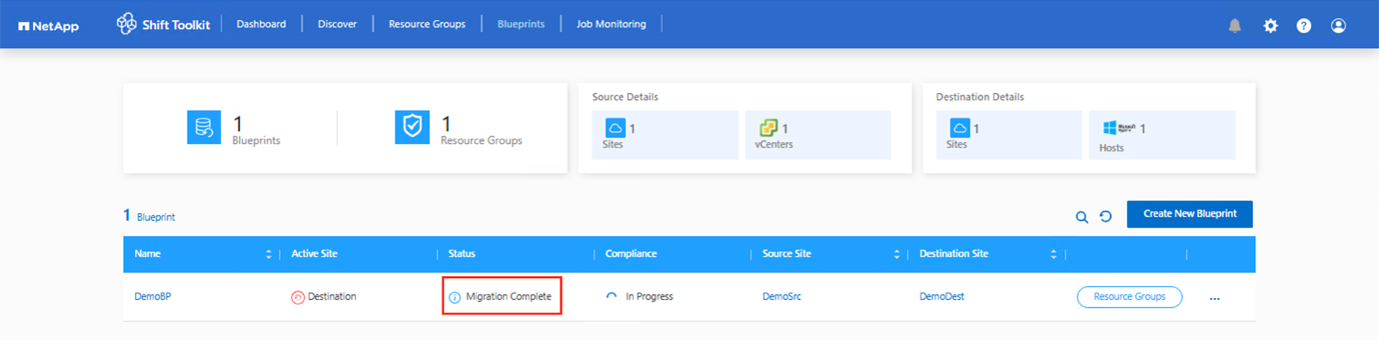
Once the job completes, the blueprint status changes to "Migration Complete".
Delete a blueprint
A blueprint that has never been executed can be deleted directly from the UI. However, after a blueprint has been triggered, it creates job history records that must be removed before the blueprint itself can be deleted. Use the PowerShell removal script to clean up these job records, after which you can delete the blueprint and its associated resource group.
-
Download the removal script from the Shift Toolkit UI by navigating to Settings > Developer Access > Script block.

-
Extract the zip folder. The package contains two files:
-
removeBpJobs.json- Configuration file -
removeBpJobs.ps1- PowerShell script
-
-
Edit the
removeBpJobs.jsonfile to specify:-
Execution name for this operation
-
Shift Toolkit IP address
-
Admin credentials
-
Blueprint name to remove
Example configuration:
"executions": [
  {
    "execution_name": "reslore",
    "shift_server_ip": "https://10.63.184.75",
    "shift_username": "admin",
    "shift_password": "Admin",
    "blueprint_details": [{"BPTHIMFAT": "True"}]
  }
]
-
-
Open PowerShell and navigate to the folder containing the extracted files.
-
Run the script:
pwsh
.\removeBpJobs.ps1
After the script completes successfully, you can delete the blueprint and its associated resource group from the Shift Toolkit UI.