

 Get started
Protect workloads against ransomware attacks
 Suggest changes
You can protect workloads against ransomware attacks by completing the following actions using BlueXP ransomware protection.
-
Change existing workload protection details.
-
Change the name of a workload (such as applications and VM datastores) not managed in SnapCenter.
-
Change the priority or importance of the workload.
-
-
Enable workload-consistent protection, which works with SnapCenter Software or SnapCenter Plug-in for VMware vSphere.
-
Create or manage ransomware protection strategies that include policies that you create for Snapshots, backups, and ransomware detection.
-
Import a strategy and adjust it.
-
Edit or delete detection strategies (only the ones that you created).
-
Protection information
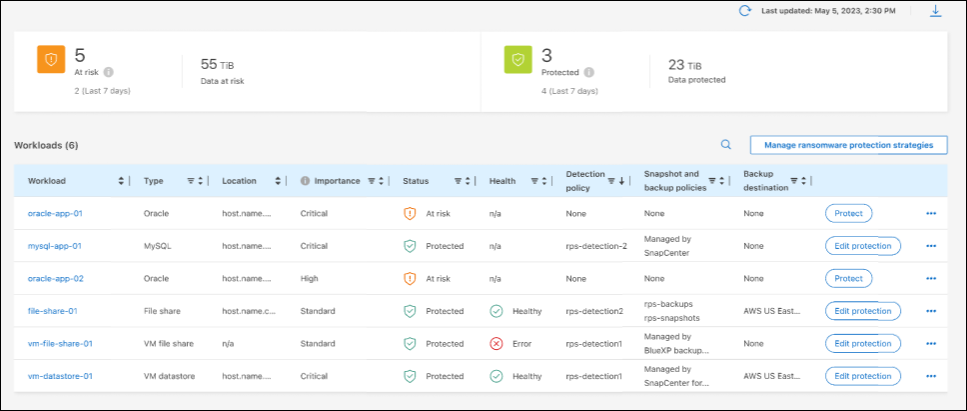
The Protection page shows the following information about workload protection:
Protection status: A workload can show one of the following protection statuses to indicate whether a policy is applied or not:
-
Protected: A policy is applied.
-
At risk: No policy is applied.
-
In progress: A policy is being applied but not completed yet.
-
Failed: A policy is applied but is not working.
Detection status: A workload can have one of the following ransomware detection statuses:
-
Learning: A ransomware detection policy was recently assigned to the workload and the service is scanning workloads.
-
Active: A ransomware detection protection policy is assigned.
-
Not set: A ransomware detection protection policy is not assigned.
-
Error: A ransomware detection policy was assigned, but the service has encountered an error.
Detection policy: The name of the ransomware detection policy appears, if one has been assigned. If the detection policy has not been assigned, "N/A" appears.
Snapshot and backup policies: This column shows the Snapshot and backup policies applied to the workload and the product or service that is managing those policies.
-
Managed by SnapCenter
-
Managed by SnapCenter Plug-in for VMware vSphere
-
Managed by BlueXP backup and recovery
-
Name of ransomware protection policy that governs Snapshots and backups
-
None
Workload importance
BlueXP ransomware protection assigns an importance or priority to each workload during discovery based on an analysis of each workload. The workload importance is determined by the following Snapshot frequencies:
-
Critical: Snapshot copies taken more than 1 per hour (highly aggressive protection schedule)
-
High: Snapshot copies taken less than 1 per hour but greater than 1 per day
-
Standard: Snapshot copies taken more than 1 per day
Predefined ransomware detection policies based on workload importance
You can choose one of the following BlueXP ransomware protection predefined policies that are aligned with workload importance:
| Policy level | Snapshot | Frequency | Retention (Days) | # of Snapshot copies | Total Max # of Snapshot copies |
|---|---|---|---|---|---|
Critical workload policy |
Quarter hourly |
Every 15 min |
3 |
288 |
309 |
Daily |
Every 1 day |
14 |
14 |
309 |
|
Weekly |
Every 1 week |
35 |
5 |
309 |
|
Monthly |
Every 30 days |
60 |
2 |
309 |
|
High workload policy |
Quarter hourly |
Every 30 mins |
3 |
144 |
165 |
Daily |
Every 1 day |
14 |
14 |
165 |
|
Weekly |
Every 1 week |
35 |
5 |
165 |
|
Monthly |
Every 30 days |
60 |
2 |
165 |
|
Standard workload policy |
Quarter hourly |
Every 60 min |
3 |
72 |
93 |
Daily |
Every 1 day |
14 |
14 |
93 |
|
Weekly |
Every 1 week |
35 |
5 |
93 |
|
Monthly |
Every 30 days |
60 |
2 |
93 |
View ransomware protection on a workload
One of the first steps in protecting workloads is viewing your current workloads and their protection status. You can see the following types of workloads:
-
Application workloads
-
VM workloads
-
File share workloads
-
From the BlueXP left navigation, select Protection > Ransomware protection.
-
Do one of the following:
-
From the Data Protection pane on the Dashboard, select View all.
-
From the menu, select Protection.
-
-
From this page, you can view and change protection details for the workload.
Change workload protection details
You can change protection details such as the workload priority and name of the workload, if that workload is not managed by SnapCenter or BlueXP backup and recovery.
-
From the BlueXP ransomware protection menu, select Protection.
-
From the Protection page, select a workload.
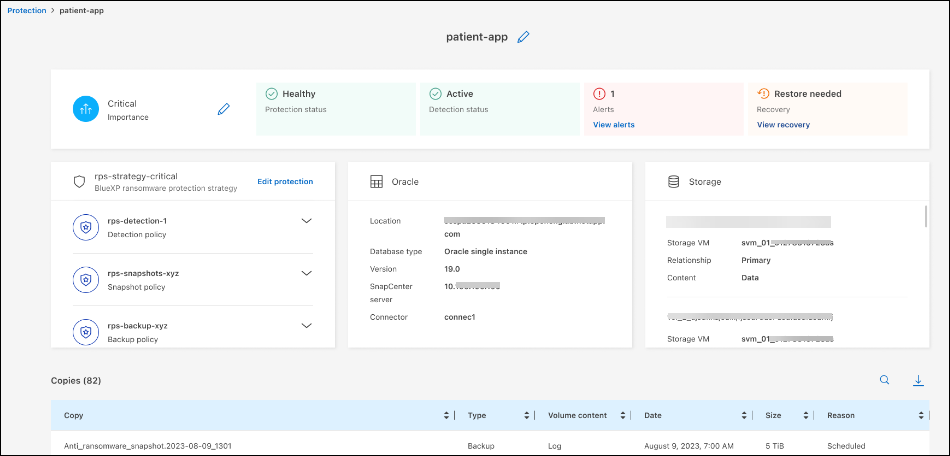
From the workload details page, you can assign a policy to a workload, change a workload name or priority, view alerts, view backup destinations, and view recovery information.
-
To change the name of a workload, click the Pencil
 icon next to the workload name and change the name.
 -
To change the importance of the workload from the assigned priority, click the Pencil
icon next to the workload priority and change it. -
To view the policy associated with the workload, in the Protection pane of the Workload details page, click View policy.
-
To view workload backup destinations, in the Protection pane of the Workload details page, click the View backup destination.
A list of configured backup destinations appears.
For details, see Configure protection settings.
Enable application- or VM-consistent protection with SnapCenter
Enabling application- or VM-consistent protection helps you protect your application or VM workloads in a consistent manner, achieving a quiescent and consistent state to avoid potential data loss later if recovery is needed.
This process initiates installing SnapCenter Software for applications or SnapCenter Plug-in for VMware vSphere for VMs.
After you enable workload-consistent protection, you can manage protection strategies in BlueXP ransomware protection. The protection strategy includes the Snapshot and Backup policies managed elsewhere along with a ransomware detection policy managed in BlueXP ransomware protection.
To learn about SnapCenter, refer to the following information:
-
From the BlueXP ransomware protection menu, select Protection.
-
From the Protection page, select a workload.
-
On the Protection page, select the Actions
 option, and in the drop-down menu, select Enable workload-consistent protection to enable SnapCenter.
If you chose a VM-based workload, the link to install SnapCenter Plug-in for VMware vSphere appears instead of "Install SnapCenter." 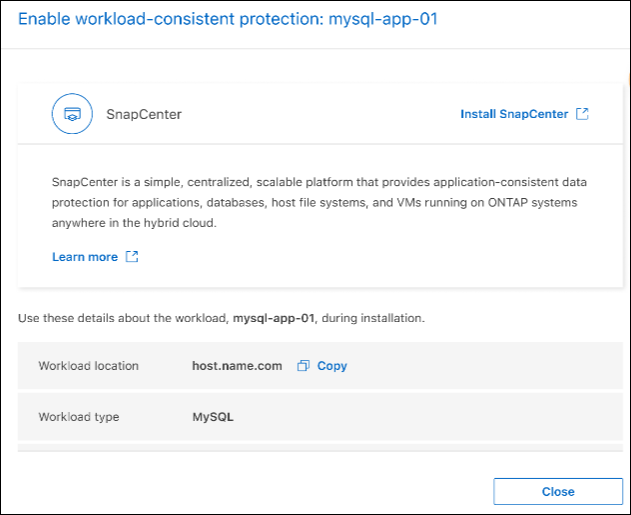
-
In the Workload location field, select Copy to copy the workload location to the clipboard for use in the SnapCenter installation. Scroll down to see the remainder of the workload details.
-
Select Install SnapCenter.
-
If you selected an application-based workload, the SnapCenter Software information appears.
-
If you selected a VM-based workload, the SnapCenter Plug-in for VMware vSphere information appears.
-
-
Follow the information to install SnapCenter.
-
Return to BlueXP ransomware protection. Select Protection to view the Protection page.
-
Review details in the Snapshot and backup policies column on the Protection page to see that the policies are managed elsewhere.
Create a ransomware protection strategy (if you have no Snapshot or Backup policies)
If Snapshot or Backup policies do not exist on the workload, you can create a ransomware protection strategy, which can include the following policies that you create in BlueXP ransomware protection:
-
Snapshot policy
-
Backup policy
-
Ransomware detection policy
-
From the BlueXP ransomware protection menu, select Protection.
-
From the Protection page, select Manage ransomware protection strategies.
-
From the Ransomware protection strategies page, select Add.
-
Enter a new strategy name, or enter an existing name to copy it. If you enter an existing name, choose which one to copy and select Copy.

If you choose to copy and modify an existing strategy, the service appends "_copy" to the original name. You should change the name and at least one setting to make it unique. -
For each item, select the Down arrow.
-
Detection policy:
-
Policy: Choose one of the predesigned detection policies.
-
Primary detection: Enable ransomware detection to have the service detect potential ransomware attacks.
-
Block file extensions: Enable this to have the service block known suspicious file extensions. The service takes automated Snapshot copies when Primary detection is enabled.
If you want to change the blocked file extensions, edit them in System Manager.
-
-
Snapshot policy:
-
Snapshot policy name: Enter a name for the Snapshot policy.
-
Snapshot schedules: Choose schedule options, the number of Snapshot copies to keep, and select to enable the schedule.
-
-
Backup policy:
-
Backup policy name: Enter a new or existing name.
-
Backup locking: Choose this to prevent backups on secondary storage from being modified or deleted for a certain period of time. This is also called immutable storage.
-
Backup schedules: Choose schedule options for secondary storage and enable the schedule.
-
-
-
Select Add.
Add a detection policy to workloads that already have Snapshot and Backup policies
With BlueXP ransomware protection, you can assign a ransomware detection policy to workloads that already have Snapshot and Backup policies, which are managed in other NetApp products or services. The detection policy will not change the policies managed in other products.
Other services, such as BlueXP backup and recovery and SnapCenter, use the following types of policies to govern workloads:
-
Policies governing Snapshots
-
Policies governing replication to secondary storage
-
Policies governing backups to object storage
-
From the BlueXP ransomware protection menu, select Protection.
-
From the Protection page, select a workload, and select Protect.
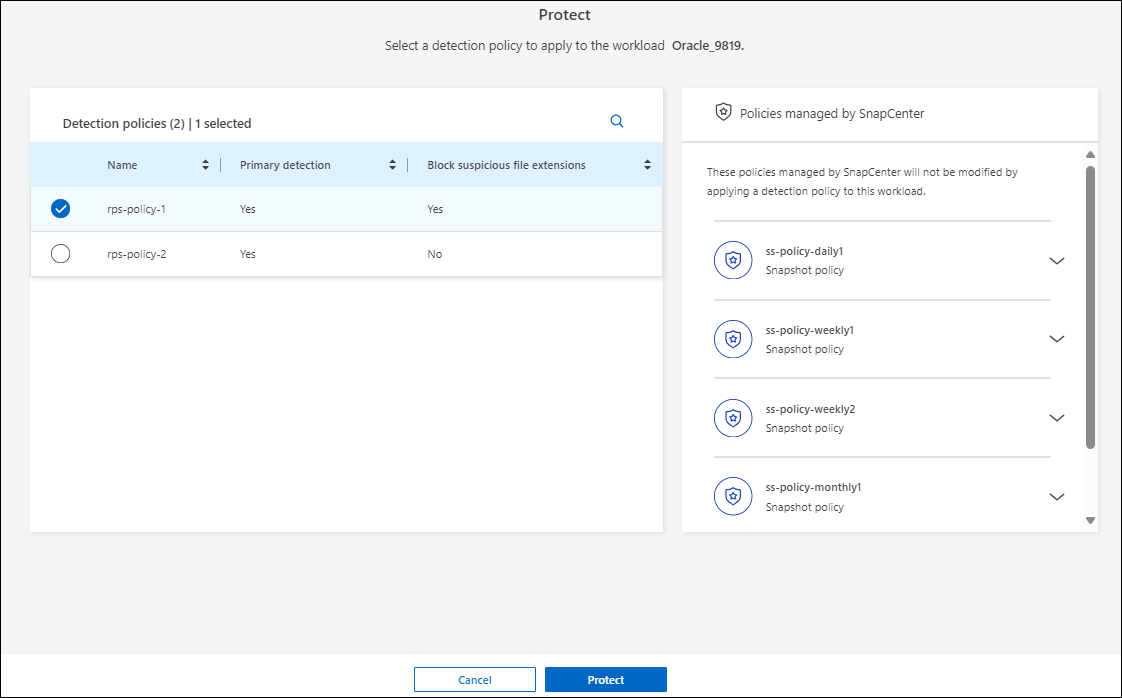
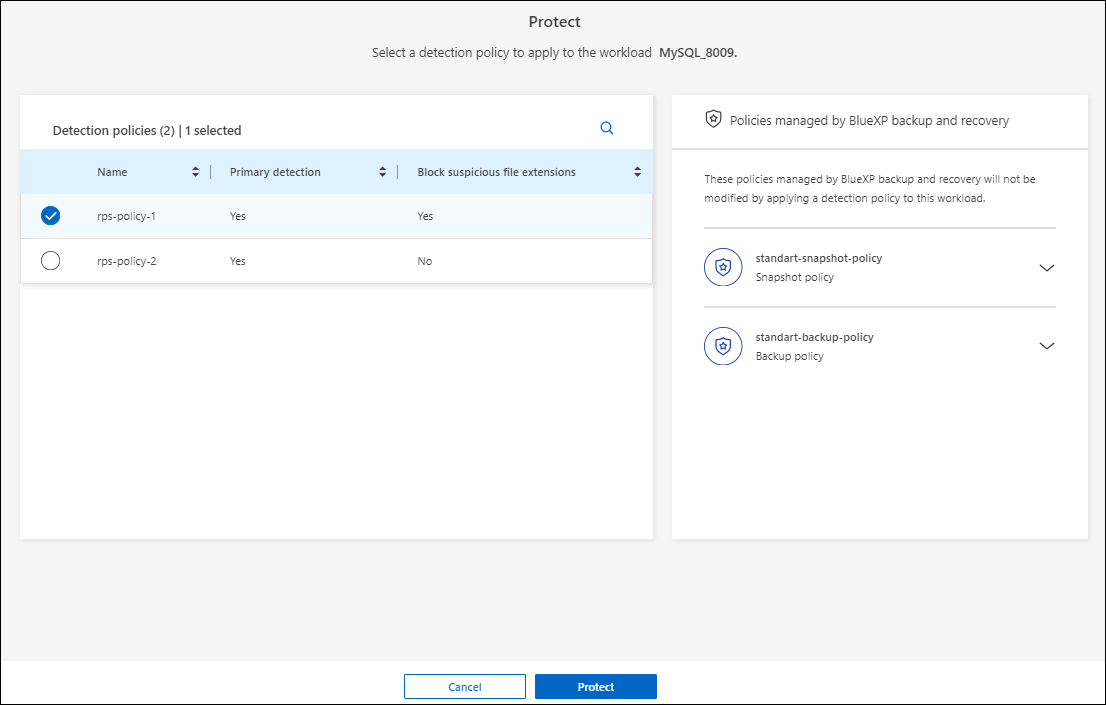
The Protect page shows the policies managed by SnapCenter Software, SnapCenter for VMware vSphere, and BlueXP backup and recovery.
The following example shows policies managed by SnapCenter:
The following example shows policies managed by BlueXP backup and recovery:
-
To see details of the policies managed elsewhere, click the Down arrow.
-
To apply a detection policy in addition to the Snapshot and backup policies managed elsewhere, select the Detection policy.
-
Select Protect.
-
On the Protection page, review the Detection policy column to see the Detection policy assigned. Also, the Snapshot and Backup policies column shows the name of the product or service managing the policies.
Assign a different policy
You can assign a different protection policy replacing the current one.
-
From the BlueXP ransomware protection menu, select Protection.
-
From the Protection page, on the workload row, select Edit protection.
-
In the Policies page, click the down arrow for the policy you want to assign to review the details.
-
Select the policy you want to assign.
-
Select Protect to finish the change.
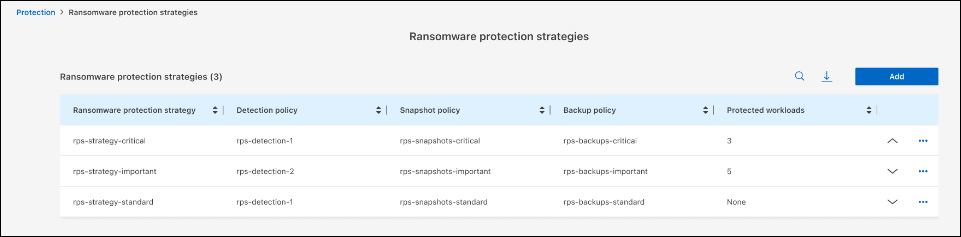
Manage ransomware protection strategies
You can edit or delete a ransomware strategy.
Edit a ransomware protection strategy
You can edit a protection strategy by selecting a different preconfigured detection policy strategy.
-
From the BlueXP ransomware protection menu, select Protection.
-
From the Protection page, select Manage ransomware strategies.
-
In the Manage strategies page, select the Actions
option for the policy you want to change. -
From the Actions menu, select Edit strategy.
-
Change the details.
-
Select Save to finish the change.
Delete a ransomware protection strategy
You can delete a protection strategy that is not currently associated with any workloads.
-
From the BlueXP ransomware protection menu, select Protection.
-
From the Protection page, select Manage ransomware strategies.
-
In the Manage strategies page, select the Actions
option for the strategy you want to delete. -
From the Actions menu, select Delete strategy.