

Protect workloads with NetApp Ransomware Resilience protection strategies
 Suggest changes
Ransomware protection strategies are a key feature of NetApp Ransomware Resilience: they support detection, protection, and replication. Protection strategies are an essential piece of your cybersecurity posture.
Required Console role
To perform this task, you need the Organization admin, Folder or project admin, or Ransomware Resilience admin role. Learn about Ransomware Resilience roles for NetApp Console.
Understand ransomware protection strategies
Ransomware protection strategies encompass detection, protection, and replication policies.
-
Detection policies identify ransomware threats
-
Protection policies include snapshot and backup policies. Detection and snapshot policies are required in a protection strategy. Backup policies are optional.
If you're using other NetApp products to protect your workload, Ransomware Resilience discovers those and provides the option to either:
-
use a ransomware detection policy and continue to use the snapshot and backup policies created by other NetApp tools, or
-
use Ransomware Resilience to manage detection, snapshots, and backups.
-
-
Replication policies enable you to replicate snapshots from Ransomware Resilience to a secondary site. Replication schedules can be set to hourly, daily, weekly, or monthly frequencies.
Currently, you can only replicate snapshots to on-premises ONTAP storage.

|
If you're configuring protection strategies for Amazon FSxN for ONTAP and Azure NetApp Files, consult the limitations for each service. |

|
For enhanced management and protection of your data estate, you can create group workloads to collectively protect volumes under one strategy. |
Protection policies with other NetApp-managed services
Beyond Ransomware Resilience, you can use NetApp Backup and Recovery to manage protection for file shares, VM file shares.
Protection information from Backup & Recovery services appears in Ransomware Resilience. You can add detection policies to these services with Ransomware Resilience. Adding a protection policy with Ransomware Resilience replaces the existing protection policies.
If a ransomware detection policy is being managed by Autonomous Ransomware Protection (ARP or ARP/AI, depending on the ONTAP version) and FPolicy in ONTAP, those workloads are protected and will continue to be managed by ARP and FPolicy.
|
|
Backup destinations are not available for workloads in Amazon FSx for NetApp ONTAP or Azure NetApp Files. Perform backup operations using the FSx for ONTAP backup service. You set backup policies for workloads in FSx for ONTAP in AWS, not in Ransomware Resilience. The backup policies appear in Ransomware Resilience and remain unchanged from AWS. |
Protection policies for workloads not protected by NetApp applications
If your workload isn't managed by Backup and Recovery or Ransomware Resilience, it may have snapshots taken as part of ONTAP or other products. If ONTAP FPolicy protection is in place, you can change the FPolicy protection using ONTAP.
Predefined detection policies
You can choose one of the following Ransomware Resilience predefined policies, which are aligned with workload importance.
|
|
The Encryption user extension policy is the only predefined policy that supports suspicious user behavior detection. |
+
The Critical replication policy is the only predefined policy that supports replicating snapshots to ONTAP.
| Policy level | Snapshot | Frequency | Retention (days) | Number of snapshot copies | Maximum number of snapshot copies |
|---|---|---|---|---|---|
Critical workload policy |
Quarter hourly |
Every 15 min |
3 |
288 |
309 |
Daily |
Every 1 day |
14 |
14 |
309 |
|
Weekly |
Every 1 week |
35 |
5 |
309 |
|
Monthly |
Every 30 days |
60 |
2 |
309 |
|
Important workload policy |
Quarter hourly |
Every 30 mins |
3 |
144 |
165 |
Daily |
Every 1 day |
14 |
14 |
165 |
|
Weekly |
Every 1 week |
35 |
5 |
165 |
|
Monthly |
Every 30 days |
60 |
2 |
165 |
|
Standard workload policy |
Quarter hourly |
Every 30 min |
3 |
72 |
93 |
Daily |
Every 1 day |
14 |
14 |
93 |
|
Weekly |
Every 1 week |
35 |
5 |
93 |
|
Monthly |
Every 30 days |
60 |
2 |
93 |
|
Encryption user extension |
Quarter hourly |
Every 30 min |
3 |
72 |
93 |
Daily |
Every 1 day |
14 |
14 |
93 |
|
Weekly |
Every 1 week |
35 |
5 |
93 |
|
Monthly |
Every 30 days |
60 |
2 |
93 |
|
Critical replication policy |
Quarter hourly |
Every 15 min |
3 |
288 |
309 |
Daily |
Every 1 day |
14 |
14 |
309 |
|
Weekly |
Every 1 week |
35 |
5 |
309 |
|
Monthly |
Every 30 days |
60 |
2 |
309 |
Add a ransomware protection strategy
There are three approaches to adding a ransomware protection strategy:
-
Create a ransomware protection strategy if you have no snapshot or backup policies.
The ransomware protection strategy includes:
-
Snapshot policy
-
Ransomware detection policy
-
Backup policy
-
-
Replace the existing snapshot or backup policies from Backup and Recovery protection with protection strategies managed by Ransomware Resilience.
The ransomware protection strategy includes:
-
Snapshot policy
-
Ransomware detection policy
-
Backup policy
-
-
Create a detection policy for workloads with existing snapshot and backup policies managed in other NetApp products or services.
The detection policy does not change the policies managed in other products.
The detection policy enables Autonomous Ransomware Protection and FPolicy protection if they are already activated in other services. Learn more about Autonomous Ransomware Protection, Backup and Recovery, and ONTAP FPolicy.
Create a ransomware protection strategy (if you have no snapshot or backup policies)
If snapshot or backup policies do not exist on the workload, you can create a ransomware protection strategy, which can include the following policies that you create in Ransomware Resilience:
-
Snapshot policy
-
Backup policy
-
Ransomware detection policy
-
Secondary replication to ONTAP
-
From the Ransomware Resilience menu, select Protection.
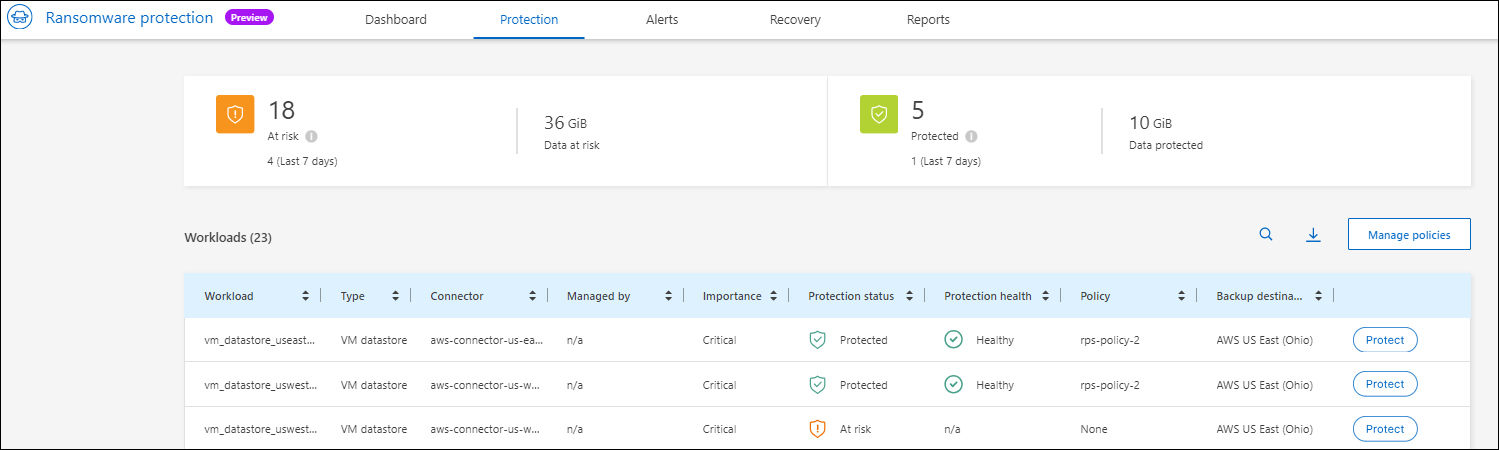
-
From the Protection page, select a workload then Protect.
-
From the Ransomware protection strategies page, select Add.
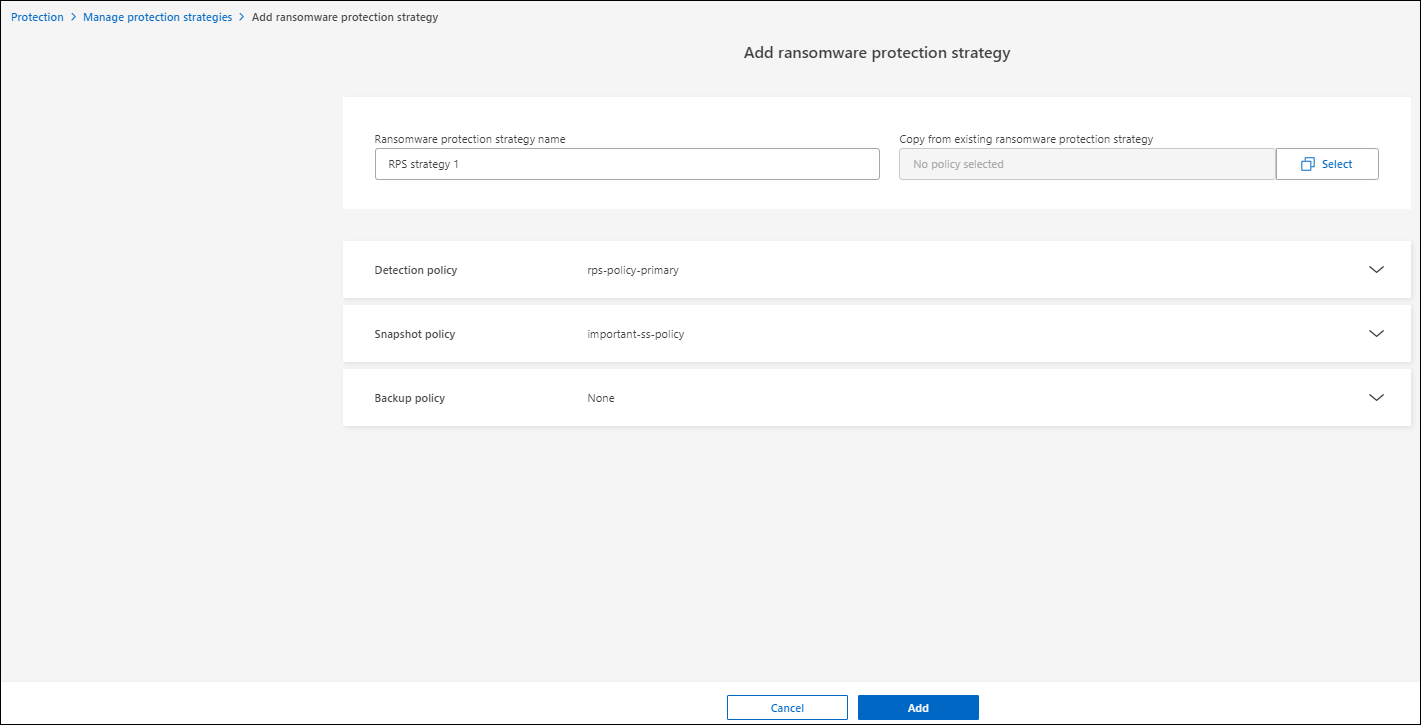
-
Enter a new strategy name, or enter an existing name to copy it. If you enter an existing name, choose which one to copy and select Copy.
If you choose to copy and modify an existing strategy, Ransomware Resilience appends "_copy" to the original name. You should change the name and at least one setting to make it unique. -
For each item, select the Down arrow.
-
Detection policy:
-
Policy: Choose one of the predesigned detection policies.
-
Primary detection: Enable Ransomware Resilience to detect potential ransomware attacks.
-
Suspicious user behavior detection: Enable user behavior detection to transmit user activity events to Ransomware Resilience and detect suspicious events, such as data breaches.
-
Block file extensions: Enable Ransomware Resilience to block known suspicious file extensions. Ransomware Resilience takes automated snapshot copies when Primary detection is enabled.
If you want to change the blocked file extensions, edit them in System Manager.
-
-
Snapshot policy:
-
Snapshot policy base name: Select a policy or select Create and enter a name for the snapshot policy.
-
Snapshot locking: Enable this to lock the snapshot copies on primary storage so that they cannot be modified or deleted for a certain period of time even if a ransomware attack manages its way to the backup storage destination. This is also called immutable storage. This enables quicker restore time.
When a snapshot is locked, the volume expiration time is set to the expiration time of the snapshot copy.
Snapshot copy locking is available with ONTAP 9.12.1 and later. To learn more about SnapLock, refer to SnapLock in ONTAP.
-
Snapshot schedules: Choose schedule options, the number of snapshot copies to keep, and select to enable the schedule.
-
-
Replication policy:
-
Replication policy basename: Enter a new name or choose an existing one. The basename is the prefix appended to all snapshots.
-
Replication schedules: Toggle the frequencies you want to enable (hourly, daily, weekly, or monthly) and set the retention value (the number of replicated snapshots to keep) for each schedule you enable.
-
-
Backup policy:
-
Backup policy basename: Enter a new or choose an existing name.
-
Backup schedules: Choose schedule options for secondary storage and enable the schedule.
To enable backup locking on secondary storage, configure your backup destinations using the Settings option. For details, see Configure settings.
-
-
-
Select Add.
Add a detection policy to workloads with existing snapshot and backup policies managed by Backup and Recovery
Ransomware Resilience enables you to assign either a detection policy or a protection policy to workloads with existing snapshot and backup protection managed in other NetApp products or services. Backup and Recovery uses policies that govern snapshots, replication to secondary storage, or backups to object storage.
Add a detection policy to workloads with existing backup or snapshot policies
If you have existing snapshot or backup policies with Backup and Recovery, you can add a policy to detect ransomware attacks. To manage protection and detection with Ransomware Resilience, see Protect with Ransomware Resilience.
-
From the Ransomware Resilience menu, select Protection.
-
From the Protection page, select a workload then select Protect.
-
Ransomware Resilience detects if there are existing active Backup and Recovery policies.
-
To leave your existing Backup and Recovery in place and only apply a detection policy, leave the Replace existing policies box unchecked.
-
Select the detection settings you want:
-
Encryption detection
-
Suspicious user behavior detection
-
Block suspicious file extensions
-
-
Select Next.
-
If you selected Suspicious user behavior detection as a detection setting, select the User activity agent or or create one.
The user activity agent hosts the new data collectors. Ransomware Resilience creates the data collector automatically to transmit user activity events to Ransomware Resilience to detect anomalous user behavior.
-
Select Next.
-
Review your choices. Select Create to activate detection.
-
On the Protection page, review the Detection status to confirm detection is Active.
Replace existing backup or snapshot policies with a ransomware protection strategy
You can replace your existing backup or snapshot policies with a ransomware protection strategy. This approach removes your externally managed protection and configures detection and protection in Ransomware Resilience.
-
From the Ransomware Resilience menu, select Protection.
-
From the Protection page, select a workload then select Protect.
-
Ransomware Resilience detects if there are existing active Backup and Recovery policies. To replace the existing policies, select the Replace existing policies box. When you select the box, Ransomware Resilience replaces the list of detection policies with detection policies.
-
Choose a protection policy. If no protection policy exists, select Add to create a new policy. For information about creating a policy, see Create a protection policy. Select Next.
-
If your strategy includes replication, select the Destination system and Destination storage VM. Select Next.
-
Select a backup destination or create a new one. Select Next.
-
If your protection strategy includes user behavior detection, select a User activity agent in your environment to host the new data collectors. Ransomware Resilience creates the data collector automatically to transmit user activity events to Ransomware Resilience to detect anomalous user behavior.
-
-
Review the new protection strategy then select Protect to apply it.
-
On the Protection page, review the Detection status to confirm detection is Active.
Assign a different policy
You can replace the existing policy with a different one.
-
From the Ransomware Resilience menu, select Protection.
-
From the Protection page, on the workload row, select Edit protection.
-
If the workload has an existing Backup and Recovery policy that you want to maintain, uncheck Replace existing policies. To replace the existing policies, check Replace existing policies.
-
In the Policies page, select the down arrow for the policy you want to assign to review the details.
-
Select the policy you want to assign.
-
Select Protect to complete the change.
Manage ransomware protection strategies
You can delete a ransomware strategy.
View workloads protected by a ransomware protection strategy
Before you delete a ransomware protection strategy, you might want to view which workloads are protected by that strategy.
You can view the workloads from the list of strategies or when you are editing a specific strategy.
-
From the Ransomware Resilience menu, select Protection.
-
From the Protection page, select Manage protection strategies.
The Ransomware protection strategies page displays a list of strategies.

-
On the Ransomware protection strategies page in the Protected workloads column, select the down arrow at the end of the row.
Delete a ransomware protection strategy
You can delete a protection strategy that is not currently associated with any workloads.
-
From the Ransomware Resilience menu, select Protection.
-
From the Protection page, select Manage protection strategies.
-
In the Manage strategies page, select the Actions
 option for the strategy you want to delete.
 -
From the Actions menu, select Delete policy.