

Recover from a ransomware attack (after incidents are neutralized) with NetApp Ransomware Resilience
 Suggest changes
After workloads have been marked "Restore needed", NetApp Ransomware Resilience recommends a recovery point actual (RPA) and orchestrates the workflow for a crash-resistant recovery.
-
If the application or VM is managed by SnapCenter, Ransomware Resilience restores the application or VM back to its previous state and last transaction using the application-consistent or VM-consistent process. The application or VM-consistent restore adds any data that did not make it into storage, for example, data in cache or in an I/O operation, to the data in the volume.
-
If the application or VM is not managed by SnapCenter and is managed by NetApp Backup and Recovery or Ransomware Resilience, Ransomware Resilience performs a crash-consistent restore, where all the data that was in the volume at the same point of time is restored, for example, if the system crashed.
You can restore the workload by selecting all volumes, specific volumes, or specific files.

|
Workload recovery can impact running workloads. You should coordinate recovery processes with the appropriate stakeholders. |
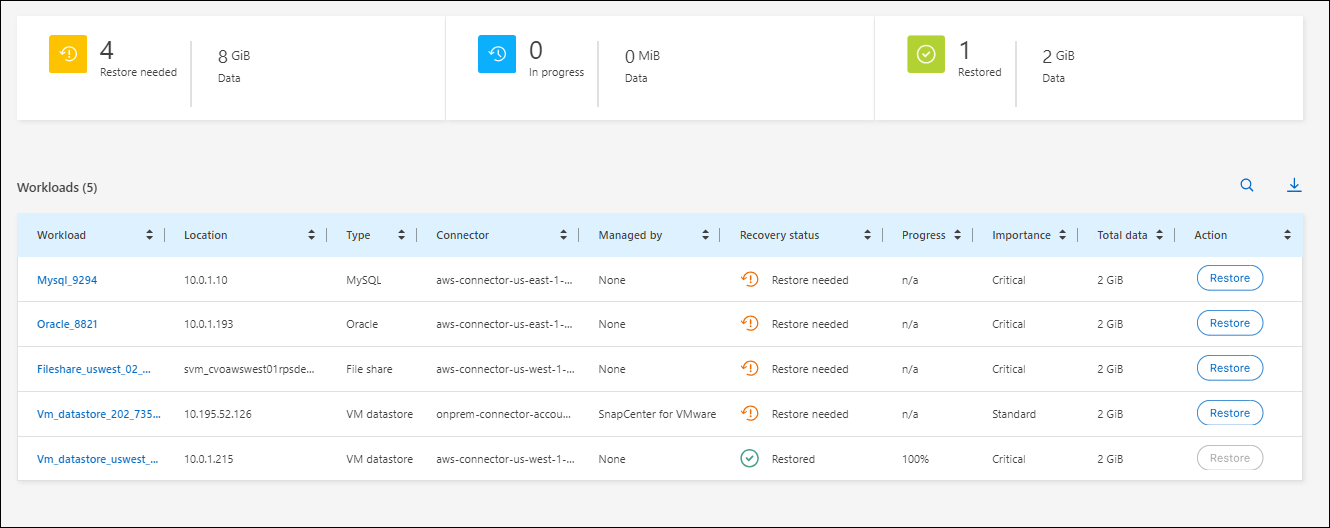
A workload can have one of the following restore statuses:
-
Restore needed: The workload needs to be restored.
-
In progress: The restore operation is currently underway.
-
Restored: The workload has been restored.
-
Failed: The workload restore process could not be completed.
View workloads that are ready to be restored
Review the workloads that are in the "Restore needed" recovery status.
-
Do one of the following:
-
From the Dashboard, review the "Restore needed" totals in the Alerts pane and select View all.
-
From the menu, select Recovery.
-
-
Review the workload information in the Recovery page.
Restore a workload managed by SnapCenter
Using Ransomware Resilience, the storage administrator can determine how best to restore workloads either from the recommended restore point or the preferred restore point.
The application state will change if required for the restore. The application will be restored to its previous state from control files, if they are included in the backup. After the restore finishes, the application opens in READ-WRITE mode.
Required Console role
To perform this task, you need the Organization admin, Folder or project admin, or Ransomware Resilience admin role. Learn about Ransomware Resilience roles for NetApp Console.
-
From Ransomware Resilience, select Recovery.
-
Review the workload information in the Recovery page.
-
Select a workload that is in the "Restore needed" state.
-
To restore, select Restore.
-
Restore scope: Application-consistent (or for SnapCenter for VMs, the restore scope is "By VM")
-
Source: Select the down arrow next to Source to see details. Select the restore point that you want to use to restore the data.
Ransomware Resilience identifies the best restore point as the latest backup just before the incident and shows a “Recommended” indication. -
Destination: Select the down arrow next to Destination to see details.
-
Select the original or alternate location.
-
Select the system.
-
Select the Storage VM.
-
-
If the original destination does not have enough space to restore the workload, a "Temporary storage" row appears. You can select the temporary storage to restore the workload data. The restored data will be copied from the temporary storage to the original location. Click on the Down arrow in the Temporary storage row and set the destination cluster, storage VM, and local tier.
-
Select Save.
-
Select Next.
-
Review your selections.
-
Select Restore.
-
From the top menu, select Recovery to review the workload on the Recovery page where the status of the operation moves through the states.
Restore a workload not managed by SnapCenter
Using Ransomware Resilience, the storage administrator can determine how best to restore workloads either from the recommended restore point or the preferred restore point.
Required Console role
To perform this task, you need the Organization admin, Folder or project admin, or Ransomware Resilience admin role. Learn about Ransomware Resilience roles for NetApp Console.
The security storage admin can recover data at different levels:
-
Recovery all volumes
-
Recover an application at the volume level or file and folder level.
-
Recover a file share at the volume level, directory, or file/folder level.
-
Recover from a datastore at a VM level.
The process differs depending on the workload type.
-
From the Ransomware Resilience menu, select Recovery.
-
Review the workload information in the Recovery page.
-
Select a workload that is in the "Restore needed" state.
-
To restore, select Restore.
-
Restore scope: Select the type of restore you want to complete:
-
All volumes
-
By volume
-
By file: You can specify a folder or single files to restore.

For SAN workloads, you can only restore by workload.
You can select up to 100 files or a single folder.
-
-
Continue with one of the following procedures depending on whether you chose application, volume, or file.
Restore all volumes
-
From the Ransomware Resilience menu, select Recovery.
-
Select a workload that is in the "Restore needed" state.
-
To restore, select Restore.
-
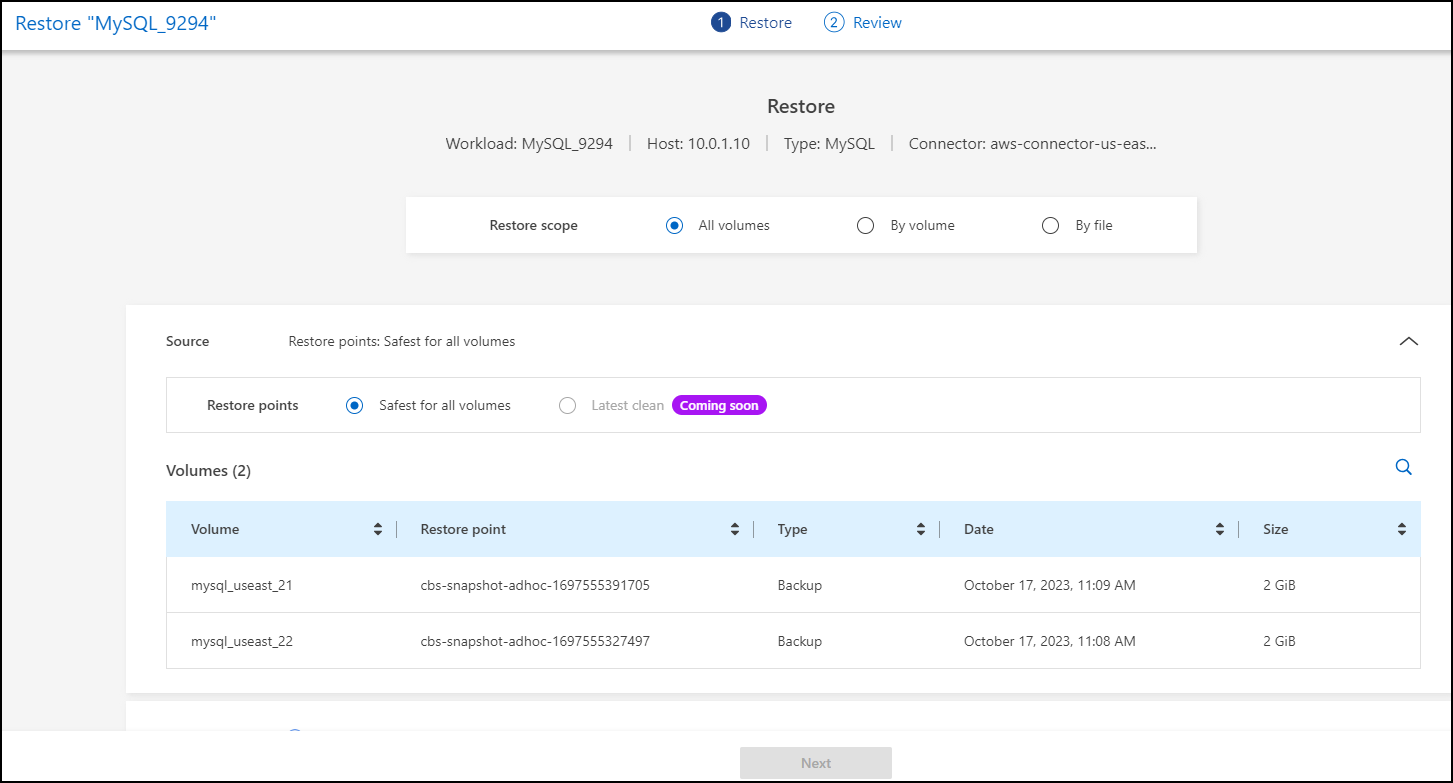
On the Restore page, in the Restore scope, select All volumes.
-
Source: Select the down arrow next to Source to see details.
-
Select the restore point that you want to use to restore the data.
Ransomware Resilience identifies the best restore point as the latest backup just before the incident and shows a "Safest for all volumes" indication. This means that all volumes will be restored to a copy prior to the first attack on the first volume detected.
-
-
Destination: Select the down arrow next to Destination to see details.
-
Select the system.
-
Select the Storage VM.
-
Select the aggregate.
-
Change the volume prefix that will be prepended to all new volumes.
The new volume name appears as prefix + original volume name + backup name + backup date.
-
-
Select Save.
-
Select Next.
-
Review your selections.
-
Select Restore.
-
From the top menu, select Recovery to review the workload on the Recovery page where the status of the operation moves through the states.
Restore an application workload at the volume level
-
From the Ransomware Resilience menu, select Recovery.
-
Select an application workload that is in the "Restore needed" state.
-
To restore, select Restore.
-
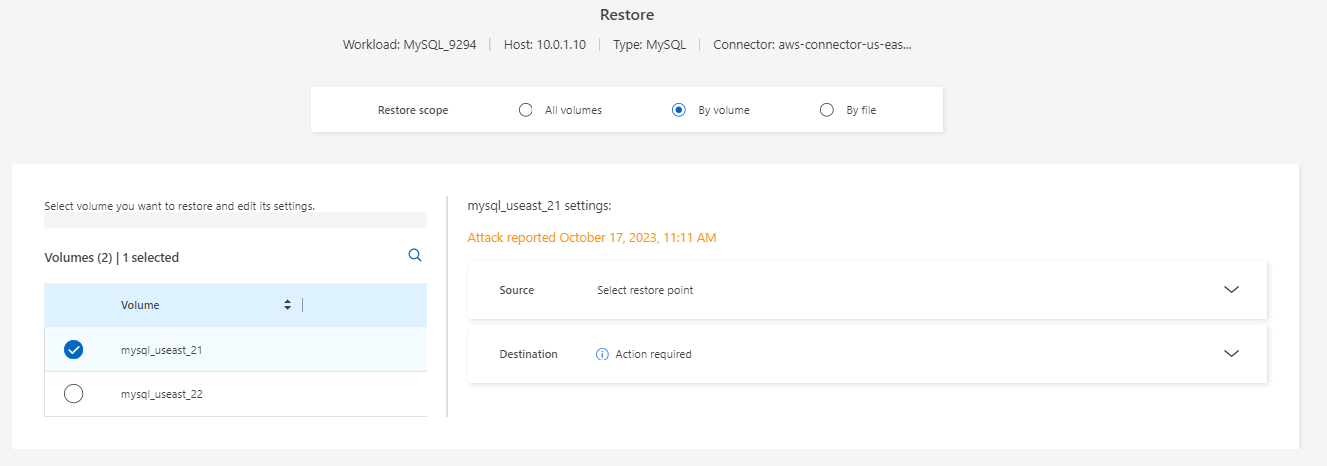
On the Restore page, in the Restore scope, select By volume.
-
On the list of volumes, select the volume you want to restore.
-
Source: Select the down arrow next to Source to see details.
-
Select the restore point that you want to use to restore the data.
Ransomware Resilience identifies the best restore point as the latest backup just before the incident and shows a "Recommended" indication.
-
-
Destination: Select the down arrow next to Destination to see details.
-
Select the system.
-
Select the Storage VM.
-
Select the aggregate.
-
Review the new volume name.
The new volume name appears as the original volume name + backup name + backup date.
-
-
Select Save.
-
Select Next.
-
Review your selections.
-
Select Restore.
-
From the top menu, select Recovery to review the workload on the Recovery page where the status of the operation moves through the states.
Restore an application workload at the file level
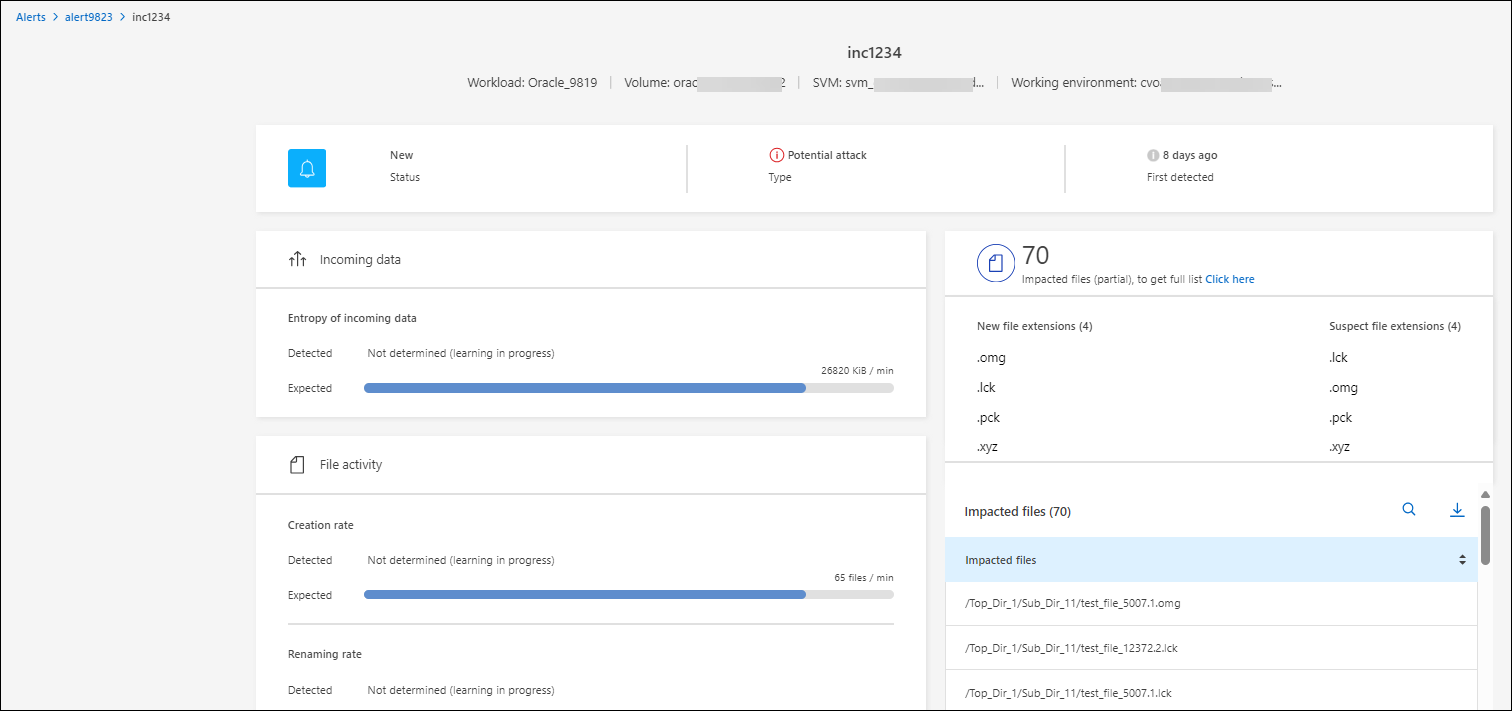
Before you restore an application workload at the file level, you can view a list of impacted files. You can access the Alerts page to download a list of impacted files. Then use the Recovery page to upload the list and choose which files to restore.
You can restore an application workload at the file level to the same or different system.
Use the Alerts page to retrieve the list of impacted files.
|
|
If a volume has multiple alerts, you will need to download the CSV list of impacted files for each alert. |
-
From the Ransomware Resilience menu, select Alerts.
-
On the Alerts page, sort the results by workload to show the alerts for the application workload that you want to restore.
-
From the list of alerts for that workload, select an alert.
-
For that alert, select a single incident.
-
To see the full list of files, select Click here at the top of the Impacted files pane.
-
For that incident, select the download icon and download the list of impacted files in CSV format.
-
From the Ransomware Resilience menu, select Recovery.
-
Select an application workload that is in the "Restore needed" state.
-
To restore, select Restore.
-
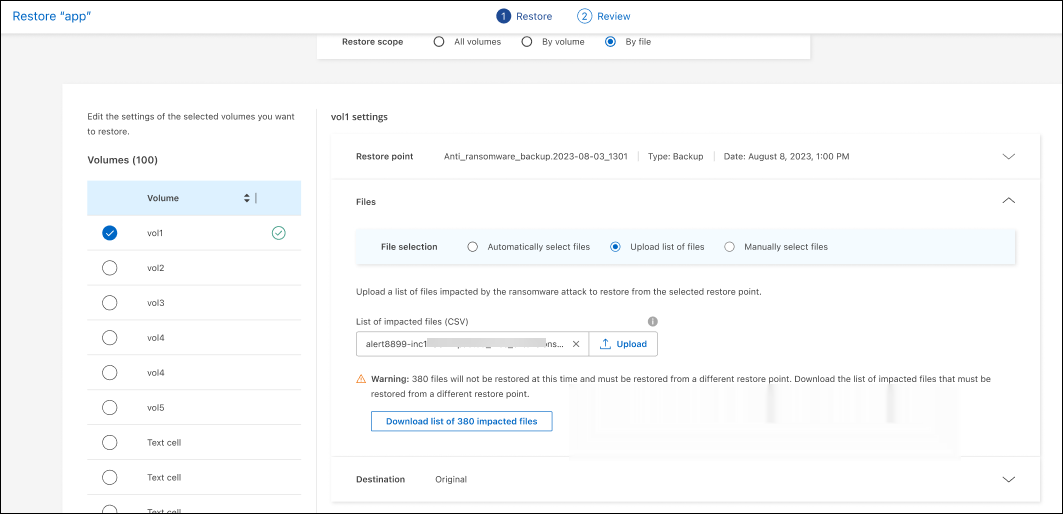
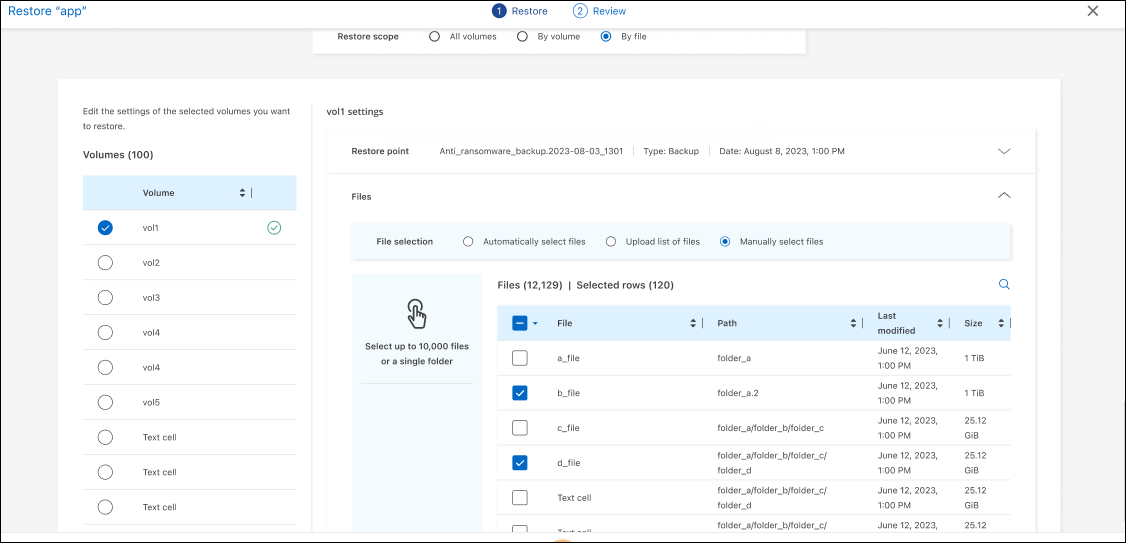
On the Restore page, in the Restore scope, select By file.
-
On the list of volumes, select the volume that contains the files that you want to restore.
-
Restore point: Select the down arrow next to Restore point to see details. Select the restore point that you want to use to restore the data.

The Reason column in the Restore points pane shows the reason for the snapshot or backup as either "Scheduled" or "Automated response to ransomware incident." -
Files:
-
Automatically select files: Let Ransomware Resilience select the files to be restored.
-
Upload list of files: Upload a CSV file that contains the list of impacted files that you got from the Alerts page or that you have. You can restore up to 10,000 files at a time.
-
Manually select files: Select up to 10,000 files or a single folder to restore.
If any files cannot be restored using the selected restore point, a message appears indicating the number of files that cannot be restored and lets you download the list of those files by selecting Download list of impacted files.
-
-
Destination: Select the down arrow next to Destination to see details.
-
Choose where to restore the data: original source location or an alternate location that you can specify.
While the original files or directory will be overwritten by the restored data, the original file and folder names will remain the same unless you specify new names. -
Select the system.
-
Select the Storage VM.
-
Optionally, enter the path.
If you don't specify a path for the restore, the files will be restored to a new volume at the top-level directory. -
Select whether you want the names of the restored files or directory to be the same names as the current location or different names.
-
-
Select Next.
-
Review your selections.
-
Select Restore.
-
From the top menu, select Recovery to review the workload on the Recovery page where the status of the operation moves through the states.
Restore a file share or datastore
-
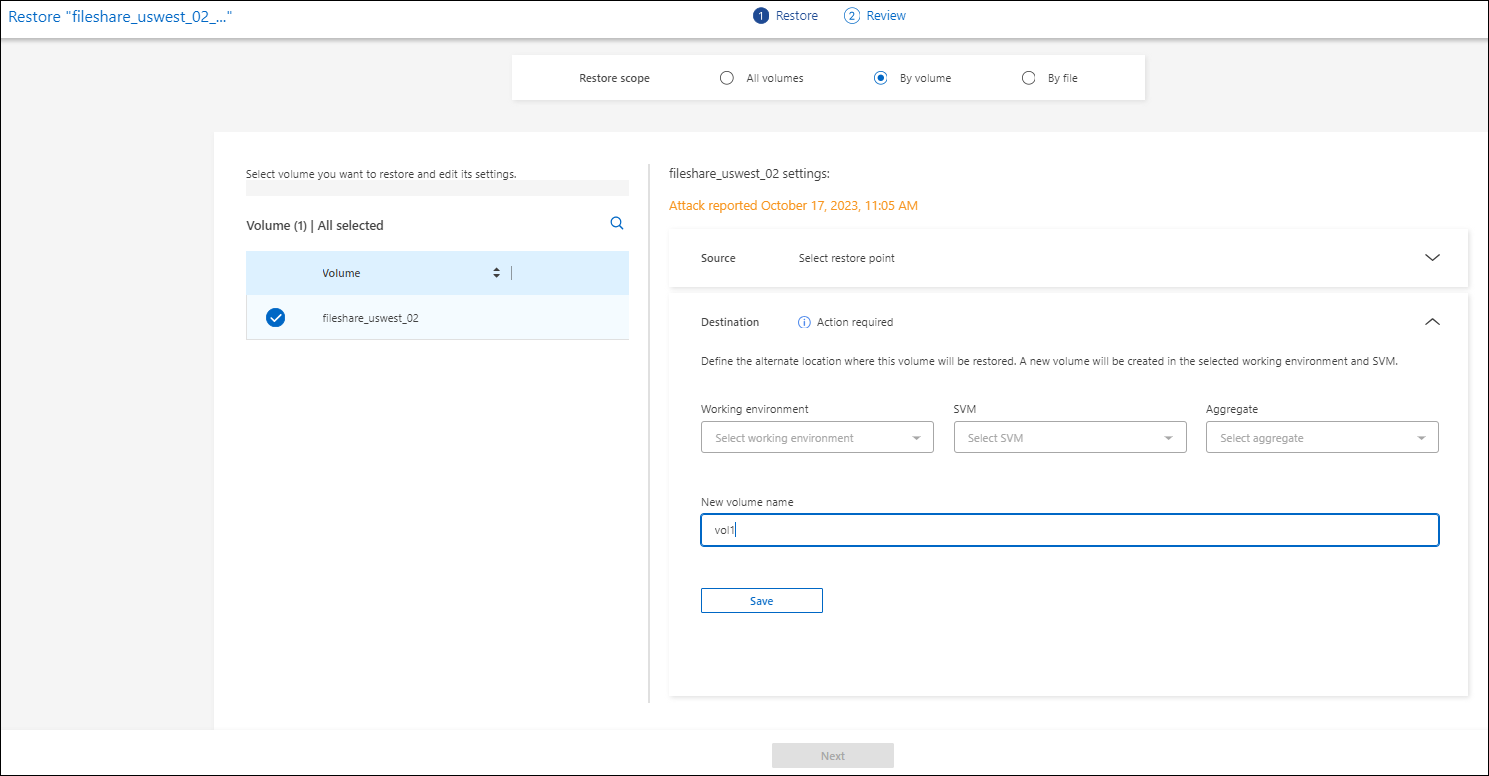
After selecting a file share or datastore to restore, on the Restore page, in the Restore scope, select By volume.
-
On the list of volumes, select the volume you want to restore.
-
Source: Select the down arrow next to Source to see details.
-
Select the restore point that you want to use to restore the data.
Ransomware Resilience identifies the best restore point as the latest backup just before the incident and shows a "Recommended" indication.
-
-
Destination: Select the down arrow next to Destination to see details.
-
Choose where to restore the data: original source location or an alternate location that you can specify.
While the original files or directory will be overwritten by the restored data, the original file and folder names will remain the same unless you specify new names. -
Select the system.
-
Select the Storage VM.
-
Optionally, enter the path.
If you don't specify a path for the restore, the files will be restored to a new volume at the top-level directory.
-
-
Select Save.
-
Review your selections.
-
Select Restore.
-
From the menu, select Recovery to review the workload on the Recovery page where the status of the operation moves through the states.
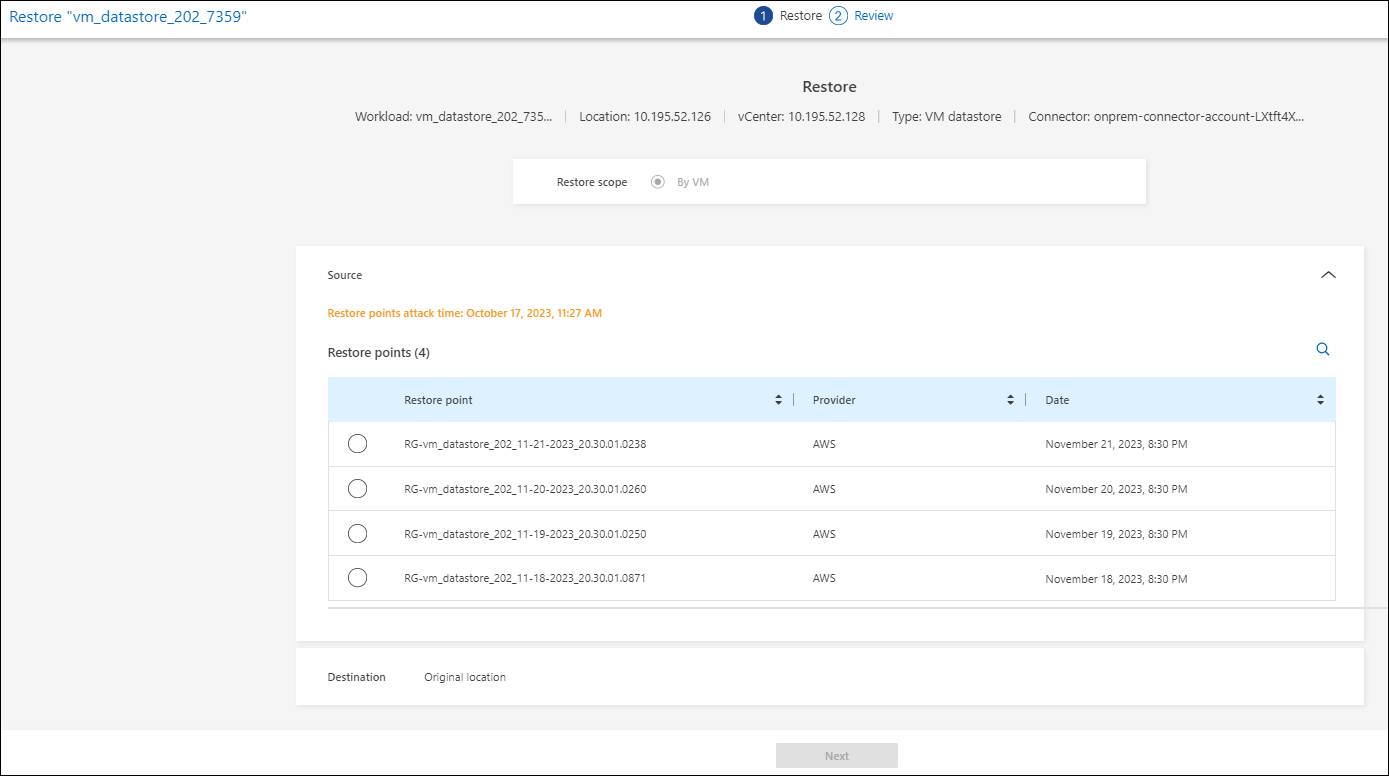
Restore a VM file share at the VM level
On the Recovery page after you selected a VM to restore, continue with these steps.
-
Source: Select the down arrow next to Source to see details.
-
Select the restore point that you want to use to restore the data.
-
Destination: To original location.
-
Select Next.
-
Review your selections.
-
Select Restore.
-
From the menu, select Recovery to review the workload on the Recovery page where the status of the operation moves through the states.