

Add Azure Blob storage accounts in the NetApp Console
 Suggest changes
Once your Azure Blob Storage system is available in the NetApp Console systems page, you can add additional storage accounts directly from the Console.
-
From the Systems page, select the Azure Blob Storage system to view its overview page.
-
Select Add storage account.
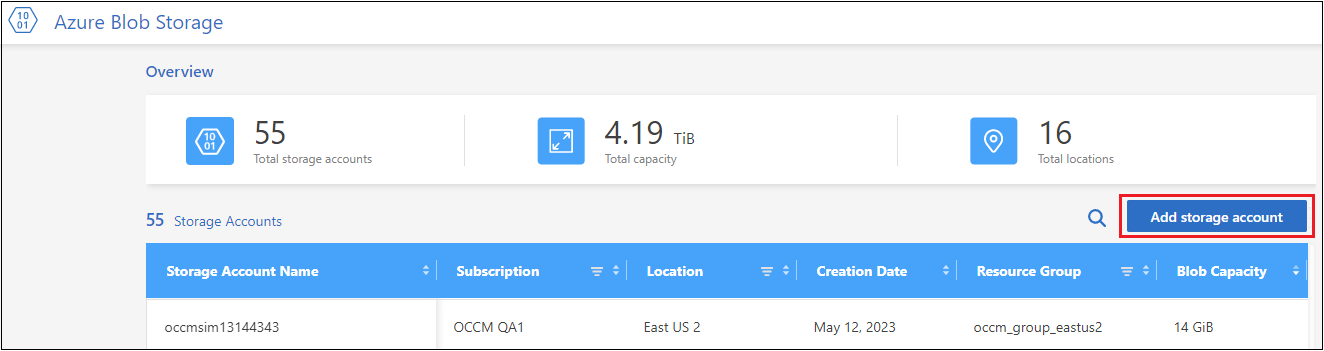
The Add storage account page is displayed.
-
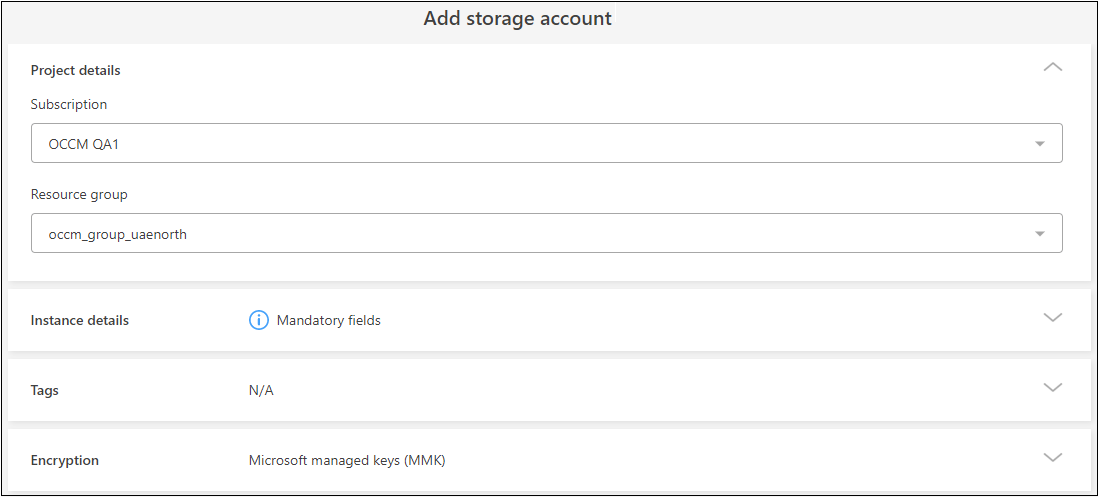
Enter the required information in the Project details section.
Field Description Subscription
Select the Azure subscription for the new storage account.
Resource group
Select an existing resource group for this storage account.
-
In the Instance details section, enter the name for the storage account, and select a region (or regions) for the storage account to be created in.
Field Description Storage account name
Enter the name you want to use for the storage account. The name must be between 3 and 24 characters in length, and it can contain numbers and lowercase letters only.
Azure Region
Select a region from the list where the storage account will be created.
Select the appropriate region for your storage account. See the Microsoft documentation for information about Azure regions and availability zones.
Not all regions are supported for all types of storage accounts or redundancy configurations. See the Microsoft documentation for information about Azure Storage redundancy.
Additionally, the choice of region can have a billing impact. See the Microsoft documentation for information about Azure Storage account billing.
Performance type
Select whether you want to use Standard or Premium performance storage. See the Microsoft documentation for information about Types of storage accounts.
-
Standard performance is used for general-purpose v2 storage accounts. This type of account is recommended for most scenarios.
-
Premium performance is used for scenarios that require low latency. There are three types of premium storage accounts are available: Block blobs, File shares, and Page blobs.
-
-
In the Tags section, you can enter up to 10 tag key/value pairs to group your resources.
Tags are metadata that you can use to group resources to identify applications, environments, regions, cloud providers, and more. You can add tags to a storage account so that the tags are applied to objects when they are added to the storage account.
Tags are disabled by default in new storage accounts created by the Console. Learn more about tagging.
-
In the Encryption section, choose the type of data encryption you want to use to protect access to the data in the storage account.
Data encryption type Description Microsoft-managed keys
By default, Microsoft-managed encryption keys are used to encrypt your data.
Customer-managed keys
You can use your own customer-managed keys for data encryption instead of using the default Microsoft-managed encryption keys. If you're planning to use your own customer-managed keys, you'll need to have created them already so you can select the Key Vault and the Keys in this page.
The keys can be in the same Subscription as the storage account, or you can select a different Subscription.
See the Microsoft Azure documentation for more information about Microsoft-managed keys, and more information about Customer-managed keys.
-
Select Add to create the bucket.