

Use CloudShell in NetApp Workload Factory
 Suggest changes
Open CloudShell to execute AWS or ONTAP CLI commands from anywhere in the NetApp Workload Factory console.
About this task
CloudShell allows you to execute AWS CLI commands or ONTAP CLI commands in a shell-like environment from within the Workload Factory console. It simulates terminal sessions in the browser, providing terminal features and proxying messages through Workload Factory's backend. It allows you to use the AWS credentials and ONTAP credentials that you have provided in your NetApp account.
CloudShell features include:
-
Multiple CloudShell sessions: deploy multiple CloudShell sessions at one time to issue several sequences of commands in parallel,
-
Multiple views: split CloudShell tab sessions so you can view two or more tabs horizontally or vertically at the same time
-
Session renaming: rename sessions as needed
-
Last session content persistence: re-open the last session if you close it by mistake
-
Settings preferences: change the font size and output type
-
AI-generated error responses for ONTAP CLI commands
-
Autocomplete support: start typing a command and use the Tab key to view available options
CloudShell commands
Within the CloudShell GUI interface, you can enter help to view available CloudShell commands. After you issue the help command, the following reference appears.
NetApp CloudShell is a GUI interface built into NetApp Workload Factory enables you to execute AWS CLI commands or ONTAP CLI commands in a shell-like environment. It simulates terminal sessions in the browser, providing terminal features and proxying messages through the backend in Workload Factory. It enables you to use the AWS credentials and ONTAP credentials that you have provided in your NetApp account.
-
clear -
help -
[--fsx <fsxId>] <ontap-command> [parameters] -
aws <aws-command> <aws-sub-command> [parameters]
Each terminal session runs in a specific context: credentials, region, and optionally FSx for ONTAP file system.
+ All AWS commands execute in the provided context. AWS commands will only succeed if the provided credentials have permissions in the specified region.
+
You can specify ONTAP commands with an optional fsxId. If you provide an fsxId with an individual ONTAP command, then this ID overrides the ID in the context. If the terminal session doesn't have an FSx for ONTAP file system ID context, then you must provide fsxId with each ONTAP command.
+ To update different context specifics, do the following: * To change credentials: "using credentials <credentialId>" * To change region: "using region <regionCode>" * To change FSx for ONTAP file system: "using fsx <fileSystemId>"
-
To show available credentials: "show credentials"
-
To show available regions: "show regions"
-
To show command history: "show history"
The following are examples of setting and using variables. If a variable value contains spaces, you should set it inside quotes.
+ * To set a variable: $<variable> = <value> * To use a variable: $<variable> * Example setting a variable: $svm1 = svm123 * Example using a variable: --fsx FileSystem-1 volumes show --vserver $svm1 * Example setting a variable with string value $comment1 = "A comment with spaces"
Shell operators such as pipe |, background execution &, and redirection > aren't supported. Command execution fails if you include these operators.
Before you begin
CloudShell works in the context of your AWS credentials. To use CloudShell, you must provide at least one AWS credential.

|
CloudShell is available for you to execute any AWS or ONTAP CLI command. However, if you want to work within the context of an FSx for ONTAP file system, make sure you issue the following command: using fsx <file-system-name>.
|
Deploy CloudShell
You can deploy CloudShell from anywhere in the NetApp Workload Factory console. You can also deploy CloudShell from the NetApp Console.
-
Log in to the Workload Factory console.
-
From the menu, select Administration and then CloudShell.
-
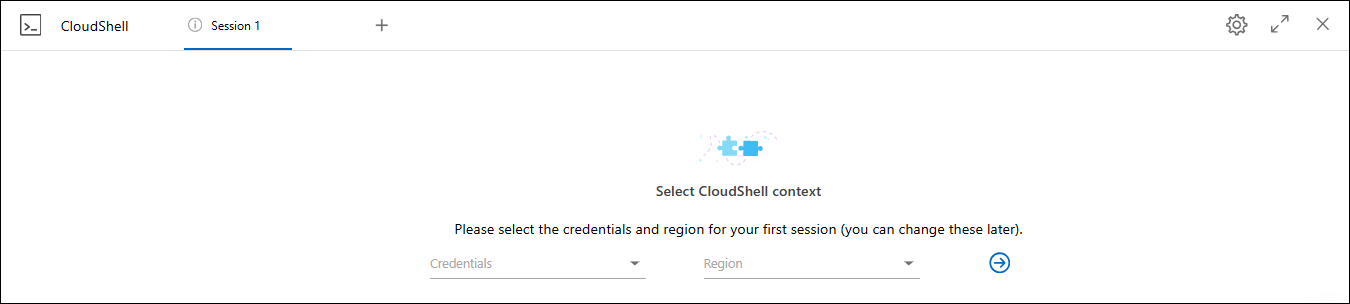
In the CloudShell window, select credentials and region for the CloudShell session and then select the arrow to continue.
-
Enter
helpto view available CloudShell commands and instructions or refer to the following CLI reference documents for available commands:-
AWS CLI reference: For commands related to FSx for ONTAP, select fsx.
-
-
Issue commands within the CloudShell session.
If an error occurs after issuing an ONTAP CLI command, select the light bulb icon to get a brief AI-generated error response with a description of the failure, the cause of the failure, and a detailed resolution. Select Read more for more details.
-
Log in to the NetApp Console.
-
From the menu, select Workloads and then Administration.
-
From the Administration menu, select CloudShell.
-
In the CloudShell window, select credentials and region for the CloudShell session and then select the arrow to continue.
-
Enter
helpto view available CloudShell commands and instructions or refer to the following CLI reference documents for available commands:-
AWS CLI reference: For commands related to FSx for ONTAP, select fsx.
-
-
Issue commands within the CloudShell session.
If an error occurs after issuing an ONTAP CLI command, select the light bulb icon to get a brief AI-generated error response with a description of the failure, the cause of the failure, and a detailed resolution. Select Read more for more details.
The CloudShell tasks shown in this screenshot can be completed by selecting the actions menu of an open CloudShell session tab. The instructions for each of these tasks follows.

Rename a CloudShell session tab
You can rename a CloudShell session tab to help you identify the session.
-
Select the actions menu of the CloudShell session tab.
-
Select Rename.
-
Enter a new name for the session tab and then click outside the tab name to set the new name.
The new name appears in the CloudShell session tab.
Duplicate CloudShell session tab
You can duplicate a CloudShell session tab to create a new session with the same name, credentials, and region. The code from the original tab isn't duplicated in the duplicated tab.
-
Select the actions menu of the CloudShell session tab.
-
Select Duplicate.
The new tab appears with the same name as the original tab.
Close CloudShell session tabs
You can close CloudShell tabs one at a time, close other tabs you're not working on, or close all tabs at once.
-
Select the actions menu of the CloudShell session tab.
-
Select one of the following:
-
Select "X" in the CloudShell tab window to close one tab at a time.
-
Select Close other tabs to close all other tabs that are open except the one you're working on.
-
Select Close all tabs to close all tabs.
-
The selected CloudShell session tabs close.
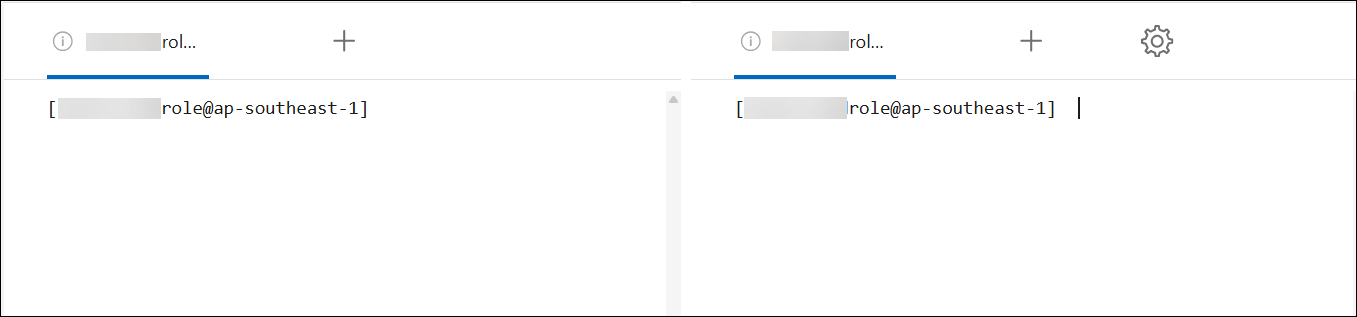
Split CloudShell session tabs
You can split CloudShell session tabs to view two or more tabs at the same time.
Drag and drop CloudShell session tabs to the top, bottom, left, or right of the CloudShell window to split the view.
Update settings for a CloudShell session
You can update font and output type settings for CloudShell sessions.
-
Deploy a CloudShell session.
-
In the CloudShell tab, select the settings icon.
The settings dialog appears.
-
Update font size and output type as needed.
Enriched output applies to JSON objects and table formatting. All other output appears as plain text. -
Select Apply.
The CloudShell settings are updated.