

Create backup policies for SQL Server databases
 Suggest changes
You can create a backup policy for the resource or the resource group before you use SnapCenter to back up SQL Server resources, or you can create a backup policy at the time you create a resource group or backup a single resource.
-
You must have defined your data protection strategy.
-
You must have prepared for data protection by completing tasks such as installing SnapCenter, adding hosts, identifying resources, and creating storage system connections.
-
You must have configured the host log directory for log backup.
-
You must have refreshed (discovered) the SQL Server resources.
-
If you are replicating Snapshot copies to a mirror or vault, the SnapCenter administrator must have assigned the storage virtual machines (SVMs) for both the source volumes and destination volumes to you.
For information about how administrators assign resources to users, see the SnapCenter installation information.
-
If you want to run the PowerShell scripts in prescripts and postscripts, you should set the value of the usePowershellProcessforScripts parameter to true in the web.config file.
The default value is false.
A backup policy is a set of rules that governs how you manage and retain backups, and how frequently the resource or resource group is backed up. Additionally, you can specify replication and script settings. Specifying options in a policy saves time when you want to reuse the policy for another resource group.
The SCRIPTS_PATH is defined using the PredefinedWindowsScriptsDirectory key located in the SMCoreServiceHost.exe.Config file of the plug-in host.
If needed, you can change this path and restart SMcore service. It is recommended that you use the default path for security.
The value of the key can be displayed from swagger through the API: API /4.7/configsettings
You can use the GET API to display the value of the key. SET API is not supported.
Step 1: Create Policy Name
-
In the left navigation pane, select Settings.
-
In the Settings page, select Policies.
-
Select New.
-
In the Name page, enter the policy name and description.
Step 2: Configure backup options
-
Choose your backup type
Back up the database files and transaction logs and to truncate the transaction logs.
-
Select Full backup and Log backup.
-
Enter the maximum number of databases that should be backed up for each Snapshot copy.

You must increase this value if you want to run multiple backup operations concurrently.
Back up the database files.
-
Select Full backup.
-
Enter the maximum number of databases that should be backed up for each Snapshot copy. Default value is 100
You must increase this value if you want to run multiple backup operations concurrently.
Back up the transaction logs. . Select Log backup.
-
If you are backing up your resources by using another backup application, select Copy only backup.
Keeping the transaction logs intact allows any backup application to restore the databases. You typically should not use the copy only option in any other circumstance.
|
|
Microsoft SQL does not support the Copy only backup option together with the Full backup and Log backup option for secondary storage. |
-
In the Availability Group Settings section, perform the following actions:
-
Backup on preferred backup replica only.
Select this option to backup only on preferred backup replica. The preferred backup replica is decided by the backup preferences configured for the AG in the SQL Server.
-
Select replicas for backup.
Choose the primary AG replica or the secondary AG replica for the backup.
-
Select Backup priority (Minimum and Maximum backup priority)
Specify a minimum backup priority number, and a maximum backup priority number that decide the AG replica for backup. For example, you can have a minimum priority of 10 and a maximum priority of 50. In this case, all the AG replicas with a priority more than 10 and less than 50 are considered for backup.
By default, the minimum priority is 1 and maximum priority is 100.
In cluster configurations, the backups are retained at each node of the cluster according to the retention settings set in the policy. If the owner node of the AG changes, the backups are taken according to the retention settings and the backups of the previous owner node will be retained. The retention for AG is applicable only at the node level. -
-
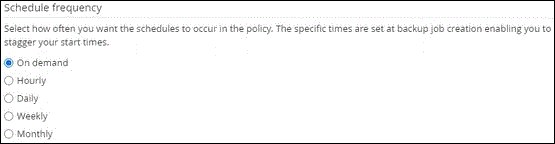
Schedule the backup frequency for this policy. Specify the schedule type by selecting either On demand, Hourly, Daily, Weekly, or Monthly.
You can only select one schedule type for a policy.
You can specify the schedule (start date, end date, and frequency) for backup operation while creating a resource group. This enables you to create resource groups that share the same policy and backup frequency, but lets you assign different backup schedules to each policy.
If you have scheduled for 2:00 a.m., the schedule will not be triggered during daylight saving time (DST).
Step 3: Configure retention settings
In the Retention page, depending on the backup type selected in the backup type page, perform one or more of the following actions:
-
In the Retention settings for the up-to-the-minute restore operation section, perform one of the following actions:
Retain only a specific number of Snapshot copies.
-
Select the Keep log backups applicable to last <number> days option, and specify the number of days to be retained. If you near this limit, you might want to delete older copies.
Retain the backup copies for a specific number of days.
-
Select the Keep log backups applicable to last <number> days of full backups option, and specify the number of days to keep the log backup copies.
-
In the Full backup retentions settings section for the On Demand retention settings, perform the following actions:
-
Specify total number of Snapshot copies to keep
-
To specify the number of Snapshot copies to keep, select Total Snapshot copies to keep.
-
If the number of Snapshot copies exceeds the specified number, the Snapshot copies are deleted with the oldest copies deleted first.
-
-

|
By default, the value of retention count is set to 2. If you set the retention count to 1, the retention operation might fail because the first Snapshot copy is the reference Snapshot copy for the SnapVault relationship until a newer Snapshot copy is replicated to the target. |
|
|
The maximum retention value is 1018 for resources on ONTAP 9.4 or later, and 254 for resources on ONTAP 9.3 or earlier. Backups will fail if retention is set to a value higher than what the underlying ONTAP version supports. |
-
Length of time to keep Snapshot copies
-
If you want to specify the number of days for which you want to keep the Snapshot copies before deleting them, select Keep Snapshot copies for.
-
-
In the Full backup retentions settings section for the Hourly, Daily, Weekly and Monthly retention settings, specify the retention settings for the schedule type selected in Backup Type page.
-
Specify total number of Snapshot copies to keep
-
To specify the number of Snapshot copies to keep, select Total Snapshot copies to keep. If the number of Snapshot copies exceeds the specified number, the Snapshot copies are deleted with the oldest copies deleted first.
-
-
|
|
You must set the retention count to 2 or higher if you plan to enable SnapVault replication. If you set the retention count to 1, the retention operation might fail because the first Snapshot copy is the reference Snapshot copy for the SnapVault relationship until a newer Snapshot copy is replicated to the target. |
-
Length of time to keep Snapshot copies
-
To specify the number of days for which you want to keep the Snapshot copies before deleting them, select Keep Snapshot copies for.
-
The log Snapshot copy retention is set to 7 days by default. Use Set-SmPolicy cmdlet to change the log Snapshot copy retention.
This example sets the log Snapshot copy retention to 2:
Set-SmPolicy -PolicyName 'newpol' -PolicyType 'Backup' -PluginPolicyType 'SCSQL' -sqlbackuptype 'FullBackupAndLogBackup' -RetentionSettings @{BackupType='DATA';ScheduleType='Hourly';RetentionCount=2},@{BackupType='LOG_SNAPSHOT';ScheduleType='None';RetentionCount=2},@{BackupType='LOG';ScheduleType='Hourly';RetentionCount=2} -scheduletype 'Hourly'
Step 4: Configure replication settings
-
In the Replication page, specify replication to the secondary storage system:
Update SnapMirror after creating a local Snapshot copy.
-
Select this option to create mirror copies of backup sets on another volume (SnapMirror).
Update SnapVault after creating a Snapshot copy.
-
Select this option to perform disk-to-disk backup replication.
-
Select a Snapshot label.
Depending on the Snapshot copy label that you select, ONTAP applies the secondary Snapshot copy retention policy that matches the label.
|
|
If you have selected Update SnapMirror after creating a local Snapshot copy, you can optionally specify the secondary policy label. However, if you have selected Update SnapVault after creating a local Snapshot copy, you should specify the secondary policy label. |
-
Enter the number of replication attempts that should occur before the process halts.
Step 5: Configure script settings
-
In the Script page, enter the path and the arguments of the prescript or postscript that should be run before or after the backup operation, respectively.
For example, you can run a script to update SNMP traps, automate alerts, and send logs.
The prescripts or postscripts path should not include drives or shares. The path should be relative to the SCRIPTS_PATH.
You must configure the SnapMirror retention policy in ONTAP so that the secondary storage does not reach the maximum limit of Snapshot copies.
Step 6: Configure verification settings
In the Verification page, perform the following steps:
-
In the Run verification for following backup schedules section, select the schedule frequency.
-
In the Database consistency check options section, perform the following actions:
-
Limit the integrity structure to physical structure of the database (PHYSICAL_ONLY)
-
Select Limit the integrity structure to physical structure of the database (PHYSICAL_ONLY) to limit the integrity check to the physical structure of the database and to detect torn pages, checksum failures, and common hardware failures that impact the database.
-
-
Suppress all information messages (NO INFOMSGS)
-
Select Supress all information messages (NO_INFOMSGS) to suppress all informational messages. Selected by default.
-
-
Display all reported error messages per object (ALL_ERRORMSGS)
-
Select Display all reported error messages per object (ALL_ERRORMSGS) to display all the reported errors per object.
-
-
Do not check nonclustered indexes (NOINDEX)
-
Select Do not check nonclustered indexes (NOINDEX) if you do not want to check nonclustered indexes. The SQL Server database uses Microsoft SQL Server Database Consistency Checker (DBCC) to check the logical and physical integrity of the objects in the database.
-
-
Limit the checks and obtain the locks instead of using an internal database Snapshot copy (TABLOCK)
-
Select Limit the checks and obtain the locks instead of using an internal database Snapshot copy (TABLOCK) to limit the checks and obtain locks instead of using an internal database Snapshot copy.
-
-
-
In the Log Backup section, select Verify log backup upon completion to verify the log backup upon completion.
-
In the Verification script settings section, enter the path and the arguments of the prescript or postscript that should be run before or after the verification operation, respectively.
The prescripts or postscripts path should not include drives or shares. The path should be relative to the SCRIPTS_PATH.
Step 7: Review summary
-
Review the summary, and then select Finish.