

Add sites in NetApp Disaster Recovery
 Suggest changes
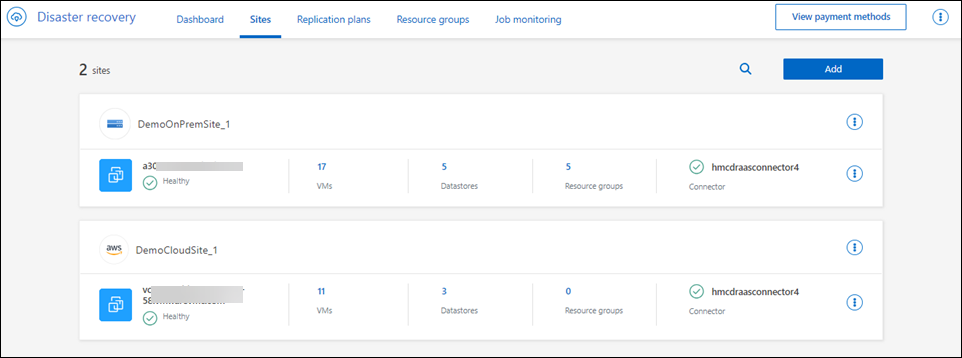
Before you can create a disaster recovery plan, you need to add sites to Disaster Recovery. A site is a collection of vCenter servers or Kubernetes clusters (on-premises or in the cloud). You should add the primary or production site and the disaster recovery site.

|
Ensure that both the source and destination use the same NetApp Console agent. |
Required NetApp Console role
The Super admin or Disaster recovery admin role is required to perform this task. Learn about user roles and permissions in NetApp Disaster Recovery. Learn about NetApp Console access roles for all services.
Add a site
When adding a site to Disaster Recovery, you must distinguish based on the type of resources in the site. You can add either vCenters or Kubernetes clusters.
-
In Disaster Recovery, select Sites in the sidebar.
-
In the dropdown menu, select the site type: VMware or Kubernetes.

-
Select Add.
-
Assign a Name to the site. For vCenters, you must also select a location for the site.
-
Select Add.
After you add a site to Disaster Recovery, you must associate resources with the site.
Add resources to a site
If you added vCenters in previous releases and want to customize the discovery schedule, you must edit the vCenter server site and set the schedule.
|
|
NetApp Disaster Recovery performs discovery once every 24 hours. After setting up a site, you can later edit the vCenter or Kubernetes cluster to customize the discovery schedule that meets your needs. For example, if you have a large number of VMs, you can set the discovery schedule to run every 23 hours and 59 minutes. If you have a small number of VMs, you can set the discovery schedule to run every 12 hours. The minimum interval is 30 minutes and the maximum is 24 hours. |
You should first perform a few manual discoveries to get the most up-to-date information about your environment. After that, you can set the schedule to run automatically.
If you have vCenters from earlier versions and want to change when discovery runs, edit the vCenter server site and set the schedule.
Newly added or deleted VMs are recognized in the next scheduled discovery or during an immediate manual discovery.
Resources can be protected only if the replication plan is in one of the following states:
-
Ready
-
Failback committed
-
Test failover committed
vCenter clusters in a site
Each site contains one or more vCenters. These vCenters use one or more ONTAP storage clusters to host NFS or VMFS datastores.
You need the following information to add a vCenter cluster to a site:
-
The vCenter management IP address or FQDN
-
Credentials for a vCenter account with the required privileges to perform operations. See required vCenter privileges for more information.
-
For cloud-hosted VMware sites, the required cloud access keys
-
A security certificate to access your vCenter.

The service supports self-signed security certificates or certificates from a central certificate authority (CA).
-
In Disaster Recovery, select Sites in the sidebar.
-
In the dropdown menu, set the filter to VMware.
-
Choose the site you want to add a Kubernetes cluster to. Select the action menu for the site then Add cluster.
-
In the Sites page, select the action menu for a site then Add vCenter.
-
Ensure the Site is correct. Choose the Console agent from the dropdown menu.
-
Add the vCenter IP address, Port number, vCenter username, and vCenter password.
-
For Google Cloud VMware Engine, choose the Project, Zone, Private cloud, and *Subnet from the dropdown menus.
-
For AWS, provide the VMC's API token and Long organizational ID.
-
-
To accept self-signed certificates for the source vCenter, check the box.
Self-signed certificates are not as secure as other certificates. If your vCenter is NOT configured with certificate authority (CA) certificates, you should check this box; otherwise, the connection to the vCenter will not work. -
Select Add.
Next add a target vCenter.
-
Add a site again for the target vCenter.
-
Again, select Add vCenter and add target vCenter information.
-
Target:
-
Choose the target site and the location. If the target is cloud, select AWS.
-
(Applies only to cloud sites) API token: Enter the API token to authorize service access for your organization. Create the API token by providing specific organization and service roles.
-
(Applies only to cloud sites) Long organization ID: Enter the unique ID for the organization. You can identify this ID by clicking on the username in the Account section of the NetApp Console.
-
-
Select Add.
The source and target vCenters appear on the list of sites.
-
After vCenters are added, NetApp Disaster Recovery performs a deep discovery of the vCenter environments, including vCenter clusters, ESXi hosts, datastores, storage foot print, virtual machine details, SnapMirror replicas, and virtual machine networks.
-
In Disaster Recovery, select Sites in the sidebar.
-
In the workload dropdown menu, set the filter to Kubernetes.
-
Choose the site you want to add a Kubernetes cluster to. Select the action menu for the site then Add cluster.
-
Verify that the Site option is correct. Choose the appropriate Console agent from the dropdown menu, then assign a Cluster name.
When naming the cluster, you can only use lowercase letters (a-z), numbers (0-9), and hyphens (-). The name must begin with a letter.
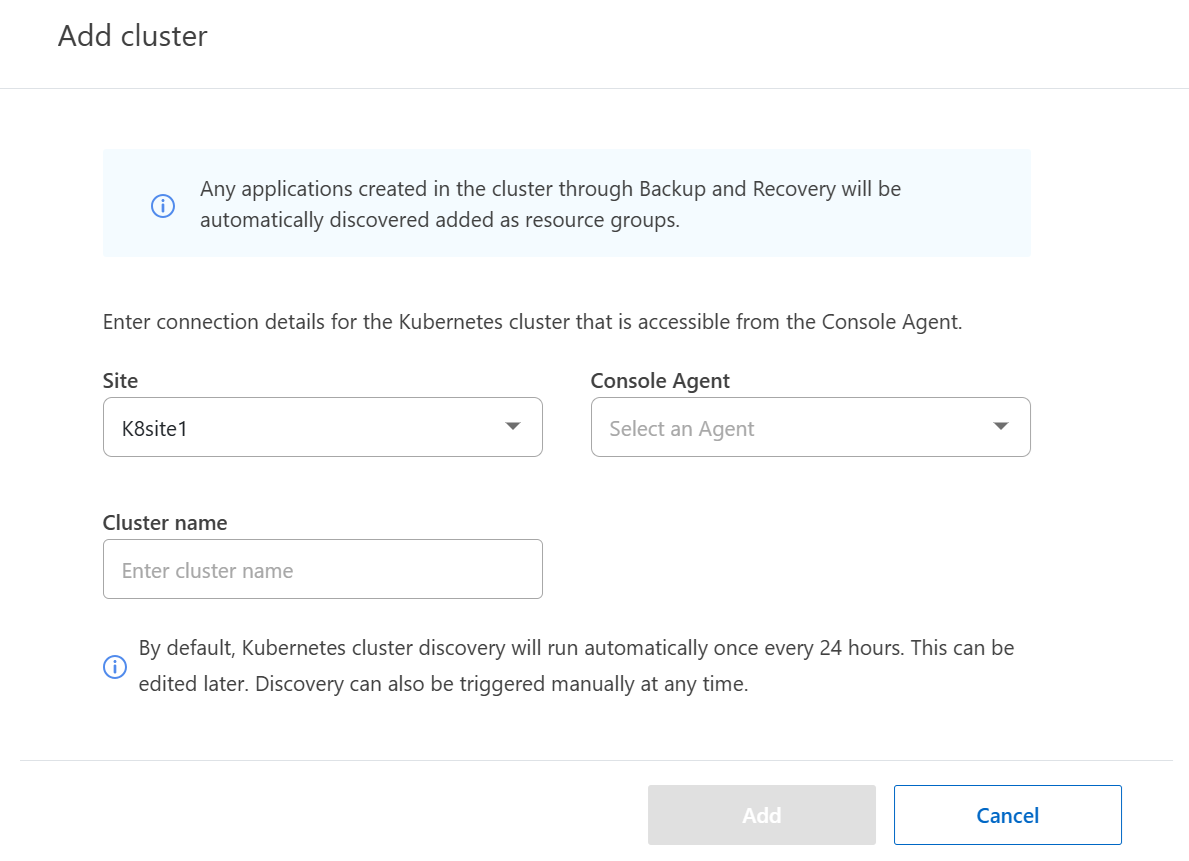
-
If you've installed Trident Protect on the cluster or the cluster is managed by Backup and Recovery, select Add.
If not, install Trident Protect
After adding resources, select Job Monitoring to track the progress.
Add subnet mapping for a vCenter site
You can manage IP addresses on failover operations using subnet mapping, which enables you to add subnets for each vCenter. When you do so, you define the IPv4 CIDR, the default gateway, and the DNS for each virtual network.
Upon failover, NetApp Disaster Recovery uses the mapped network's CIDR to assign each vNIC a new IP address.
For example:
-
NetworkA = 10.1.1.0/24
-
NetworkB = 192.168.1.0/24
VM1 has a vNIC (10.1.1.50) that is connected to NetworkA.
NetworkA is mapped to NetworkB in the replication plan settings.
Upon failover, NetApp Disaster Recovery replaces the Network portion of the original IP address (10.1.1) and keeps the host address (.50) of the original IP address (10.1.1.50). For VM1, NetApp Disaster Recovery looks at the CIDR settings for NetworkB and uses that the NetworkB network portion 192.168.1 while keeping the host portion (.50) to create the new IP address for VM1. The new IP becomes 192.168.1.50.
In summary, the host address stays the same, while the network address is replaced with whatever is configured in the site subnet mapping. This enables you to manage IP address reassignment upon failover more easily, especially if you have hundreds of networks and thousands of VMs to manage.
Using subnet mapping is an optional two-step process:
-
First, add the subnet mapping for each vCenter site.
-
Second, in the replication plan, indicate that you want to use subnet mapping in the Virtual Machines tab and Target IP field.
-
From the NetApp Disaster Recovery menu, select Sites.
-
From the Actions
 icon on the right, select Add subnet.
The Configure subnet page appears:
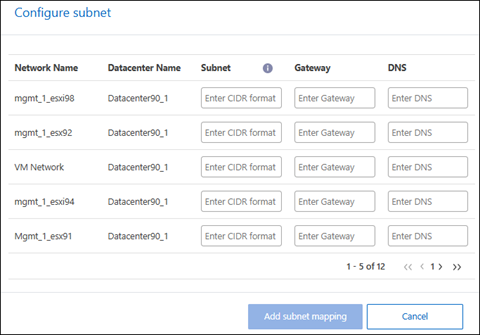
-
In the Configure subnet page, enter the following information:
-
Subnet: Enter the IPv4 CIDR for the subnet up to /32.
CIDR notation is a method of specifying IP addresses and their network masks. The /24 denotes the netmask. The number consists of an IP address with the number after the "/" indicating how many bits of the IP address denote the network. For example, 192.168.0.50/24, the IP address is 192.168.0.50 and the total number of bits in the network address is 24. 192.168.0.50 255.255.255.0 becomes 192.168.0.0/24. -
Gateway: Enter the default gateway for the subnet.
-
DNS: Enter the DNS for the subnet.
-
-
Select Add subnet mapping.
Select subnet mapping for a replication plan
When you create a replication plan, you can select the subnet mapping for the replication plan.
Using subnet mapping is an optional two-step process:
-
First, add the subnet mapping for each vCenter site.
-
Second, in the replication plan, indicate that you want to use subnet mapping.
-
From the NetApp Disaster Recovery menu, select Replication plans.
-
Select Add to add a replication plan.
-
Complete the fields in the usual way by adding the vCenter servers, selecting the resource groups or applications, and completing the mappings.
-
In the Replication plan > Resource mapping page, select the Virtual machines section.
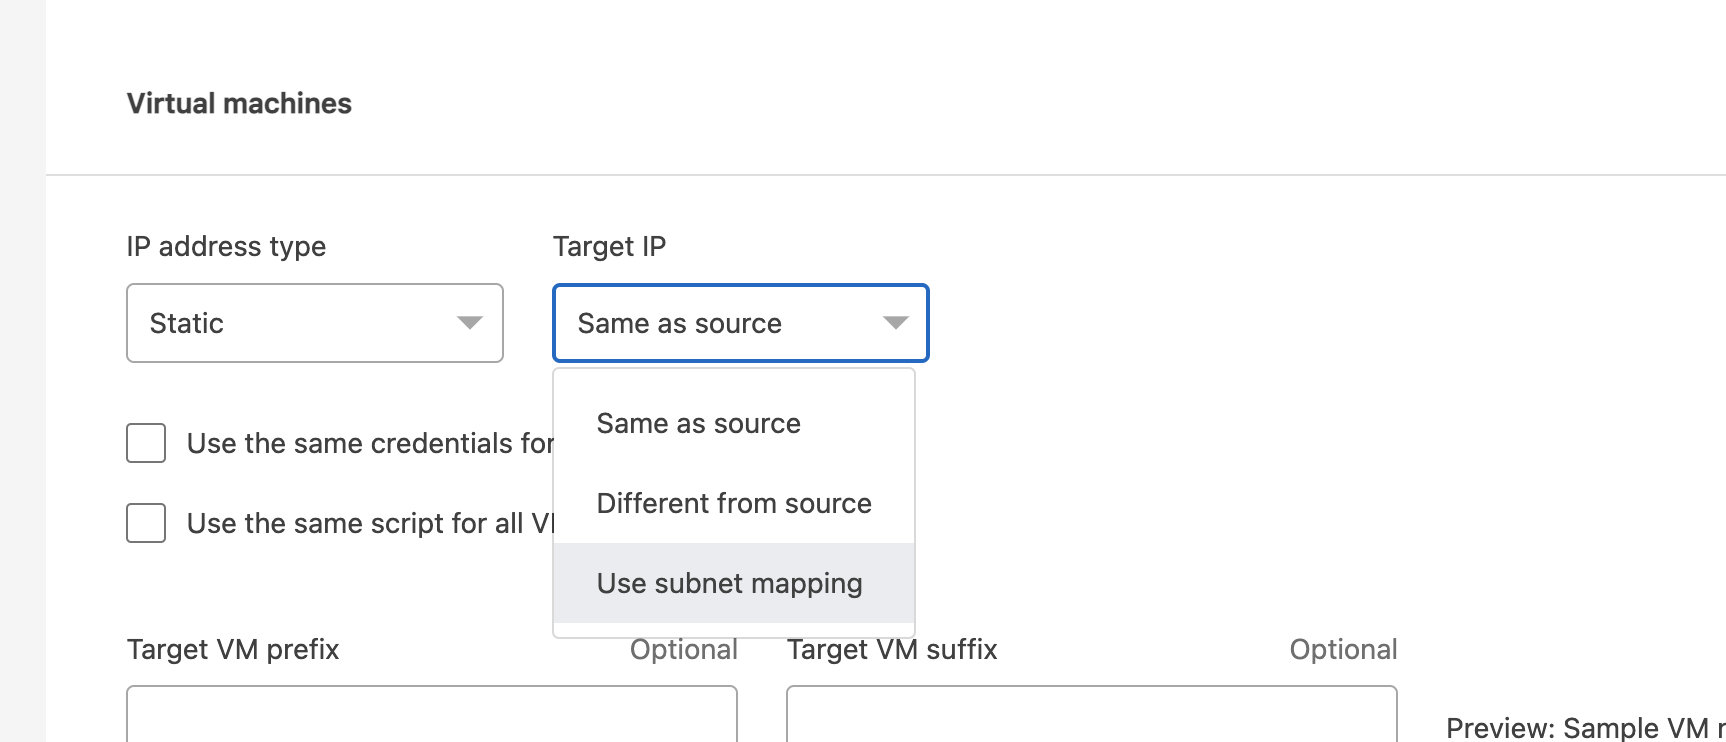
-
In the Target IP field, select Use subnet mapping from the drop-down list.
If there are two VMs (for example, one is Linux and the other is Windows), credentials are needed only for Windows. -
Continue with the creating the replication plan.
Edit the vCenter server site and customize the discovery schedule
You can edit the vCenter server site to customize the discovery schedule. For example, if you have a large number of VMs, you can set the discovery schedule to run every 23 hours and 59 minutes. If you have a small number of VMs, you can set the discovery schedule to run every 12 hours.
If you have vCenters from earlier versions and want to change when discovery runs, edit the vCenter server site and set the schedule.
If you don't want to schedule discovery, you can disable the scheduled discovery option and refresh the discovery manually at any time.
-
From the NetApp Disaster Recovery menu, select Sites.
-
Select the site you want to edit.
-
Select the Actions
icon on the right and select Edit. -
In the Settings window, edit the fields as needed.
-
To customize the discovery schedule, check the Enable scheduled discovery box. Select the date for discovery to begin and the interval of discovery in hours and minutes.
-
In the Edit vCenter server page, edit the fields as needed.
-
To customize the discovery schedule, check the Enable scheduled discovery box and select the date and time interval you want.

-
Select Save.
Refresh discovery manually
You can refresh the discovery manually at any time. This is useful if you have added or removed VMs and want to update the information in NetApp Disaster Recovery.
-
From the NetApp Disaster Recovery menu, select Sites.
-
Select the site you want to refresh.
-
Select the Actions
icon on the right and select Refresh.