Manage backup-to-object storage options in the Advanced Settings page
 Suggest changes


You can change cluster-level, backup-to-object storage settings that you set when activating BlueXP backup and recovery for each ONTAP system by using the Advanced Settings page. You can also modify some settings that are applied as "default" backup settings. This includes changing the transfer rate of backups to object storage, whether historical Snapshot copies are exported as backup files, and enabling or disabling ransomware scans for a working environment.

|
These settings are available for backup-to-object storage only. None of these settings affect your Snapshot or replication settings. Similar cluster-level replications settings for Snapshots and replications will be added in the future. |
You can change the following options in the Advanced Settings page:
-
Changing the network bandwidth allocated to upload backups to object storage using the Max Transfer Rate option
-
Changing whether historical Snapshot copies are exported as backup files and included in your initial baseline backup files for future volumes
-
Changing whether "yearly" snapshots are removed from the source system
-
Enabling or disabling ransomware scans for a working environment
View cluster-level backup settings
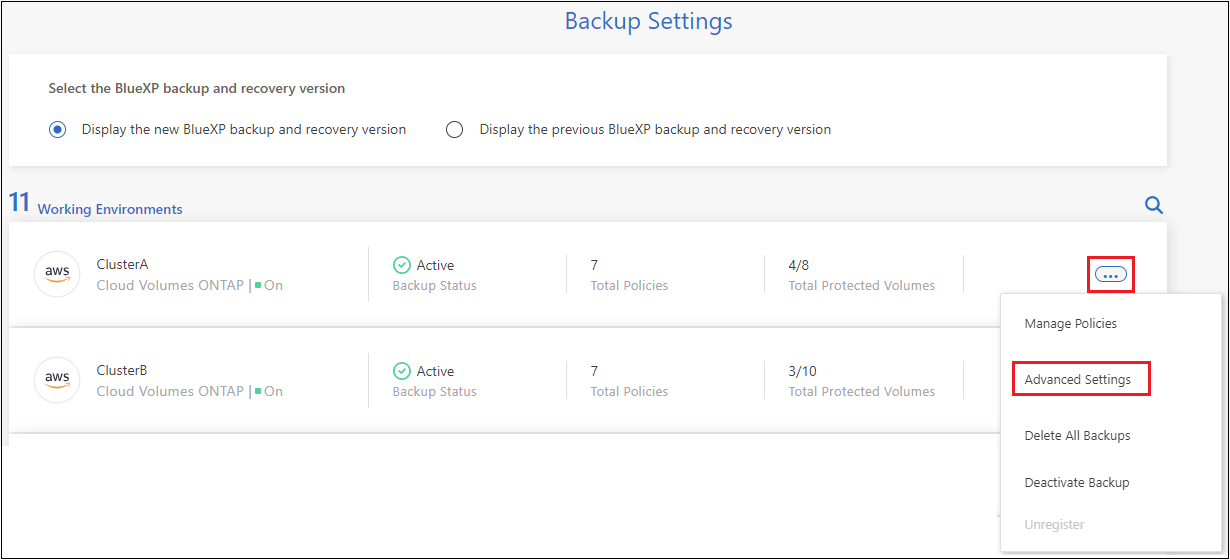
You can view the cluster-level backup settings for each working environment.
-
From the BlueXP menu, select Protection > Backup and recovery.
-
From the Volumes tab, select Backup Settings.

-
From the Backup Settings page, click
 for the working environment and select Advanced Settings.
The Advanced Settings page displays the current settings for that working environment.

-
Expand the option and make the change.
All backup operations after the change will use the new values.
Note that some options are unavailable based on the version of ONTAP on the source cluster, and based on the cloud provider destination where the backups reside.
Change the network bandwidth available to upload backups to object storage
When you activate BlueXP backup and recovery for a working environment, by default, ONTAP can use an unlimited amount of bandwidth to transfer the backup data from volumes in the working environment to object storage. If you notice that backup traffic is affecting normal user workloads, you can throttle the amount of network bandwidth that is used during the transfer using the Max Transfer Rate option in the Advanced Settings page.
-
From the Volumes tab, select Backup Settings.
-
From the Backup Settings page, click
 for the working environment and select Advanced Settings.
 -
In the Advanced Settings page, expand the Max Transfer Rate section.

-
Choose a value between 1 and 1,000 Mbps as the maximum transfer rate.
-
Select the Limited radio button and enter the maximum bandwidth that can be used, or select Unlimited to indicate that there is no limit.
-
Select Apply.
This setting does not affect the bandwidth allocated to any other replication relationships that may be configured for volumes in the working environment.
Change whether historical Snapshot copies are exported as backup files
If there are any local Snapshot copies for volumes that match the backup schedule label you're using in this working environment (for example, daily, weekly, etc.), you can export those historic snapshots to object storage as backup files. This enables you to initialize your backups in the cloud by moving older snapshot copies into the baseline backup copy.
Note that this option only applies to new backup files for new read/write volumes, and it is not supported with data protection (DP) volumes.
-
From the Volumes tab, select Backup Settings.
-
From the Backup Settings page, click
 for the working environment and select Advanced Settings.
 -
In the Advanced Settings page, expand the Export existing Snapshot copies section.

-
Select whether you want existing Snapshot copies to be exported.
-
Select Apply.
Change whether "yearly" snapshots are removed from the source system
When you select the "yearly" backup label for a backup policy for any of your volumes, the Snapshot copy that is created is very large. By default, these yearly snapshots are deleted automatically from the source system after being transferred to object storage. You can change this default behavior from the Yearly Snapshot Deletion section.
-
From the Volumes tab, select Backup Settings.
-
From the Backup Settings page, click
 for the working environment and select Advanced Settings.
 -
In the Advanced Settings page, expand the Yearly Snapshot Deletion section.

-
Select Disabled to retain the yearly snapshots on the source system.
-
Select Apply.
Enable or disable ransomware scans
Ransomware protection scans are enabled by default. The default setting for the scan frequency is for 7 days. The scan occurs only on the latest Snapshot copy. You can enable or disable ransomware scans on the latest Snapshot copy by using the option on the Advanced Settings page. If you enable it, scans are performed every 7 days by default.

|
Enabling ransomware scans will incur extra charges depending on the cloud provider. |
Refer to Manage policies for details about managing policies that implement ransomware detection.
-
From the Volumes tab, select Backup Settings.
-
From the Backup Settings page, click
 for the working environment and select Advanced Settings.
 -
In the Advanced Settings page, expand the Ransomware scan section.
-
Enable or disable Ransomware Scan.


 Release notes