

 Release notes
Manage data brokers
 Suggest changes
A data broker syncs data from a source location to a target location. A data broker is required for each sync relationship that you create. Manage data brokers by adding a new data broker to a group, by viewing information about data brokers, and more.
Data broker groups
Grouping data brokers together can help improve the performance of sync relationships.
Determining the number of data brokers
In many cases, a single data broker can meet the performance requirements for a sync relationship. If it doesn’t, you can accelerate sync performance by adding additional data brokers to the group. But you should first check other factors that can impact sync performance. Learn more about how to determine when multiple data brokers are required.
Groups can manage several relationships
A data broker group can manage one or more sync relationships at a time.
For example, let's say you have three relationships:
-
Relationship 1 uses data broker A
-
Relationship 2 uses data broker B
-
Relationship 3 uses data broker A
You want to accelerate the performance of relationship 1 so you add a new data broker (data broker C) to the group. Because data broker A is also used to manage relationship 3, having two data brokers in the group also accelerates the performance of this relationship.
Supported types of data broker in a group
A data broker group can consist of one or more AWS, Azure, or GCP data brokers and one or more on-prem data brokers. A group can't consist of a mixture of AWS, Azure, and GCP data brokers. For example, a group can have two AWS data brokers and on on-prem data broker, but not one AWS data broker and one Azure data broker.
New data brokers only
You can only add new data brokers to a group. You can't add existing data brokers to a group.
Add a new data broker
There are several ways to create a new data broker:
-
When creating a new sync relationship
-
From the Manage Data Brokers page by clicking Add New Data Broker which creates the data broker in a new group
-
From the Manage Data Brokers page by creating a new data broker in an existing group
-
You can't add data brokers to a group that manages an encrypted sync relationship.
-
If you want to create a data broker in an existing group, the data broker must be an on-prem data broker or the same type of data broker.
For example, if a group includes an AWS data broker, then you can create an AWS data broker or on-prem data broker in that group. You can't create an Azure data broker or GCP data broker because they aren't the same data broker type.
-
Click Sync > Manage Data Brokers.
-
Click Add New Data Broker.
-
Follow the prompts to create the data broker.
For help, refer to the following pages:
-
Click Manage Data Brokers.
-
Click the action menu and select Edit Group Name.

-
Follow the prompts to create the data broker.
For help, refer to the following pages:
View a data broker's configuration
You might want to view details about a data broker to identify things like its host name, IP address, available CPU and RAM, and more.
Cloud Sync provides the following details about a data broker:
-
Basic information: Instance ID, host name, etc.
-
Network: Region, network, subnet, private IP, etc.
-
Software: Linux distribution, data broker version, etc.
-
Hardware: CPU and RAM
-
Configuration: Details about the data broker's two kinds of main processes—scanner and transferrer

The scanner scans the source and target and decides what should be copied. The transferrer does the actual copying. NetApp personnel might use these configuration details to suggest actions that can optimize performance.
-
Click Manage Data Brokers.
-
Click
 to expand the list of data brokers in a group.
 -
Click
to view details about a data broker.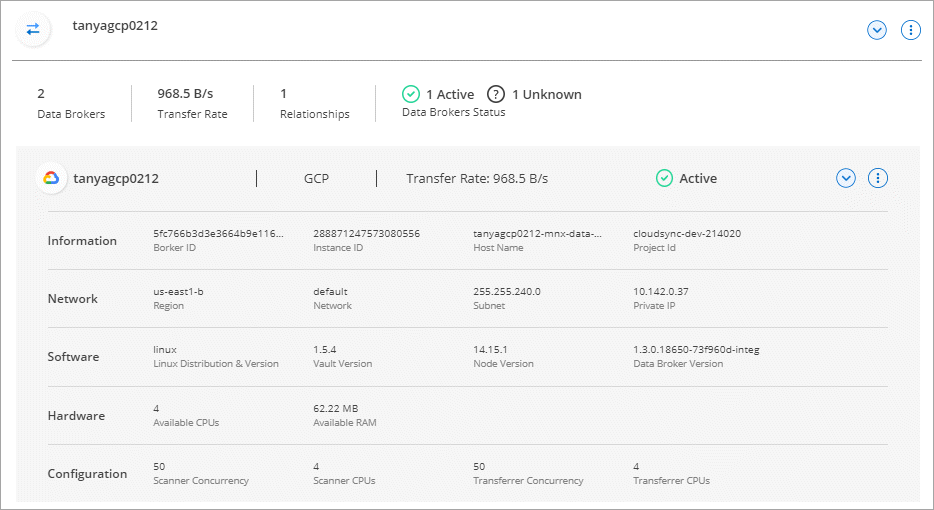
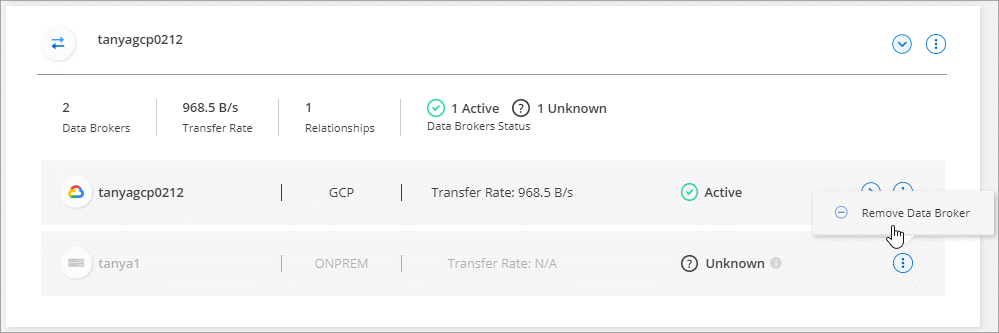
Remove a data broker from a group
You might remove a data broker from a group if it's no longer needed or if the initial deployment failed. This action only deletes the data broker from Cloud Sync's records. You'll need to manually delete the data broker and any additional cloud resources yourself.
-
Cloud Sync deletes a group when you remove the last data broker from the group.
-
You can't remove the last data broker from a group if there is a relationship using that group.
-
Click Manage Data Brokers.
-
Click
to expand the list of data brokers in a group. -
Click the action menu for a data broker and select Remove Data Broker.
-
Click Remove Data Broker.
Cloud Sync removes the data broker from the group.
Edit a group's name
Change the name of a data broker group at any time.
-
Click Manage Data Brokers.
-
Click the action menu and select Edit Group Name.

-
Enter a new name and click Save.
Cloud Sync updates the name of the data broker group.
Address issues with a data broker
Cloud Sync displays a status for each data broker that can help you troubleshoot issues.
-
Identify any data brokers that have a status of "Unknown" or "Failed."
-
Hover over the
 to see the failure reason.
 -
Correct the issue.
For example, you might need to simply restart the data broker if it's offline, or you might need to remove data broker if the initial deployment failed.
Defining a unified configuration for a data broker group
If a sync relationship encounters errors during the sync process, unifying the concurrency of the data broker group can help to decrease the number of sync errors. Be aware that changes to the group's configuration can affect performance by slowing down the transfer.
We don't recommend changing the configuration on your own. You should consult with NetApp to understand when to change the configuration and how to change it.
-
Click Manage Data Brokers.
-
Click the Settings icon for a data broker group.
-
Change the settings as needed and then click Unify Configuration.
Note the following:
-
You can pick and choose which settings to change—you don't need to change all four at once.
-
After a new configuration is sent to a data broker, the data broker automatically restarts and uses the new configuration.
-
It can take up to a minute until this change takes place and is visible in the Cloud Sync interface.
-
If a data broker isn't running, it's configuration won't change because Cloud Sync can't communicate with it. The configuration will change after the data broker restarts.
-
After you set a unified configuration, any new data brokers will automatically use the new configuration.
-