

 Release notes
Syncing NFS data using data-in-flight encryption
 Suggest changes
If your business has strict security policies, you can sync NFS data using data-in-flight encryption. This feature is supported from an NFS server to another NFS server and from Azure NetApp Files to Azure NetApp Files.
For example, you might want to sync data between two NFS servers that are in different networks. Or you might need to securely transfer data on Azure NetApp Files across subnets or regions.
How data-in-flight encryption works
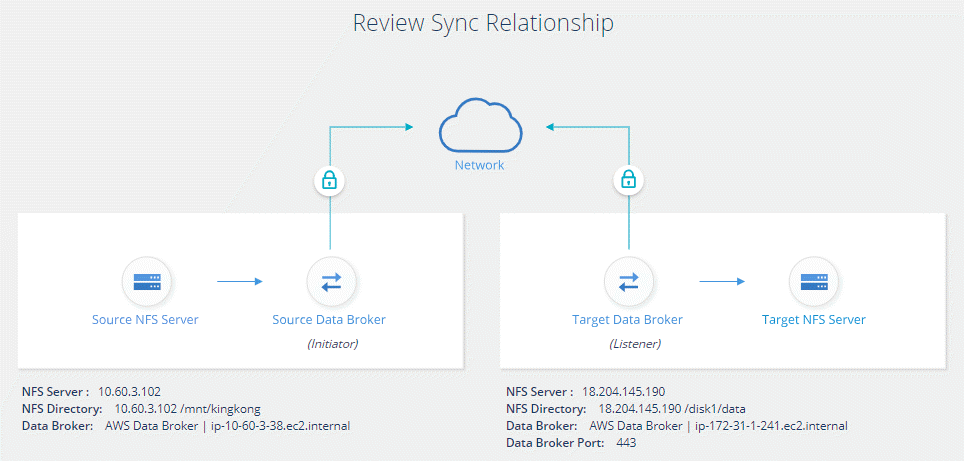
Data-in-flight encryption encrypts NFS data when it's sent over the network between two data brokers. The following image shows a relationship between two NFS servers and two data brokers:
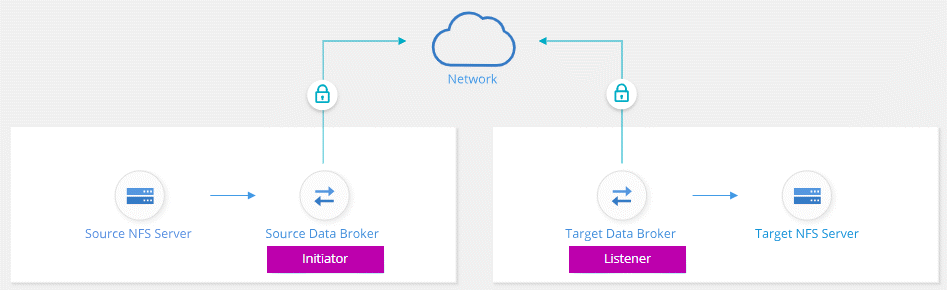
One data broker functions as the initiator. When it’s time to sync data, it sends a connection request to the other data broker, which is the listener. That data broker listens for requests on port 443. You can use a different port, if needed, but be sure to check that the port is not in use by another service.
For example, if you sync data from an on-premises NFS server to a cloud-based NFS server, you can choose which data broker listens for the connection requests and which sends them.
Here's how in-flight encryption works:
-
After you create the sync relationship, the initiator starts an encrypted connection with the other data broker.
-
The source data broker encrypts data from the source using TLS 1.3.
-
It then sends the data over the network to the target data broker.
-
The target data broker decrypts the data before sending it to the target.
-
After the initial copy, the service syncs any changed data every 24 hours. If there is data to sync, the process starts with the initiator opening an encrypted connection with the other data broker.
If you prefer to sync data more frequently, you can change the schedule after you create the relationship.
Supported NFS versions
-
For NFS servers, data-in-flight encryption is supported with NFS versions 3, 4.0, 4.1, and 4.2.
-
For Azure NetApp Files, data-in-flight encryption is supported with NFS versions 3 and 4.1.
Proxy server limitation
If you create an encrypted sync relationship, the encrypted data is sent over HTTPS and isn't routable through a proxy server.
What you'll need to get started
Be sure to have the following:
-
Two NFS servers that meet source and target requirements or Azure NetApp Files in two subnets or regions.
-
The IP addresses or fully qualified domain names of the servers.
-
Network locations for two data brokers.
You can select an existing data broker but it must function as the initiator. The listener data broker must be a new data broker.
If you have not yet deployed a data broker, review the data broker requirements. Because you have strict security policies, be sure to review the networking requirements, which includes outbound traffic from port 443 and the internet endpoints that the data broker contacts.
Syncing NFS data using data-in-flight encryption
Create a new sync relationship between two NFS servers or between Azure NetApp Files, enable the in-flight encryption option, and follow the prompts.
-
Log in to NetApp Cloud Central and select Cloud Sync.
-
Click Create New Sync Relationship.
-
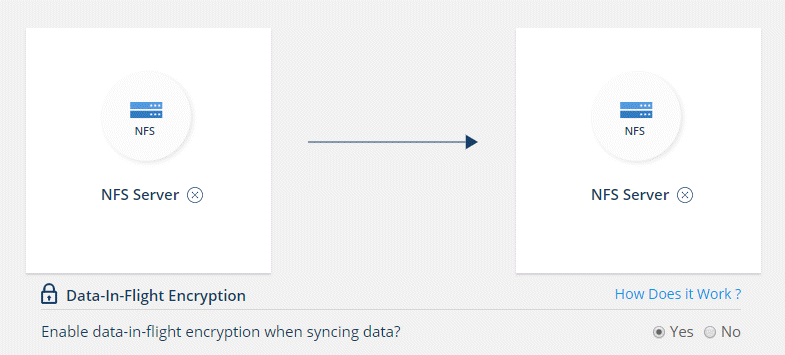
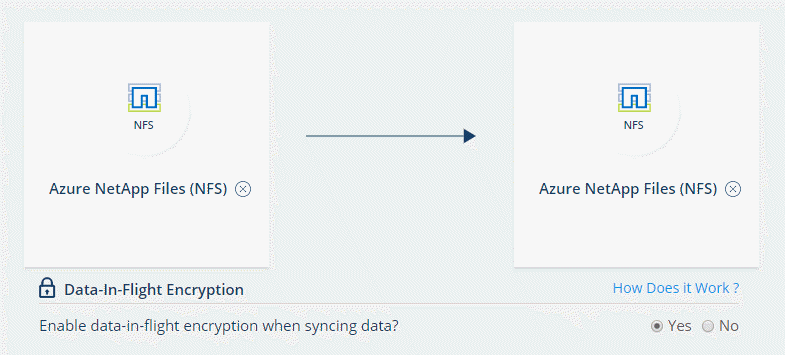
Drag and drop NFS Server to the source and target locations or Azure NetApp Files to the source and target locations and select Yes to enable data-in-flight encryption.
The following image shows what you'd select to sync data between two NFS servers:
The following image shows what you'd select to sync data between Azure NetApp Files:
-
Follow the prompts to create the relationship:
-
NFS Server/Azure NetApp Files: Choose the NFS version and then specify a new NFS source or select an existing server.
-
Define Data Broker Functionality: Define which data broker listens for connection requests on a port and which one initiates the connection. Make your choice based on your networking requirements.
-
Data Broker: Follow the prompts to add a new source data broker or select an existing data broker.
If the source data broker acts as the listener, then it must be a new data broker.
If you need a new data broker, Cloud Sync prompts you with the installation instructions. You can deploy the data broker in the cloud or download an installation script for your own Linux host.

-
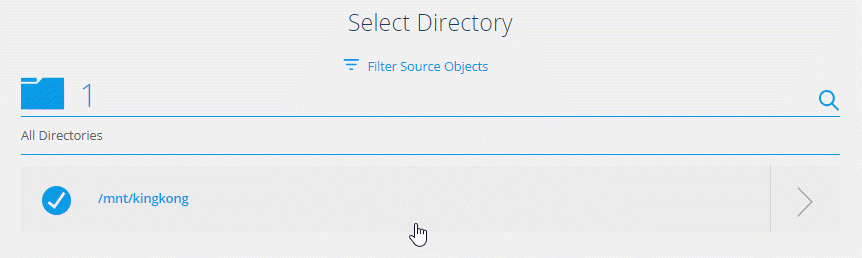
Directories: Choose the directories that you want to sync by selecting all directories, or by drilling down and selecting a subdirectory.
Click Filter Source Objects to modify settings that define how source files and folders are synced and maintained in the target location.
-
Target NFS Server/Target Azure NetApp Files: Choose the NFS version and then enter a new NFS target or select an existing server.
-
Target Data Broker: Follow the prompts to add a new source data broker or select an existing data broker.
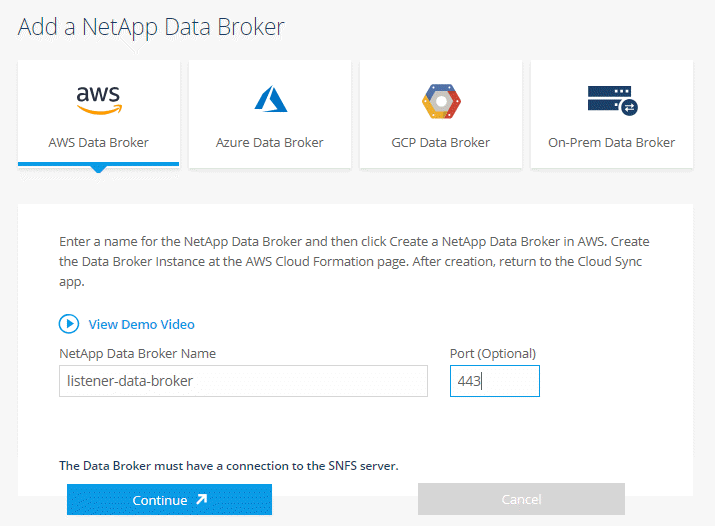
If the target data broker acts as the listener, then it must be a new data broker.
Here's an example of the prompt when the target data broker functions as the listener. Notice the option to specify the port.
-
Target Directories: Select a top-level directory, or drill down to select an existing subdirectory or to create a new folder inside an export.
-
Settings: Define how source files and folders are synced and maintained in the target location.
-
Review: Review the details of the sync relationship and then click Create Relationship.
-
Cloud Sync starts creating the new sync relationship. When it's done, click View in Dashboard to view details about the new relationship.