

 Release notes
Manage your BlueXP account
 Suggest changes
When you create a BlueXP account, it only includes a single admin user and a workspace. You can manage the account to fit your organization's needs by adding users, creating service accounts for automation purposes, by adding workspaces, and more.
Manage your account with the Tenancy API
If you want to manage your account settings by sending API requests, then you'll need to use the Tenancy API. This API is different than the BlueXP API, which you use to create and manage Cloud Volumes ONTAP working environments.
Create and manage users
The user's in your account can access and manage the resources in specific workspaces.
Add users
Associate users with your BlueXP account so those users can create and manage working environments in BlueXP.
-
If the user hasn't already done so, ask the user to go to NetApp BlueXP website and sign up.
-
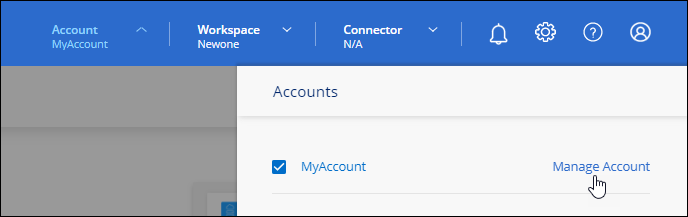
From the top of BlueXP, select the Account drop-down.

-
select Manage Account next to the currently selected account.
-
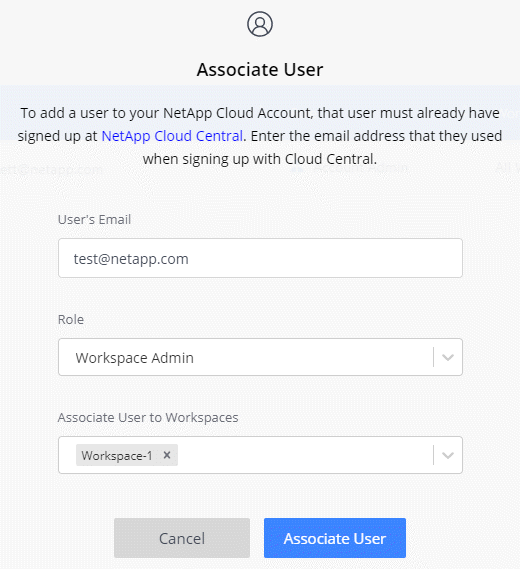
From the Members tab, select Associate User.
-
Enter the user's email address and select a role for the user:
-
Account Admin: Can perform any action in BlueXP.
-
Workspace Admin: Can create and manage resources in assigned workspaces.
-
Compliance Viewer: Can only view compliance information for BlueXP classification and generate reports for workspaces that they have permission to access.
-
-
If you selected Workspace Admin or Compliance Viewer, select one or more workspaces to associate with that user.
-
Select Associate.
The user should receive an email from NetApp BlueXP titled "Account Association." The email includes the information needed to access BlueXP.
Remove users
Disassociating a user makes it so they can no longer access the resources in a BlueXP account.
-
From the top of BlueXP, select the Account drop-down and select Manage Account.
-
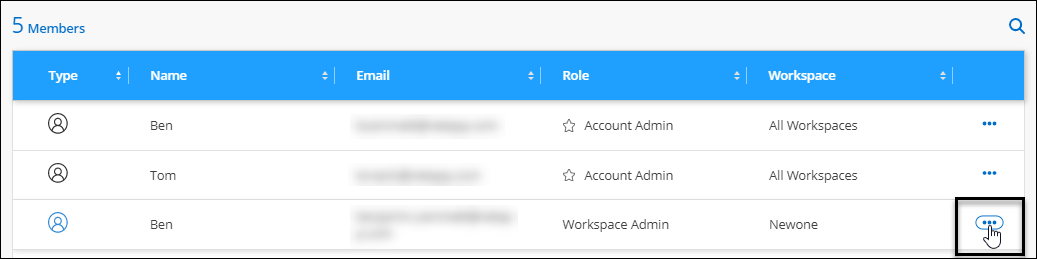
From the Members tab, select the action menu in the row that corresponds to the user.
-
Select Disassociate User and select Disassociate to confirm.
The user can no longer access the resources in this BlueXP account.
Manage a Workspace Admin's workspaces
You can associate and disassociate Workspace Admins with workspaces at any time. Associating the user enables them to create and view the working environments in that workspace.

|
You also need to associate the Connector with workspaces so Workspace Admins can access those workspaces from BlueXP. Learn how to manage a Connector's workspaces. |
-
From the top of BlueXP, select the Account drop-down and select Manage Account.
-
From the Members tab, select the action menu in the row that corresponds to the user.
-
Select Manage Workspaces.
-
Select the workspaces to associate with the user and select Apply.
The user can now access those workspaces from BlueXP, as long as the Connector was also associated with the workspaces.
Create and manage service accounts
A service account acts as a "user" that can make authorized API calls to BlueXP for automation purposes. This makes it easier to manage automation because you don't need to build automation scripts based on a real person's user account who can leave the company at any time.
You give permissions to a service account by assigning it a role, just like any other BlueXP user. You can also associate the service account with specific workspaces in order to control the working environments (resources) that the service can access.
When you create the service account, BlueXP enables you to copy or download a client ID and client secret for the service account. This key pair is used for authentication with BlueXP.
Note that a refresh token is not required for API operations when using a service account. Learn about refresh tokens
Create a service account
Create as many service accounts as you need to manage the resources in your working environments.
-
From the top of BlueXP, select the Account drop-down.
-
Select Manage Account next to the currently selected account.
-
From the Members tab, select Create Service Account.
-
Enter a name and select a role. If you chose a role other than Account Admin, choose the workspace to associate with this service account.
-
Select Create.
-
Copy or download the client ID and client secret.
The client secret is visible only once and is not stored anywhere by BlueXP. Copy or download the secret and store it safely.
-
Select Close.
Obtain a bearer token for a service account
In order to make API calls to the Tenancy API, you'll need to obtain a bearer token for a service account.
Copy the client ID
You can copy a service account's client ID at any time.
-
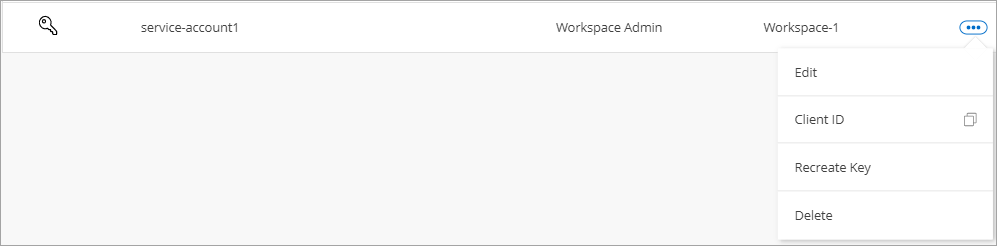
From the Members tab, select the action menu in the row that corresponds to the service account.
-
Select Client ID.
-
The ID is copied to your clipboard.
Recreate keys
Recreating the key will delete the existing key for this service account and then create a new key. You won't be able to use the previous key.
-
From the Members tab, select the action menu in the row that corresponds to the service account.
-
Select Recreate Key.
-
Select Recreate to confirm.
-
Copy or download the client ID and client secret.
The client secret is visible only once and is not stored anywhere by BlueXP. Copy or download the secret and store it safely.
-
Select Close.
Delete a service account
Delete a service account if you no longer need to use it.
-
From the Members tab, select the action menu in the row that corresponds to the service account.
-
Select Delete.
-
Select Delete again to confirm.
Manage workspaces
Manage your workspaces by creating, renaming, and deleting them. Note that you can't delete a workspace if it contains any resources. It must be empty.
-
From the top of BlueXP, select the Account drop-down and select Manage Account.
-
Select Workspaces.
-
Choose one of the following options:
-
Select Add New Workspace to create a new workspace.
-
Select Rename to rename the workspace.
-
Select Delete to delete the workspace.
If you created a new workspace, you must also add the Connector to that workspace. If you don't add the Connector, then Workspace Admins can't access any of the resources in the workspace. Refer to the following section for more details.
-
Manage a Connector's workspaces
You need to associate the Connector with workspaces so Workspace Admins can access those workspaces from BlueXP.
If you only have Account Admins, then associating the Connector with workspaces isn't required. Account Admins have the ability to access all workspaces in BlueXP by default.
-
From the top of BlueXP, select the Account drop-down and select Manage Account.
-
Select Connector.
-
Select Manage Workspaces for the Connector that you want to associate.
-
Select the workspaces to associate with the Connector and select Apply.
Change your account name
Change your account name at any time to change it to something meaningful for you.
-
From the top of BlueXP, select the Account drop-down and select Manage Account.
-
In the Overview tab, select the edit icon next to the account name.
-
Type a new account name and select Save.
Allow private previews
Allow private previews in your account to get access to new services that are made available as a preview in BlueXP.
Services in private preview are not guaranteed to behave as expected and might sustain outages and be missing functionality.
-
From the top of BlueXP, select the Account drop-down and select Manage Account.
-
In the Overview tab, enable the Allow Private Preview setting.
Allow third-party services
Allow third-party services in your account to get access to third-party services that are available in BlueXP. Third-party services are cloud services similar to the services that NetApp offers, but they're managed and supported by third-party companies.
-
From the top of BlueXP, select the Account drop-down and select Manage Account.
-
In the Overview tab, enable the Allow Third Party Services setting.