

Install Astra Control Center with a Cloud Volumes ONTAP storage backend
 Suggest changes
With Astra Control Center, you can manage your apps in a hybrid cloud environment with self-managed Kubernetes clusters and Cloud Volumes ONTAP instances. You can deploy Astra Control Center in your on-premises Kubernetes clusters or in one of the self-managed Kubernetes clusters in the cloud environment.
With one of these deployments, you can perform app data management operations using Cloud Volumes ONTAP as a storage backend. You can also configure an S3 bucket as the backup target.
To install Astra Control Center in Amazon Web Services (AWS), Google Cloud Platform (GCP) and Microsoft Azure with a Cloud Volumes ONTAP storage backend, perform the following steps depending on your cloud environment.
You can manage your apps in distributions with self-managed Kubernetes clusters, such with OpenShift Container Platform (OCP). Only self-managed OCP clusters are validated for deploying Astra Control Center.
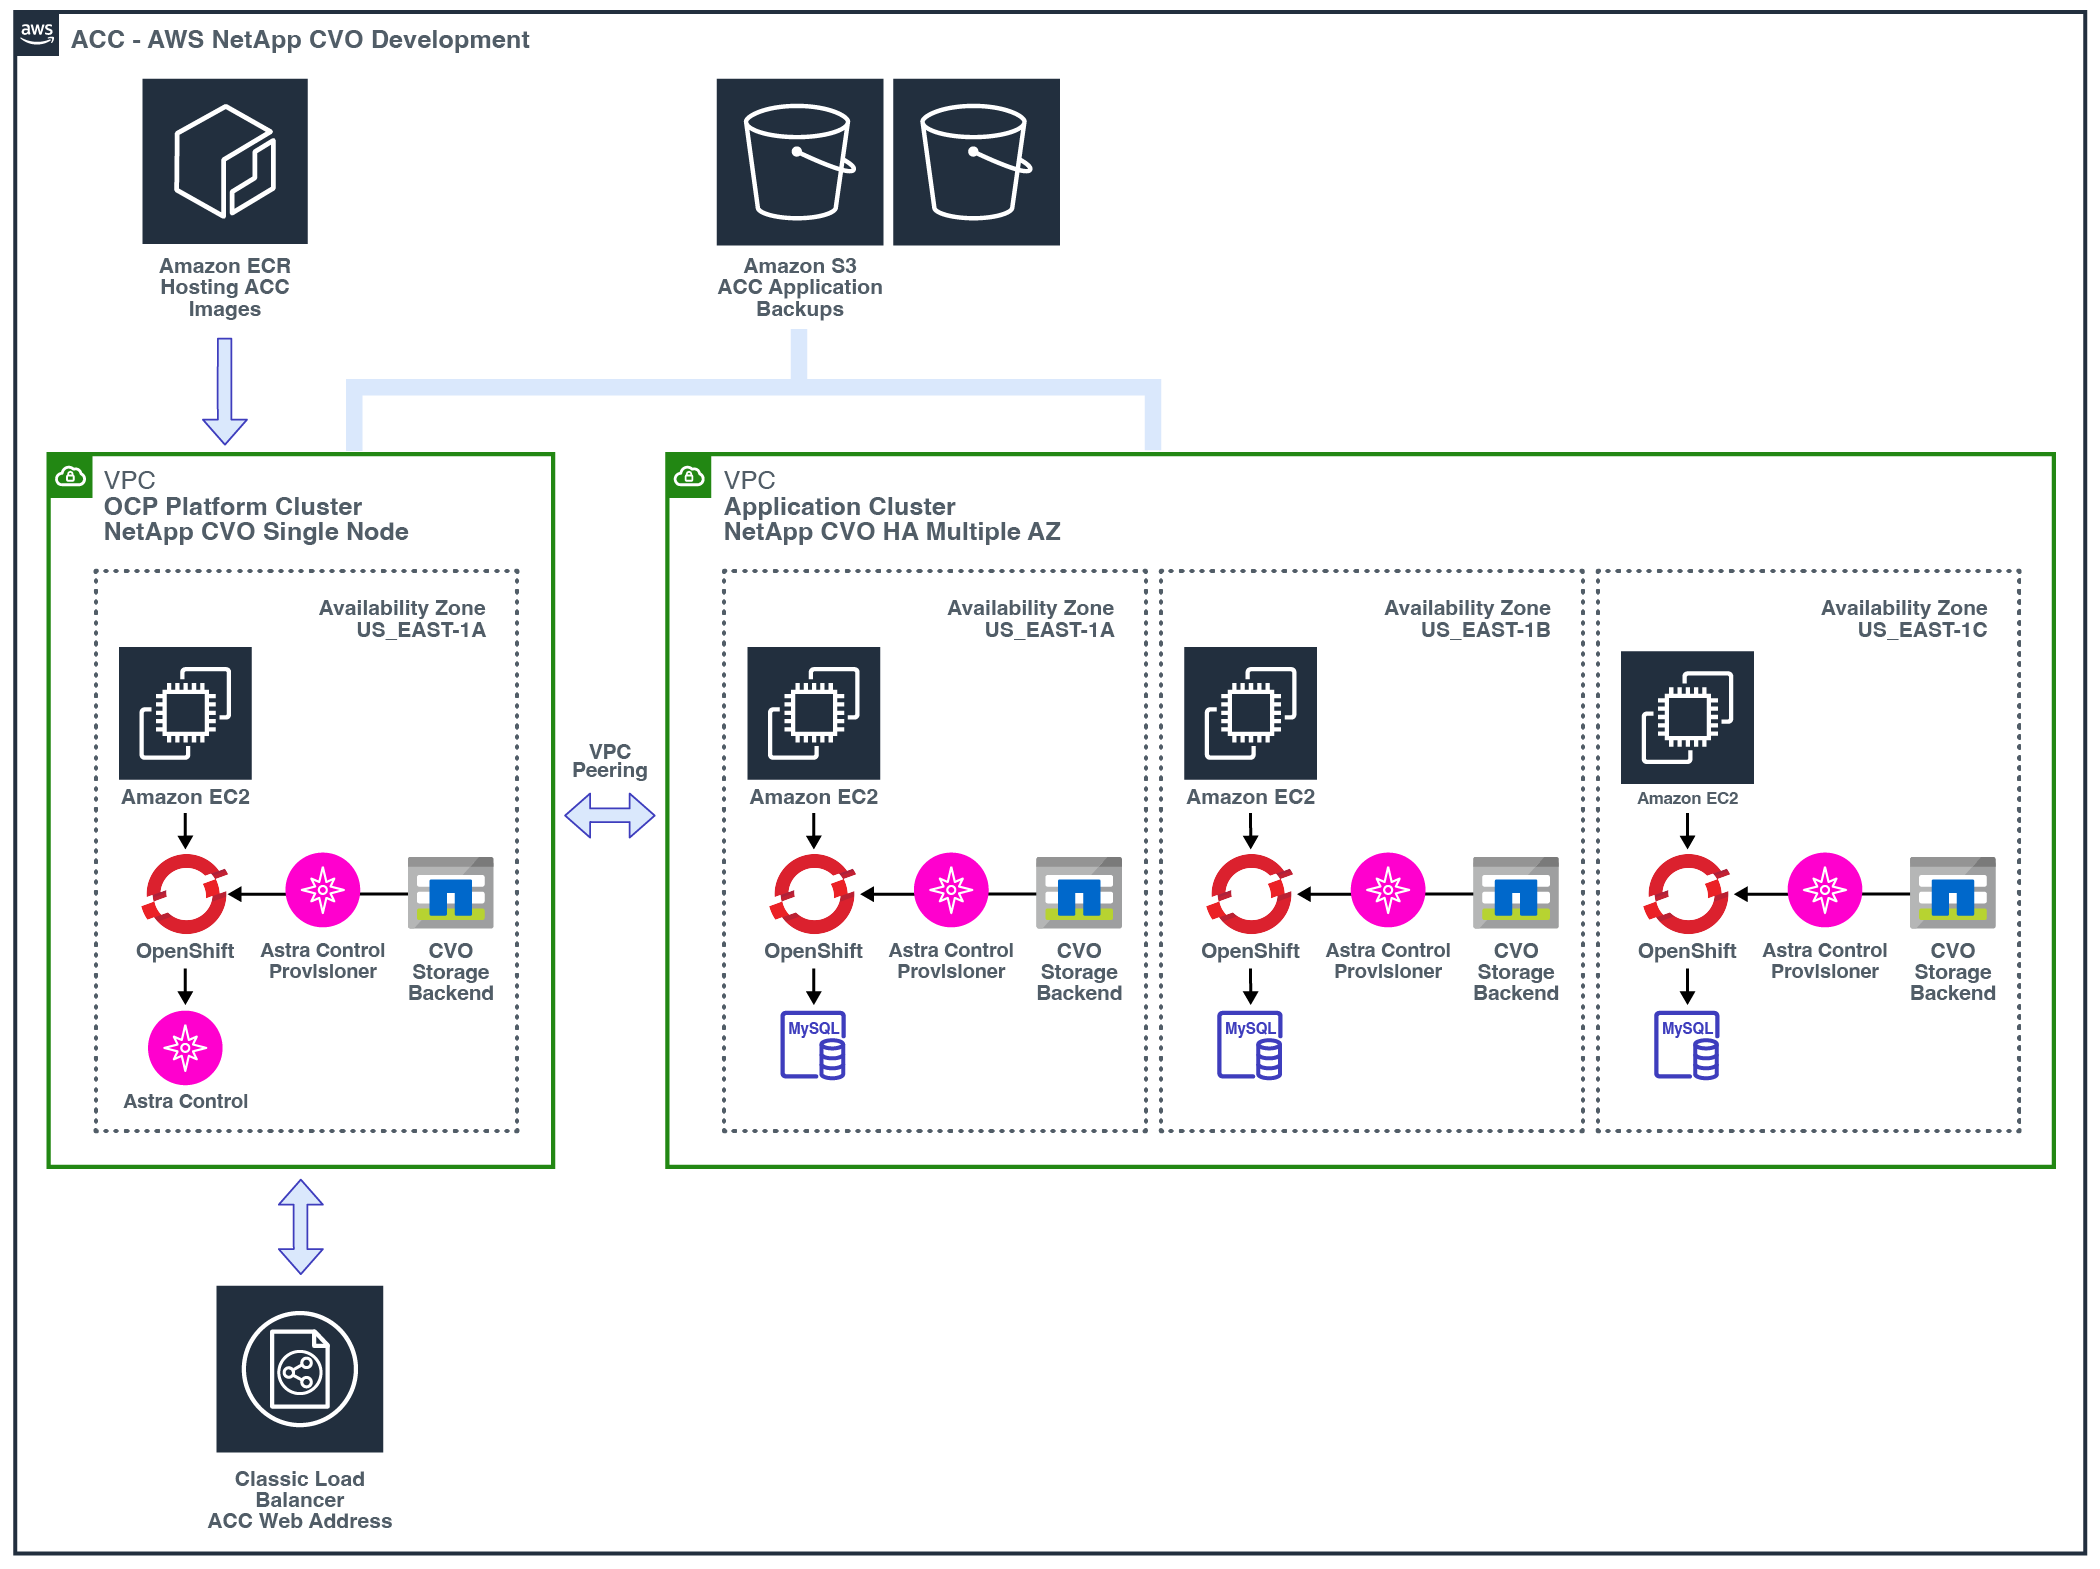
Deploy Astra Control Center in Amazon Web Services
You can deploy Astra Control Center on a self-managed Kubernetes cluster hosted on an Amazon Web Services (AWS) public cloud.
What you'll need for AWS
Before you deploy Astra Control Center in AWS, you'll need the following items:
-
Astra Control Center license. Refer to Astra Control Center licensing requirements.
-
NetApp Cloud Central account
-
If using OCP, Red Hat OpenShift Container Platform (OCP) permissions (on namespace level to create pods)
-
AWS credentials, Access ID and Secret Key with permissions that enable you to create buckets and connectors
-
AWS account Elastic Container Registry (ECR) access and login
-
AWS hosted zone and Amazon Route 53 entry required to access the Astra Control UI
Operational environment requirements for AWS
Astra Control Center requires the following operational environment for AWS:
-
Red Hat OpenShift Container Platform 4.11 through 4.13
Ensure that the operating environment you choose to host Astra Control Center meets the basic resource requirements outlined in the environment's official documentation.
Astra Control Center requires specific resources in addition to the environment's resource requirements. Refer to Astra Control Center operational environment requirements.

|
The AWS registry token expires in 12 hours, after which you'll have to renew the Docker image registry secret. |
Overview of deployment for AWS
Here is an overview of the process to install Astra Control Center for AWS with Cloud Volumes ONTAP as a storage backend.
Each of these steps is explained in more detail below.
Ensure that you have sufficient IAM permissions
Ensure that you have sufficient IAM roles and permissions that enable you to install a RedHat OpenShift cluster and a NetApp BlueXP (formerly Cloud Manager) Connector.
Install a RedHat OpenShift cluster on AWS
Install a RedHat OpenShift Container Platform cluster on AWS.
For installation instructions, see Installing a cluster on AWS in OpenShift Container Platform.
Configure AWS
Next, configure AWS to create a virtual network, set up EC2 compute instances, and create an AWS S3 bucket. If you cannot access the NetApp Astra Control Center image registry, you'll also need to create an Elastic Container Registry (ECR) to host the Astra Control Center images, and push the images to this registry.
Follow the AWS documentation to complete the following steps. See AWS installation documentation.
-
Create an AWS virtual network.
-
Review the EC2 compute instances. This can be a bare metal server or VMs in AWS.
-
If the instance type does not already match the Astra minimum resource requirements for master and worker nodes, change the instance type in AWS to meet the Astra requirements. Refer to Astra Control Center requirements.
-
Create at least one AWS S3 bucket to store your backups.
-
(Optional) If you cannot access the NetApp image registry, do the following:
-
Create an AWS Elastic Container Registry (ECR) to host all the Astra Control Center images.
If you do not create the ECR, Astra Control Center cannot access monitoring data from a cluster containing Cloud Volumes ONTAP with an AWS backend. The issue is caused when the cluster you try to discover and manage using Astra Control Center does not have AWS ECR access. -
Push the Astra Control Center images to your defined registry.
-
|
|
The AWS Elastic Container Registry (ECR) token expires after 12 hours and causes cross-cluster clone operations to fail. This issue occurs when managing a storage backend from Cloud Volumes ONTAP configured for AWS. To correct this issue, authenticate with the ECR again and generate a new secret for clone operations to resume successfully. |
Here's an example of an AWS deployment:
Configure NetApp BlueXP for AWS
Using NetApp BlueXP (formerly Cloud Manager), create a workspace, add a connector to AWS, create a working environment, and import the cluster.
Follow the BlueXP documentation to complete the following steps. See the following:
-
Add your credentials to BlueXP.
-
Create a workspace.
-
Add a connector for AWS. Choose AWS as the Provider.
-
Create a working environment for your cloud environment.
-
Location: "Amazon Web Services (AWS)"
-
Type: "Cloud Volumes ONTAP HA"
-
-
Import the OpenShift cluster. The cluster will connect to the working environment you just created.
-
View the NetApp cluster details by selecting K8s > Cluster list > Cluster Details.
-
In the upper right corner, note the Astra Control Provisioner version.
-
Note the Cloud Volumes ONTAP cluster storage classes showing NetApp as the provisioner.
This imports your Red Hat OpenShift cluster and assigns it a default storage class. You select the storage class.
Astra Control Provisioner is automatically installed as part of the import and discovery process.
-
-
Note all the persistent volumes and volumes in this Cloud Volumes ONTAP deployment.

|
Cloud Volumes ONTAP can operate as a single node or in High Availability. If HA is enabled, note the HA status and node deployment status running in AWS. |
Install Astra Control Center for AWS
Follow the standard Astra Control Center installation instructions.
|
|
AWS uses the Generic S3 bucket type. |
Deploy Astra Control Center in Google Cloud Platform
You can deploy Astra Control Center on a self-managed Kubernetes cluster hosted on a Google Cloud Platform (GCP) public cloud.
What you'll need for GCP
Before you deploy Astra Control Center in GCP, you'll need the following items:
-
Astra Control Center license. Refer to Astra Control Center licensing requirements.
-
NetApp Cloud Central account
-
If using OCP, Red Hat OpenShift Container Platform (OCP) 4.11 through 4.13
-
If using OCP, Red Hat OpenShift Container Platform (OCP) permissions (on namespace level to create pods)
-
GCP Service Account with permissions that enable you to create buckets and connectors
Operational environment requirements for GCP
Ensure that the operating environment you choose to host Astra Control Center meets the basic resource requirements outlined in the environment's official documentation.
Astra Control Center requires specific resources in addition to the environment's resource requirements. Refer to Astra Control Center operational environment requirements.
Overview of deployment for GCP
Here is an overview of the process to install Astra Control Center on a self-managed OCP cluster in GCP with Cloud Volumes ONTAP as a storage backend.
Each of these steps is explained in more detail below.
Install a RedHat OpenShift cluster on GCP
The first step is to install a RedHat OpenShift cluster on GCP.
For installation instructions, see the following:
Create a GCP Project and Virtual Private Cloud
Create at least one GCP Project and Virtual Private Cloud (VPC).
|
|
OpenShift might create its own resource groups. In addition to these, you should also define a GCP VPC. Refer to OpenShift documentation. |
You might want to create a platform cluster resource group and a target app OpenShift cluster resource group.
Ensure that you have sufficient IAM permissions
Ensure that you have sufficient IAM roles and permissions that enable you to install a RedHat OpenShift cluster and a NetApp BlueXP (formerly Cloud Manager) Connector.
Configure GCP
Next, configure GCP to create a VPC, set up compute instances, and create a Google Cloud Object Storage. If you cannot access the NetApp Astra Control Center image registry, you'll also need to create a Google Container Registry to host the Astra Control Center images, and push the images to this registry.
Follow the GCP documentation to complete the following steps. See Installing OpenShift cluster in GCP.
-
Create a GCP Project and VPC in the GCP that you plan on using for the OCP cluster with CVO backend.
-
Review the compute instances. This can be a bare metal server or VMs in GCP.
-
If the instance type does not already match the Astra minimum resource requirements for master and worker nodes, change the instance type in GCP to meet the Astra requirements. Refer to Astra Control Center requirements.
-
Create at least one GCP Cloud Storage Bucket to store your backups.
-
Create a secret, which is required for bucket access.
-
(Optional) If you cannot access the NetApp image registry, do the following:
-
Create a Google Container Registry to host the Astra Control Center images.
-
Set up Google Container Registry access for Docker push/pull for all the Astra Control Center images.
Example: Astra Control Center images can be pushed to this registry by entering the following script:
gcloud auth activate-service-account <service account email address>
--key-file=<GCP Service Account JSON file>
This script requires an Astra Control Center manifest file and your Google Image Registry location. Example:
manifestfile=acc.manifest.bundle.yaml
GCP_CR_REGISTRY=<target GCP image registry>
ASTRA_REGISTRY=<source Astra Control Center image registry>

while IFS= read -r image; do
    echo "image: $ASTRA_REGISTRY/$image $GCP_CR_REGISTRY/$image"
    root_image=${image%:*}
    echo $root_image
    docker pull $ASTRA_REGISTRY/$image
    docker tag $ASTRA_REGISTRY/$image $GCP_CR_REGISTRY/$image
    docker push $GCP_CR_REGISTRY/$image
done < acc.manifest.bundle.yaml
-
-
Set up DNS zones.
Configure NetApp BlueXP for GCP
Using NetApp BlueXP (formerly Cloud Manager), create a workspace, add a connector to GCP, create a working environment, and import the cluster.
Follow the BlueXP documentation to complete the following steps. See Getting started with Cloud Volumes ONTAP in GCP.
-
Access to the GCP Service Account with the required IAM permissions and roles
-
Add your credentials to BlueXP. See Adding GCP accounts.
-
Add a connector for GCP.
-
Choose "GCP" as the Provider.
-
Enter GCP credentials. See Creating a connector in GCP from BlueXP.
-
Ensure that the connector is running and switch to that connector.
-
-
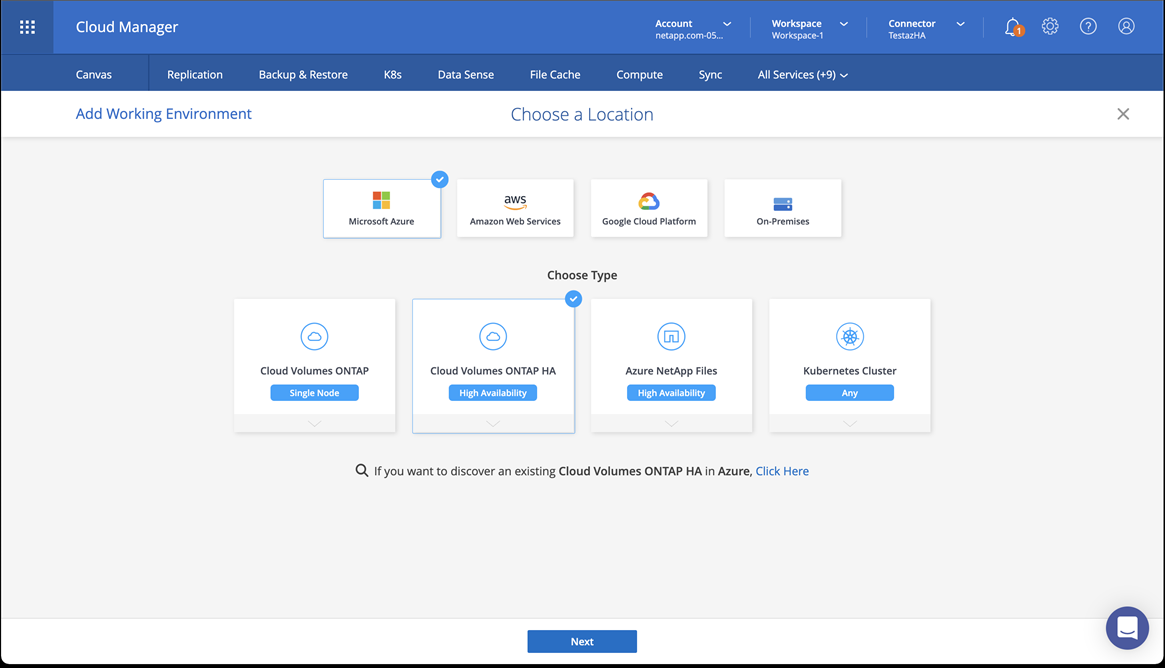
Create a working environment for your cloud environment.
-
Location: "GCP"
-
Type: "Cloud Volumes ONTAP HA"
-
-
Import the OpenShift cluster. The cluster will connect to the working environment you just created.
-
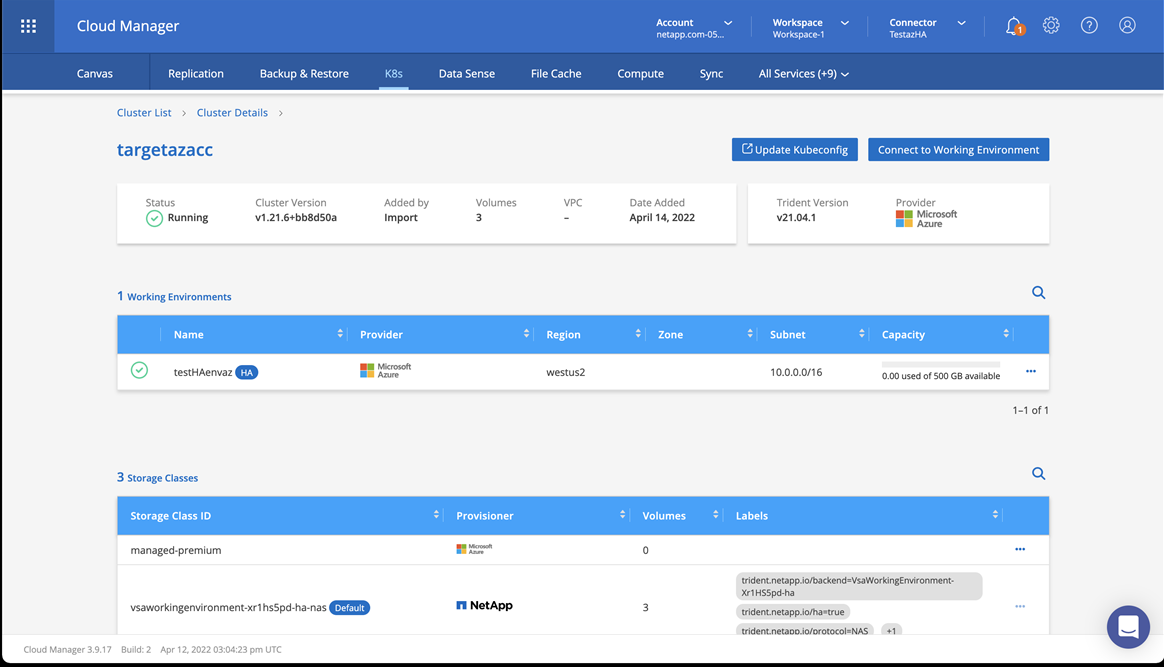
View the NetApp cluster details by selecting K8s > Cluster list > Cluster Details.
-
In the upper right corner, note the Astra Control Provisioner version.
-
Note the Cloud Volumes ONTAP cluster storage classes showing "NetApp" as the provisioner.
This imports your Red Hat OpenShift cluster and assigns it a default storage class. You select the storage class.
Astra Control Provisioner is automatically installed as part of the import and discovery process.
-
-
Note all the persistent volumes and volumes in this Cloud Volumes ONTAP deployment.
|
|
Cloud Volumes ONTAP can operate as a single node or in High Availability (HA). If HA is enabled, note the HA status and node deployment status running in GCP. |
Install Astra Control Center for GCP
Follow the standard Astra Control Center installation instructions.
|
|
GCP uses the Generic S3 bucket type. |
-
Generate the Docker Secret to pull images for the Astra Control Center installation:
kubectl create secret docker-registry <secret name> --docker-server=<Registry location> --docker-username=_json_key --docker-password="$(cat <GCP Service Account JSON file>)" --namespace=pcloud
Deploy Astra Control Center in Microsoft Azure
You can deploy Astra Control Center on a self-managed Kubernetes cluster hosted on a Microsoft Azure public cloud.
What you'll need for Azure
Before you deploy Astra Control Center in Azure, you'll need the following items:
-
Astra Control Center license. Refer to Astra Control Center licensing requirements.
-
NetApp Cloud Central account
-
If using OCP, Red Hat OpenShift Container Platform (OCP) 4.11 through 4.13
-
If using OCP, Red Hat OpenShift Container Platform (OCP) permissions (on namespace level to create pods)
-
Azure credentials with permissions that enable you to create buckets and connectors
Operational environment requirements for Azure
Ensure that the operating environment you choose to host Astra Control Center meets the basic resource requirements outlined in the environment's official documentation.
Astra Control Center requires specific resources in addition to the environment's resource requirements. Refer to Astra Control Center operational environment requirements.
Overview of deployment for Azure
Here is an overview of the process to install Astra Control Center for Azure.
Each of these steps is explained in more detail below.
Install a RedHat OpenShift cluster on Azure
The first step is to install a RedHat OpenShift cluster on Azure.
For installation instructions, see the following:
Create Azure resource groups
Create at least one Azure resource group.
|
|
OpenShift might create its own resource groups. In addition to these, you should also define Azure resource groups. Refer to OpenShift documentation. |
You might want to create a platform cluster resource group and a target app OpenShift cluster resource group.
Ensure that you have sufficient IAM permissions
Ensure that you have sufficient IAM roles and permissions that enable you to install a RedHat OpenShift cluster and a NetApp BlueXP Connector.
Configure Azure
Next, configure Azure to create a virtual network, set up compute instances, and create an Azure Blob container. If you cannot access the NetApp Astra Control Center image registry, you'll also need to create an Azure Container Registry (ACR) to host the Astra Control Center images, and push the images to this registry.
Follow the Azure documentation to complete the following steps. See Installing OpenShift cluster on Azure.
-
Create an Azure virtual network.
-
Review the compute instances. This can be a bare metal server or VMs in Azure.
-
If the instance type does not already match the Astra minimum resource requirements for master and worker nodes, change the instance type in Azure to meet the Astra requirements. Refer to Astra Control Center requirements.
-
Create at least one Azure Blob container to store your backups.
-
Create a storage account. You'll need a storage account to create a container to be used as a bucket in Astra Control Center.
-
Create a secret, which is required for bucket access.
-
(Optional) If you cannot access the NetApp image registry, do the following:
-
Create an Azure Container Registry (ACR) to host the Astra Control Center images.
-
Set up ACR access for Docker push/pull for all the Astra Control Center images.
-
Push the Astra Control Center images to this registry using the following script:
az acr login -n <AZ ACR URL/Location>
This script requires the Astra Control Center manifest file and your Azure ACR location.
Example:
manifestfile=acc.manifest.bundle.yaml
AZ_ACR_REGISTRY=<target Azure ACR image registry>
ASTRA_REGISTRY=<source Astra Control Center image registry>

while IFS= read -r image; do
    echo "image: $ASTRA_REGISTRY/$image $AZ_ACR_REGISTRY/$image"
    root_image=${image%:*}
    echo $root_image
    docker pull $ASTRA_REGISTRY/$image
    docker tag $ASTRA_REGISTRY/$image $AZ_ACR_REGISTRY/$image
    docker push $AZ_ACR_REGISTRY/$image
done < acc.manifest.bundle.yaml
-
-
Set up DNS zones.
Configure NetApp BlueXP (formerly Cloud Manager) for Azure
Using BlueXP (formerly Cloud Manager), create a workspace, add a connector to Azure, create a working environment, and import the cluster.
Follow the BlueXP documentation to complete the following steps. See Getting started with BlueXP in Azure.
Access to the Azure account with the required IAM permissions and roles
-
Add your credentials to BlueXP.
-
Add a connector for Azure. See BlueXP policies.
-
Choose Azure as the Provider.
-
Enter Azure credentials, including the application ID, client secret, and directory (tenant) ID.
-
-
Ensure that the connector is running and switch to that connector.

-
Create a working environment for your cloud environment.
-
Location: "Microsoft Azure".
-
Type: "Cloud Volumes ONTAP HA".
-
-
Import the OpenShift cluster. The cluster will connect to the working environment you just created.
-
View the NetApp cluster details by selecting K8s > Cluster list > Cluster Details.
-
In the upper right corner, note the Astra Control Provisioner version.
-
Note the Cloud Volumes ONTAP cluster storage classes showing NetApp as the provisioner.
This imports your Red Hat OpenShift cluster and assigns a default storage class. You select the storage class.
Astra Control Provisioner is automatically installed as part of the import and discovery process. -
-
Note all the persistent volumes and volumes in this Cloud Volumes ONTAP deployment.
-
Cloud Volumes ONTAP can operate as a single node or in High Availability. If HA is enabled, note the HA status and node deployment status running in Azure.
Install and configure Astra Control Center for Azure
Install Astra Control Center with the standard installation instructions.
Using Astra Control Center, add an Azure bucket. Refer to Set up Astra Control Center and add buckets.