

NetApp HCI installation and deployment overview
 Suggest changes
Use these instructions to install and deploy NetApp HCI. These instructions include links to more details.
Here is an overview of the process:
Prepare for installation
Before you begin the installation, complete the NetApp HCI Installation Discovery Workbook pre-flight checklist sent to you prior to receiving the hardware.
Prepare the network and installation sites
Here is a simplified NetApp HCI network topology installation:
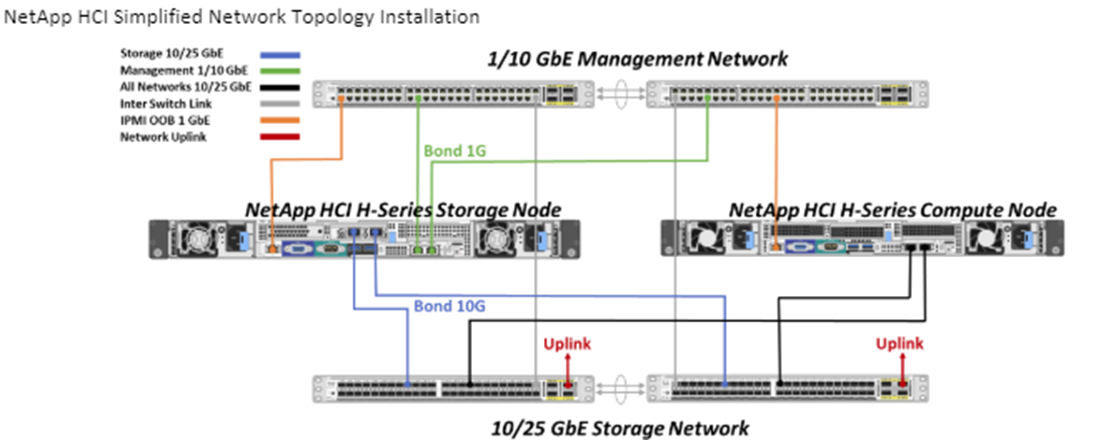
This is the simplified network topology for a single storage node and single compute node. The minimum cluster for NetApp HCI is two storage and two compute nodes.

|
Your network topology might differ from what is shown here. This is an example only. |
This setup uses two network cables on the compute nodes for connectivity to all NetApp HCI networks.
Read these resources:
-
Use the NetApp HCI Installation Discovery Workbook to configure your network before the installation.
-
For details and other supported configurations, see TR-4820: NetApp HCI Networking Quick Planning Guide and the NetApp HCI Installation and Setup Instructions.
-
For information about NetApp HCI configurations smaller than four storage nodes, see TR-4823: NetApp HCI 2-Node Storage Cluster.
-
For details about configuring Link Aggregation Control Protocol (LACP) on the switch ports used for each of the storage nodes, see Configure LCAP for optimal storage performance.
This setup consolidates all traffic onto two physical, redundant ports, reducing the cabling and streamlining network configuration. This configuration requires that the storage, vMotion and any virtual machine network segments use VLAN tagging. The management network segment can use native or tagged VLAN; however, native VLAN is the preferred mode so that NetApp Deployment Engine (NDE) can assign network resources in an automated manner (Zero Conf).
This mode requires vSphere Distributed Switches (vDS), which require VMware vSphere Enterprise Plus licensing.
Networking requirements before you begin
Here are highlights of prerequisites.
For prerequisites details, see Requirements for NetApp HCI deployment overview.
-
Bond1G is a logical interface that combines 1GbE network ports on storage nodes and a management interface on compute nodes. This network is used for NDE API traffic. All nodes must be able to communicate over the management interface in the same L2 network.
-
Bond10G is a logical interface that combines 10/25GbE ports and are used by NDE for beaconing and inventory. All nodes must be able to communicate over the Bond10G interface with non-fragmented jumbo frames.
-
NDE requires at a minimum one manually assigned IP address on the Bond1G interface on one storage node. NDE will be run from this node.
-
All nodes will have temporary IP addresses assigned by NDE discovery, which is accomplished by Automatic Private IP Addressing (APIPA).
|
|
During the NDE process, all nodes will then be assigned permanent IP addresses and any APIPA assigned temporary IPs will be released. |
-
NDE requires separate networks for management, iSCSI and vMotion that are preconfigured on the switch network.
Validate network readiness with NetApp Active IQ Config Advisor
To ensure network readiness for NetApp HCI, install the NetApp Active IQ Config Advisor 5.8.1 or later. This network validation tool is located with other NetApp Support Tools. Use this tool to validate connectivity, VLAN IDs, IP address requirements, switch connectivity and more.
For details, see Validate your environment with Active IQ Config Advisor
Work with your NetApp team
Your NetApp team uses the NetApp Active IQ Config Advisor report and the Discovery Workbook to validate that your network environment is ready.
Install NetApp HCI hardware
NetApp HCI can be installed in different configurations:
-
H410C compute nodes: Two-cable configuration or six-cable configuration
-
H610C compute node: Two-cable configuration
-
H615C compute node: Two-cable configuration
-
H410S storage node
-
H610S storage node

|
For precautions and details, see Install H-series hardware. |
-
Install the rails and the chassis.
-
Install nodes in the chassis and install drives for storage nodes. (Applies only if you are installing H410C and H410S in a NetApp H-series chassis.)
-
Install the switches.
-
Cable the compute node.
-
Cable the storage node.
-
Connect the power cords.
-
Power on the NetApp HCI nodes.
Complete optional tasks after installing hardware
After installing the NetApp HCI hardware, you should perform some optional, yet recommended tasks.
Manage storage capacity across all chassis
Ensure that storage capacity is split evenly across all chassis containing storage nodes.
Configure IPMI for each node
After you have racked, cabled, and powered on your NetApp HCI hardware, you can configure Intelligent Platform Management Interface (IPMI) access for each node. Assign each IPMI port an IP address and change the default administrator IPMI password as soon as you have remote IPMI access to the node.
See Configure IPMI.
Deploy NetApp HCI using the NetApp Deployment Engine (NDE)
The NDE UI is the software wizard interface used to install NetApp HCI.
Launch the NDE UI
NetApp HCI uses a storage node management network IPv4 address for initial access to the NDE. As a best practice, connect from the first storage node.
-
You already assigned the initial storage node management network IP address manually or by using DHCP.
-
You must have physical access to the NetApp HCI installation.
-
If you do not know the initial storage node management network IP, use the Terminal User Interface (TUI), which is accessed via keyboard and monitor on the storage node or use a USB stick.
For details, see Accessing the NetApp Deployment Engine.
-
If you do know the IP address, from a web browser, connect to the Bond1G address of the primary node via HTTP, not HTTPS.
Example:
http://<IP_address>:442/nde/
Deploy NetApp HCI with the NDE UI
-
In the NDE, accept the prerequisites, check to use Active IQ, and accept license agreements.
-
Optionally, enable Data Fabric File Services by ONTAP Select and accept the ONTAP Select license.
-
Configure a new vCenter deployment. Select Configure Using a Fully Qualified Domain Name and enter both the vCenter Server Domain Name and DNS Server IP address.
It is strongly recommended to use the FQDN approach for vCenter installation. -
Review that the inventory assessment of all nodes completed successfully.
The storage node that is running the NDE is already checked.
-
Select all nodes and select Continue.
-
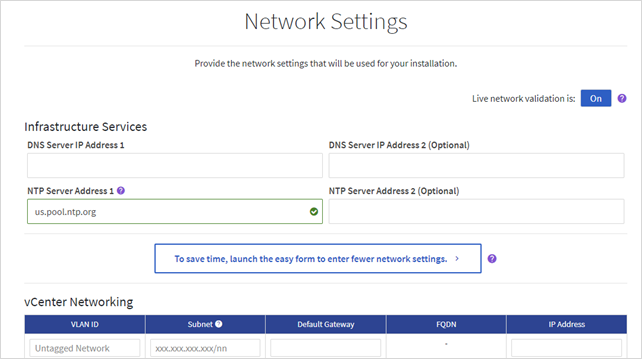
Configure network settings. Refer to the NetApp HCI Installation Discovery Workbook for the values to use.
-
Select the blue box to launch the easy form.
-
On the Network Settings Easy Form:
-
Type the Naming Prefix. (Refer to the System Details of the NetApp HCI Installation Discovery Workbook.)
-
Select No for Will you assign VLAN IDs? (You assign them later in the main Network Settings page.)
-
Type the subnet CIDR, default gateway, and starting IP address for the management, vMotion, and iSCI networks according to your workbook. (Refer to the IP Assignment Method section of the NetApp HCI Installation Discovery Workbook for these values.)
-
Select Apply to Network Settings.
-
-
Join an existing vCenter (optional).
-
Record node serial numbers in the NetApp HCI Installation Discovery Workbook.
-
Specify a VLAN ID for the vMotion Network and any network that requires VLAN tagging. See the NetApp HCI Installation Discovery Workbook.
-
Download your configuration as a .CSV file.
-
Select Start Deployment.
-
Copy and save the URL that appears.
It can take about 45 minutes to complete the deployment.
Verify the installation using the vSphere Web Client
-
Launch the vSphere Web Client and log in using the credentials specified during NDE use.
You must append
@vsphere.localto the user name. -
Verify that no alarms are present.
-
Verify that the vCenter, mNode, and ONTAP Select (optional) appliances are running without warning icons.
-
Observe that the two default datastores (NetApp-HCI-Datastore_01 & 02) are created.
-
Select each datastore and ensure that all compute nodes are listed in the Hosts tab.
-
Validate vMotion and Datastore-02.
-
Migrate the vCenter Server to NetApp-HCI-Datastore-02 (storage only vMotion).
-
Migrate the vCenter Server to each of the compute nodes (compute only vMotion).
-
-
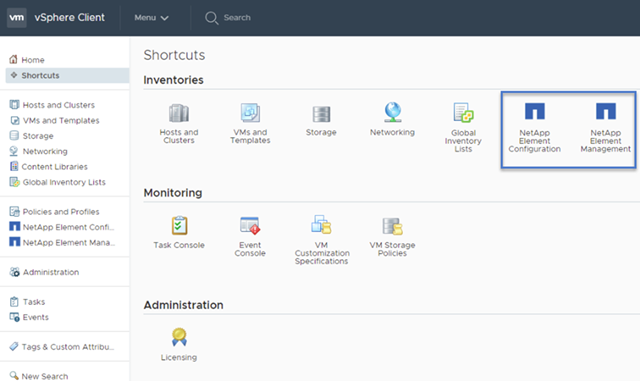
Go to the NetApp Element Plug-in for vCenter Server and ensure that the cluster is visible.
-
Ensure no alerts appear on the Dashboard.
Manage NetApp HCI using the vCenter Plug-in
After you install NetApp HCI, you can configure clusters, volumes, datastores, logs, access groups, initiators, and Quality of Service (QoS) policies by using the NetApp Element Plug-in for vCenter Server.
For details, see NetApp Element Plug-in for vCenter Server documentation.
Monitor or upgrade NetApp HCI with the Hybrid Cloud Control
You can optionally use the NetApp HCI Hybrid Cloud Control to monitor, upgrade, or expand your system.
You log in to NetApp Hybrid Cloud Control by browsing to the IP address of the management node.
Using the Hybrid Cloud Control, you can do the following:
Steps
-
Open the IP address of the management node in a web browser. For example:
https://<ManagementNodeIP>
-
Log in to NetApp Hybrid Cloud Control by providing the NetApp HCI storage cluster administrator credentials.
The NetApp Hybrid Cloud Control interface appears.