

Upgrade compute node firmware
 Suggest changes
For H-series compute nodes, you can upgrade the firmware for hardware components such as the BMC, BIOS, and NIC. To upgrade compute node firmware, you can use the NetApp Hybrid Cloud Control UI, REST API, a USB drive with the latest firmware image, or the BMC UI.
After the upgrade, the compute node boots into ESXi and works as before, retaining the configuration.
-
Compute drivers: You have upgraded your compute node drivers. If compute node drivers are not compatible with the new firmware, the upgrade will not start. See the Interoperability Matrix Tool (IMT) for driver and firmware compatibility information, and check the latest compute node firmware release notes for important late-breaking firmware and driver details.
-
Admin privileges: You have cluster administrator and BMC administrator permissions to perform the upgrade.
-
System ports: If you are using NetApp Hybrid Cloud Control for upgrades, you have ensured that the necessary ports are open. See Network ports for more information.
-
Minimum BMC and BIOS versions: The node you intend to upgrade using NetApp Hybrid Cloud Control meets the following minimum requirements:
Model Minimum BMC version Minimum BIOS version H410C
All versions supported (no upgrade required)
All versions supported (no upgrade required)
H610C
3.96.07
3B01
H615C
4.68.07
3B08.CO

H615C compute nodes must update BMC firmware to version 4.68 using the compute firmware bundle 2.27 to enable NetApp Hybrid Cloud Control to perform future firmware upgrades.
For a complete matrix of firmware and driver firmware for your hardware, see supported firmware and ESXi driver versions. -
BIOS boot order: Manually change the boot order in the BIOS setup for each node to ensure
USB CD/DVDappears in the boot list. See this article for more information. -
BMC credentials: Update the credentials NetApp Hybrid Cloud Control uses to connect to the compute node BMC. You can do this using either the NetApp Hybrid Cloud Control UI or API. Updating BMC information prior to upgrade refreshes the inventory and ensures that management node services are aware of all hardware parameters needed to complete the upgrade.
-
Attached media: Disconnect any physical USB or ISO before starting a compute node upgrade.
-
KVM ESXi console: Close all open Serial-Over-LAN (SOL) sessions and active KVM sessions in the BMC UI before starting a compute node upgrade.
-
Witness Node requirements: In two- and three-node storage clusters, one Witness Node must be running in the NetApp HCI installation at all times.
-
Compute node health check: You have verified that the node is ready to be upgraded. See Run compute node health checks prior to upgrading compute firmware.
-
End User License Agreement (EULA): Beginning with management services 2.20.69, you must accept and save the EULA before using the NetApp Hybrid Cloud Control UI or API to upgrade compute node firmware:
-
Open the IP address of the management node in a web browser:
https://<ManagementNodeIP>
-
Log in to NetApp Hybrid Cloud Control by providing the storage cluster administrator credentials.
-
Select Upgrade near the top right of the interface.
-
The EULA pops up. Scroll down, select I accept for current and all future updates, and select Save.
-
In production environments, upgrade the firmware on one compute node at a time.
|
|
The ESXi host must be taken out of lockdown mode prior to running a health check and proceeding with the firmware upgrade. See How to disable lockdown mode on ESXi host and VMware lockdown mode behavior for more information. |
For NetApp Hybrid Cloud Control UI or API upgrades, your ESXi host will be automatically placed in maintenance mode during the upgrade process if you have the DRS feature and required licensing. The node will be rebooted and after the upgrade process is complete, the ESXi host will be taken out of maintenance mode. For USB and BMC UI options, you will need to place the ESXi host in maintenance mode manually, as described in each procedure.
Choose the option that is relevant to your upgrade scenario:
Use NetApp Hybrid Cloud Control UI to upgrade a compute node
Starting with management services 2.14, you can upgrade a compute node using the NetApp Hybrid Cloud Control UI. From the list of nodes, you must select the node to upgrade. The Current Versions tab shows the current firmware versions and the Proposed Versions tab shows the available upgrade versions, if any.

|
For a successful upgrade, ensure that the health check on the vSphere cluster is successful. |
|
|
Upgrading the NIC, BIOS, and BMC can take approximately 60 minutes per node depending on the speed of network connectivity between the management node and the BMC host. |
|
|
Using the NetApp Hybrid Cloud Control UI to upgrade compute firmware on H300E/H500E/H700E compute nodes is no longer supported. To upgrade, it is recommended that you use a USB drive or the BMC UI to mount the compute firmware bundle. |
-
If your management node is not connected to the internet, you have downloaded the compute firmware bundle from the NetApp Support Site.
You should extract the TAR.GZfile to aTARfile, and then extract theTARfile to the compute firmware bundle.
-
Open the IP address of the management node in a web browser:
https://<ManagementNodeIP>
-
Log in to NetApp Hybrid Cloud Control by providing the storage cluster administrator credentials.
-
Select Upgrade near the top right of the interface.
-
On the Upgrades page, select Compute firmware.
-
Select the cluster you are upgrading.
You will see the nodes in the cluster listed along with the current firmware versions and newer versions, if available for upgrade.
-
Select Browse to upload the compute firmware bundle that you downloaded from the NetApp Support Site.
-
Wait for the upload to complete. A progress bar shows the status of the upload.
The file upload will happen in the background if you navigate away from the browser window. An on-screen message is displayed after the file is successfully uploaded and validated. Validation might take several minutes.
-
Select the compute firmware bundle.
-
Select Begin Upgrade.
After you select Begin Upgrade, the window shows failed health checks, if any.

The upgrade cannot be paused after you begin. Firmware will be updated sequentially in the following order: NIC, BIOS, and BMC. Do not log in to the BMC UI during upgrade. Logging into the BMC terminates the Hybrid Cloud Control Serial-Over-LAN (SOL) session that monitors upgrade process. -
If the health checks at the cluster or node level passed with warnings, but without critical failures, you will see Ready to be Upgraded. Select Upgrade Node.
While the upgrade is in progress, you can leave the page and come back to it later to continue monitoring the progress. During the upgrade, the UI shows various messages about the status of the upgrade.
While upgrading the firmware on H610C compute nodes, do not open the Serial-Over-LAN (SOL) console through the BMC web UI. This might cause the upgrade to fail. The UI displays a message after the upgrade is complete. You can download logs after the upgrade is complete. For information about the various upgrade status changes, see Upgrade status changes.
|
|
If a failure happens during the upgrade, NetApp Hybrid Cloud Control will reboot the node, take it out of maintenance mode, and display the failure status with a link to the error log. You can download the error log, which contains specific instructions or links to KB articles, to diagnose and correct any issue. For additional insight into compute node firmware upgrade issues using NetApp Hybrid Cloud Control, see this KB article. |
Upgrade status changes
Here are the different states that the UI shows before, during, and after the upgrade process:
| Upgrade state | Description |
|---|---|
Node failed one or more health checks. Expand to view details. |
One or more health checks failed. |
Error |
An error has occurred during the upgrade. You can download the error log and send it to NetApp Support. |
Unable to Detect |
This status is displayed if NetApp Hybrid Cloud Control is unable to query the compute node when the compute node asset does not have the hardware tag. |
Ready to be Upgraded. |
All the health checks passed successfully, and the node is ready to be upgraded. |
An error has occurred during the upgrade. |
The upgrade fails with this notification when a critical error occurs. Download the logs by selecting the Download Logs link to help resolve the error. You can try upgrading again after you resolve the error. |
Node upgrade is in progress. |
The upgrade is in progress. A progress bar shows the upgrade status. |
Use NetApp Hybrid Cloud Control API to upgrade a compute node
You can use APIs to upgrade each compute node in a cluster to the latest firmware version. You can use an automation tool of your choice to run the APIs. The API workflow documented here uses the REST API UI available on the management node as an example.
|
|
Using the NetApp Hybrid Cloud Control UI to upgrade compute firmware on H300E/H500E/H700E compute nodes is no longer supported. To upgrade, it is recommended that you use a USB drive or the BMC UI to mount the compute firmware bundle. |
Compute node assets, including vCenter and hardware assets, must be known to management node assets. You can use the inventory service APIs to verify assets (https://<ManagementNodeIP>/inventory/1/).
-
Go to the NetApp HCI software downloads page and download the latest compute firmware bundle to a device that is accessible to the management node.
For dark site upgrades, you can reduce upload time if the upgrade package and the management node are both local. -
Upload the compute firmware bundle to the management node:
-
Open the management node REST API UI on the management node:
https://<ManagementNodeIP>/package-repository/1/
-
Select Authorize and complete the following:
-
Enter the cluster user name and password.
-
Enter the client ID as
mnode-client. -
Select Authorize to begin a session.
-
Close the authorization window.
-
-
From the REST API UI, select POST /packages.
-
Select Try it out.
-
Select Browse and select the compute firmware bundle.
-
Select Execute to initiate the upload.
-
From the response, copy and save the compute firmware bundle ID (
"id") for use in a later step.
-
-
Verify the status of the upload.
-
From the REST API UI, select GET /packages/{id}/status.
-
Select Try it out.
-
Enter the compute firmware bundle ID you copied in the previous step in id.
-
Select Execute to initiate the status request.
The response indicates
stateasSUCCESSwhen complete. -
From the response, copy and save the compute firmware bundle name (
"name") and version ("version") for use in a later step.
-
-
Locate the compute controller ID and node hardware ID for the node you intend to upgrade:
-
Open the inventory service REST API UI on the management node:
https://<ManagementNodeIP>/inventory/1/
-
Select Authorize and complete the following:
-
Enter the cluster user name and password.
-
Enter the client ID as
mnode-client. -
Select Authorize to begin a session.
-
Close the authorization window.
-
-
From the REST API UI, select GET /installations.
-
Select Try it out.
-
Select Execute.
-
From the response, copy the installation asset ID (
"id"). -
From the REST API UI, select GET /installations/{id}.
-
Select Try it out.
-
Paste the installation asset ID into the id field.
-
Select Execute.
-
From the response, copy and save the cluster controller ID (
"controllerId")and node hardware ID ("hardwareId") for use in a later step:"compute": { "errors": [], "inventory": { "clusters": [ { "clusterId": "Test-1B", "controllerId": "a1b23456-c1d2-11e1-1234-a12bcdef123a","nodes": [ { "bmcDetails": { "bmcAddress": "10.111.0.111", "credentialsAvailable": true, "credentialsValidated": true }, "chassisSerialNumber": "111930011231", "chassisSlot": "D", "hardwareId": "123a4567-01b1-1243-a12b-11ab11ab0a15", "hardwareTag": "00000000-0000-0000-0000-ab1c2de34f5g", "id": "e1111d10-1a1a-12d7-1a23-ab1cde23456f", "model": "H410C",
-
-
Run the compute node firmware upgrade:
-
Open the hardware service REST API UI on the management node:
https://<ManagementNodeIP>/hardware/2/
-
Select Authorize and complete the following:
-
Enter the cluster user name and password.
-
Enter the client ID as
mnode-client. -
Select Authorize to begin a session.
-
Close the authorization window.
-
-
Select POST /nodes/{hardware_id}/upgrades.
-
Select Try it out.
-
Enter the hardware host asset ID (
"hardwareId"saved from a previous step) in the parameter field. -
Do the following with the payload values:
-
Retain the values
"force": falseand"maintenanceMode": true"so that health checks are performed on the node and the ESXi host is set to maintenance mode. -
Enter the cluster controller ID (
"controllerId"saved from a previous step). -
Enter the compute firmware bundle name package version that you saved from a previous step.
{
  "config": {
    "force": false,
    "maintenanceMode": true
  },
  "controllerId": "a1b23456-c1d2-11e1-1234-a12bcdef123a",
  "packageName": "compute-firmware-12.2.109",
  "packageVersion": "12.2.109"
}
-
-
Select Execute to initiate the upgrade.
The upgrade cannot be paused after you begin. Firmware will be updated sequentially in the following order: NIC, BIOS, and BMC. Do not log in to the BMC UI during upgrade. Logging into the BMC terminates the Hybrid Cloud Control Serial-Over-LAN (SOL) session that monitors upgrade process. -
Copy the upgrade task ID that is part of the resource link (
"resourceLink") URL in the response.
-
-
Verify the upgrade progress and results:
-
Select GET /task/{task_id}/logs.
-
Select Try it out.
-
Enter the task ID from the previous step in task_Id.
-
Select Execute.
-
Do one of the following if there are problems or special requirements during the upgrade:
Option Steps You need to correct cluster health issues due to
failedHealthChecksmessage in the response body.-
Go to the specific KB article listed for each issue or perform the specified remedy.
-
If a KB is specified, complete the process described in the relevant KB article.
-
After you have resolved cluster issues, reauthenticate if needed and select POST /nodes/{hardware_id}/upgrades.
-
Repeat the steps as described previously in the upgrade step.
The upgrade fails and the mitigation steps are not listed in upgrade log.
-
See this KB article (login required).
-
-
Run the GET /task/{task_id}/logs API multiple times, as needed, until the process is complete.
During the upgrade, the
statusindicatesrunningif no errors are encountered. As each step finishes, thestatusvalue changes tocompleted.The upgrade has finished successfully when the status for each step is
completedand thepercentageCompletedvalue is100.
-
-
(Optional) Confirm upgraded firmware versions for each component:
-
Open the hardware service REST API UI on the management node:
https://<ManagementNodeIP>/hardware/2/
-
Select Authorize and complete the following:
-
Enter the cluster user name and password.
-
Enter the client ID as
mnode-client. -
Select Authorize to begin a session.
-
Close the authorization window.
-
-
From the REST API UI, select GET /nodes/{hardware_id}/upgrades.
-
(Optional) Enter date and status parameters to filter the results.
-
Enter the hardware host asset ID (
"hardwareId"saved from a previous step) in the parameter field. -
Select Try it out.
-
Select Execute.
-
Verify in the response that firmware for all components has been successfully upgraded from the previous version to the latest firmware.
-
Use a USB drive imaged with the latest compute firmware bundle
You can insert a USB drive with the latest compute firmware bundle downloaded to a USB port on the compute node. As an alternative to using the USB thumb drive method described in this procedure, you can mount the compute firmware bundle on the compute node using the Virtual CD/DVD option in the Virtual Console in the Baseboard Management Controller (BMC) interface. The BMC method takes considerably longer than the USB thumb drive method. Ensure that your workstation or server has the necessary network bandwidth and that your browser session with the BMC does not time out.
-
If your management node is not connected to the internet, you have downloaded the compute firmware bundle from the NetApp Support Site.
You should extract the TAR.GZfile to aTARfile, and then extract theTARfile to the compute firmware bundle.
-
Use the Etcher utility to flash the compute firmware bundle to a USB drive.
-
Place the compute node in maintenance mode using VMware vCenter, and evacuate all virtual machines from the host.
If VMware Distributed Resource Scheduler (DRS) is enabled on the cluster (this is the default in NetApp HCI installations), virtual machines will automatically be migrated to other nodes in the cluster. -
Insert the USB thumb drive into a USB port on the compute node and reboot the compute node using VMware vCenter.
-
During the compute node POST cycle, press F11 to open the Boot Manager. You may need to press F11 multiple times in quick succession. You can perform this operation by connecting a video/keyboard or by using the console in
BMC. -
Select One Shot > USB Flash Drive from the menu that appears. If the USB thumb drive does not appear in the menu, verify that USB Flash Drive is part of the legacy boot order in the BIOS of the system.
-
Press Enter to boot the system from the USB thumb drive. The firmware flash process begins.
After firmware flashing is complete and the node reboots, it might take a few minutes for ESXi to start.
-
After the reboot is complete, exit maintenance mode on the upgraded compute node using vCenter.
-
Remove the USB flash drive from the upgraded compute node.
-
Repeat this task for other compute nodes in your ESXi cluster until all compute nodes are upgraded.
Use the Baseboard Management Controller (BMC) user interface (UI)
You must perform the sequential steps to load the compute firmware bundle and reboot the node to the compute firmware bundle to ensure that the upgrade is successful. The compute firmware bundle should be located on the system or virtual machine (VM) hosting the web browser. Verify that you have downloaded the compute firmware bundle before you start the process.
|
|
The recommendation is to have the system or VM and the node on the same network. |
|
|
It takes approximately 25 to 30 minutes for the upgrade via the BMC UI. |
Upgrade firmware on H410C and H300E/H500E/H700E nodes
If your node is part of a cluster, you must place the node in maintenance mode before the upgrade, and take it out of maintenance mode after the upgrade.
|
|
Ignore the following informational message you see during the process: Untrusty Debug Firmware Key is used, SecureFlash is currently in Debug Mode
|
-
If your node is part of a cluster, place it in maintenance mode as follows. If not, skip to step 2.
-
Log in to the VMware vCenter web client.
-
Right-click the host (compute node) name and select Maintenance Mode > Enter Maintenance Mode.
-
Select OK.
VMs on the host will be migrated to another available host. VM migration can take time depending on the number of VMs that need to be migrated.
Ensure that all the VMs on the host are migrated before you proceed.
-
-
Navigate to the BMC UI,
https://BMCIP/#login, where BMCIP is the IP address of the BMC. -
Log in using your credentials.
-
Select Remote Control > Console Redirection.
-
Select Launch Console.
You might have to install Java or update it. -
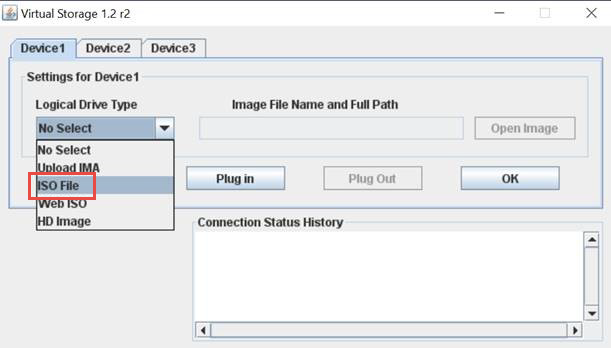
When the console opens, select Virtual Media > Virtual Storage.
-
On the Virtual Storage screen, select Logical Drive Type, and select ISO File.
-
Select Open Image to browse to the folder where you downloaded the compute firmware bundle file, and select the compute firmware bundle file.
-
Select Plug In.
-
When the connection status shows
Device#: VM Plug-in OK!!, select OK. -
Reboot the node by pressing F12 and selecting Restart or selecting Power Control > Set Power Reset.
-
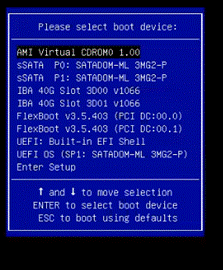
During reboot, press F11 to select the boot options and load the compute firmware bundle. You might have to press F11 a few times before the boot menu is displayed.
You will see the following screen:

-
On the above screen, press Enter. Depending on your network, it might take a few minutes after you press Enter for the upgrade to begin.
Some of the firmware upgrades might cause the console to disconnect and/or cause your session on the BMC to disconnect. You can log back into the BMC, however some services, such as the console, may not be available due to the firmware upgrades. After the upgrades have completed, the node will perform a cold reboot, which can take approximately five minutes. -
Log back in to the BMC UI and select System to verify the BIOS version and build time after booting to the OS. If the upgrade completed correctly, you see the new BIOS and BMC versions.
The BIOS version will not show the upgraded version until the node has finished fully booting. -
If the node is part of a cluster, complete the steps below. If it is a standalone node, no further action is needed.
-
Log in to the VMware vCenter web client.
-
Take the host out of maintenance mode. This might show a disconnected red flag. Wait until all statuses are cleared.
-
Power on any of the remaining VMs that were powered off.
-
Upgrade firmware on H610C/H615C nodes
The steps vary depending on whether the node is standalone or part of a cluster. The procedure can take approximately 25 minutes and includes powering the node off, uploading the compute firmware bundle, flashing the devices, and powering the node back on after the upgrade.
-
If your node is part of a cluster, place it in maintenance mode as follows. If not, skip to step 2.
-
Log in to the VMware vCenter web client.
-
Right-click the host (compute node) name and select Maintenance Mode > Enter Maintenance Mode.
-
Select OK.
VMs on the host will be migrated to another available host. VM migration can take time depending on the number of VMs that need to be migrated.
Ensure that all the VMs on the host are migrated before you proceed.
-
-
Navigate to the BMC UI,
https://BMCIP/#login, where BMC IP is the IP address of the BMC. -
Log in using your credentials.
-
Select Remote Control > Launch KVM (Java).
-
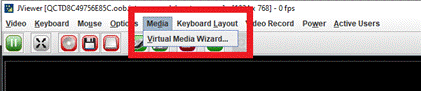
In the console window, select Media > Virtual Media Wizard.
-
Select Browse and select the compute firmware
.isofile. -
Select Connect.
A popup indicating success is displayed, along with the path and device showing at the bottom. You can close the Virtual Media window.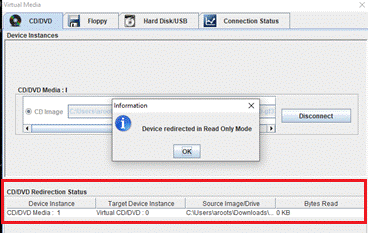
-
Reboot the node by pressing F12 and selecting Restart or selecting Power Control > Set Power Reset.
-
During reboot, press F11 to select the boot options and load the compute firmware bundle.
-
Select AMI Virtual CDROM from the list displayed and select Enter. If you do not see AMI Virtual CDROM in the list, go into the BIOS and enable it in the boot list. The node will reboot after you save. During the reboot, press F11.
-
On the screen displayed, select Enter.
Some of the firmware upgrades might cause the console to disconnect and/or cause your session on the BMC to disconnect. You can log back into the BMC, however some services, such as the console, might not be available due to the firmware upgrades. After the upgrades have completed, the node will perform a cold reboot, which can take approximately five minutes. -
If you get disconnected from the console, select Remote Control and select Launch KVM or Launch KVM (Java) to reconnect and verify when the node has finished booting back up. You might need multiple reconnects to verify that the node booted successfully.
During the powering on process, for approximately five minutes, the KVM console displays No Signal. -
After the node is powered on, select Dashboard > Device Information > More info to verify the BIOS and BMC versions. The upgraded BIOS and BMC versions are displayed. The upgraded version of the BIOS will not be displayed until the node has fully booted up.
-
If you placed the node in maintenance mode, after the node boots to ESXi, right-click the host (compute node) name, and select Maintenance Mode > Exit Maintenance Mode, and migrate the VMs back to the host.
-
In vCenter, with the host name selected, configure and verify the BIOS version.