

Upgrade the Element Plug-in for vCenter Server
 Suggest changes
For existing vSphere environments with a registered NetApp Element Plug-in for vCenter Server, you can update your plug-in registration after you first update the management services package that contains the plug-in service.
You can update the plug-in registration on vCenter Server Virtual Appliance (vCSA) or Windows using the registration utility. You must change your registration for the vCenter Plug-in on every vCenter Server where you need to use the plug-in.
This upgrade procedure covers the following upgrade scenarios:
-
You are upgrading to Element Plug-in for vCenter Server 4.10, 4.9, 4.8, 4.7, 4.6, 4.5, or 4.4.
-
You are upgrading to a 7.0, 6.7, or 6.5 HTML5 vSphere Web Client.

The plug-in is not compatible with VMware vCenter Server 6.5 for Element Plug-in for VMware vCenter Server 4.6, 4.7, and 4.8. -
You are upgrading to a 6.7 Flash vSphere Web Client.
|
|
The plug-in is not compatible with version 6.7 U2 build 13007421 of the HTML5 vSphere Web Client and other 6.7 U2 builds released prior to update 2a (build 13643870). For more information about supported vSphere versions, see the release notes for your version of the plug-in. |
-
Admin privileges: You have vCenter Administrator role privileges to install a plug-in.
-
vSphere upgrades: You have performed any required vCenter upgrades before upgrading the NetApp Element Plug-in for vCenter Server. This procedure assumes that vCenter upgrades have already been completed.
-
vCenter Server: Your vCenter Plug-in version 4.x is registered with a vCenter Server. From the registration utility (
https://<ManagementNodeIP>:9443), select Registration Status, complete the necessary fields, and select Check Status to verify that the vCenter Plug-in is already registered and the version number of the current installation. -
Management services updates: You have updated your management services bundle to the latest version. Updates to the vCenter plug-in are distributed using management services updates that are released outside of major product releases for NetApp HCI and SolidFire all-flash storage.
-
Management node upgrades: You are running a management node that has been upgraded to version 11.3 or later. vCenter Plug-in 4.4 or later requires a an 11.3 or later management node with a modular architecture that provides individual services. Your management node must be powered on with its IP address or DHCP address configured.
-
Element storage upgrades: You have a cluster running NetApp Element software 11.3 or later.
-
vSphere Web Client: You have logged out of the vSphere Web Client before beginning any plug-in upgrade. The web client will not recognize updates made during this process to your plug-in if you do not log out.
-
Enter the IP address for your management node in a browser, including the TCP port for registration:
https://<ManagementNodeIP>:9443
The registration utility UI opens to the Manage QoSSIOC Service Credentials page for the plug-in.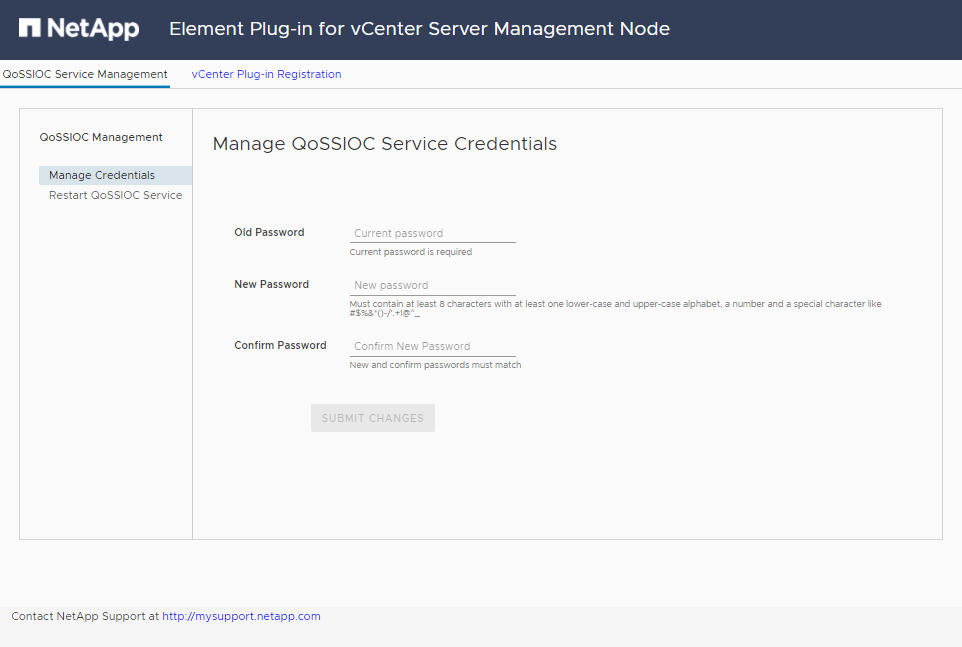
-
Select vCenter Plug-in Registration.
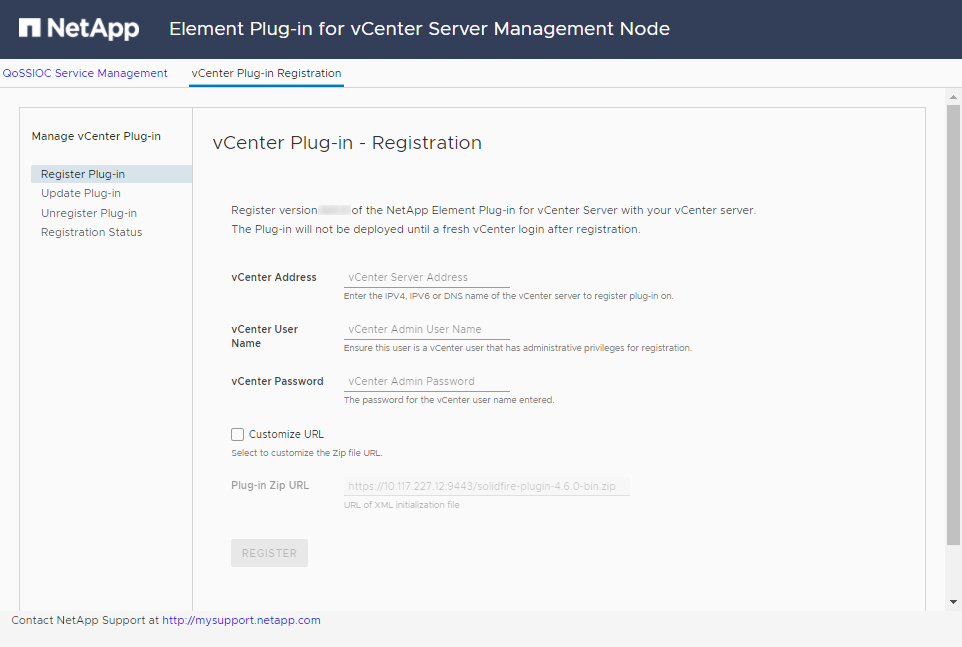
-
Within Manage vCenter Plug-in, select Update Plug-in.
-
Confirm or update the following information:
-
The IPv4 address or the FQDN of the vCenter service on which you will register your plug-in.
-
The vCenter Administrator user name.

The user name and password credentials you enter must be for a user with vCenter Administrator role privileges. -
The vCenter Administrator password.
-
(For in-house servers/dark sites) A custom URL for the plug-in ZIP.
You can select Custom URL to customize the URL if you are using an HTTP or HTTPS server (dark site) or have modified the ZIP file name or network settings. For additional configuration steps if you intend to customize a URL, see Element Plug-in for vCenter Server documentation about modifying vCenter properties for an in-house (dark site) HTTP server.
-
-
Select Update.
A banner appears in the registration utility UI when the registration is successful.
-
Log in to the vSphere Web Client as a vCenter Administrator. If you are already logged in to the vSphere Web Client, you must first log out and then log in again.
This action creates a new database and completes the installation in the vSphere Web Client. -
In the vSphere Web Client, look for the following completed tasks in the task monitor to ensure installation has completed:
Download plug-inandDeploy plug-in. -
Verify that the NetApp Element Configuration and Management extension points appear in the Shortcuts tab of the vSphere Web Client and in the side panel.
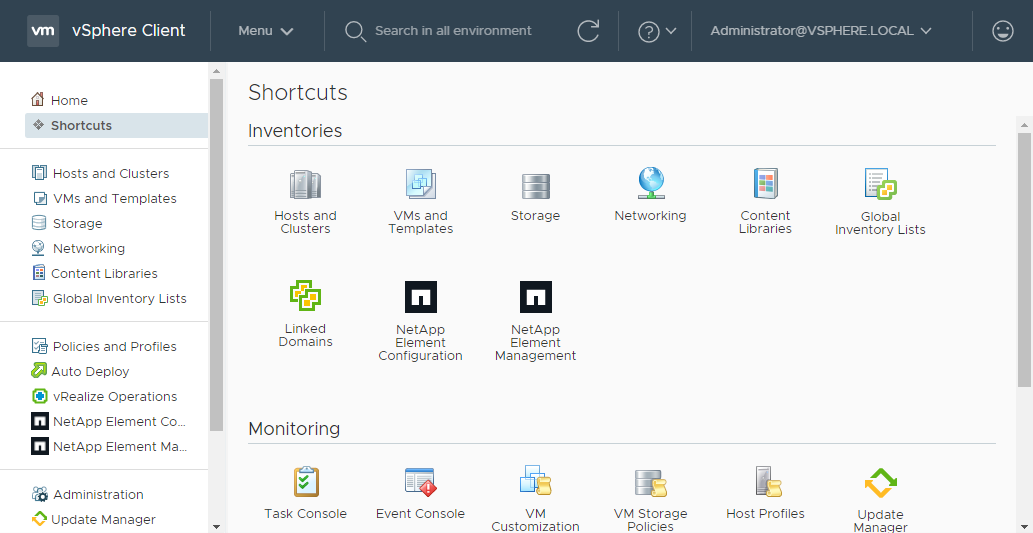
If the vCenter Plug-in icons are not visible, see Element Plug-in for vCenter Server documentation about troubleshooting the plug-in.
After upgrading to NetApp Element Plug-in for vCenter Server 4.8 or later with VMware vCenter Server 6.7U1, if the storage clusters are not listed or a server error appears in the Clusters and QoSSIOC Settings sections of the NetApp Element Configuration, see Element Plug-in for vCenter Server documentation about troubleshooting these errors.
-
Verify the version change in the About tab in the NetApp Element Configuration extension point of the plug-in.
You should see the following version details or details of a more recent version:
NetApp Element Plug-in Version: 4.10
NetApp Element Plug-in Build Number: 12
|
|
The vCenter Plug-in contains online Help content. To ensure that your Help contains the latest content, clear your browser cache after upgrading your plug-in. |