Remove a Rancher installation on NetApp HCI
 Suggest changes


If you accidentally deploy Rancher on NetApp HCI with incorrect information (such as an incorrect Rancher server FQDN), you need to remove the installation and then redeploy. Follow these steps to remove the Rancher installation on NetApp HCI instance.
This action does not delete the user clusters.

|
You might want to retain the user clusters. If you do retain them, you can later migrate them to another Rancher implementation. If you want to delete the user clusters, you should do that first before deleting the Rancher server; otherwise, deleting the user clusters after the Rancher server is deleted is more difficult. |
Remove Rancher on NetApp HCI using NetApp Hybrid Cloud Control
You can use NetApp Hybrid Cloud Control web UI to remove the three virtual machines that were set up during deployment to host the Rancher server.
-
Open the IP address of the management node in a web browser:
https://<ManagementNodeIP>
-
Log in to NetApp Hybrid Cloud Control by providing the storage cluster administrator credentials.
-
From the Dashboard, select the menu on the upper right.
-
Select Configure.

-
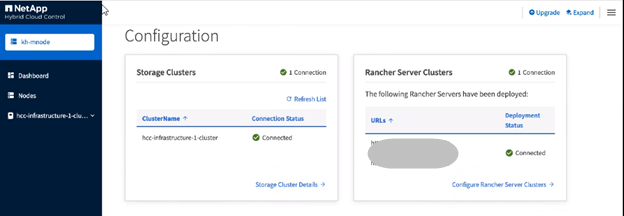
In the Rancher Server Clusters pane, select Configure Rancher Server Clusters.
-
Select the Actions menu for the Rancher installation you need to remove.
Selecting Delete immediately removes the Rancher on NetApp HCI management cluster. -
Select Delete.
Remove Rancher on NetApp HCI using the REST API
You can use the NetApp Hybrid Cloud Control REST API to remove the three virtual machines that were set up during deployment to host the Rancher server.
-
Enter the management node IP address followed by
/k8sdeployer/api/:https://[IP address]/k8sdeployer/api/
-
Select Authorize or any lock icon and enter cluster admin credentials for permissions to use APIs.
-
Enter the cluster user name and password.
-
Select Request body from the type drop-down list if the value is not already selected.
-
Enter the client ID as
mnode-clientif the value is not already populated. -
Do not enter a value for the client secret.
-
Select Authorize to begin a session.
-
Close the window.
-
-
Close the Available authorizations dialog box.
-
Select POST/destroy.
-
Select Try it out.
-
In the request body text box, enter the Rancher server FQDN as the
serverURLvalue. -
Select Execute.
After several minutes, the Rancher server virtual machines should no longer be visible in the Hosts and Clusters list in vSphere Client. After removal, you can use NetApp Hybrid Cloud Control to redeploy Rancher on NetApp HCI.


