User Accounts and Roles
 Suggest changes
Data Infrastructure Insights provides up to four user account roles: Account Owner, Administrator, User, and Guest. Each account is assigned specific permission levels as noted in the table below. Users are either invited to Data Infrastructure Insights and assigned a specific role, or can sign in via Single Sign-On (SSO) Authorization with a default role. SSO Authorization is available as a feature in Data Infrastructure Insights Premium Edition.
Permission levels
You use an account that has Administrator privileges to create or modify user accounts. Each user account is assigned a role for each Data Infrastructure Insights feature from the following permission levels.
| Role | Observability | Workload Security | Reporting | Admin |
|---|---|---|---|---|
Account Owner |
Same as Administrator |
Same as Administrator |
Same as Administrator |
Same as Administrator, as well as manage SSO Authentication and Identity Federation configuration. Can also assign additional owners as well as add clients on the Managed Service Provider (MSP) master tenant. |
Administrator |
Can perform all Observability functions, as well as management of data collectors. |
Can perform all Security functions, including those for Alerts, Forensics, data collectors, automated response policies, and API tokens for Security. |
Can perform all User/Author functions including managing Reporting API tokens, as well as all administrative tasks such as configuration of reports, and the shutdown and restart of reporting tasks. |
Can invite other users but can only assign Observability roles. Can view but not modify SSO configuration. Can create and manage API access tokens. Can view audit information. Can view subscription information, usage, and history. Can manage global alert notification and subscription notification recipient lists. |
User |
Can view and modify dashboards, queries, alerts, annotations, annotation rules, and applications, and manage device resolution. |
Can view and manage Alerts and view Forensics. User role can change alert status, add a note, take snapshots manually, and manage restrict user access. |
Can perform all Guest/Consumer functions as well as create and manage reports and dashboards. |
Not available |
Guest |
Has read-only access to asset pages, dashboards, alerts, and can view and run queries. |
Can view Alerts and Forensics. Guest role cannot change alert status, add a note, take snapshots manually, or restrict user access. |
Can view, schedule, and run reports and set personal preferences such as those for languages and time zones. Guests/Consumers cannot create reports or perform administrative tasks. |
Not available |
Best practice is to limit the number of users with Administrator permissions. The greatest number of accounts should be user or guest accounts.
Data Infrastructure Insights Permissions by User Role
The following table shows the Data Infrastructure Insights permissions granted to each user role.
Feature |
Administrator/ |
User |
Guest |
Acquisition Units: Add/Modify/Delete |
Y |
N |
N |
Alerts*: Create/Modify/Delete |
Y |
Y |
N |
Alerts*: View |
Y |
Y |
Y |
Annotation Rules: Create/Run/Modify/Delete |
Y |
Y |
N |
Annotations: Create/Modify/Assign/View/Remove/Delete |
Y |
Y |
N |
API Access*: Create/Rename/Disable/Revoke |
Y |
N |
N |
Applications: Create/View/Modify/Delete |
Y |
Y |
N |
Asset Pages: Modify |
Y |
Y |
N |
Asset Pages: View |
Y |
Y |
Y |
Audit: View |
Y |
N |
N |
Cloud Cost |
Y |
N |
N |
Security |
Y |
N |
N |
Dashboards: Create/Modify/Delete |
Y |
Y |
N |
Dashboards: View |
Y |
Y |
Y |
Data Collectors: Add/Modify/Poll/Delete |
Y |
N |
N |
Notifications: View |
Y |
Y |
Y |
Notifications: Modify |
Y |
N |
N |
Queries: Create/Modify/Delete |
Y |
Y |
N |
Queries: View/Run |
Y |
Y |
Y |
Device Resolution |
Y |
Y |
N |
Reports*: View/Run |
Y |
Y |
Y |
Reports*: Create/Modify/Delete/Schedule |
Y |
Y |
N |
Subscription: View/Modify |
Y |
N |
N |
User Management: Invite/Add/Modify/Deactivate |
Y |
N |
N |
*Requires Premium Edition
Creating Accounts by Inviting Users
Creating a new user account is achieved through NetApp Console. A user can respond to the invitation sent through email, but if the user does not have an account with Console, the user needs to sign up so that they can accept the invitation.
-
The user name is the email address of the invitation.
-
Understand the user roles you will be assigning.
-
Passwords are defined by the user during the sign up process.
-
Log into Data Infrastructure Insights
-
In the menu, click Admin > User Management
The User Management screen is displayed. The screen contains a list of all of the accounts on the system.
-
Click + User
The Invite User screen is displayed.
-
Enter an email address or multiple addresses for invitations.
Note: When you enter multiple addresses, they are all created with the same role. You can only set multiple users to the same role.
-
Select the user's role for each feature of Data Infrastructure Insights.

The features and roles you can choose from depend on which features you have access to in your particular Administrator role. For example, if you have Admin role only for Reporting, you will be able to assign users to any role in Reporting, but will not be able to assign roles for Observability or Security. 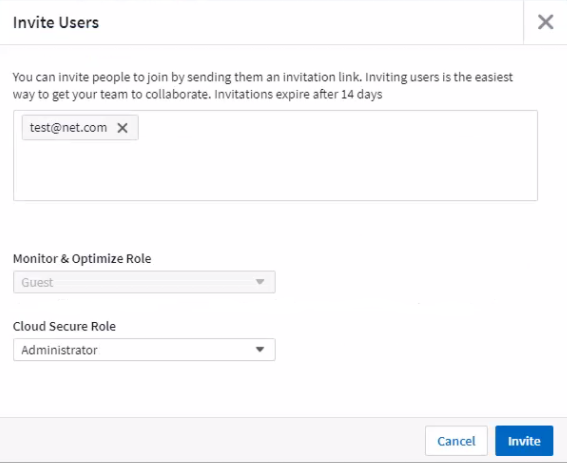
-
Click Invite
The invitation is sent to the user. Users will have 14 days to accept the invitation. Once a user accepts the invitation, they will be taken to the NetApp Cloud Portal, where they will sign up using the email address in the invitation. If they have an existing account for that email address, they can simply sign in and will then be able to access their Data Infrastructure Insights environment.
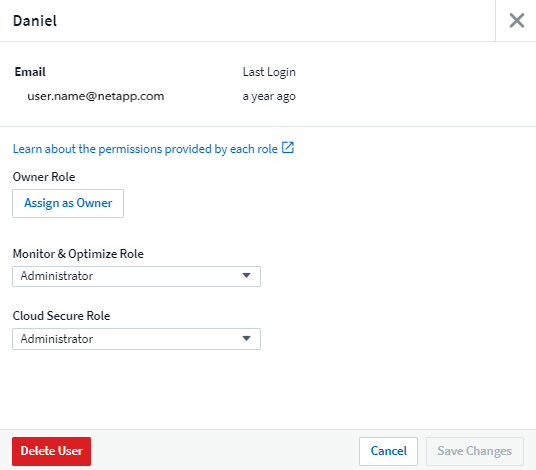
Modifying an existing user's role
To modify an existing user's role, including adding them as a secondary account owner, follow these steps.
-
Click Admin > User Management. The screen displays a list of all of the accounts on the system.
-
Click the user name of the account you want to change.
-
Modify the user's role in each Data Infrastructure Insights feature set as needed.
-
Click Save Changes.
To assign a Secondary Account Owner
You must be logged in as an account owner for Observability in order to assign the account owner role to another user.
-
Click Admin > User Management.
-
Click the user name of the account you want to change.
-
In the User dialog, click on Assign as Owner.
-
Save the changes.
You can have as many account owners as you wish, but best practice is to limit the owner role to only select people.
Deleting Users
A user with the Administrator role can delete a user (for example, someone no longer with the company) by clicking on the user's name and clicking Delete User in the dialog. The user will be removed from the Data Infrastructure Insights environment.
Note that any dashboards, queries, etc. that were created by the user will remain available in the Data Infrastructure Insights environment even after the user is removed.
Single Sign-On (SSO) and Identity Federation
What is Identity Federation?
With Identity Federation:
-
Authentication is delegated to the customer’s identity management system, using the customer’s credentials from your corporate directory, and automatization policies such as Multi-Factor Authentication (MFA).
-
Users log in once to all NetApp Console Services (Single Sign On).
User accounts are managed in NetApp Console for all Cloud Services. By default, authentication is done using a Console local user profile. Below is a simplified overview of that process:

However, some customers would like to use their own identity provider to authenticate their users for Data Infrastructure Insights and their other NetApp Console Services. With Identity Federation, NetApp Console accounts are authenticated using credentials from your corporate directory.
The following is a simplified example of that process:

In the above diagram, when a user accesses Data Infrastructure Insights, that user is directed to the customer’s identity management system for authentication. Once the account is authenticated, the user is directed to the Data Infrastructure Insights tenant URL.
Enabling Identity Federation
Console uses Auth0 to implement Identity Federation and integrate with services like Active Directory Federation Services (ADFS) and Microsoft Azure Active Directory (AD). To configure Identity Federation, see the Federation instructions.
|
|
You must configure Identity Federation before you can use SSO with Data Infrastructure Insights. |
It is important to understand that changing identity federation will apply not only to Data Infrastructure Insights but to all NetApp Console Services. The customer should discuss this change with the NetApp team of each product they own to make sure the configuration they are using will work with Identity Federation or if adjustments need to be made on any accounts. The customer will need to involve their internal SSO team in the change to identity federation as well.
It is also important to realize that once identity federation is enabled, that any changes to the company’s identity provider (such moving from SAML to Microsoft AD) will likely require troubleshooting/changes/attention to update the profiles of the users.
For this or any other federation issues, you can open a support ticket at https://mysupport.netapp.com/site/help.
Single Sign-On (SSO) User Auto-Provisioning
In addition to inviting users, administrators can enable Single Sign-On (SSO) User Auto-Provisioning access to Data Infrastructure Insights for all users in their corporate domain, without having to invite them individually. With SSO enabled, any user with the same domain email address can log into Data Infrastructure Insights using their corporate credentials.
|
|
SSO User Auto-Provisioning is available in Data Infrastructure Insights Premium Edition, and must be configured before it can be enabled for Data Infrastructure Insights. SSO User Auto-Provisioning configuration includes Identity Federation through NetApp Console as described in the section above. Federation allows single sign-on users to access your NetApp Console accounts using credentials from your corporate directory, using open standards such as Security Assertion Markup Language 2.0 (SAML) and OpenID Connect (OIDC). |
To configure SSO User Auto-Provisioning, on the Admin > User Management page, You must first have set up Identity Federation. Select the Set Up Federation link in the banner to proceed to Console Federation. Once that is configured, Data Infrastructure Insights administrators can then enable SSO user login. When an administrator enables SSO User Auto-Provisioning, they choose a default role for all SSO users (such as Guest or User). Users who log in through SSO will have that default role.

Occasionally, an administrator will want to promote a single user out of the default SSO role (for example, to make them an administrator). They can accomplish this on the Admin > User Management page by clicking on the right-side menu for the user and selecting Assign Role. Users who are assigned an explicit role in this way continue to have access to Data Infrastructure Insights even if SSO User Auto-Provisioning is subsequently disabled.
If the user no longer requires the elevated role, you can click the menu to Remove User. The user will be removed from the list. If SSO User Auto-Provisioning is enabled, the user can continue log in to Data Infrastructure Insights through SSO, with the default role.
You can choose to hide SSO users by unchecking the Show SSO Users checkbox.
However, do not enable SSO User Auto-Provisioning if either of these are true:
-
Your organization has more than one Data Infrastructure Insights tenant
-
Your organization does not want any/every user in the federated domain to have some level of automatic access to the Data Infrastructure Insights tenant. At this point in time, we do not have the ability to use groups to control role access with this option.
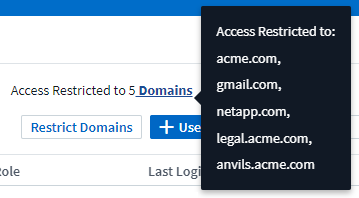
Restricting Access by Domain
Data Infrastructure Insights can restrict user access to only the domains you specify. On the Admin > User Management page, select "Restrict Domains".
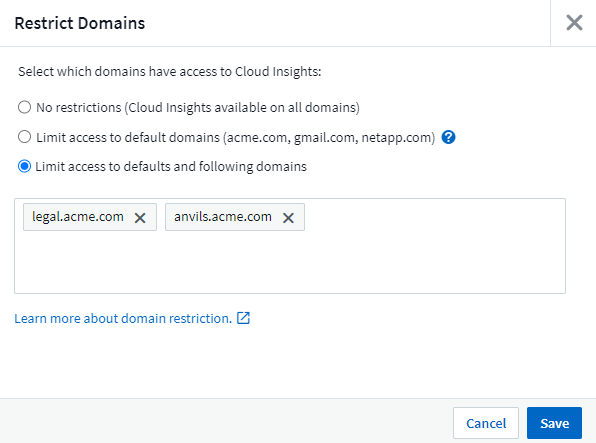
You are presented with these choices:
-
No restrictions: Data Infrastructure Insights remains accessible to users regardless of their domain.
-
Limit access to default domains: default domains are those used by your Data Infrastructure Insights environment account owners. These domains are always accessible.
-
Limit access to defaults plus domains you specify. List any domains you want to have access to your Data Infrastructure Insights environment, in addition to the default domains.