

Monitor NetApp Console operations
 Suggest changes
You can monitor the status of the operations that the Console is performing to see if there are any issues that you need to address. You can view the status from the Audit page, the Notification Center, or have notifications sent to your email.
The table highlights the features of the Audit page and Notification Center by comparing them.
| Notification Center | Audit page |
|---|---|
Shows high level status for events and actions |
Provides details for each event or action for further investigation |
Shows status for the current login session (the information does not appear in the Notification Center after you log off) |
Retains status for the last month |
Shows only actions initiated in the user interface |
Shows all actions from the UI or APIs |
Shows user-initiated actions |
Shows all actions, whether user-initiated or system-initiated |
Filter results by importance |
Filter by service, action, user, status, and more |
Provides the ability to email notifications to users and to others |
No email capability |
Audit user activity from the Audit page
Use the Audit page to identify who performed an action or its status.
The Audit page shows the actions that users completed to manage your organization or account. This includes management actions such as associating users, creating systems, creating agents, and more.
You can also verify who added a member to an organization or that a project was deleted successfully.
-
Select Administration > Audit.
-
Use the filters above the table to change which actions display in the table.
For example, you can use the Service filter to show actions related to a specific service, or you can use the User filter to show actions related to a specific user account.
Download audit logs from the Audit page
You can download the audit logs from the Audit page to a CSV file. This enables you to keep a record of the actions that users perform in your organization. The CSV file includes all columns in the downloaded CSV file, regardless of filters or displayed columns on the Audit page.
-
In the Audit page, select the download icon in the upper right corner of the table.
Monitor activities using the Notification Center
Notifications track Console operations to confirm success. They enable you to view the status for many Console actions that you initiated during your current login session. Not all Console services report information into the Notification Center.
You can display the notifications by selecting the notification bell (![]() ) in the menu bar. The color of the little bubble in the bell indicates the highest level severity notification that is active. So if you see a red bubble, it means there's an important notification that you should look at.
) in the menu bar. The color of the little bubble in the bell indicates the highest level severity notification that is active. So if you see a red bubble, it means there's an important notification that you should look at.
You can also configure the Console to send certain types of notifications by email so you can be informed of important system activity even when you're not logged into the system. Emails can be sent to any users who are part of your organization, or to any other recipients who need to be aware of certain types of system activity. See how to set email notification settings.
Comparing the Notification Center with alerts
The Notification Center enables you to view the status of operations you've initiated and set up alert notifications for certain types of system activities. Meanwhile, alerts enable you to view issues or potential risks in your ONTAP storage environment related to capacity, availability, performance, protection, and security.
Notification types
The Console classifies notifications into the following categories:
| Notification type | Description |
|---|---|
Critical |
A problem occurred that might lead to service disruption if corrective action is not taken immediately. |
Error |
An action or process ended with failure, or could lead to failure if corrective action is not taken. |
Warning |
An issue that you should be aware of to make sure it does not reach the critical severity. Notifications of this severity do not cause service disruption, and immediate corrective action might not be required. |
Recommendation |
A system recommendation for you to take an action to improve the system or a certain service; for example: costs saving, suggestion for new services, recommended security configuration, etc. |
Information |
A message that provides additional information about an action or process. |
Success |
An action or process completed successfully. |
Filter notifications
By default you'll see all active notifications in the Notification Center. You can filter the notifications that you see to show only those notifications that are important to you. You can filter by "Service" and by notification "Type".
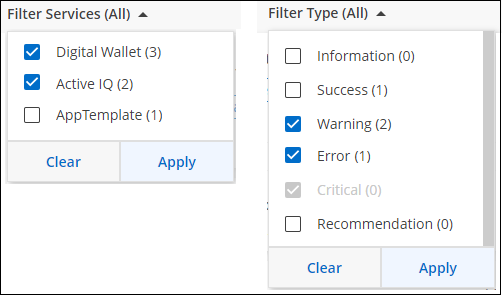
For example, if you want to see only "Error" and "Warning" notifications for Console operations, select those entries and you'll see only those types of notifications.
Dismiss notifications
You can remove notifications from the page if you no longer need to see them. You can dismiss notifications individually or all at once.
To dismiss all notifications, in the Notification Center, select  and select Dismiss All.
To dismiss individual notifications, hover your cursor over the notification and select Dismiss.
Set email notification settings
You can send specific types of notifications by email so you can be informed of important system activity even when you're not logged in. Emails can be sent to any users who are part of your organization or account, or to any other recipients who need to be aware of certain types of system activity.

|
|
The filters you set in the Notification Center do not determine the types of notifications you receive by email. By default, any Organization admin will receive emails for all "Critical" and "Recommendation" notifications. These notifications are across all services - you can't choose to receive notifications for only certain services, for example agents or NetApp Backup and Recovery.
All other users and recipients are configured not to receive any notification emails - so you'll need to configure notification settings for any additional users.
You must have the Organization admin role to customize the notifications settings.
-
Select Administration > Notifications settings.
-
Select Organization users or Additional recipients.
The Additional recipients page allows you to configure the Console to notify people who are members of your Console organization.
-
Select a user, or multiple users, from either the Organization users page or the Additional Recipients page, and choose the type of notifications to be sent:
-
To make changes for a single user, select the menu in the Notifications column for that user, check the types of Notifications to be sent, and select Apply.
-
To make changes for multiple users, check the box for each user, select Manage Email Notifications, check the types of Notifications to be sent, and select Apply.
-
Add additional email recipients
The users who appear in the Organization users page are populated automatically from the users in your organization or account. You can add email addresses in the Additional Recipients page for other people, or groups, who do not have access to the Console, but who need to be notified about certain types of alerts and notifications.
-
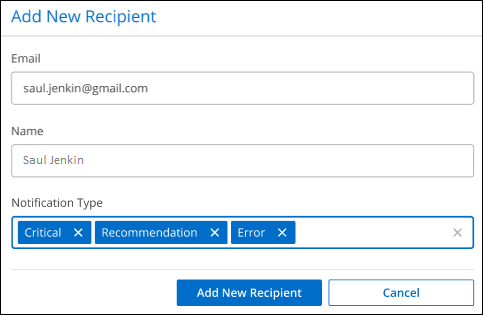
From the Notifications settings page, select Add New Recipients.
-
Enter the name, email address, and select the types of notifications that recipient will receive, and select Add New Recipient.