Install NetApp Data Classification on a host that has internet access
 Suggest changes


To deploy NetApp Data Classification on a Linux host in your network or on a Linux host in the cloud that has internet access, you need deploy the Linux host manually in your network or in the cloud.
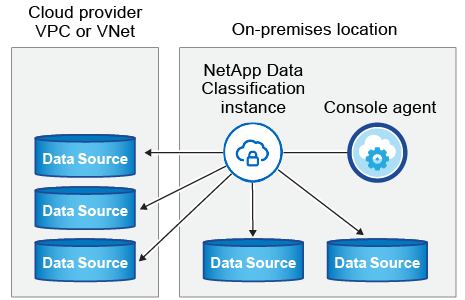
The on-premises installation is a good option if you prefer to scan on-premises ONTAP systems using a Data Classification instance that's also located on premises. This is not a requirement. The software functions the same regardless of which installation method you choose.
The Data Classification installation script starts by checking if the system and environment meet the required prerequisites. If the prerequisites are all met, then the installation starts. If you would like to verify the prerequisites independently of running the Data Classification installation, there is a separate software package you can download that only tests for the prerequisites. See how to check if your Linux host is ready to install Data Classification.
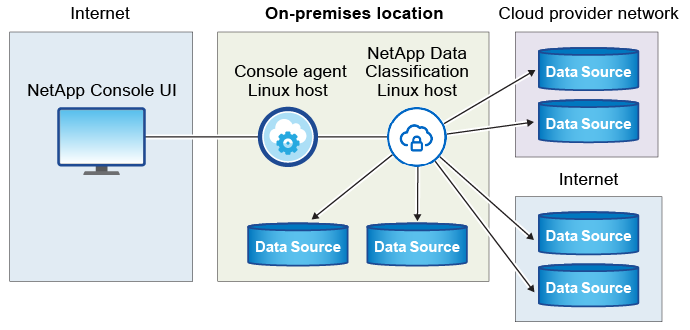
The typical installation on a Linux host in your premises has the following components and connections.

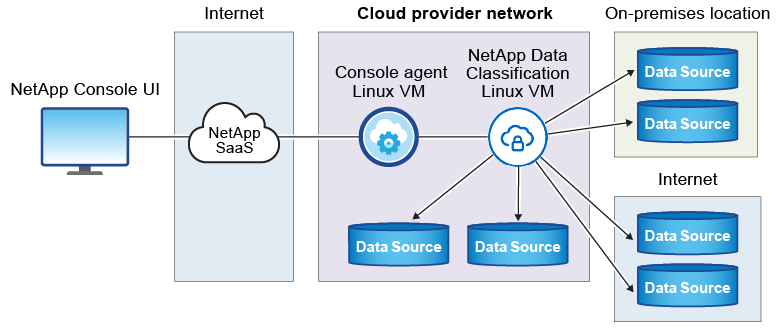
The typical installation on a Linux host in the cloud has the following components and connections.

Quick start
Get started quickly by following these steps, or scroll down to the remaining sections for full details.
 Create a Console agent
If you don't already have a Console agent , deploy the Console agent on-premises on a Linux host in your network, or on a Linux host in the cloud.
You can also create a Console agent with your cloud provider. See creating a Console agent in AWS, creating a Console agent in Azure, or creating a Console agent in GCP.
 Review prerequisites
Ensure that your environment can meet the prerequisites. This includes outbound internet access for the instance, connectivity between the Console agent and Data Classification over port 443, and more. See the complete list.
You also need a Linux system that meets the following requirements.
 Download and deploy Data Classification
Download the Cloud Data Classification software from the NetApp Support Site and copy the installer file to the Linux host you plan to use. Then launch the installation wizard and follow the prompts to deploy the Data Classification instance.
Create a Console agent
A Console agent is required before you can install and use Data Classification. In most cases you'll probably have a Console agent set up before you attempt to activate Data Classification because most Console features require a Console agent, but there are cases where you'll you need to set one up now.
To create one in your cloud provider environment, see creating a Console agent in AWS, creating a Console agent in Azure, or creating a Console agent in GCP.
There are some scenarios where you have to use a Console agent that's deployed in a specific cloud provider:
-
When scanning data in Cloud Volumes ONTAP in AWS or Amazon FSx for ONTAP, you use a Console agent in AWS.
-
When scanning data in Cloud Volumes ONTAP in Azure or in Azure NetApp Files, you use a Console agent in Azure.
For Azure NetApp Files, it must be deployed in the same region as the volumes you wish to scan.
-
When scanning data in Cloud Volumes ONTAP in GCP, you use a Console agent in GCP.
On-prem ONTAP systems, NetApp file shares and database accounts can be scanned using any of these cloud Console agents.
Note that you can also deploy the Console agent on-premises on a Linux host in your network or on a Linux host in the cloud. Some users planning to install Data Classification on-prem may also choose to install the Console agent on-prem.
You'll need the IP address or host name of the Console agent system when installing Data Classification. You'll have this information if you installed the Console agent in your premises. If the Console agent is deployed in the cloud, you can find this information from the Console: select the Help icon then Support then Console agent.
Prepare the Linux host system
Data Classification software must run on a host that meets specific operating system requirements, RAM requirements, software requirements, and so on. The Linux host can be in your network, or in the cloud.
Ensure that you can keep Data Classification running. The Data Classification machine needs to stay on to continuously scan your data.
-
Data Classification must be on a dedicated host. The host can't be shared with other applications or third-party software such as antivirus.
-
Choose the size that aligns with the data set you plan to scan with Data Classification.
System size CPU RAM (swap memory must be disabled) Disk Extra Large
32 CPUs
128 GB RAM
-
1 TiB SSD on /, or 100 GiB available on /opt
-
895 GiB available on /var/lib/docker
-
5 GiB on /tmp
-
For Podman, 30 GB on /var/tmp
Large
16 CPUs
64 GB RAM
-
500 GiB SSD on /, or 100 GiB available on /opt
-
400 GiB available on /var/lib/docker or for Podman /var/lib/containers
-
5 GiB on /tmp
-
For Podman, 30 GB on /var/tmp
-
-
When deploying a compute instance in the cloud for your Data Classification installation, it's recommended you use a system that meets the "Large" system requirements above:
-
Amazon Elastic Compute Cloud (Amazon EC2) instance type: "m6i.4xlarge". See additional AWS instance types.
-
Azure VM size: "Standard_D16s_v3". See additional Azure instance types.
-
GCP machine type: "n2-standard-16". See additional GCP instance types.
-
-
UNIX folder permissions: The following minimum UNIX permissions are required:
Folder Minimum permissions /tmp
rwxrwxrwt/opt
rwxr-xr-x/var/lib/docker
rwx------/usr/lib/systemd/system
rwxr-xr-x -
Operating system:
-
The following operating systems require using the Docker container engine:
-
Red Hat Enterprise Linux version 7.8 and 7.9
-
Ubuntu 22.04 (requires Data Classification version 1.23 or greater)
-
Ubuntu 24.04 (requires Data Classification version 1.23 or greater)
-
-
The following operating systems require using the Podman container engine, and they require Data Classification version 1.30 or greater:
-
Red Hat Enterprise Linux version 8.8, 8.10, 9.0, 9.1, 9.2, 9.3, 9.4, 9.5, and 9.6.
-
-
Advanced Vector Extensions (AVX2) must be enabled on the host system.
-
-
Red Hat Subscription Management: The host must be registered with Red Hat Subscription Management. If it's not registered, the system can't access repositories to update required 3rd-party software during installation.
-
Additional software: You must install the following software on the host before you install Data Classification:
-
Depending on the OS you are using, you need to install one of the container engines:
-
Docker Engine version 19.3.1 or greater. View installation instructions.
-
Podman version 4 or greater. To install Podman, enter (
sudo yum install podman netavark -y).
-
-
-
Python version 3.6 or greater. View installation instructions.
-
NTP considerations: NetApp recommends configuring the Data Classification system to use a Network Time Protocol (NTP) service. The time must be synchronized between the Data Classification system and the Console agent system.
-
-
Firewalld considerations: If you are planning to use
firewalld, we recommend that you enable it before installing Data Classification. Run the following commands to configurefirewalldso that it is compatible with Data Classification:firewall-cmd --permanent --add-service=http firewall-cmd --permanent --add-service=https firewall-cmd --permanent --add-port=80/tcp firewall-cmd --permanent --add-port=8080/tcp firewall-cmd --permanent --add-port=443/tcp firewall-cmd --reload
If you're planning to use additional Data Classification hosts as scanner nodes, add these rules to your primary system at this time:
firewall-cmd --permanent --add-port=2377/tcp
firewall-cmd --permanent --add-port=7946/udp
firewall-cmd --permanent --add-port=7946/tcp
firewall-cmd --permanent --add-port=4789/udp
Note that you must restart Docker or Podman whenever you enable or update
firewalldsettings.

|
The IP address of the Data Classification host system can't be changed after installation. |
Enable outbound internet access from Data Classification
Data Classification requires outbound internet access. If your virtual or physical network uses a proxy server for internet access, ensure that the Data Classification instance has outbound internet access to contact the following endpoints.
| Endpoints | Purpose |
|---|---|
https://api.console.netapp.com |
Communication with the Console, which includes NetApp accounts. |
https://netapp-cloud-account.auth0.com |
Communication with the Console website for centralized user authentication. |
https://support.compliance.api.bluexp.netapp.com/ |
Provides access to software images, manifests, templates, and to send logs and metrics. |
https://support.compliance.api.bluexp.netapp.com/ |
Enables NetApp to stream data from audit records. |
https://github.com/docker |
Provides prerequisite packages for docker installation. |
http://packages.ubuntu.com/ |
Provides prerequisite packages for Ubuntu installation. |
Verify that all required ports are enabled
You must ensure that all required ports are open for communication between the Console agent, Data Classification, Active Directory, and your data sources.
| Connection Type | Ports | Description |
|---|---|---|
Console agent <> Data Classification |
8080 (TCP), 443 (TCP), and 80. 9000 |
The firewall or routing rules for the Console agent must allow inbound and outbound traffic over port 443 to and from the Data Classification instance. |
Console agent <> ONTAP cluster (NAS) |
443 (TCP) |
The Console discovers ONTAP clusters using HTTPS. If you use custom firewall policies, they must meet the following requirements:
|
Data Classification <> ONTAP cluster |
|
Data Classification needs a network connection to each Cloud Volumes ONTAP subnet or on-prem ONTAP system. Firewalls or routing rules for Cloud Volumes ONTAP must allow inbound connections from the Data Classification instance. Make sure these ports are open to the Data Classification instance:
NFS volume export policies must allow access from the Data Classification instance. |
Data Classification <> Active Directory |
389 (TCP & UDP), 636 (TCP), 3268 (TCP), and 3269 (TCP) |
You must have an Active Directory already set up for the users in your company. Additionally, Data Classification needs Active Directory credentials to scan CIFS volumes. You must have the information for the Active Directory:
|
Install Data Classification on the Linux host
For typical configurations you'll install the software on a single host system. See those steps here.

See Preparing the Linux host system and Reviewing prerequisites for the full list of requirements before you deploy Data Classification.
Upgrades to Data Classification software is automated as long as the instance has internet connectivity.

|
Data Classification is currently unable to scan S3 buckets, Azure NetApp Files, or FSx for ONTAP when the software is installed on premises. In these cases you'll need to deploy a separate Console agent and instance of Data Classification in the cloud and switch between Connectors for your different data sources. |
Single-host installation for typical configurations
Review the requirements and follow these steps when installing Data Classification software on a single on-premises host.
Watch this video to see how to install Data Classification.
Note that all installation activities are logged when installing Data Classification. If you run into any issues during installation, you can view the contents of the installation audit log. It is written to /opt/netapp/install_logs/.
-
Verify that your Linux system meets the host requirements.
-
Verify that the system has the two prerequisite software packages installed (Docker Engine or Podman, and Python 3).
-
Make sure you have root privileges on the Linux system.
-
If you're using a proxy for access to the internet:
-
You'll need the proxy server information (IP address or host name, connection port, connection scheme: https or http, user name and password).
-
If the proxy is performing TLS interception, you'll need to know the path on the Data Classification Linux system where the TLS CA certificates are stored.
-
The proxy must be non-transparent. Data Classification does not currently support transparent proxies.
-
The user must be a local user. Domain users are not supported.
-
-
Verify that your offline environment meets the required permissions and connectivity.
-
Download the Data Classification software from the NetApp Support Site. The file you should select is named DATASENSE-INSTALLER-<version>.tar.gz.
-
Copy the installer file to the Linux host you plan to use (using
scpor some other method). -
Unzip the installer file on the host machine, for example:
tar -xzf DATASENSE-INSTALLER-V1.25.0.tar.gz -
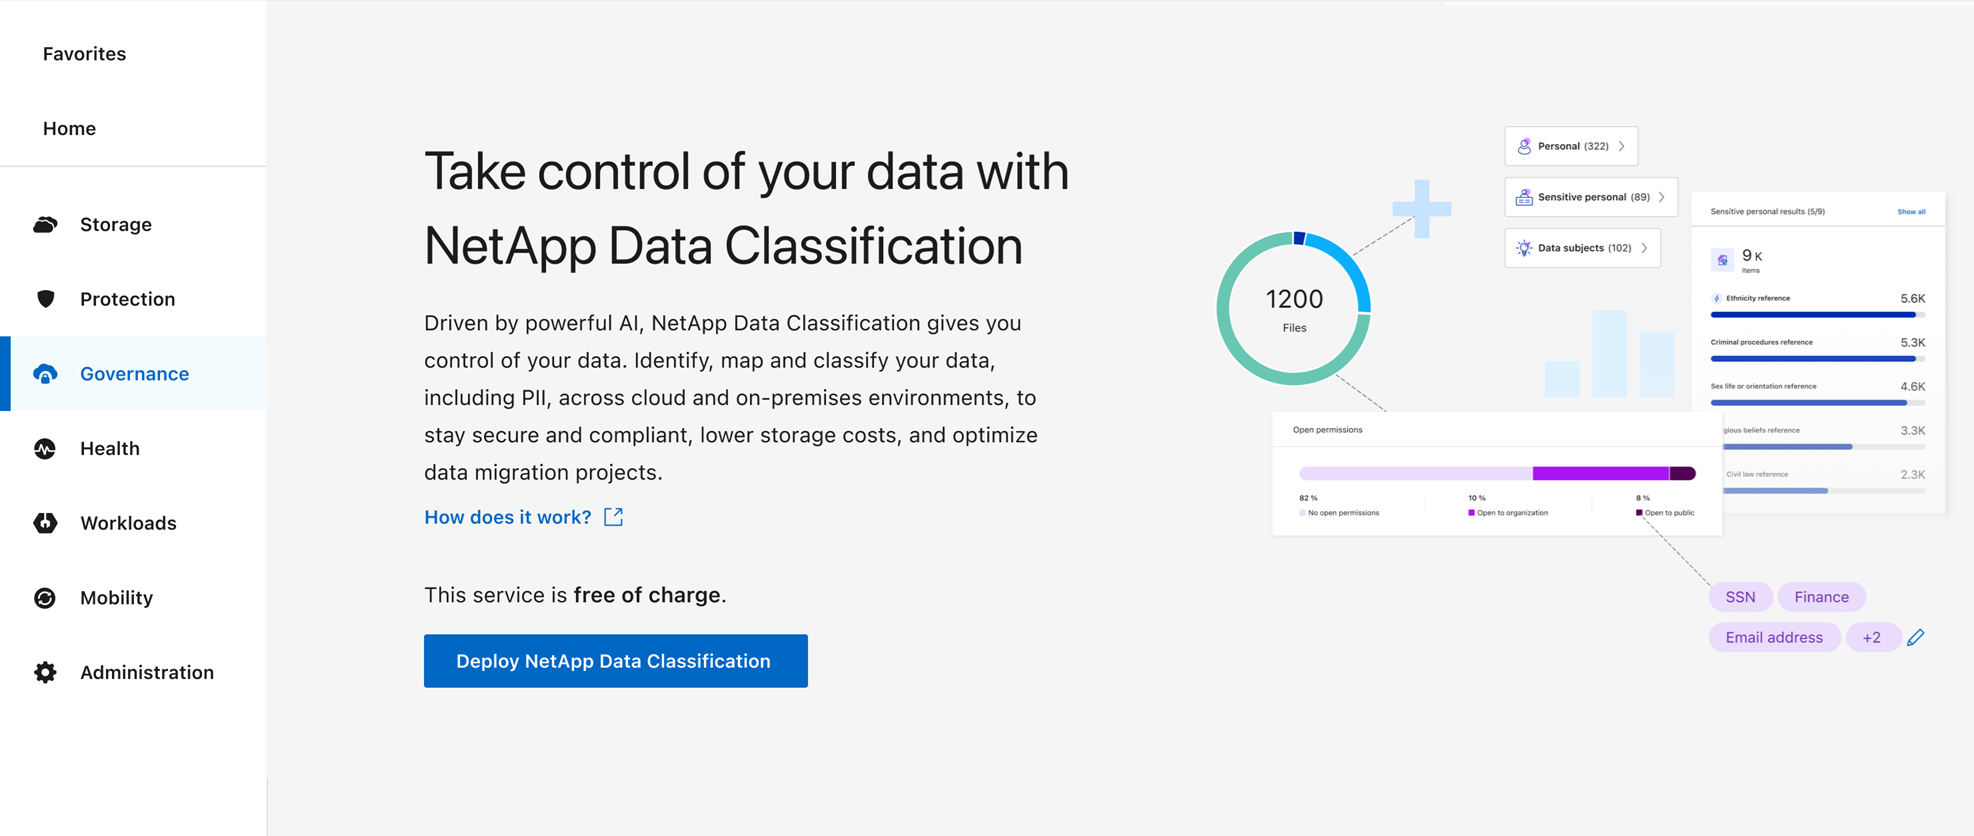
In the Console, select Governance > Classification.
-
Select Deploy Classification On-Premises or Cloud.

-
Depending on whether you are installing Data Classification on an instance you prepared in the cloud or on an instance you prepared in your premises, select the appropriate Deploy option to start the Data Classification installation.
-
The Deploy Data Classification On Premises dialog is displayed. Copy the provided command (for example:
sudo ./install.sh -a 12345 -c 27AG75 -t 2198qq) and paste it in a text file so you can use it later. Then select Close to dismiss the dialog. -
On the host machine, enter the command you copied and then follow a series of prompts, or you can provide the full command including all required parameters as command line arguments.
Note that the installer performs a pre-check to make sure your system and networking requirements are in place for a successful installation. Watch this video to understand the pre-check messages and implications.
Enter parameters as prompted: Enter the full command: -
Paste the command you copied from step 7:
sudo ./install.sh -a <account_id> -c <client_id> -t <user_token>If you are installing on a cloud instance (not on your premises), add
--manual-cloud-install <cloud_provider>. -
Enter the IP address or host name of the Data Classification host machine so it can be accessed by the Console agent system.
-
Enter the IP address or host name of the Console agent host machine so it can be accessed by the Data Classification system.
-
Enter proxy details as prompted. If your Console agent already uses a proxy, there is no need to enter this information again here since Data Classification will automatically use the proxy used by the Console agent.
Alternatively, you can create the whole command in advance, providing the necessary host and proxy parameters:
sudo ./install.sh -a <account_id> -c <client_id> -t <user_token> --host <ds_host> --manager-host <cm_host> --manual-cloud-install <cloud_provider> --proxy-host <proxy_host> --proxy-port <proxy_port> --proxy-scheme <proxy_scheme> --proxy-user <proxy_user> --proxy-password <proxy_password> --cacert-folder-path <ca_cert_dir>Variable values:
-
account_id = NetApp Account ID
-
client_id = Console agent Client ID (add the suffix "clients" to the client ID if it not already there)
-
user_token = JWT user access token
-
ds_host = IP address or host name of the Data Classification Linux system.
-
cm_host = IP address or host name of the Console agent system.
-
cloud_provider = When installing on a cloud instance, enter "AWS", "Azure", or "Gcp" depending on cloud provider.
-
proxy_host = IP or host name of the proxy server if the host is behind a proxy server.
-
proxy_port = Port to connect to the proxy server (default 80).
-
proxy_scheme = Connection scheme: https or http (default http).
-
proxy_user = Authenticated user to connect to the proxy server, if basic authentication is required. The user must be a local user - domain users are not supported.
-
proxy_password = Password for the user name that you specified.
-
ca_cert_dir = Path on the Data Classification Linux system containing additional TLS CA certificate bundles. Only required if the proxy is performing TLS interception.
-
The Data Classification installer installs packages, registers the installation, and installs Data Classification. Installation can take 10 to 20 minutes.
If there is connectivity over port 8080 between the host machine and the Console agent instance, you'll see the installation progress in the Data Classification tab in the Console.
From the Configuration page you can select the data sources that you want to scan.


