

Scan file shares with NetApp Data Classification
 Suggest changes
To scan file shares, you must first create a file shares group in NetApp Data Classification. File shares groups are for NFS or CIFS (SMB) shares hosted on-premises or in the cloud.

|
Scanning data from non-NetApp file shares is not supported in the Data Classification core version. |
Prerequisites
Review the following prerequisites to make sure that you have a supported configuration before you enable Data Classification.
-
The shares can be hosted anywhere, including in the cloud or on-premises. CIFS shares from older NetApp 7-Mode storage systems can be scanned as file shares.
-
Data Classification can't extract permissions or the "last accessed time" from 7-Mode systems.
-
Because of a known issue between some Linux versions and CIFS shares on 7-Mode systems, you must configure the share to use only SMBv1 with NTLM authentication enabled.
-
-
There needs to be network connectivity between the Data Classification instance and the shares.
-
You can add a DFS (Distributed File System) share as a regular CIFS share. Because Data Classification is unaware that the share is built upon multiple servers/volumes combined as a single CIFS share, you might receive permission or connectivity errors about the share when the message really only applies to one of the folders/shares that is located on a different server/volume.
-
For CIFS (SMB) shares, ensure that you have Active Directory credentials that provide read access to the shares. Admin credentials are preferred in case Data Classification needs to scan any data that requires elevated permissions.
If you want to make sure your files "last accessed times" are unchanged by Data Classification scans, it's recommended the user has Write Attributes permissions in CIFS or write permissions in NFS. If possible, configure the Active Directory user as part of a parent group in the organization which has permissions to all files.
-
All CIFS file shares in a group must use the same Active Directory credentials.
-
You can mix NFS and CIFS (using either Kerberos or NTLM) shares. You must add the shares to the group separately. That is, you must complete the process twice—once per protocol.
-
You cannot create a file shares group that mixes CIFS authentication types (Kerberos and NTLM).
-
-
If you're using CIFS with Kerberos authentication, ensure the IP address provided is accessible to the Data Classification. The files shares can't be added if the IP address is unreachable.
Create a file shares group
When you add file shares to the group, you must use the format <host_name>:/<share_path>.
You can add file shares individually or you can enter a line-separated list of the file shares you want to scan. You can add up to 100 shares at a time.
-
From the Data Classification menu, select Configuration.
-
From the Configuration page, select Add System > Add File Shares Group.
-
In the Add File Shares Group dialog, enter the name for the group of shares then select Continue.
-
Select the protocol for the file shares you are adding.

-
If you're adding CIFS shares with NTLM authentication, enter the Active Directory credentials to access the CIFS volumes. Although read-only credentials are supported, it's recommended you provide full access with administrator credentials. Select Save.
-
-
Add the file shares that you want to scan (one file share per line). Then select Continue.
-
A confirmation dialog displays the number of shares that were added.
-
Decide how you want to scan the volumes. What's the difference between Mapping and Classification scans?.
-
To enable scanning on all volumes in the system, select Activate scan then select Map only all volumes or Full scan all volumes.
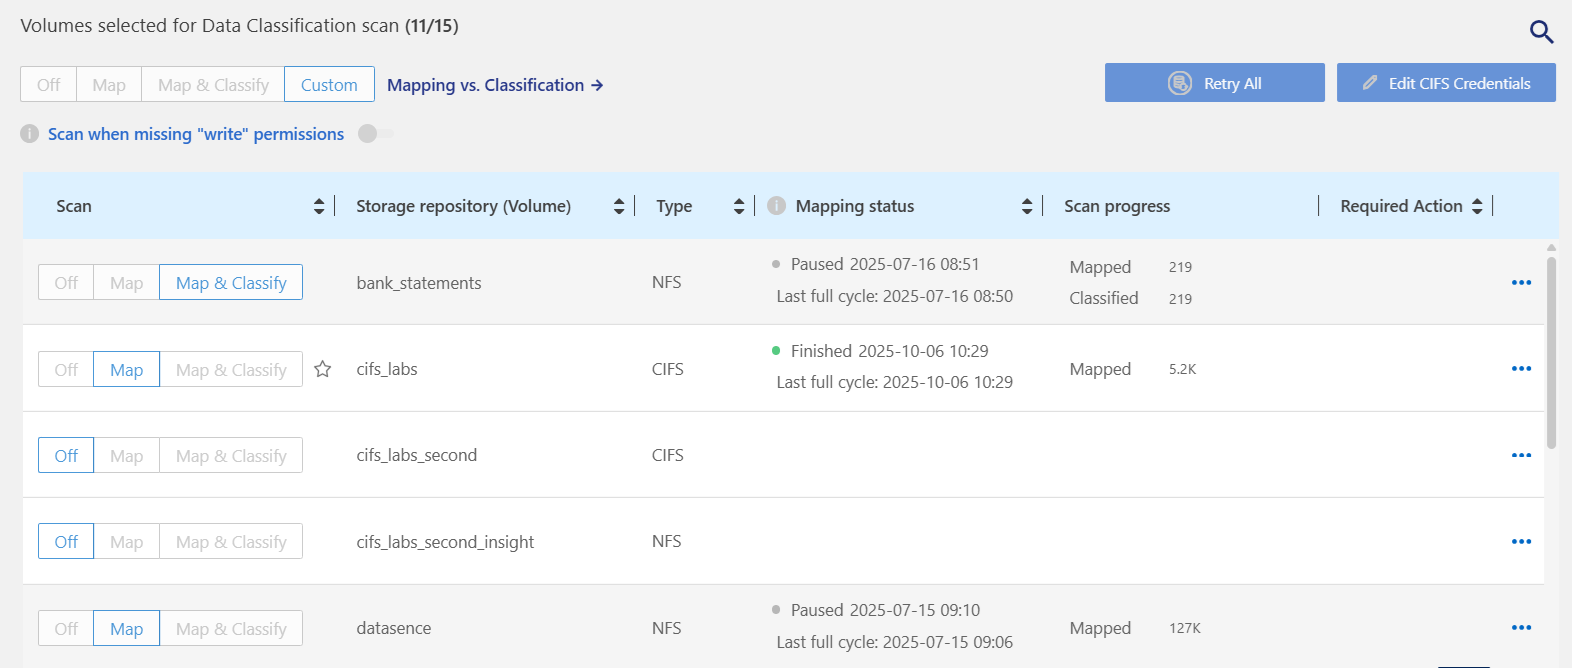
To manage scanning on only select volumes, select Activate scan then Manage. In the system overview, identify the resources you want to scan. Select the scan type for each volume then set it to the scanning type you want: full or mapping-only.
See Enable and disable scans on volumes for details.
|
|
The system overview page has a Scan without write permissions option that is disabled by default. If Data Classification doesn't have the appropriate permissions, it won't scan the files because Data Classification can't revert the "last accessed time" to the original timestamp. You can override this setting using the Scan without write permissions option. To learn more about this option, see Metadata collected from data sources in Data Classification. |
Data Classification starts scanning the files in the file shares you added. You can Track the scanning progress and view the results of the scan in the Dashboard.
|
|
If the scan doesn't complete successfully for a CIFS configuration with Kerberos authentication, check the Configuration tab for errors. |
Edit a file shares group
After you create a file shares group, you can edit the CIFS protocol or add and remove file shares.
-
From the Data Classification menu, select Configuration.
-
From the Configuration page, find the file shares group system you want to modify then select Manage.
-
Select Edit CIFS Credentials.
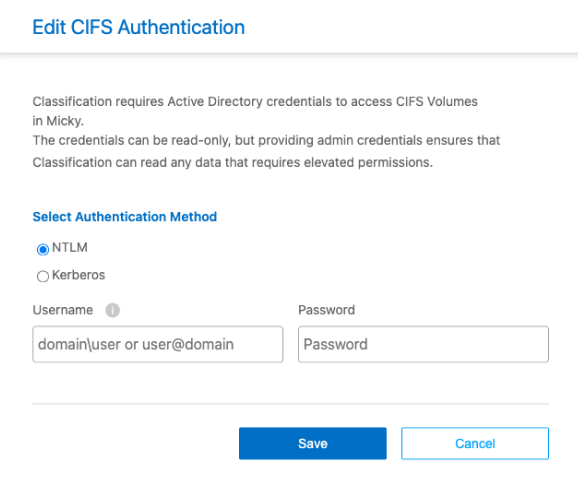
-
Choose the authentication method: NTLM or Kerberos.
-
Enter the Active Directory Username and Password.
-
Select Save to complete the process.
-
From the Data Classification menu, select Configuration.
-
From the Configuration page, find the file shares group you want to modify. Select Manage.
-
Select + Add shares.
-
Select the protocol for the file shares you are adding.
If you're adding file shares to a protocol you've already configured, no changes are required.
If you're adding file shares with a second protocol, ensure you've properly configured the authentication as detailed in the prerequisites.
-
Add the file shares you want to scan (one file share per line) using the format
<host_name>:/<share_path>. -
Select Save to complete adding the file shares.
-
From the Data Classification menu, select Configuration.
-
Find the system you want to remove file shares from then select Manage.
-
From the system overview page, select the Actions
 for the file share you want to remove.
 -
From the Actions menu, select Remove Share.
Track the scanning progress
You can track the progress of the initial scan.
-
Select the Configuration menu.
-
Find the file share group then select Manage.
-
For the storage repository, check the Scan progress column to view its status. There are separate progress bars if you've enabled full scans.
Enable and disable scans on volumes
You can start or stop scans on any system at any time from the Configuration page. You can also switch scans from map-only scans to mapping and classification scans, and vice-versa. It's recommended that you scan all volumes in a system.
The option to Scan without write permissions is disabled by default. This means that if Data Classification doesn't have appropriate write permissions, the system won't scan the files because Data Classification can't revert the "last accessed time" to the original timestamp. If your system can tolerate the last accessed time being modified, select this option. Learn more.
|
|
New volumes added to the system are automatically scanned only when you have enabled scanning for all volumes. If you've only enabled scanning on certain volumes, you must manually enable scanning on the newly added volume. |
-
From the Data Classification menu, select Configuration.
-
Identify the system you want to scan. Select Activate scan. In the dropdown, choose Scan all volumes: full scan, Scan all volumes: mapping only, or Manage scans to open the system menu and configure scanning on specific volumes.
To enable or disable scans for individual volumes, find the volumes in the list. In the scan type column, select Map only or Full scan.
When you enable scanning, Data Classification starts scanning the volumes you selected in the system. Results start to appear in the Compliance dashboard as soon as Data Classification starts the scan. Scan completion time depends on the amount of data, ranging from minutes to hours.