Scan Amazon FSx for ONTAP volumes with NetApp Data Classification
 Suggest changes


Complete a few steps to scan Amazon FSx for ONTAP volumes with NetApp Data Classification.
Before you begin
-
You need an active Console agent in AWS to deploy and manage Data Classification.
-
The security group you selected when creating the system must allow traffic from the Data Classification instance. You can find the associated security group using the ENI connected to the FSx for ONTAP file system and edit it using the AWS Management Console.
-
Ensure the following ports are open to the Data Classification instance:
-
For NFS – ports 111 and 2049.
-
For CIFS – ports 139 and 445.
-
Deploy the Data Classification instance
Deploy Data Classification if there isn't already an instance deployed.
You should deploy Data Classification in the same AWS network as the Console agent for AWS and the FSx volumes you wish to scan.
Note: Deploying Data Classification in an on-premises location is not currently supported when scanning FSx volumes.
Upgrades to Data Classification software is automated as long as the instance has internet connectivity.
Enable Data Classification in your systems
You can enable Data Classification for FSx for ONTAP volumes.
-
From NetApp Console, Governance > Classification.
-
From the Data Classification menu, select Configuration.

-
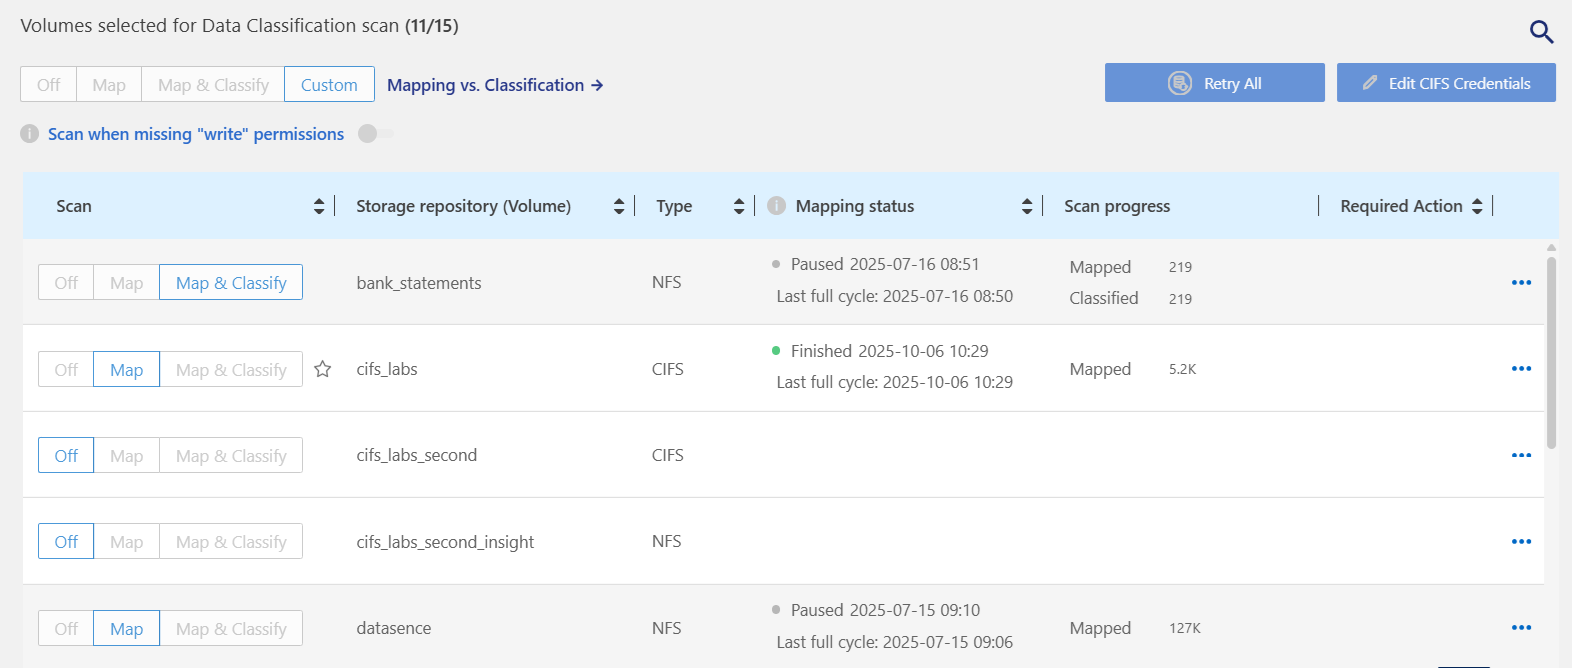
Select how you want to scan the volumes in each system. Learn about mapping and classification scans:
-
To map all volumes, select Map all Volumes.
-
To map and classify all volumes, select Map & Classify all Volumes.
-
To customize scanning for each volume, select Or select scanning type for each volume, and then choose the volumes you want to map and/or classify.
-
-
In the confirmation dialog box, select Approve to have Data Classification start scanning your volumes.
Data Classification starts scanning the volumes you selected in the system. Results will be available in the Compliance dashboard as soon as Data Classification finishes the initial scans. The time that it takes depends on the amount of data—it could be a few minutes or hours. You can track the progress of the initial scan by navigating to the Configuration menu then selecting the System configuration. Track the progress of each scan in the progress bar; you can hover over the progress bar to see the number of files scanned relative to the total files in the volume.

|
|
Verify that Data Classification has access to volumes
Make sure Data Classification can access volumes by checking your networking, security groups, and export policies.
You'll need to provide Data Classification with CIFS credentials so it can access CIFS volumes.
-
From the Data Classification menu, select Configuration.
-
On the Configuration page, select View Details to review the status and correct any errors.
For example, the following image shows a volume Data Classification can't scan due to network connectivity issues between the Data Classification instance and the volume.

-
Make sure there's a network connection between the Data Classification instance and each network that includes volumes for FSx for ONTAP.
For FSx for ONTAP, Data Classification can scan volumes only in the same region as the Console. -
Ensure NFS volume export policies include the IP address of the Data Classification instance so it can access the data on each volume.
-
If you use CIFS, provide Data Classification with Active Directory credentials so it can scan CIFS volumes.
-
From the Data Classification menu, select Configuration.
-
For each system, select Edit CIFS Credentials and enter the user name and password that Data Classification needs to access CIFS volumes on the system.
The credentials can be read-only, but providing admin credentials ensures that Data Classification can read any data that requires elevated permissions. The credentials are stored on the Data Classification instance.
If you want to make sure your files "last accessed times" are unchanged by Data Classification scans, it's recommended the user has Write Attributes permissions in CIFS or write permissions in NFS. If possible, configure the Active Directory user as part of a parent group in the organization which has permissions to all files.
After you enter the credentials, you should see a message that all CIFS volumes were authenticated successfully.
-
Enable and disable scans on volumes
You can start or stop scans on any system at any time from the Configuration page. You can also switch scans from mapping-only scans to mapping and classification scans, and vice-versa. It's recommended that you scan all volumes in a system.

|
New volumes added to the system are automatically scanned only when you have selected the Map or Map & Classify setting in the heading area. When set to Custom or Off in the heading area, you'll need to activate mapping and/or full scanning on each new volume you add in the system. |
The switch at the top of the page for Scan when missing "write" permissions is disabled by default. This means that if Data Classification doesn't have write attributes permissions in CIFS or write permissions in NFS, the system won't scan the files because Data Classification can't revert the "last access time" to the original timestamp. If you don't care if the last access time is reset, turn the switch ON and all files are scanned regardless of the permissions. Learn more.

|
New volumes added to the system are automatically scanned only when you have set the Map or Map & Classify setting in the heading area. When the setting for all volumes is Custom or Off, you need to activate scanning manually for each new volume you add. |

-
From the Data Classification menu, select Configuration.
-
Choose a system, then select Configuration.
-
To enable or disable scans for all volumes, select Map, Map & Classify, or Off in the heading above all volumes.
To enable or disable scans for individual volumes, find the volumes in the list then select Map, Map & Classify, or Off next to the volume name.
When you enable scanning, Data Classification starts scanning the volumes you selected in the system. Results start to appear in the Compliance dashboard as soon as Data Classification starts the scan. Scan completion time depends on the amount of data, ranging from minutes to hours.
Scan data protection volumes
By default, data protection (DP) volumes are not scanned because they are not exposed externally and Data Classification cannot access them. These are the destination volumes for SnapMirror operations from an FSx for ONTAP file system.
Initially, the volume list identifies these volumes as Type DP with the Status Not Scanning and the Required Action Enable Access to DP volumes.

If you want to scan these data protection volumes:
-
From the Data Classification menu, select Configuration.
-
Select Enable Access to DP volumes at the top of the page.
-
Review the confirmation message and select Enable Access to DP volumes again.
-
Volumes that were initially created as NFS volumes in the source FSx for ONTAP file system are enabled.
-
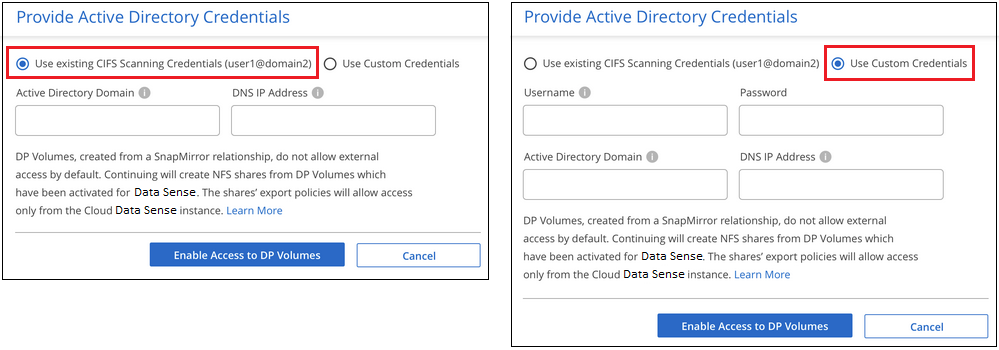
Volumes that were initially created as CIFS volumes in the source FSx for ONTAP file system require that you enter CIFS credentials to scan those DP volumes. If you already entered Active Directory credentials so that Data Classification can scan CIFS volumes you can use those credentials, or you can specify a different set of Admin credentials.

-
-
Activate each DP volume that you want to scan.
Once enabled, Data Classification creates an NFS share from each DP volume that was activated for scanning. The share export policies only allow access from the Data Classification instance.
If you had no CIFS data protection volumes when you initially enabled access to DP volumes, and later add some, the button Enable Access to CIFS DP appears at the top of the Configuration page. Select this button and add CIFS credentials to enable access to these CIFS DP volumes.

|
Active Directory credentials are registered only in the storage VM of the first CIFS DP volume, so all DP volumes on that SVM will be scanned. Any volumes that reside on other SVMs will not have the Active Directory credentials registered, so those DP volumes won't be scanned. |


