

Back up individual custom plug-in resources
 Suggest changes
If an individual custom plug-in resource is not part of any resource group, you can back up the resource from the Resources page. You can back up the resource on demand, or, if the resource has a policy attached and a schedule configured, then backups occur automatically according to the schedule.
What you will need
-
You must have created a backup policy.
-
If you want to back up a resource that has a SnapMirror relationship with a secondary storage, the ONTAP role assigned to the storage user should include the “snapmirror all” privilege. However, if you are using the “vsadmin” role, then the “snapmirror all” privilege is not required.
Steps
-
In the left navigation pane, click Resources, and then select the appropriate plug-in from the list.
-
In the Resources page, filter resources from the View drop-down list based on resource type.
Click
 , and then select the host name and the resource type to filter the resources. You can then click to close the filter pane.
 -
Click the resource that you want to back up.
-
In the Resource page, if you want to use a custom name, select the Use custom name format for Snapshot copy check box , and then enter a custom name format for the Snapshot copy name.
For example, customtext_policy_hostname or resource_hostname. By default, a timestamp is appended to the Snapshot copy name.
-
In the Application Settings page, do the following:
-
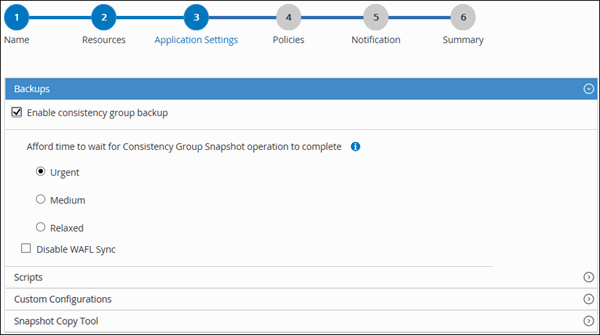
Click the Backups arrow to set additional backup options:
Enable consistency group backup, if needed, and perform the following tasks:
For this field… Do this… Afford time to wait for Consistency Group Snapshot operation to complete
Select Urgent, Medium, or Relaxed to specify the wait time for Snapshot copy operation to complete.
Urgent = 5 seconds, Medium = 7 seconds, and Relaxed = 20 seconds.
Disable WAFL Sync
Select this to avoid forcing a WAFL consistency point.
-
Click the Scripts arrow to run pre and post commands for quiesce, Snapshot copy, and unquiesce operations. You can also run pre commands before exiting the backup operation.
Prescripts and postscripts are run in the SnapCenter Server.
-
Click the Custom Configurations arrow, and then enter the custom value pairs required for all jobs using this resource.
-
Click the Snapshot Copy Tool arrow to select the tool to create Snapshot copies:
If you want… Then… SnapCenter to take a storage level Snapshot copy
Select SnapCenter without File System Consistency.
SnapCenter to use the plug-in for Windows to put the file system into a consistent state and then take a Snapshot copy
Select SnapCenter with File System Consistency.
To enter the command to create a Snapshot copy
Select Other, and then enter the command to create a Snapshot copy.
-
-
In the Policies page, perform the following steps:
-
Select one or more policies from the drop-down list.

You can also create a policy by clicking  .
.
In the Configure schedules for selected policies section, the selected policies are listed.
-
Click
in the Configure Schedules column for the policy for which you want to configure a schedule. -
In the Add schedules for policy policy_name dialog box, configure the schedule, and then click OK.
Where, policy_name is the name of the policy that you have selected.
The configured schedules are listed in the Applied Schedules column.
-
-
In the Notification page, from the Email preference drop-down list, select the scenarios in which you want to send the emails.
You must also specify the sender and receiver email addresses, and the subject of the email. SMTP must also be configured in Settings > Global Settings.
-
Review the summary, and then click Finish.
The resources topology page is displayed.
-
Click Back up Now.
-
In the Backup page, perform the following steps:
-
If you have applied multiple policies to the resource, from the Policy drop-down list, select the policy that you want to use for backup.
If the policy selected for the on-demand backup is associated with a backup schedule, the on-demand backups will be retained based on the retention settings specified for the schedule type.
-
Click Backup.
-
-
Monitor the operation progress by clicking Monitor > Jobs.