Release notes
Add scanner nodes to an existing deployment
 Suggest changes
You can add scanner nodes to an existing deployment on a Linux host with internet access.
You can add more scanner nodes if you find that you need more scanning processing power to scan your data sources. You can add the scanner nodes immediately after installing the manager node, or you can add a scanner node later. For example, if you realize that the amount of data in one of your data sources has doubled or tripled in size after 6 months, you can add a new scanner node to assist with data scanning.
NOTE This information is relevant only for BlueXP classification legacy versions 1.30 and earlier.
There are two ways in which you can add additional scanner nodes:
-
add a node to assist with scanning all data sources
-
add a node to assist with scanning a specific data source, or a specific group of data sources (typically based on location)
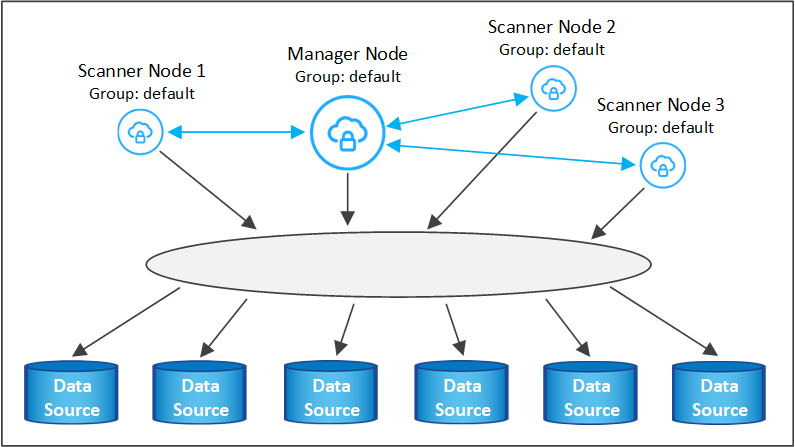
By default, any new scanner nodes you add are added to the general pool of scanning resources. This is called the "default scanner group". In the image below, there is 1 Manager node and 3 Scanner nodes in the "default" group that are all scanning data from all 6 data sources.
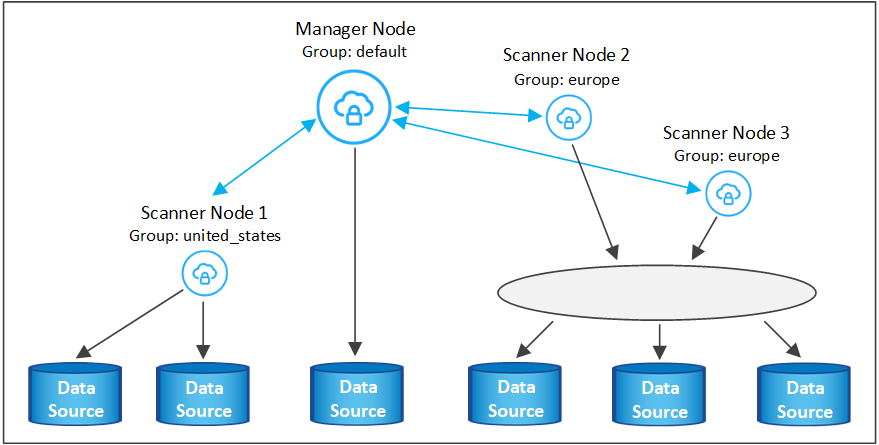
If you have certain data sources that you want to be scanned by scanner nodes that are physically closer to the data sources, you can define a scanner node, or group of scanner nodes, to scan a specific data source, or group of data sources. In the image below, there is 1 Manager node and 3 Scanner nodes.
-
The Manager node is in the "default" group, and it is scanning 1 data source
-
Scanner node 1 is in the "united_states" group, and it is scanning 2 data sources
-
Scanner nodes 2 and 3 are in the "europe" group, and they share the scanning tasks for 3 data sources
BlueXP classification scanner groups can be defined as separate geographic areas where your data is stored. You can deploy multiple BlueXP classification scanner nodes around the world and choose a scanner group for each node. In that way, each scanner node will scan the data that is the closest to it. The closer the scanner node is to the data, the better, because it reduces network latency as much as possible while scanning data.
You can choose which scanner groups to add to BlueXP classification and you can choose their names. BlueXP classification does not enforce that a node mapped to a scanner group named "europe" will be deployed in Europe.
You'll follow these steps to install additional BlueXP classification scanner nodes:
-
Prepare the Linux host systems that will act as the Scanner nodes
-
Download the Data Sense software to these Linux systems
-
Run a command on the Manager node to identify the Scanner nodes
-
Follow the steps to deploy the software on the Scanner nodes (and to optionally define a "scanner group" for certain Scanner nodes)
-
If you defined a scanner group, on the Manager node:
-
Open the file "working_environment_to_scanner_group_config.yml" and define the working environments that will be scanned by each scanner group
-
Run the following script to register this mapping information with all Scanner nodes:
update_we_scanner_group_from_config_file.sh
-
-
Verify that all your Linux systems for Scanner nodes meet the host requirements.
-
Verify that the systems have the two prerequisite software packages installed (Docker Engine or Podman, and Python 3).
-
Make sure you have root privileges on the Linux systems.
-
Verify that your environment meets the required permissions and connectivity.
-
You must have the IP addresses of the Scanner node hosts that you are adding.
-
You must have the IP address of the BlueXP classification Manager node host system
-
You must have the IP address or host name of the Connector system, your NetApp Account ID, Connector Client ID, and user access token. If you're planning to use scanner groups, you'll need to know the Working Environment ID for each data source in your account. See Prerequisite steps below to get this information.
-
The following ports and protocols must be enabled on all hosts:
Port Protocols Description 2377
TCP
Cluster management communications
7946
TCP, UDP
Inter-node communication
4789
UDP
Overlay network traffic
50
ESP
Encrypted IPsec overlay network (ESP) traffic
111
TCP, UDP
NFS Server for sharing files between the hosts (needed from each scanner node to manager node)
2049
TCP, UDP
NFS Server for sharing files between the hosts (needed from each scanner node to manager node)
-
If you are using
firewalldon your BlueXP classification machines, we recommend that you enable it before installing BlueXP classification. Run the following commands to configurefirewalldso that it is compatible with BlueXP classification:firewall-cmd --permanent --add-service=http firewall-cmd --permanent --add-service=https firewall-cmd --permanent --add-port=80/tcp firewall-cmd --permanent --add-port=8080/tcp firewall-cmd --permanent --add-port=443/tcp firewall-cmd --permanent --add-port=2377/tcp firewall-cmd --permanent --add-port=7946/udp firewall-cmd --permanent --add-port=7946/tcp firewall-cmd --permanent --add-port=4789/udp firewall-cmd --reload
Note that you must restart Docker or Podman whenever you enable or update
firewalldsettings.
Follow these steps to get the NetApp Account ID, Connector Client ID, Connector Server Name, and user access token that are required to add scanner nodes.
-
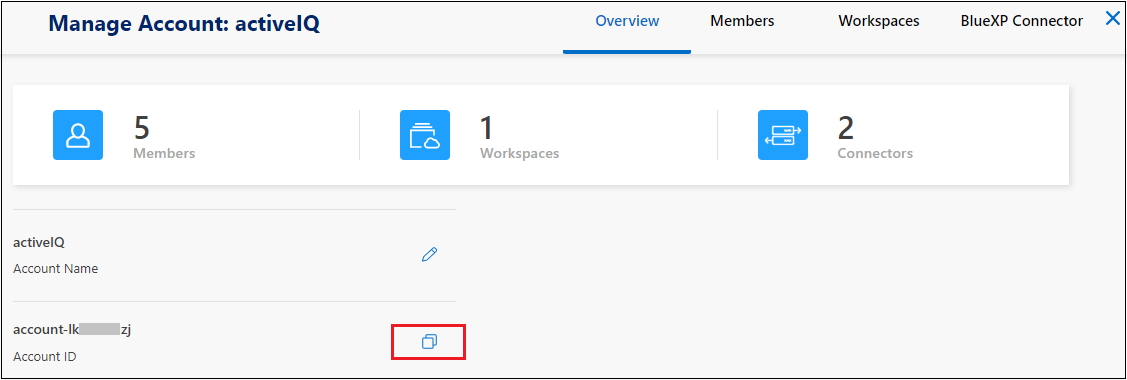
From the BlueXP menu bar, click Account > Manage Accounts.
-
Copy the Account ID.
-
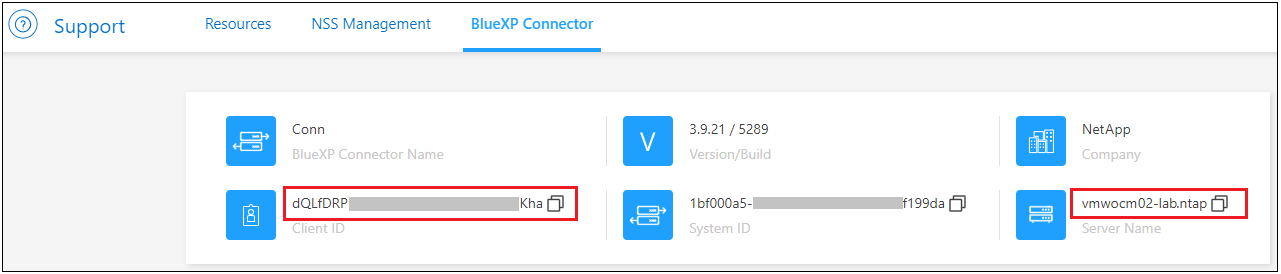
From the BlueXP menu bar, click Help > Support > BlueXP Connector.
-
Copy the connector Client ID and the Server Name.
-
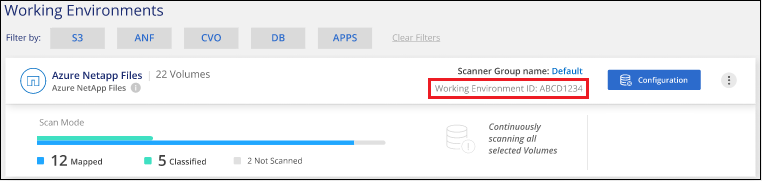
If you're planning to use scanner groups, from the BlueXP classification Configuration tab, copy the Working Environment ID for each working environment that you plan to add to a scanner group.
-
Go to the API Documentation Developer Hub and click Learn how to authenticate.

-
Follow the authentication instructions, using the username and password of the account admin in the "username" and "password" parameters.
-
Then copy the access token from the response.
-
On the BlueXP classification Manager node, run the script "add_scanner_node.sh". For example, this command adds 2 scanner nodes:
sudo ./add_scanner_node.sh -a <account_id> -c <client_id> -m <cm_host> -h <ds_manager_ip> -n <node_private_ip_1,node_private_ip_2> -t <user_token>Variable values:
-
account_id = NetApp Account ID
-
client_id = Connector Client ID (add the suffix "clients" to the client ID that you copied in the Prerequisite steps)
-
cm_host = IP address or host name of the Connector system
-
ds_manager_ip = Private IP address of the BlueXP classification Manager node system
-
node_private_ip = IP addresses of the BlueXP classification Scanner node systems (multiple scanner node IPs are separated by a comma)
-
user_token = JWT user access token
-
-
Before the add_scanner_node script completes, a dialog displays the installation command needed for the scanner nodes. Copy the command (for example:
sudo ./node_install.sh -m 10.11.12.13 -t ABCDEF1s35212 -u red95467j) and save it in a text file. -
On each scanner node host:
-
Copy the Data Sense installer file (DATASENSE-INSTALLER-<version>.tar.gz) to the host machine (using
scpor some other method). -
Unzip the installer file.
-
Paste and execute the command that you copied in step 2.
-
If you want to add a scanner node into a "scanner group", add the parameter -r <scanner_group_name> to the command. Otherwise, the scanner node is added to the "default" group.
When the installation finishes on all scanner nodes and they have been joined to the manager node, the "add_scanner_node.sh" script finishes as well. The installation can take 10 to 20 minutes.
-
-
If you added any scanner nodes into a scanner group, return to the Manager node and perform the following 2 tasks:
-
Open the file "/opt/netapp/config/custom_configuration/working_environment_to_scanner_group_config.yml" and enter the mapping for which scanner groups will scan specific working environments. You'll need to have the Working Environment ID for each data source. For example, the following entries add 2 working environments to the "europe" scanner group and 2 to the "united_states" scanner group:
scanner_groups:
 europe:
   working_environments:
     - "working_environment_id1"
     - "working_environment_id2"
 united_states:
   working_environments:
     - "working_environment_id3"
     - "working_environment_id4"
Any working environment that is not added to the list is scanned by the "default" group - you must have at least one manager or scanner node in the "default" group.
-
Run the following script to register this mapping information with all Scanner nodes:
/opt/netapp/Datasense/tools/update_we_scanner_group_from_config_file.sh
-
BlueXP classification is set up with Manager and Scanner nodes to scan all your data sources.
From the Configuration page you can select the data sources that you want to scan - if you haven't already done that. If you created scanner groups, each data source is scanned by the Scanner nodes in the respective group.
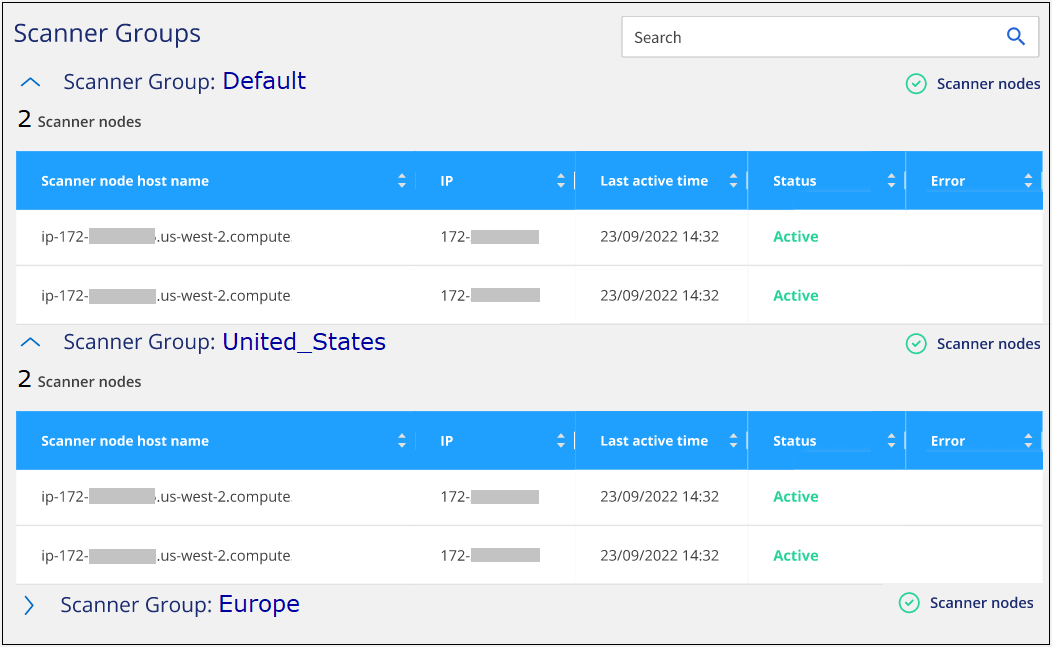
You can see the Scanner Group name for each working environment in the Configuration page.
You can also see the list of all scanner groups along with the IP address and status for each scanner node in the group in the bottom of the Configuration page.