

Manage Cloud Volumes ONTAP encryption keys with Azure Key Vault
 Suggest changes
You can use Azure Key Vault (AKV) to protect your ONTAP encryption keys in an Azure-deployed application. Refer to the Microsoft documentation.
AKV can be used to protect NetApp Volume Encryption (NVE) keys only for data SVMs. For more information, refer to the ONTAP documentation.
Key management with AKV can be enabled with the CLI or the ONTAP REST API.
When using AKV, be aware that by default a data SVM LIF is used to communicate with the cloud key management endpoint. A node management network is used to communicate with the cloud provider's authentication services (login.microsoftonline.com). If the cluster network is not configured correctly, the cluster will not properly utilize the key management service.
-
Cloud Volumes ONTAP must be running version 9.10.1 or later
-
Volume Encryption (VE) license installed (NetApp Volume Encryption license is automatically installed on each Cloud Volumes ONTAP system that is registered with NetApp Support)
-
You must have a Multi-tenant Encryption Key Management (MT_EK_MGMT) license
-
You must be a cluster or SVM administrator
-
An Active Azure subscription
-
AKV can only be configured on a data SVM
-
NAE can't be used using AKV. NAE requires an external-supported KMIP server.
-
Cloud Volumes ONTAP nodes poll AKV every 15 minutes to confirm accessibility and key availability. This polling period is non-configurable, and after four consecutive failures in the polling attempt (totaling 1 hour), the volumes are placed offline.
Configuration process
The outlined steps capture how to register your Cloud Volumes ONTAP configuration with Azure and how to create an Azure Key Vault and keys. If you have already completed these steps, ensure you have the correct configuration settings, particularly in Create an Azure Key Vault, and then proceed to Cloud Volumes ONTAP configuration.
-
You must first register your application in the Azure subscription that you want the Cloud Volumes ONTAP to use for access the Azure Key Vault. Within the Azure portal, select App registrations.
-
Select New registration.
-
Provide a name for your application and select a supported application type. The default single tenant suffices for Azure Key Vault usage. Select Register.
-
In the Azure Overview window, select the application you have registered. Copy the application (client) ID and the directory (tenant) ID to a secure location. They will be required later in the registration process.
-
In the Azure portal for your Azure Key Vault app registration, select the Certificates & secrets pane.
-
Select New client secret. Enter a meaningful name for your client secret. NetApp recommends a 24-month expiration period; however, your specific cloud governance policies may require a different setting.
-
Click Add to create the client secret. Copy the secret string listed in the Value column and store it in a secure location for use later in Cloud Volumes ONTAP configuration. The secret value will not be displayed again after you navigate away from the page.
-
If you have an existing Azure Key Vault, you can connect it to your Cloud Volumes ONTAP configuration; however, you must adapt the access policies to the settings in this process.
-
In the Azure portal, navigate to the Key Vaults section.
-
Click +Create and enter the required information including resource group, region, and pricing tier. In addition, enter the number of days to retain deleted vaults and select Enable purge protection on the key vault.
-
Select Next to choose an access policy.
-
Select the following options:
-
Under Access configuration, select the Vault access policy.
-
Under Resource access, select Azure Disk Encryption for volume encryption.
-
-
Select +Create to add an access policy.
-
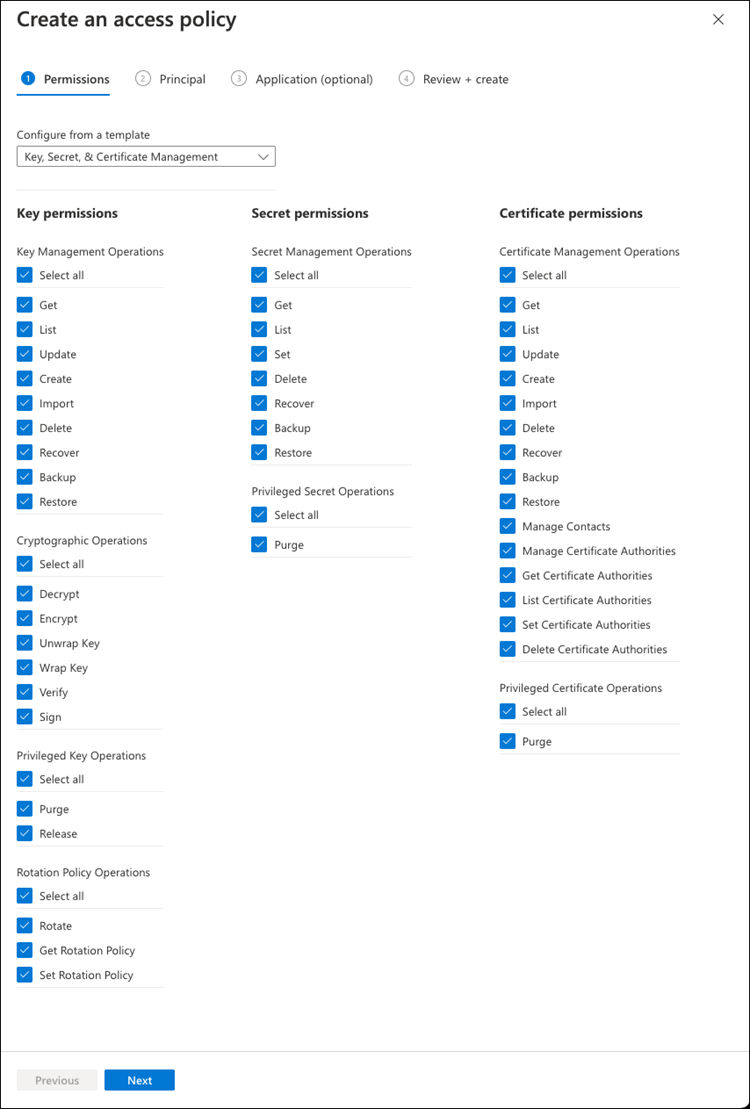
Under Configure from a template, click the drop-down menu and then select the Key, Secret, and Certificate Management template.
-
Choose each of the drop-down permissions menus (key, secret, certificate) and then Select all at the top of the menu list to select all the permissions available. You should have:
-
Key permissions: 20 selected
-
Secret permissions: 8 selected
-
Certificate permissions: 16 selected
-
-
Click Next to select the Principal Azure registered application you created in Azure Application Registration. Select Next.

Only one principal can be assigned per policy. 
-
Click Next two times until you arrive at Review and create. Then, click Create.
-
Select Next to advance to Networking options.
-
Choose the appropriate network access method or select All networks and Review + Create to create the key vault. (Network access method may be prescribed by a governance policy or your corporate cloud security team.)
-
Record the Key Vault URI: In the key vault you created, navigate to the Overview menu and copy the Vault URI from the right-hand column. You need this for a later step.
-
In the menu for the Key Vault you have created for Cloud Volumes ONTAP, navigate to the Keys option.
-
Select Generate/import to create a new key.
-
Leave the default option set to Generate.
-
Provide the following information:
-
Encryption key name
-
Key type: RSA
-
RSA key size: 2048
-
Enabled: Yes
-
-
Select Create to create the encryption key.
-
Return to the Keys menu and select the key you just created.
-
Select the key ID under Current version to view the key properties.
-
Locate the Key Identifier field. Copy the URI up to but not including the hexadecimal string.
-
This process is only required if you are configuring Azure Key Vault for an HA Cloud Volumes ONTAP system.
-
In the Azure portal navigate to Virtual Networks.
-
Select the Virtual Network where you deployed the Cloud Volumes ONTAP system and select the Subnets menu on the left side of the page.
-
Select the subnet name for you Cloud Volumes ONTAP deployment from the list.
-
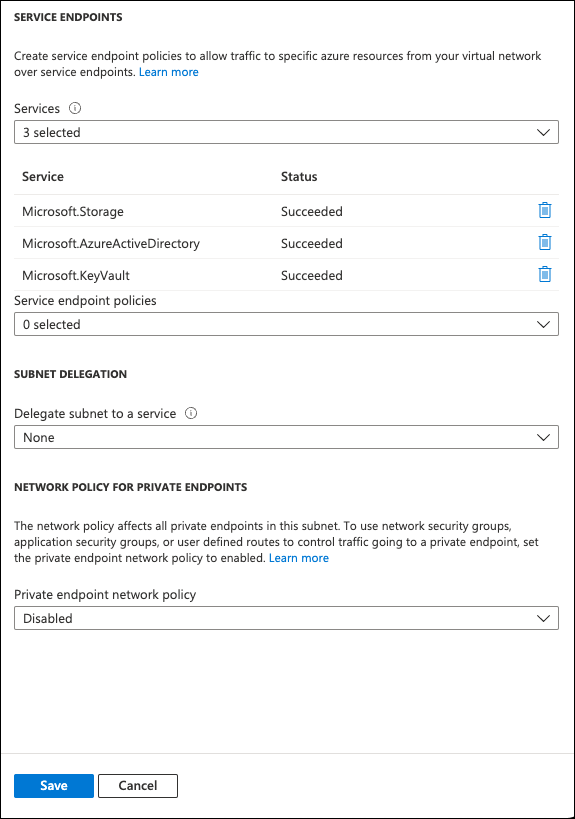
Navigate to the Service Endpoints heading. In the drop-down menu, select the following:
-
Microsoft.AzureActiveDirectory
-
Microsoft.KeyVault
-
Microsoft.Storage (optional)
-
-
Select Save to capture your settings.
-
Connect to the cluster management LIF with your preferred SSH client.
-
Enter the advanced privilege mode in ONTAP:
set advanced -con off -
Identify the desired data SVM and verify its DNS configuration:
vserver services name-service dns show-
If a DNS entry for the desired data SVM exists and it contains an entry for the Azure DNS, then no action is required. If it does not, add a DNS server entry for the data SVM that points to the Azure DNS, private DNS, or on-premise server. This should match the entry for the cluster admin SVM:
vserver services name-service dns create -vserver SVM_name -domains domain -name-servers IP_address -
Verify the DNS service has been created for the data SVM:
vserver services name-service dns show
-
-
Enable Azure Key Vault using the client ID and tenant ID saved after the application registration:
security key-manager external azure enable -vserver SVM_name -client-id Azure_client_ID -tenant-id Azure_tenant_ID -name key_vault_URI -key-id full_key_URI
The _full_key_URIvalue must utilize the<https:// <key vault host name>/keys/<key label>format. -
Upon successful enablement of the Azure Key Vault, enter the
client secret valuewhen prompted. -
Check the status of the key manager:
security key-manager external azure check
The output will look like:::*> security key-manager external azure check Vserver: data_svm_name Node: akvlab01-01 Category: service_reachability Status: OK Category: ekmip_server Status: OK Category: kms_wrapped_key_status Status: UNKNOWN Details: No volumes created yet for the vserver. Wrapped KEK status will be available after creating encrypted volumes. 3 entries were displayed.If the
service_reachabilitystatus is notOK, the SVM cannot reach the Azure Key Vault service with all the required connectivity and permissions. Ensure that your Azure network policies and routing don't block your private vNet from reaching the Azure Key Vault Public endpoint. If they do, consider using an Azure Private endpoint to access the Key vault from within the vNet. You may also need to add a static hosts entry on your SVM to resolve the private IP address for your endpoint.The
kms_wrapped_key_statuswill reportUNKNOWNat initial configuration. Its status will change toOKafter the first volume is encrypted. -
OPTIONAL: Create a test volume to verify the functionality of NVE.
vol create -vserver SVM_name -volume volume_name -aggregate aggr -size size -state online -policy defaultIf configured correctly, Cloud Volumes ONTAP will automatically create the volume and enable volume encryption.
-
Confirm the volume was created and encrypted correctly. If it is, the
-is-encryptedparameter will display astrue.
vol show -vserver SVM_name -fields is-encrypted -
Optional: If you want to update the credentials on the Azure Key Vault authentication certificate, use the following command:
security key-manager external azure update-credentials -vserver v1 -authentication-method certificate