

View compliance details about the private data stored in your organization with NetApp Data Classification
 Suggest changes
Gain control of your private data by viewing details about the personal data (PII) and sensitive personal data (SPII) in your organization. You can also gain visibility by reviewing the categories and file types that NetApp Data Classification found in your data.

|
File-level compliance details are only available if you perform a full classification scan. Mapping-only scans don't yield file-level details. |
By default, the Data Classification dashboard displays compliance data for all systems and databases. To see data for only some of the systems, select them.

You can filter the results from the Data Investigation page and download a report of the results as a CSV file. See Filtering data in the Data Investigation page for details.
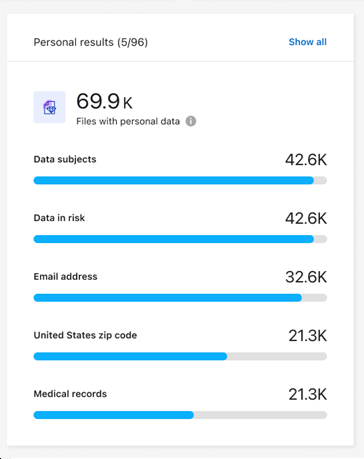
View files that contain personal data
Data Classification automatically identifies specific words, strings, and patterns (Regex) inside the data. For example, credit card numbers, social security numbers, bank account numbers, passwords, and more. Data Classification identifies this type of information in individual files, in files within directories (shares and folders), and in database tables.
You can also create custom search terms to identify personal data specific to your organization. For more information, see Create a custom classification.
For some types of personal data, Data Classification uses proximity validation to validate its findings. The validation occurs by looking for one or more predefined keywords in proximity to the personal data that was found. For example, Data Classification identifies a U.S. social security number (SSN) as an SSN if it sees a proximity word next to it—for example, SSN or social security. The table of personal data shows when Data Classification uses proximity validation.
-
From the Data Classification menu, select the Compliance tab.
-
To investigate the details for all personal data, select the icon next to the personal data percentage.
-
To investigate the details for a specific type of personal data, select View All and then select the Investigate Results arrow icon for a specific type of personal data, for example, email addresses.
-
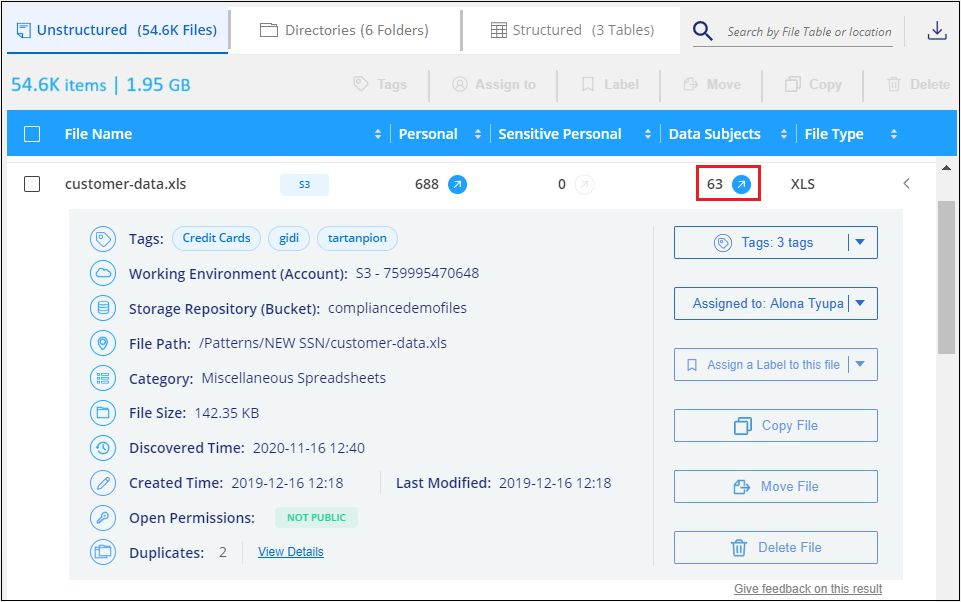
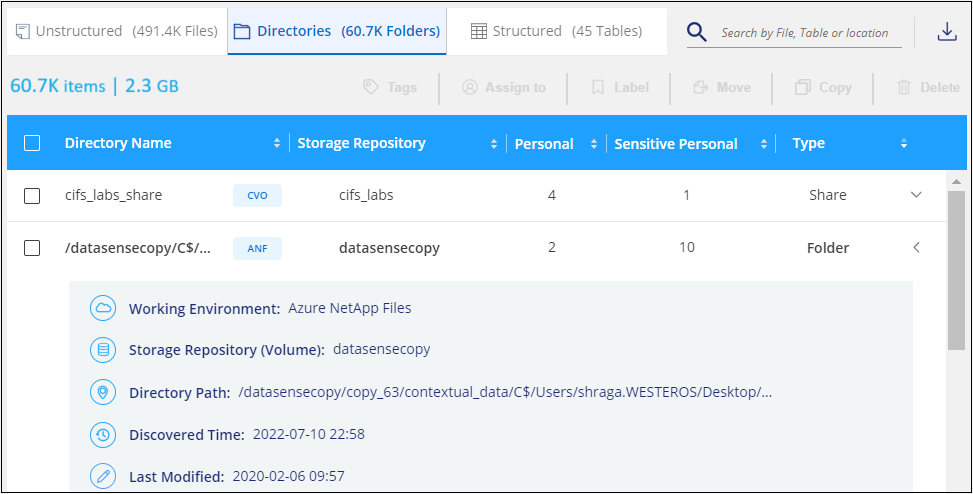
Investigate the data by searching, sorting, expanding details for a specific file, selecting the Investigate Results arrow to see masked information, or by downloading the file list.
The following images show personal data found in a directory (shares and folders). In the Structured tab, you view personal data found in databases. In the Unstructured tab, you can view file-level data.
View files that contain sensitive personal data
Data Classification automatically identifies special types of sensitive personal information, as defined by privacy regulations such as articles 9 and 10 of the GDPR. For example, information regarding a person's health, ethnic origin, or sexual orientation. See the full list. Data Classification identifies this type of information in individual files, in files within directories (shares and folders), and in database tables.
Data Classification uses AI, natural language processing (NLP), machine learning (ML), and cognitive computing (CC) to understand the meaning of the content that it scans in order to extract entities and categorize it accordingly.
For example, one sensitive GDPR data category is ethnic origin. Because of its NLP abilities, Data Classification can distinguish the difference between a sentence that reads "George is Mexican" (indicating sensitive data as specified in article 9 of the GDPR), versus "George is eating Mexican food."
|
|
Only English is supported when scanning for sensitive personal data. Support for more languages will be added later. |
-
From the Data Classification menu, select Compliance.
-
To investigate the details for all sensitive personal data, locate the Sensitive personal results card then select Show all.
 .
. -
To investigate the details for a specific type of sensitive personal data, select View All then select the Investigate Results arrow icon for a specific type of sensitive personal data.
-
Investigate the data by searching, sorting, expanding details for a specific file, clicking Investigate Results to see masked information, or by downloading the file list.