在OpenShift Container Platform上安裝Astra Control Center
 建議變更
建議變更


您可以在執行FlexPod 於下列項目的OpenShift叢集上安裝Astra Control Center、或是在使用Cloud Volumes ONTAP NetApp儲存後端的AWS上安裝Astra Control Center。在本解決方案中、Astra Control Center部署在OpenShift裸機叢集上。
Astra Control Center可以使用所述的標準程序來安裝 "請按這裡" 或從Red Hat OpenShift作業系統集線器。Astra Control操作員是Red Hat認證的操作員。在本解決方案中、Astra Control Center是使用Red Hat作業系統集線器安裝。
環境需求
-
Astra Control Center支援多種Kubernetes發佈版本、而Red Hat OpenShift則支援Red Hat OpenShift Container Platform 4.8或4.9。
-
除了環境與終端使用者的應用程式資源需求之外、Astra Control Center還需要下列資源:
| 元件 | 需求 |
|---|---|
儲存後端容量 |
至少可提供500GB容量 |
工作節點 |
至少3個工作節點、各有4個CPU核心和12GB RAM |
完整網域名稱(FQDN)位址 |
Astra Control Center的FQDN位址 |
Astra Trident |
已安裝並設定Astra Trident 21.004或更新版本 |
入口控制器或負載平衡器 |
設定入口控制器、以URL或負載平衡器公開Astra Control Center、以提供可解析為FQDN的IP位址 |
-
您必須擁有現有的私有映像登錄、才能將Astra Control Center建置映像推送至該登錄。您需要提供影像登錄的URL、以便上傳影像。

|
執行特定工作流程時會擷取部分映像、必要時會建立及銷毀容器。 |
-
Astra Control Center需要建立儲存類別、並將其設為預設儲存類別。Astra Control Center支援ONTAP Astra Trident提供的下列支援資訊驅動程式:
-
ONTAP-NAS
-
ONTAP-NAS-flexgroup
-
ONTAP-SAN
-
ONTAP-san經濟型
-

|
我們假設已部署的OpenShift叢集已安裝Astra Trident、並已設定ONTAP 成包含一個恢復功能的後端、同時也定義了預設的儲存類別。 |
-
對於OpenShift環境中的應用程式複製、Astra Control Center需要允許OpenShift掛載磁碟區並變更檔案擁有權。若要修改ONTAP 不允許執行這些作業的功能表匯出原則、請執行下列命令:
export-policy rule modify -vserver <storage virtual machine name> -policyname <policy name> -ruleindex 1 -superuser sys
export-policy rule modify -vserver <storage virtual machine name> -policyname <policy name> -ruleindex 1 -anon 65534

|
若要將第二個OpenShift作業環境新增為受管理的運算資源、請確定已啟用Astra Trident Volume快照功能。若要使用Astra Trident啟用及測試Volume快照、請參閱官方說明 "Astra Trident說明"。 |
-
答 "Volume SnapClass" 應在管理應用程式的所有Kubernetes叢集上設定。這也可能包括安裝Astra Control Center的K8s叢集。Astra Control Center可管理其執行所在K8s叢集上的應用程式。
應用程式管理需求
-
*授權。*若要使用Astra Control Center管理應用程式、您需要Astra Control Center授權。
-
*命名空間。*命名空間是最大的實體、可由Astra Control Center以應用程式的形式加以管理。您可以選擇根據現有命名空間中的應用程式標籤和自訂標籤來篩選元件、並將資源子集當作應用程式來管理。
-
* StorageClass。*如果您安裝的應用程式已明確設定StorageClass、而且需要複製應用程式、則複製作業的目標叢集必須具有原本指定的StorageClass。將具有明確設定StorageClass的應用程式複製到沒有相同StorageClass的叢集時、將會失敗。
-
* Kubernetes資源。*使用Kubernetes資源的應用程式若未被Astra Control擷取、則可能沒有完整的應用程式資料管理功能。Astra Control可擷取下列Kubernetes資源:
| Kubernetes資源 | ||
|---|---|---|
叢集角色 |
ClusterRoleBinding |
組態對應 |
CustomResourceDesDefinition |
CustomResource |
可關係工作 |
示範 |
HorizontalPodAutoscaler |
入侵 |
部署組態 |
互鎖Webhook |
PeristentVolume Claim |
Pod |
Podcast中斷預算 |
Podcast範本 |
網路原則 |
ReplicaSet |
角色 |
角色繫結 |
路由 |
秘密 |
驗證Webhook |
使用OpenShift作業系統集線器安裝Astra Control Center
下列程序會使用Red Hat作業系統集線器安裝Astra Control Center。在這個解決方案中、Astra Control Center安裝在執行FlexPod 效益的裸機OpenShift叢集上。
-
請從下載Astra Control Center套裝組合(「Astra控制中心-[版本].tar.gz」) "NetApp支援網站"。
-
從下載Astra Control Center憑證和金鑰的.Zip檔案 "NetApp支援網站"。
-
驗證套件的簽名。
openssl dgst -sha256 -verify astra-control-center[version].pub -signature <astra-control-center[version].sig astra-control-center[version].tar.gz
-
擷取Astra影像。
tar -vxzf astra-control-center-[version].tar.gz
-
變更至Astra目錄。
cd astra-control-center-[version]
-
將映像新增至本機登錄。
For Docker:
docker login [your_registry_path]OR
For Podman:
podman login [your_registry_path]
-
使用適當的指令碼來載入映像、標記映像、然後將它們推送到本機登錄。
適用於Docker:
export REGISTRY=[Docker_registry_path]
for astraImageFile in $(ls images/*.tar) ; do
  # Load to local cache. And store the name of the loaded image trimming the 'Loaded images: '
  astraImage=$(docker load --input ${astraImageFile} | sed 's/Loaded image: //')
  astraImage=$(echo ${astraImage} | sed 's!localhost/!!')
  # Tag with local image repo.
  docker tag ${astraImage} ${REGISTRY}/${astraImage}
  # Push to the local repo.
  docker push ${REGISTRY}/${astraImage}
done
若為Podman:
export REGISTRY=[Registry_path] for astraImageFile in $(ls images/*.tar) ; do # Load to local cache. And store the name of the loaded image trimming the 'Loaded images: ' astraImage=$(podman load --input ${astraImageFile} | sed 's/Loaded image(s): //') astraImage=$(echo ${astraImage} | sed 's!localhost/!!') # Tag with local image repo. podman tag ${astraImage} ${REGISTRY}/${astraImage} # Push to the local repo. podman push ${REGISTRY}/${astraImage} done -
登入裸機OpenShift叢集Web主控台。從側功能表中、選取運算子>運算子集線器。輸入「Astra」以列出「NetApp-acc營運者」。
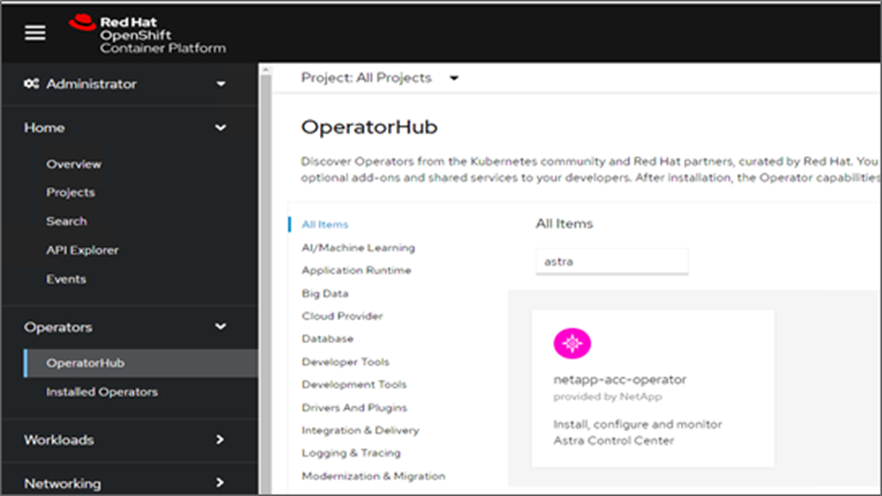
「NetApp-acc操作者」是經過認證的Red Hat OpenShift操作者、列於作業系統集線器目錄下。 -
選取「NetApp-acc operator」、然後按一下「Install(安裝)」。
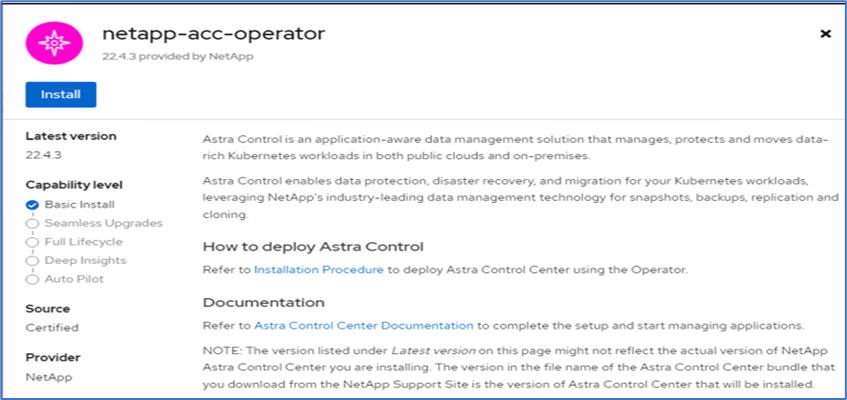
-
選取適當的選項、然後按一下「Install(安裝)」。
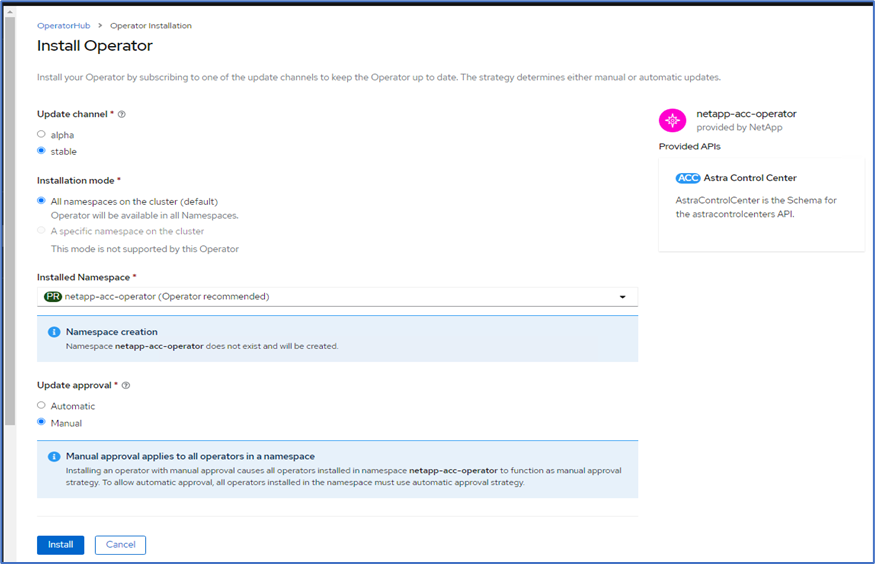
-
核准安裝、並等待操作員安裝。
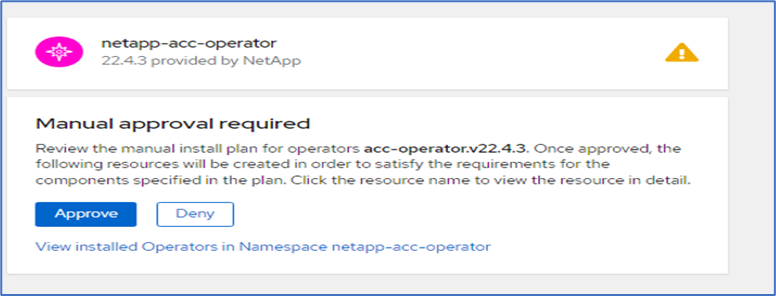
-
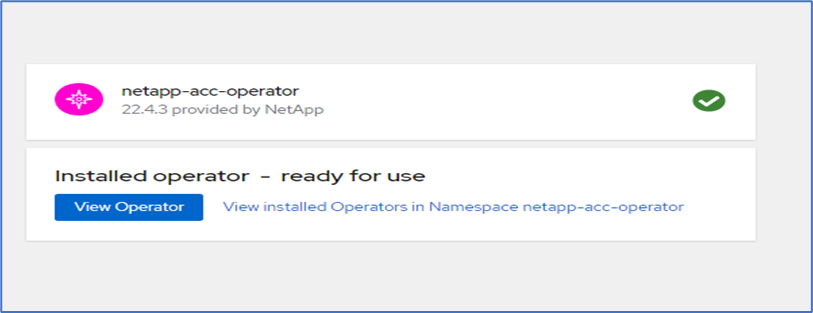
在此階段、操作員已成功安裝並準備就緒可供使用。按一下「View operator(檢視操作員)」開始安裝Astra Control Center。
-
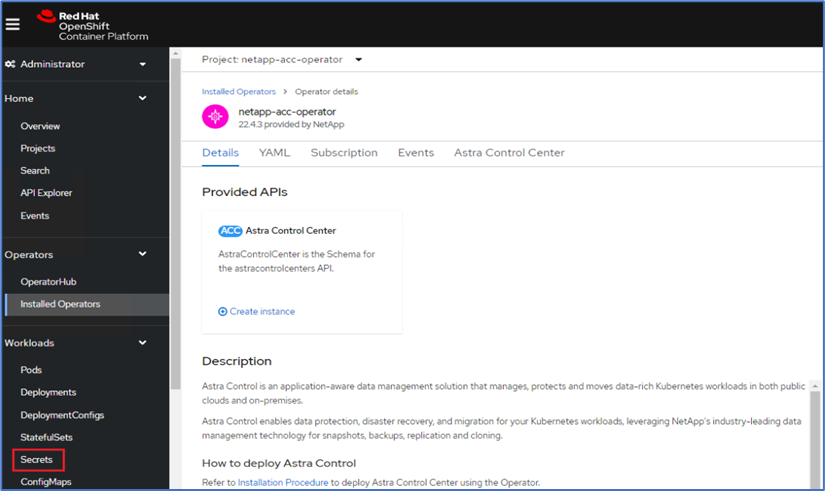
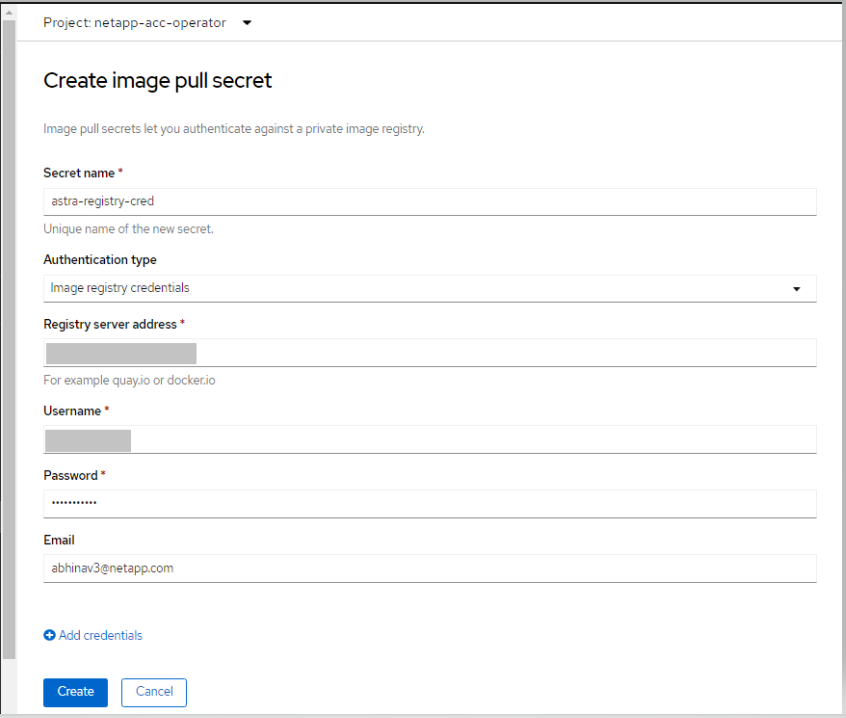
在安裝Astra Control Center之前、請先建立Pull secret、以便從先前推入的Docker登錄下載Astra映像。
-
若要從Docker Private repo擷取Astra Control Center映像檔、請在「NetApp-acc operator」命名空間中建立秘密。此秘密名稱會在Astra Control Center Yaml資訊清單中稍後提供。
-
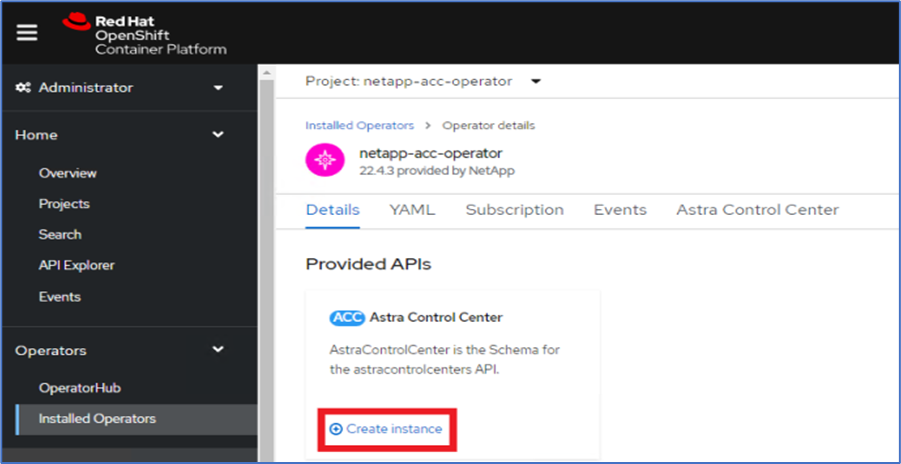
從側功能表中選取「運算子」>「安裝的運算子」、然後按一下所提供API區段下方的「建立執行個體」。
-
填寫「Create」(建立)「吧」「Control Center」表單。提供名稱、Astra位址和Astra版本。
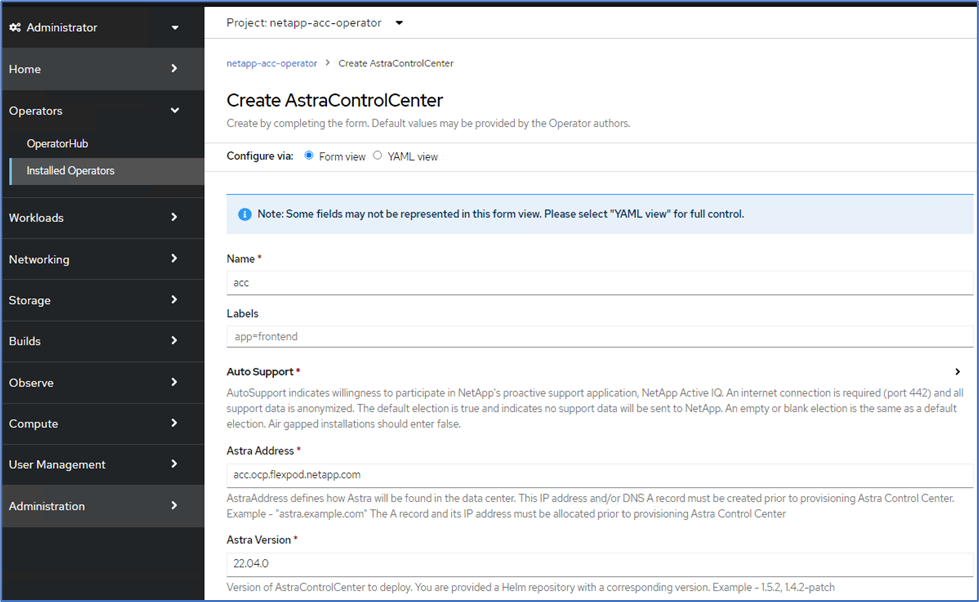
在Astra Address下、提供Astra Control Center的FQDN位址。此位址用於存取Astra Control Center網頁主控台。FQDN也應解析為可連線的IP網路、並應在DNS中設定。 -
輸入帳戶名稱、電子郵件地址、系統管理員姓氏、並保留預設的Volume回收原則。如果您使用負載平衡器、請將Ingress Type設為「AccTraefik」。否則、請選取「Ingress、Controller」(入口控制器)的「Gener通用」(通用)。在「Image登錄」下、輸入Container映像登錄路徑和機密。
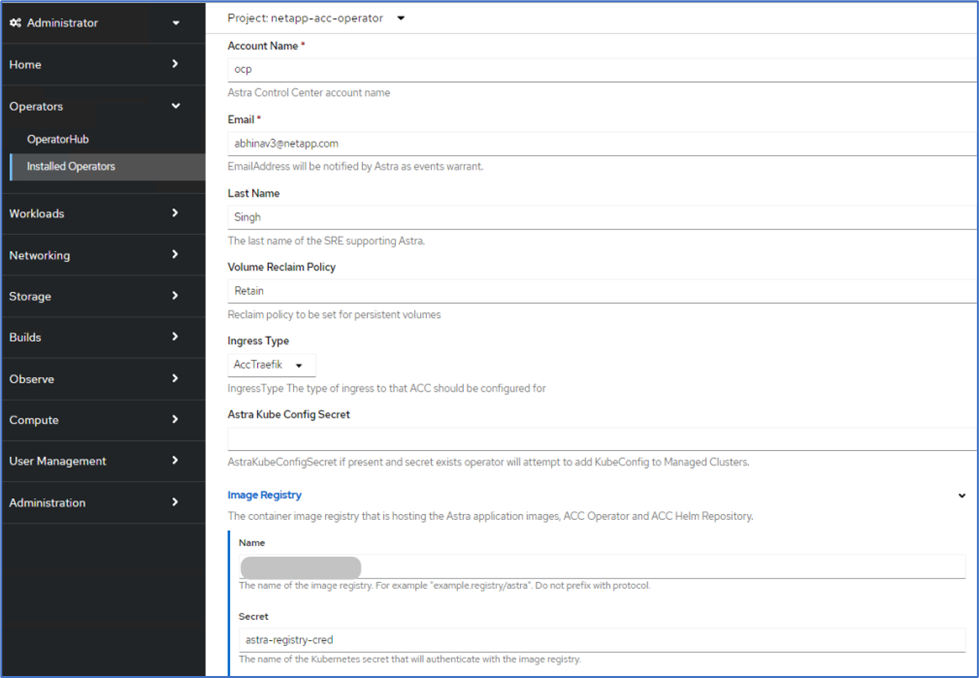
在此解決方案中、會使用Metallb負載平衡器。因此、入口類型為AccTraefik。這會將Astra Control Center truefik閘道公開為負載平衡器類型的Kubernetes服務。 -
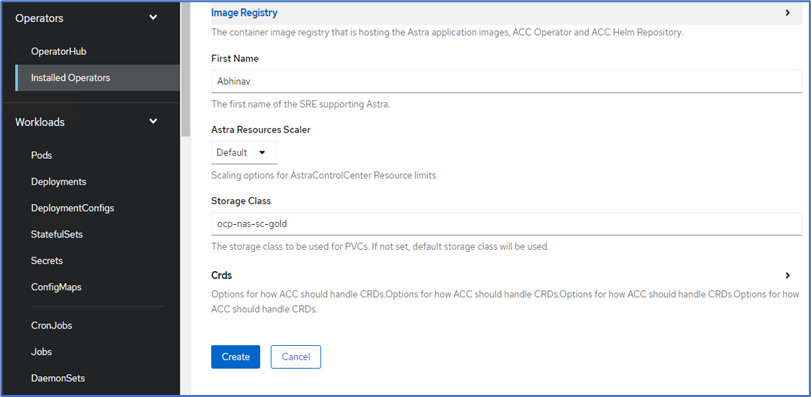
輸入管理員名字、設定資源擴充、並提供儲存類別。按一下「建立」。
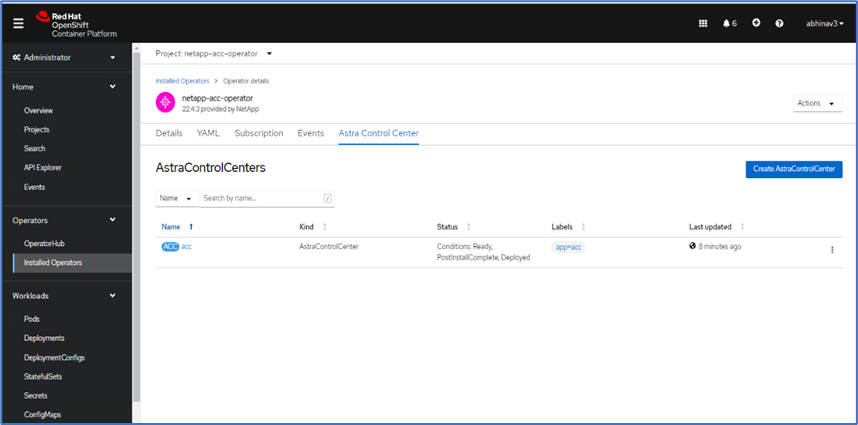
Astra Control Center執行個體的狀態應從「部署」變更為「就緒」。
-
驗證是否已成功安裝所有系統元件、以及所有Pod是否都在執行中。
root@abhinav-ansible# oc get pods -n netapp-acc-operator
NAME                                               READY   STATUS    RESTARTS   AGE
acc-helm-repo-77745b49b5-7zg2v                     1/1     Running   0          10m
acc-operator-controller-manager-5c656c44c6-tqnmn   2/2     Running   0          13m
activity-589c6d59f4-x2sfs                          1/1     Running   0          6m4s
api-token-authentication-4q5lj                     1/1     Running   0          5m26s
api-token-authentication-pzptd                     1/1     Running   0          5m27s
api-token-authentication-tbtg6                     1/1     Running   0          5m27s
asup-669df8d49-qps54                               1/1     Running   0          5m26s
authentication-5867c5f56f-dnpp2                    1/1     Running   0          3m54s
bucketservice-85495bc475-5zcc5                     1/1     Running   0          5m55s
cert-manager-67f486bbc6-txhh6                      1/1     Running   0          9m5s
cert-manager-cainjector-75959db744-4l5p5           1/1     Running   0          9m6s
cert-manager-webhook-765556b869-g6wdf              1/1     Running   0          9m6s
cloud-extension-5d595f85f-txrfl                    1/1     Running   0          5m27s
cloud-insights-service-674649567b-5s4wd            1/1     Running   0          5m49s
composite-compute-6b58d48c69-46vhc                 1/1     Running   0          6m11s
composite-volume-6d447fd959-chnrt                  1/1     Running   0          5m27s
credentials-66668f8ddd-8qc5b                       1/1     Running   0          7m20s
entitlement-fd6fc5c58-wxnmh                        1/1     Running   0          6m20s
features-756bbb7c7c-rgcrm                          1/1     Running   0          5m26s
fluent-bit-ds-278pg                                1/1     Running   0          3m35s
fluent-bit-ds-5pqc6                                1/1     Running   0          3m35s
fluent-bit-ds-8l7cq                                1/1     Running   0          3m35s
fluent-bit-ds-9qbft                                1/1     Running   0          3m35s
fluent-bit-ds-nj475                                1/1     Running   0          3m35s
fluent-bit-ds-x9pd8                                1/1     Running   0          3m35s
graphql-server-698d6f4bf-kftwc                     1/1     Running   0          3m20s
identity-5d4f4c87c9-wjz6c                          1/1     Running   0          6m27s
influxdb2-0                                        1/1     Running   0          9m33s
krakend-657d44bf54-8cb56                           1/1     Running   0          3m21s
license-594bbdc-rghdg                              1/1     Running   0          6m28s
login-ui-6c65fbbbd4-jg8wz                          1/1     Running   0          3m17s
loki-0                                             1/1     Running   0          9m30s
metrics-facade-75575f69d7-hnlk6                    1/1     Running   0          6m10s
monitoring-operator-65dff79cfb-z78vk               2/2     Running   0          3m47s
nats-0                                             1/1     Running   0          10m
nats-1                                             1/1     Running   0          9m43s
nats-2                                             1/1     Running   0          9m23s
nautilus-7bb469f857-4hlc6                          1/1     Running   0          6m3s
nautilus-7bb469f857-vz94m                          1/1     Running   0          4m42s
openapi-8586db4bcd-gwwvf                           1/1     Running   0          5m41s
packages-6bdb949cfb-nrq8l                          1/1     Running   0          6m35s
polaris-consul-consul-server-0                     1/1     Running   0          9m22s
polaris-consul-consul-server-1                     1/1     Running   0          9m22s
polaris-consul-consul-server-2                     1/1     Running   0          9m22s
polaris-mongodb-0                                  2/2     Running   0          9m22s
polaris-mongodb-1                                  2/2     Running   0          8m58s
polaris-mongodb-2                                  2/2     Running   0          8m34s
polaris-ui-5df7687dbd-trcnf                        1/1     Running   0          3m18s
polaris-vault-0                                    1/1     Running   0          9m18s
polaris-vault-1                                    1/1     Running   0          9m18s
polaris-vault-2                                    1/1     Running   0          9m18s
public-metrics-7b96476f64-j88bw                    1/1     Running   0          5m48s
storage-backend-metrics-5fd6d7cd9c-vcb4j           1/1     Running   0          5m59s
storage-provider-bb85ff965-m7qrq                   1/1     Running   0          5m25s
telegraf-ds-4zqgz                                  1/1     Running   0          3m36s
telegraf-ds-cp9x4                                  1/1     Running   0          3m36s
telegraf-ds-h4n59                                  1/1     Running   0          3m36s
telegraf-ds-jnp2q                                  1/1     Running   0          3m36s
telegraf-ds-pdz5j                                  1/1     Running   0          3m36s
telegraf-ds-znqtp                                  1/1     Running   0          3m36s
telegraf-rs-rt64j                                  1/1     Running   0          3m36s
telemetry-service-7dd9c74bfc-sfkzt                 1/1     Running   0          6m19s
tenancy-d878b7fb6-wf8x9                            1/1     Running   0          6m37s
traefik-6548496576-5v2g6                           1/1     Running   0          98s
traefik-6548496576-g82pq                           1/1     Running   0          3m8s
traefik-6548496576-psn49                           1/1     Running   0          38s
traefik-6548496576-qrkfd                           1/1     Running   0          2m53s
traefik-6548496576-srs6r                           1/1     Running   0          98s
trident-svc-679856c67-78kbt                        1/1     Running   0          5m27s
vault-controller-747d664964-xmn6c                  1/1     Running   0          7m37s
每個Pod的狀態應為「執行中」。部署系統Pod可能需要幾分鐘的時間。 -
當所有Pod都在執行時、請執行下列命令來擷取一次性密碼。在Yaml版本的輸出中、檢查「tatus.deploymentState`」欄位以取得部署的值、然後複製「states.uuid」值。密碼為「ACC-」、後面接著UUID值。(ACC-[UUUID])。
root@abhinav-ansible# oc get acc -o yaml -n netapp-acc-operator
-
在瀏覽器中、使用您提供的FQDN瀏覽至URL。
-
使用預設使用者名稱(即安裝期間提供的電子郵件地址和一次性密碼ACC-[UUUUID])登入。
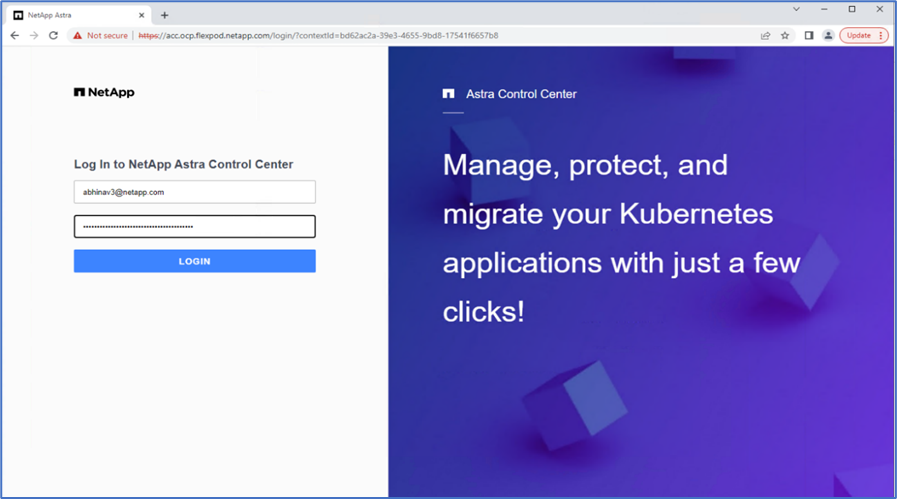
如果您輸入錯誤密碼三次、系統管理員帳戶會鎖定15分鐘。 -
變更密碼並繼續。
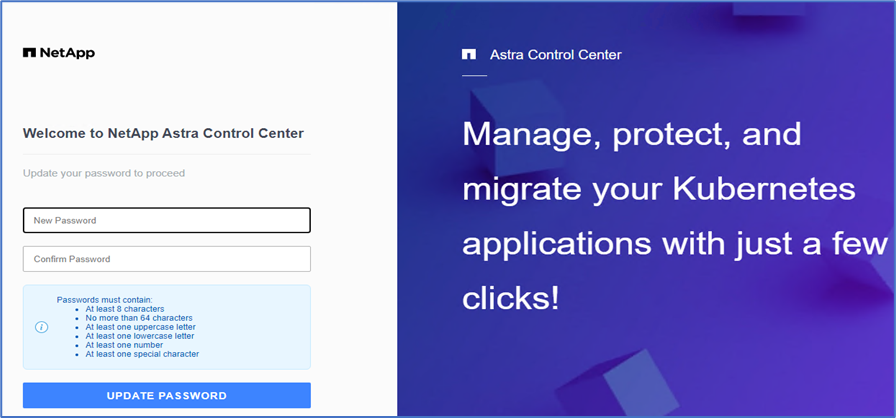
如需Astra Control Center安裝的詳細資訊、請參閱 "Astra Control Center安裝總覽" 頁面。
設定Astra控制中心
安裝Astra Control Center之後、請登入UI、上傳授權、新增叢集、管理儲存設備及新增儲存區。
-
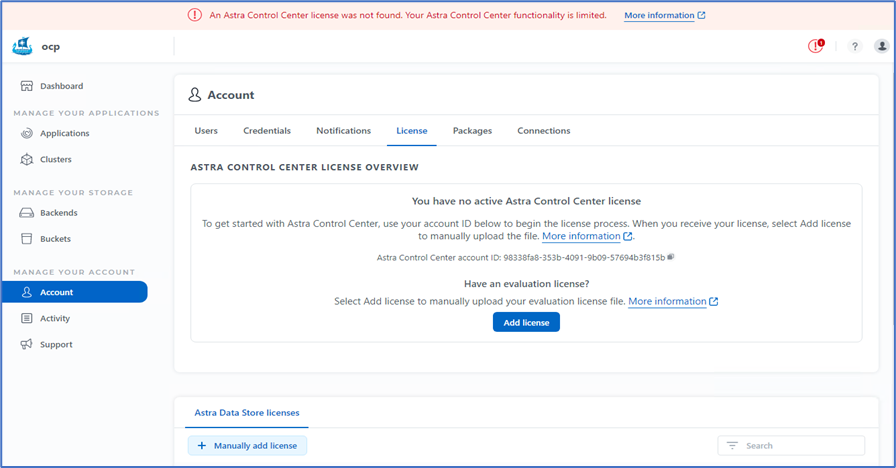
在首頁的「Account(帳戶)」下、移至「License(授權)」索引標籤、然後選取「Add License(新增授權)」以上傳Astra授權。
-
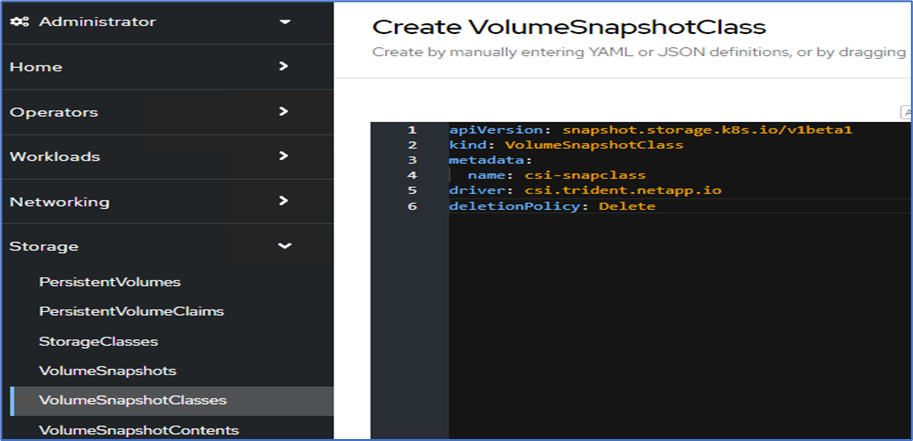
在新增OpenShift叢集之前、請先從OpenShift網路主控台建立Astra Trident Volume快照類別。Volume Snapshot類別是以「csi.trident.netapp.io`驅動程式」來設定。
-
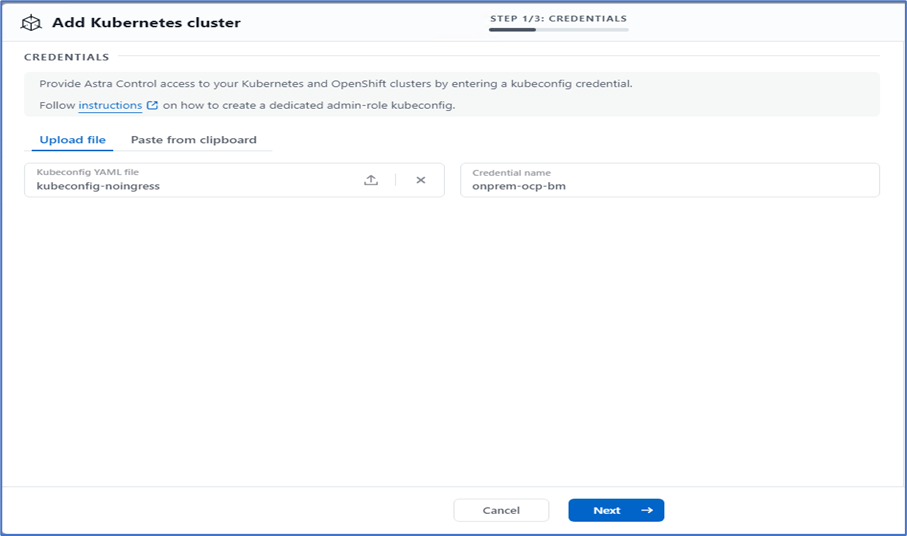
若要新增Kubernetes叢集、請移至首頁上的「叢集」、然後按一下「新增Kubernetes叢集」。然後上傳叢集的「kubeconfig」檔案、並提供認證名稱。按一下「下一步」
-
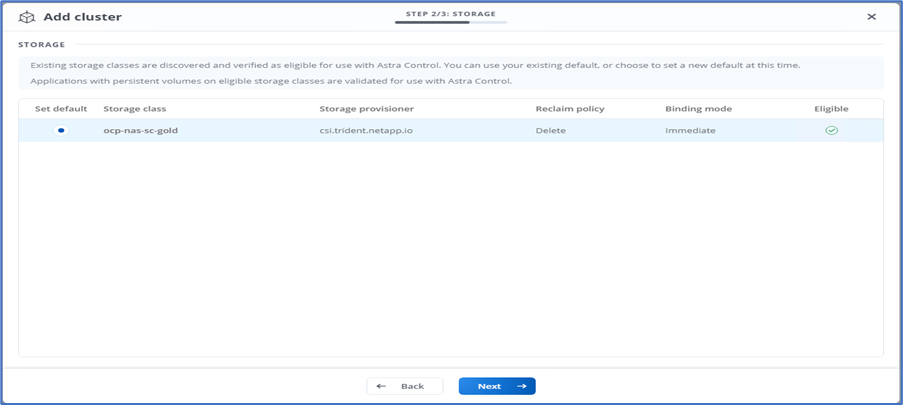
系統會自動探索現有的儲存類別。選取預設儲存類別、按一下「Next(下一步)」、然後按一下「Add cluster(新增叢集)」。
-
叢集會在幾分鐘內新增。若要新增其他OpenShift Container Platform叢集、請重複步驟1–4。
若要將額外的OpenShift作業環境新增為受管理的運算資源、請確定Astra Trident "Volume SnapshotClass物件" 已定義。 -
若要管理儲存設備、請移至後端、按一下您要管理的後端「動作」下方的三個點。按一下「管理」。

-
提供ONTAP 「不全」認證、然後按「下一步」。檢閱資訊、然後按一下「託管」。後端應如下例所示。

-
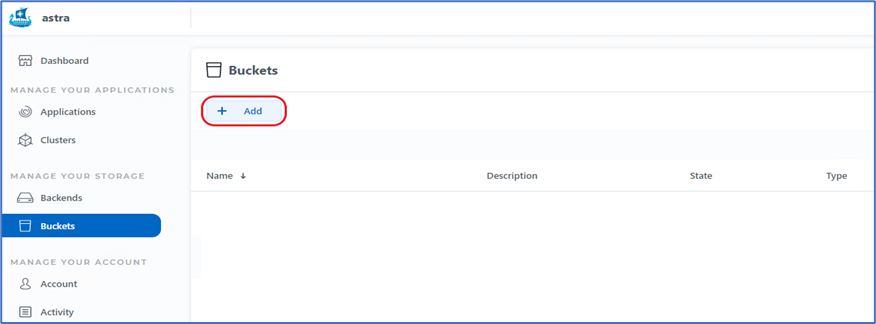
若要將儲存庫新增至Astra Control、請選取「儲存庫」、然後按一下「新增」。
-
選取儲存區類型、並提供儲存區名稱、S3伺服器名稱、或IP位址和S3認證。按一下「更新」。
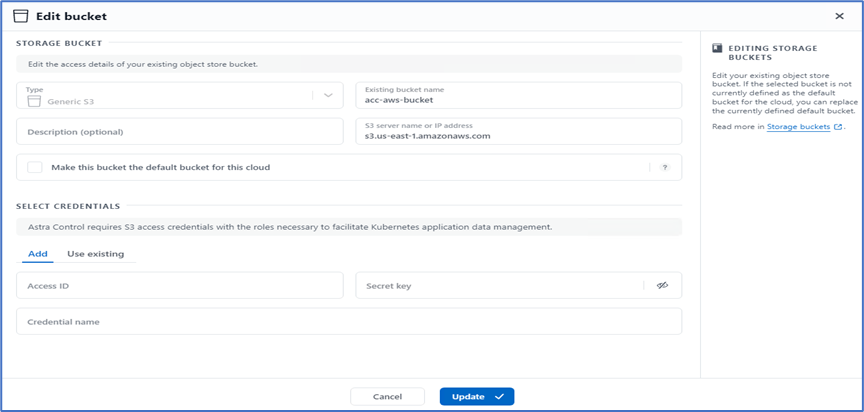
在本解決方案中ONTAP 、AWS S3和SS3鏟斗都是使用的。您也可以使用StorageGRID 此功能。 庫位狀態應為健全狀態。

Astra Control是Kubernetes叢集註冊的一部分、透過Astra Control Center進行應用程式感知資料管理、可自動建立角色繫結和NetApp監控命名空間、以從應用程式Pod和工作節點收集度量和記錄。將其中一個受支援的ONTAP型儲存類別設為預設類別。
您先請 "將叢集新增至Astra Control管理"、您可以在叢集上安裝應用程式(Astra Control之外)、然後前往Astra Control的「應用程式」頁面、以管理應用程式及其資源。如需使用Astra管理應用程式的詳細資訊、請參閱 "應用程式管理需求"。


