

Astra Control Center installation on OpenShift Container Platform
 Suggest changes
You can install Astra Control Center either on OpenShift cluster running on FlexPod or on AWS with a Cloud Volumes ONTAP storage backend. In this solution, Astra Control Center is deployed on the OpenShift bare-metal cluster.
Astra Control Center can be installed using the standard process described here or from the Red Hat OpenShift OperatorHub. Astra Control Operator is a Red Hat certified operator. In this solution, Astra Control Center is installed using the Red Hat OperatorHub.
Environment requirements
-
Astra Control Center supports multiple Kubernetes distributions; for Red Hat OpenShift, the supported versions include Red Hat OpenShift Container Platform 4.8 or 4.9.
-
Astra Control Center requires the following resources in addition to the environment’s and the end-user's application resource requirements:
| Components | Requirement |
|---|---|
Storage backend capacity |
At least 500GB available |
Worker nodes |
At least 3 worker nodes, with 4 CPU cores and 12GB RAM each |
Fully qualified domain name (FQDN) address |
An FQDN address for Astra Control Center |
Astra Trident |
Astra Trident 21.04 or newer installed and configured |
Ingress controller or |
Configure the ingress controller to expose Astra Control Center with a URL or load balancer to provide IP address which will resolve to the FQDN |
-
You must have an existing private image registry to which you can push the Astra Control Center build images. You need to provide the URL of the image registry where you upload the images.

|
Some images are pulled while executing certain workflows, and containers are created and destroyed when necessary. |
-
Astra Control Center requires that a storage class be created and set as the default storage class. Astra Control Center supports the following ONTAP drivers provided by Astra Trident:
-
ontap-nas
-
ontap-nas-flexgroup
-
ontap-san
-
ontap-san-economy
-
|
|
We assume that the deployed OpenShift clusters have Astra Trident installed and configured with an ONTAP backend, and a default storage class is also defined. |
-
For application cloning in OpenShift environments, Astra Control Center needs to allow OpenShift to mount volumes and change the ownership of files. To modify the ONTAP export policy to allow these operations, run the following commands:
export-policy rule modify -vserver <storage virtual machine name> -policyname <policy name> -ruleindex 1 -superuser sys
export-policy rule modify -vserver <storage virtual machine name> -policyname <policy name> -ruleindex 1 -anon 65534
|
|
To add a second OpenShift operational environment as a managed compute resource, make sure that the Astra Trident Volume snapshot feature is enabled. To enable and test volume snapshots with Astra Trident, see the official Astra Trident instructions. |
-
A VolumeSnapClass should be configured on all Kubernetes clusters from where the applications is managed. This could also include the K8s cluster on which Astra Control Center is installed. Astra Control Center can manage applications on the K8s cluster on which it is running.
Application management requirements
-
Licensing. To manage applications using Astra Control Center, you need an Astra Control Center license.
-
Namespaces. A namespace is the largest entity that can be managed as an application by Astra Control Center. You can choose to filter out components based on the application labels and custom labels in an existing namespace and manage a subset of resources as an application.
-
StorageClass. If you install an application with a StorageClass explicitly set and you need to clone the application, the target cluster for the clone operation must have the originally specified StorageClass. Cloning an application with an explicitly set StorageClass to a cluster that does not have the same StorageClass fails.
-
Kubernetes resources. Applications that use Kubernetes resources not captured by Astra Control might not have full application data management capabilities. Astra Control can capture the following Kubernetes resources:
| Kubernetes resources | ||
|---|---|---|
ClusterRole |
ClusterRoleBinding |
ConfigMap |
CustomResourceDefinition |
CustomResource |
CronJob |
DaemonSet |
HorizontalPodAutoscaler |
Ingress |
DeploymentConfig |
MutatingWebhook |
PersistentVolumeClaim |
Pod |
PodDisruptionBudget |
PodTemplate |
NetworkPolicy |
ReplicaSet |
Role |
RoleBinding |
Route |
Secret |
ValidatingWebhook |
Install Astra Control Center using OpenShift OperatorHub
The following procedure installs Astra Control Center using Red Hat OperatorHub. In this solution, Astra Control Center is installed on a bare-metal OpenShift cluster running on FlexPod.
-
Download the Astra Control Center bundle (
astra-control-center-[version].tar.gz) from the NetApp Support site. -
Download the .zip file for the Astra Control Center certificates and keys from the NetApp Support site.
-
Verify the signature of the bundle.
openssl dgst -sha256 -verify astra-control-center[version].pub -signature <astra-control-center[version].sig astra-control-center[version].tar.gz
-
Extract the Astra images.
tar -vxzf astra-control-center-[version].tar.gz
-
Change to the Astra directory.
cd astra-control-center-[version]
-
Add the images to your local registry.
For Docker:
docker login [your_registry_path]OR
For Podman:
podman login [your_registry_path]
-
Use the appropriate script to load the images, tag the images, and push them to your local registry.
For Docker:
export REGISTRY=[Docker_registry_path]
for astraImageFile in $(ls images/*.tar) ; do
  # Load to local cache. And store the name of the loaded image trimming the 'Loaded images: '
  astraImage=$(docker load --input ${astraImageFile} | sed 's/Loaded image: //')
  astraImage=$(echo ${astraImage} | sed 's!localhost/!!')
  # Tag with local image repo.
  docker tag ${astraImage} ${REGISTRY}/${astraImage}
  # Push to the local repo.
  docker push ${REGISTRY}/${astraImage}
done
For Podman:
export REGISTRY=[Registry_path] for astraImageFile in $(ls images/*.tar) ; do # Load to local cache. And store the name of the loaded image trimming the 'Loaded images: ' astraImage=$(podman load --input ${astraImageFile} | sed 's/Loaded image(s): //') astraImage=$(echo ${astraImage} | sed 's!localhost/!!') # Tag with local image repo. podman tag ${astraImage} ${REGISTRY}/${astraImage} # Push to the local repo. podman push ${REGISTRY}/${astraImage} done -
Log into the bare-metal OpenShift cluster web console. From the side menu, select Operators > OperatorHub. Enter
astrato list thenetapp-acc-operator.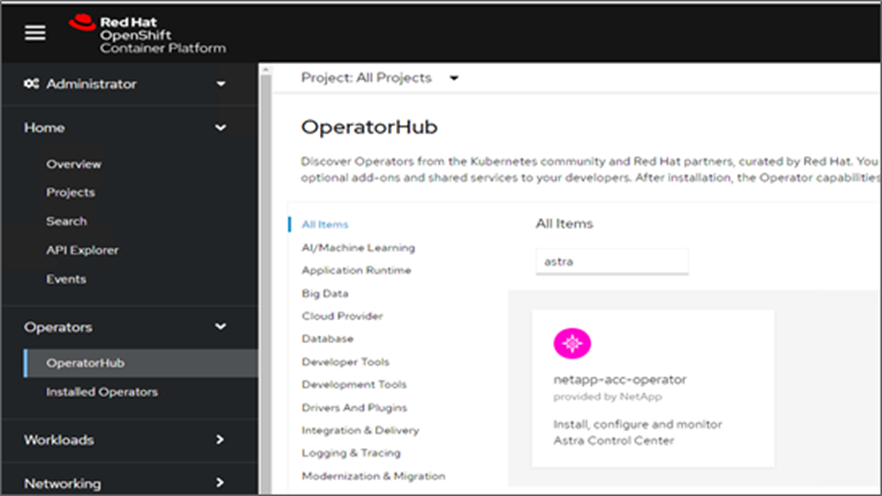
netapp-acc-operatoris a certified Red Hat OpenShift Operator and is listed under the OperatorHub catalogue. -
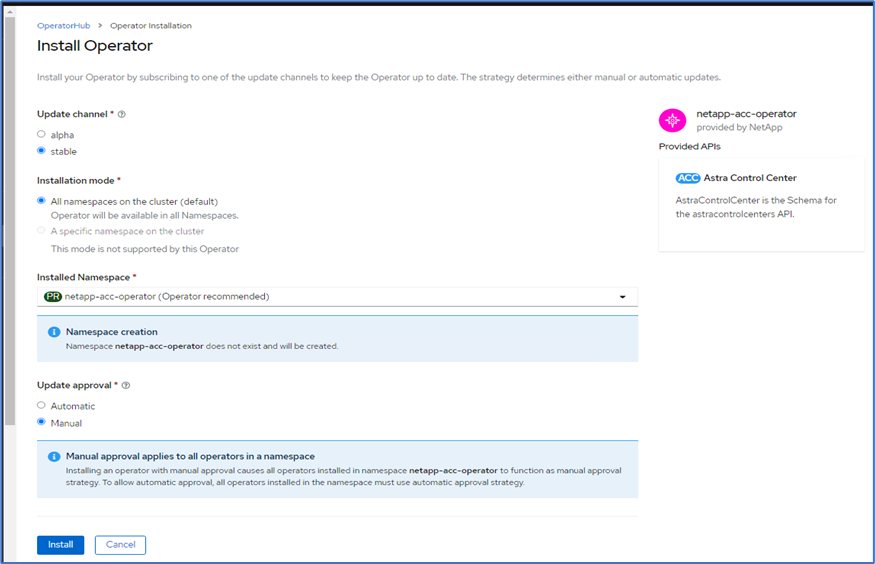
Select
netapp-acc-operatorand click Install.
-
Select the appropriate options and click Install.
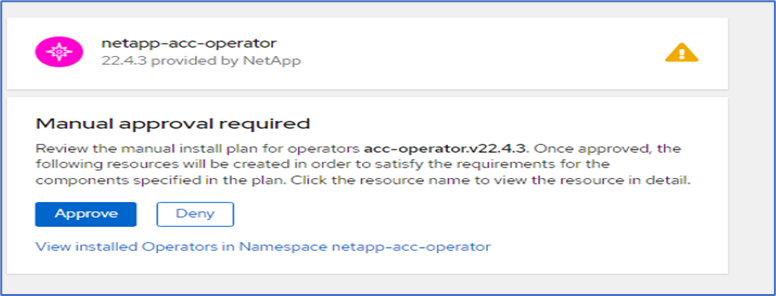
-
Approve the installation and wait for the operator to be installed.
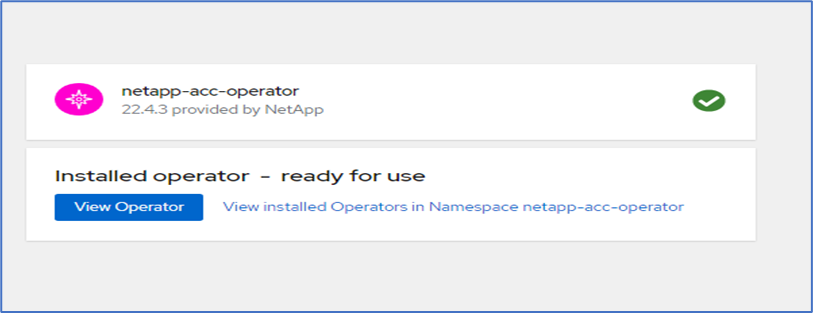
-
At this stage, the operator is installed successfully and ready for use. Click View Operator to start the installation of Astra Control Center.
-
Before installing Astra Control Center, create the pull secret to download Astra images from the Docker registry that you pushed earlier.

-
To pull the Astra Control Center images from your Docker private repo, create a secret in the
netapp-acc-operatornamespace. This secret name is provided in the Astra Control Center YAML manifest in a later step.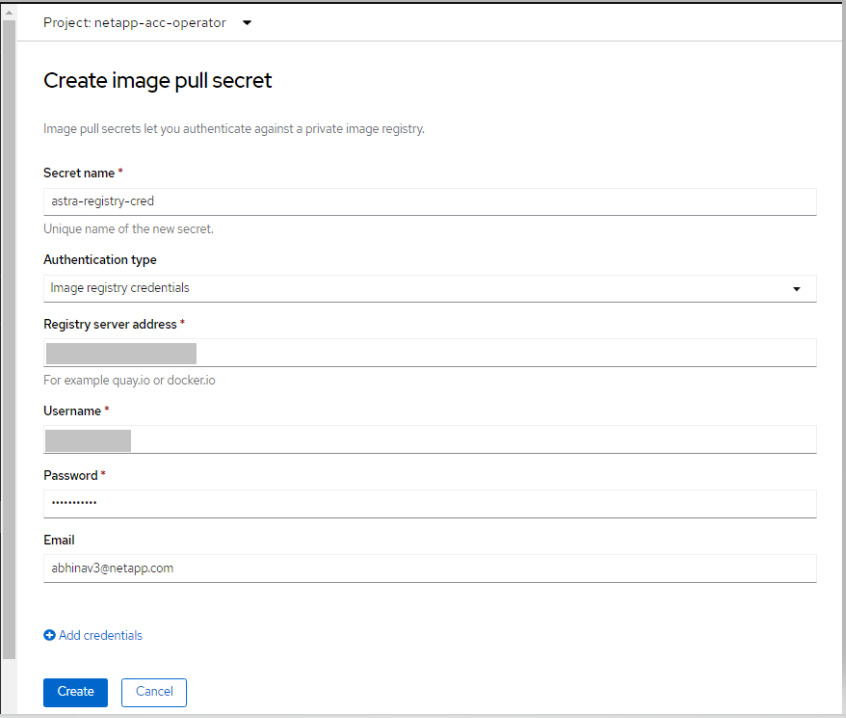
-
From the side menu, select Operators > Installed Operators and click Create Instance under the provided APIs section.
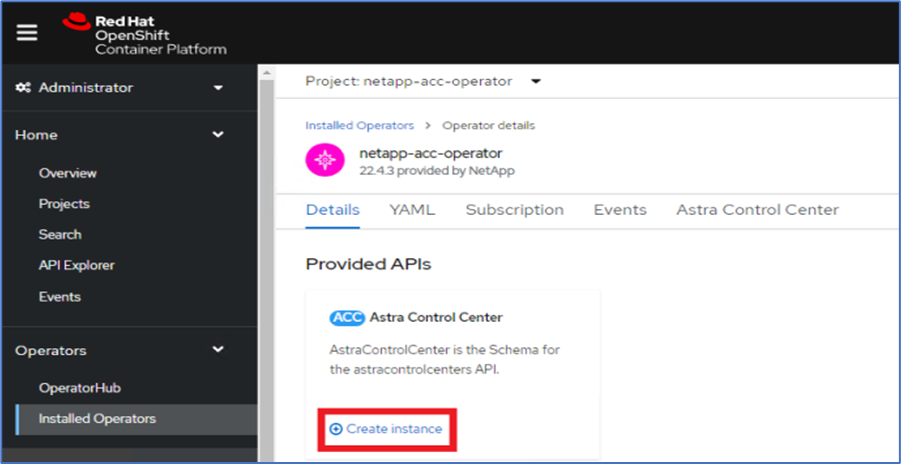
-
Complete the Create AstraControlCenter form. Provide the name, Astra address, and Astra version.
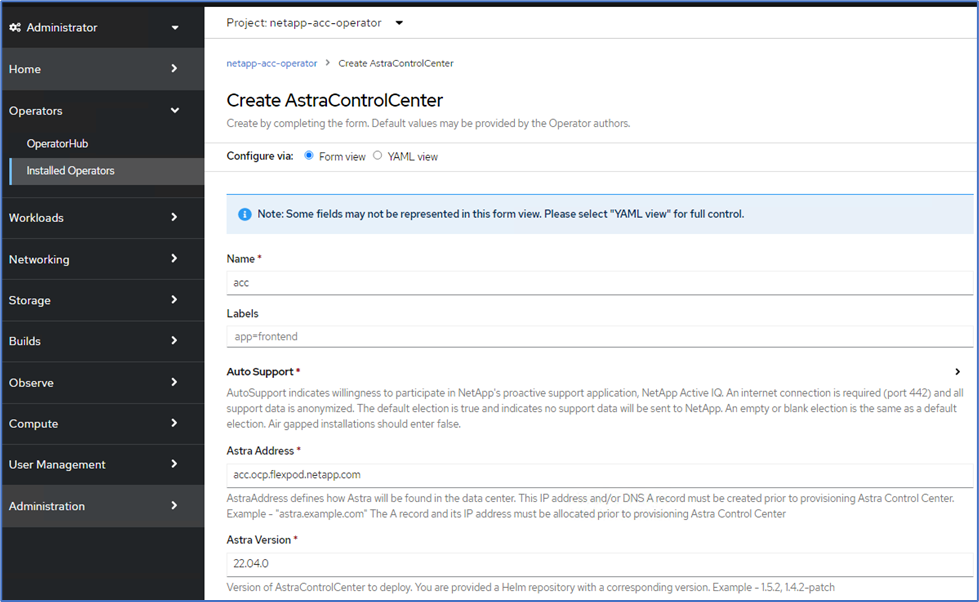
Under Astra Address, provide the FQDN address for Astra Control Center. This address is used to access the Astra Control Center Web console. The FQDN should also resolve to a reachable IP network and should be configured in the DNS. -
Enter an account name, email address, administrator last name, and retain the default volume reclaim policy. If you are using a load balancer, set the Ingress Type to
AccTraefik. Otherwise, select Generic forIngress.Controller. Under Image Registry, enter the container image registry path and secret.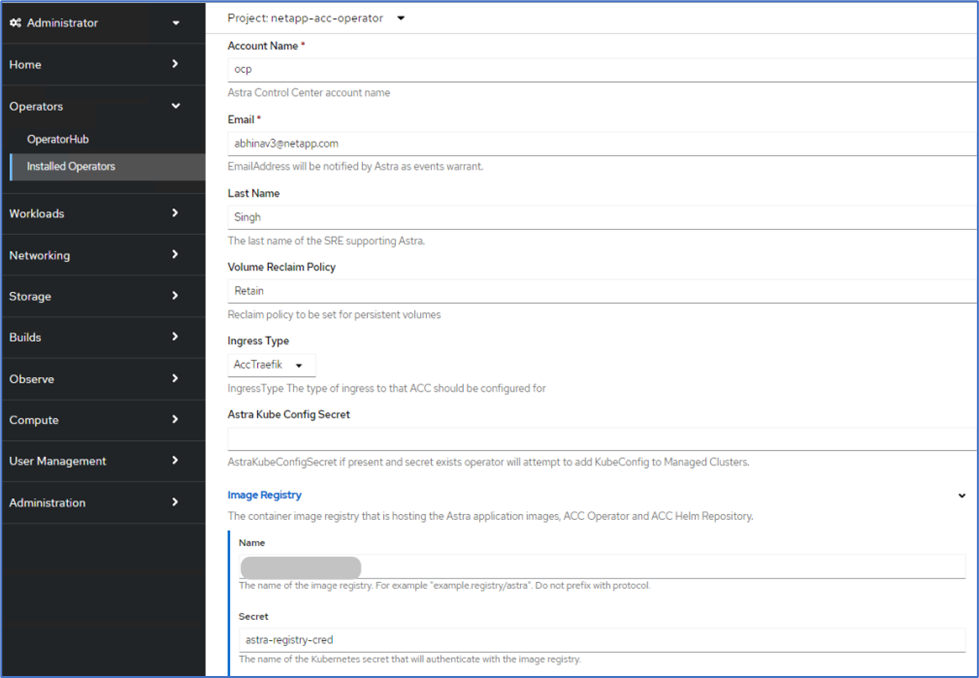
In this solution, the Metallb load balancer is used. Therefore, the ingress type is AccTraefik. This exposes the Astra Control Center traefik gateway as a Kubernetes service of type LoadBalancer. -
Enter the admin first name, configure the resource scaling, and provide the storage class. Click Create.
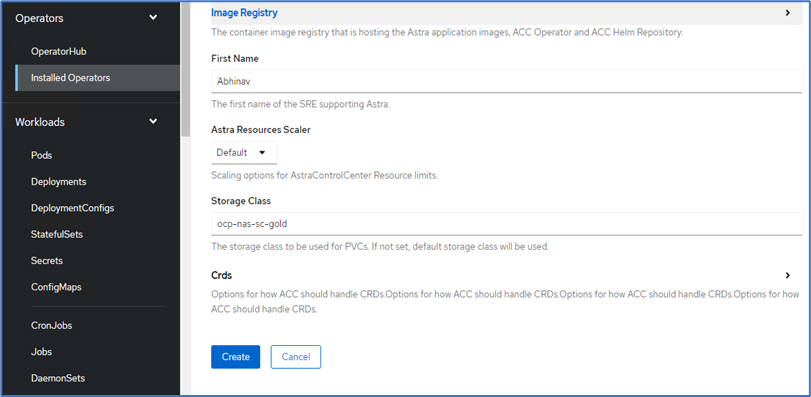
The status of the Astra Control Center instance should change from Deploying to Ready.
-
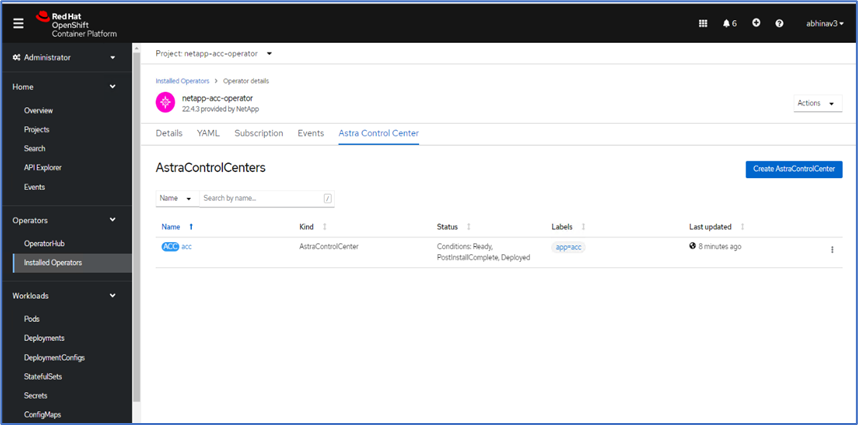
Verify that all system components have been installed successfully and that all pods are running.
root@abhinav-ansible# oc get pods -n netapp-acc-operator
NAME                                               READY   STATUS    RESTARTS   AGE
acc-helm-repo-77745b49b5-7zg2v                     1/1     Running   0          10m
acc-operator-controller-manager-5c656c44c6-tqnmn   2/2     Running   0          13m
activity-589c6d59f4-x2sfs                          1/1     Running   0          6m4s
api-token-authentication-4q5lj                     1/1     Running   0          5m26s
api-token-authentication-pzptd                     1/1     Running   0          5m27s
api-token-authentication-tbtg6                     1/1     Running   0          5m27s
asup-669df8d49-qps54                               1/1     Running   0          5m26s
authentication-5867c5f56f-dnpp2                    1/1     Running   0          3m54s
bucketservice-85495bc475-5zcc5                     1/1     Running   0          5m55s
cert-manager-67f486bbc6-txhh6                      1/1     Running   0          9m5s
cert-manager-cainjector-75959db744-4l5p5           1/1     Running   0          9m6s
cert-manager-webhook-765556b869-g6wdf              1/1     Running   0          9m6s
cloud-extension-5d595f85f-txrfl                    1/1     Running   0          5m27s
cloud-insights-service-674649567b-5s4wd            1/1     Running   0          5m49s
composite-compute-6b58d48c69-46vhc                 1/1     Running   0          6m11s
composite-volume-6d447fd959-chnrt                  1/1     Running   0          5m27s
credentials-66668f8ddd-8qc5b                       1/1     Running   0          7m20s
entitlement-fd6fc5c58-wxnmh                        1/1     Running   0          6m20s
features-756bbb7c7c-rgcrm                          1/1     Running   0          5m26s
fluent-bit-ds-278pg                                1/1     Running   0          3m35s
fluent-bit-ds-5pqc6                                1/1     Running   0          3m35s
fluent-bit-ds-8l7cq                                1/1     Running   0          3m35s
fluent-bit-ds-9qbft                                1/1     Running   0          3m35s
fluent-bit-ds-nj475                                1/1     Running   0          3m35s
fluent-bit-ds-x9pd8                                1/1     Running   0          3m35s
graphql-server-698d6f4bf-kftwc                     1/1     Running   0          3m20s
identity-5d4f4c87c9-wjz6c                          1/1     Running   0          6m27s
influxdb2-0                                        1/1     Running   0          9m33s
krakend-657d44bf54-8cb56                           1/1     Running   0          3m21s
license-594bbdc-rghdg                              1/1     Running   0          6m28s
login-ui-6c65fbbbd4-jg8wz                          1/1     Running   0          3m17s
loki-0                                             1/1     Running   0          9m30s
metrics-facade-75575f69d7-hnlk6                    1/1     Running   0          6m10s
monitoring-operator-65dff79cfb-z78vk               2/2     Running   0          3m47s
nats-0                                             1/1     Running   0          10m
nats-1                                             1/1     Running   0          9m43s
nats-2                                             1/1     Running   0          9m23s
nautilus-7bb469f857-4hlc6                          1/1     Running   0          6m3s
nautilus-7bb469f857-vz94m                          1/1     Running   0          4m42s
openapi-8586db4bcd-gwwvf                           1/1     Running   0          5m41s
packages-6bdb949cfb-nrq8l                          1/1     Running   0          6m35s
polaris-consul-consul-server-0                     1/1     Running   0          9m22s
polaris-consul-consul-server-1                     1/1     Running   0          9m22s
polaris-consul-consul-server-2                     1/1     Running   0          9m22s
polaris-mongodb-0                                  2/2     Running   0          9m22s
polaris-mongodb-1                                  2/2     Running   0          8m58s
polaris-mongodb-2                                  2/2     Running   0          8m34s
polaris-ui-5df7687dbd-trcnf                        1/1     Running   0          3m18s
polaris-vault-0                                    1/1     Running   0          9m18s
polaris-vault-1                                    1/1     Running   0          9m18s
polaris-vault-2                                    1/1     Running   0          9m18s
public-metrics-7b96476f64-j88bw                    1/1     Running   0          5m48s
storage-backend-metrics-5fd6d7cd9c-vcb4j           1/1     Running   0          5m59s
storage-provider-bb85ff965-m7qrq                   1/1     Running   0          5m25s
telegraf-ds-4zqgz                                  1/1     Running   0          3m36s
telegraf-ds-cp9x4                                  1/1     Running   0          3m36s
telegraf-ds-h4n59                                  1/1     Running   0          3m36s
telegraf-ds-jnp2q                                  1/1     Running   0          3m36s
telegraf-ds-pdz5j                                  1/1     Running   0          3m36s
telegraf-ds-znqtp                                  1/1     Running   0          3m36s
telegraf-rs-rt64j                                  1/1     Running   0          3m36s
telemetry-service-7dd9c74bfc-sfkzt                 1/1     Running   0          6m19s
tenancy-d878b7fb6-wf8x9                            1/1     Running   0          6m37s
traefik-6548496576-5v2g6                           1/1     Running   0          98s
traefik-6548496576-g82pq                           1/1     Running   0          3m8s
traefik-6548496576-psn49                           1/1     Running   0          38s
traefik-6548496576-qrkfd                           1/1     Running   0          2m53s
traefik-6548496576-srs6r                           1/1     Running   0          98s
trident-svc-679856c67-78kbt                        1/1     Running   0          5m27s
vault-controller-747d664964-xmn6c                  1/1     Running   0          7m37s
Each pod should have a status of Running. It might take several minutes before the system pods are deployed. -
When all pods are running, run the following command to retrieve the one-time password. In the YAML version of the output, check the
status.deploymentStatefield for the deployed value, and then copy thestatus.uuidvalue. The password isACC-followed by the UUID value. (ACC-[UUID]).root@abhinav-ansible# oc get acc -o yaml -n netapp-acc-operator
-
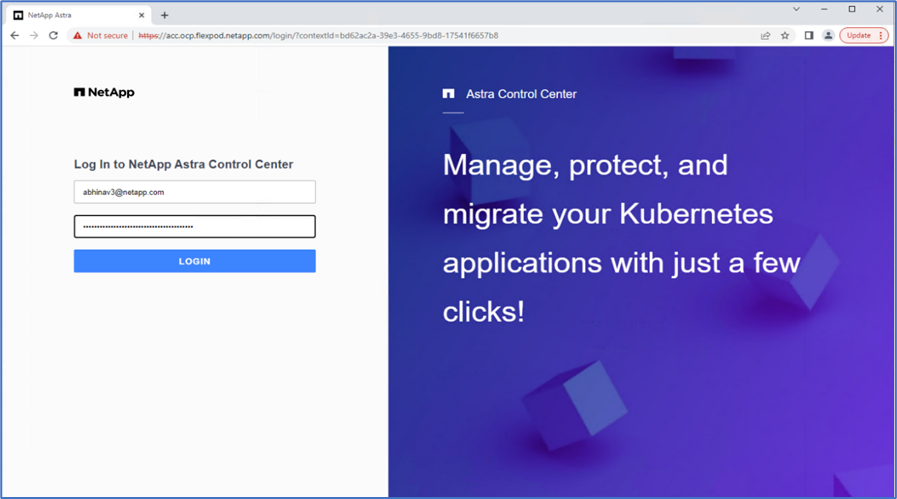
In a browser, navigate to the URL by using the FQDN that you had provided.
-
Log in using the default user name, which is the email address provided during the installation and the one-time password ACC-[UUID].
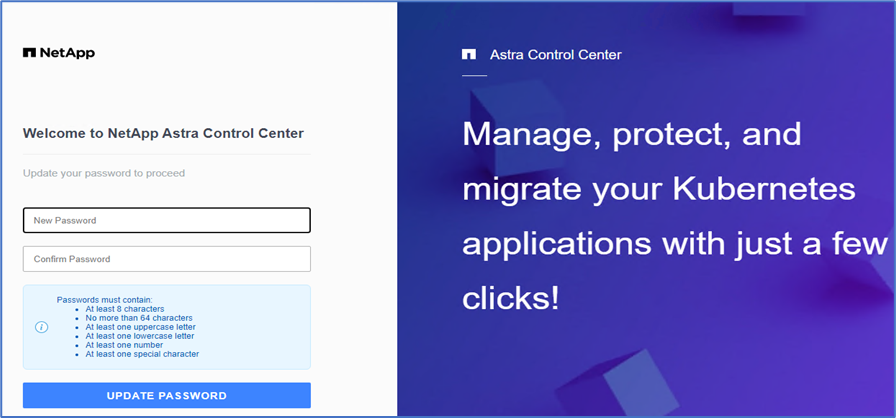
If you enter an incorrect password three times, then the administrator account is locked for 15 minutes. -
Change the password and proceed.
For more information about the Astra Control Center installation, see the Astra Control Center Installation overview page.
Set up Astra Control Center
After you install Astra Control Center, log into the UI, upload the license, add clusters, manage storage, and add buckets.
-
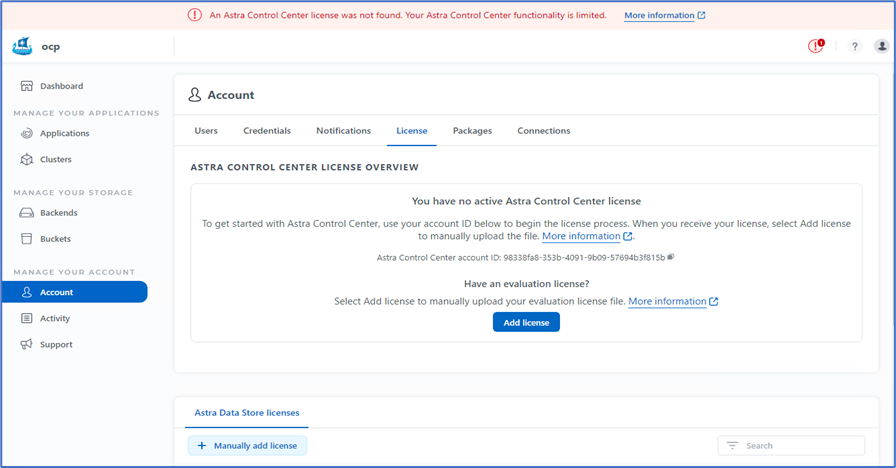
On the home page under Account, go to the License tab and select Add License to upload the Astra license.
-
Before adding the OpenShift cluster, create an Astra Trident Volume snapshot class from the OpenShift web console. The Volume snapshot class is configured with the
csi.trident.netapp.iodriver.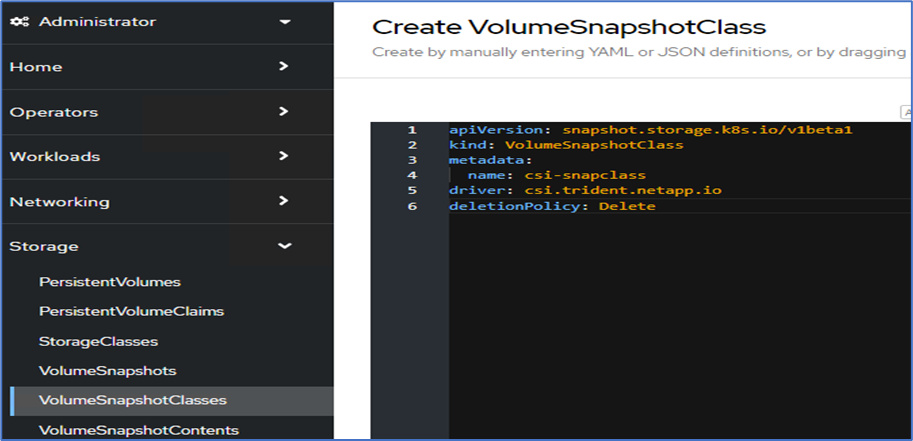
-
To add the Kubernetes cluster, go to Clusters on the home page and click Add Kubernetes Cluster. Then upload the
kubeconfigfile for the cluster and provide a credential name. Click Next.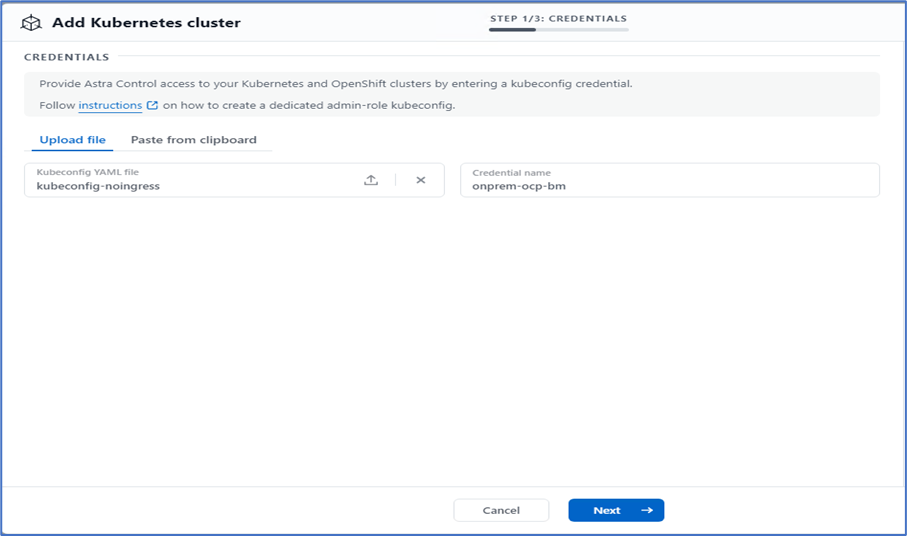
-
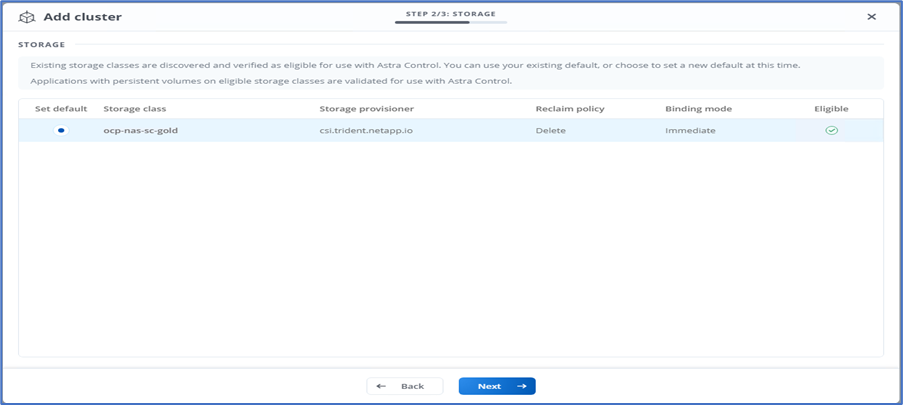
The existing storage classes are discovered automatically. Select the default storage class, click Next, and then click Add cluster.
-
The cluster is added in few minutes. To add additional OpenShift Container Platform clusters, repeat steps 1–4.
To add an additional OpenShift operational environment as a managed compute resource, make sure that the Astra Trident VolumeSnapshotClass objects are defined. -
To manage the storage, go to Backends, click the three dots under Actions against the backend that you would like to manage. Click Manage.
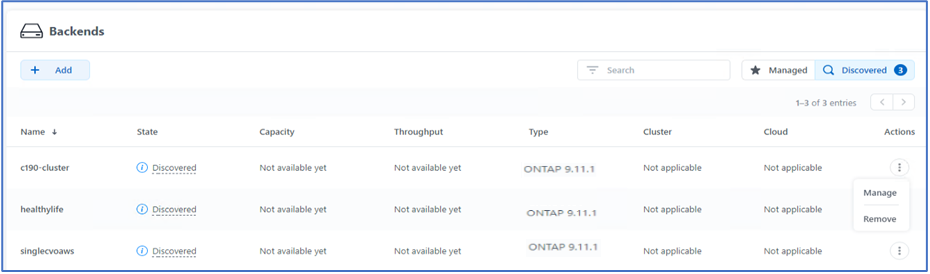
-
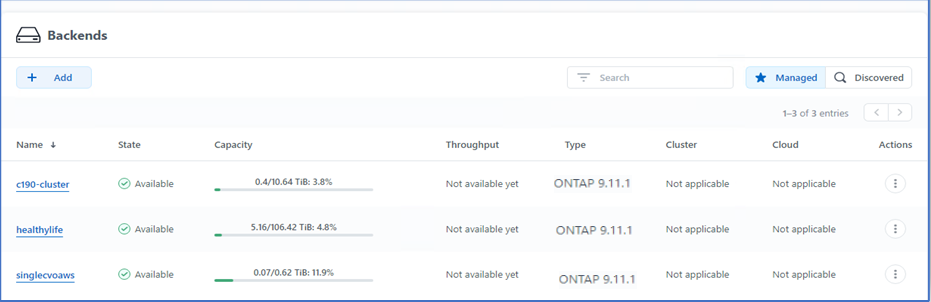
Provide the ONTAP credentials and click Next. Review the information and click Managed. The backends should look like the following example.
-
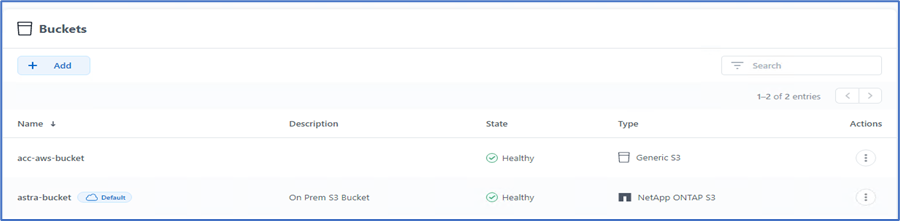
To add a bucket to Astra Control, select Buckets and click Add.
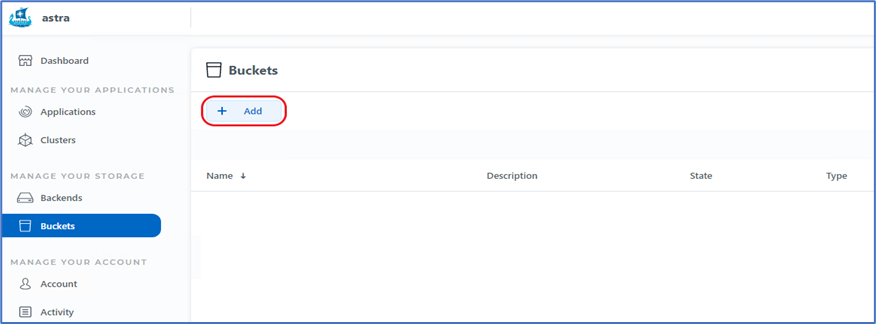
-
Select the bucket type and provide the bucket name, S3 server name, or IP address and S3 credential. Click Update.
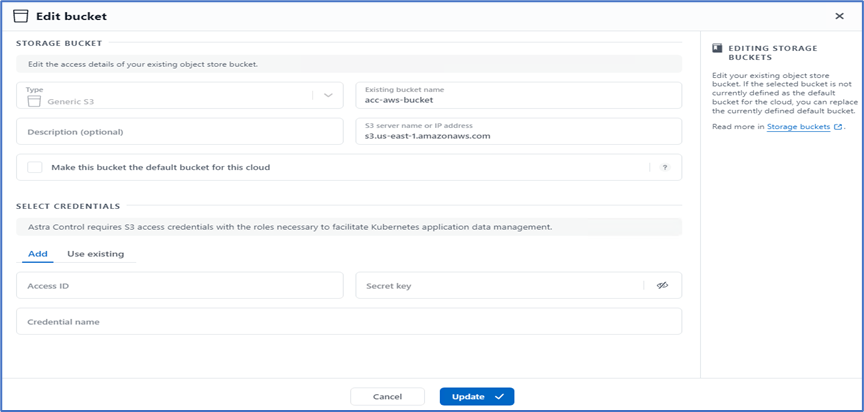
In this solution, AWS S3 and ONTAP S3 buckets are both used. You can also use StorageGRID. The Bucket state should be Healthy.
As a part of Kubernetes cluster registration with Astra Control Center for application-aware data management, Astra Control automatically creates role bindings and a NetApp monitoring namespace to collect metrics and logs from the application pods and worker nodes. Make one of the supported ONTAP-based storage classes the default.
After you add a cluster to Astra Control management, you can install apps on the cluster (outside of Astra Control) and then go to the Apps page in Astra Control to manage the apps and their resources. For more information about managing apps with Astra, see the App management requirements.